Living with the Volvo 1800
By Nigel Keen
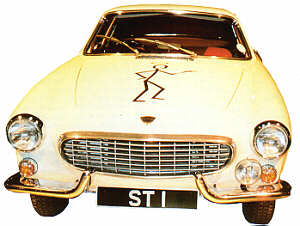
When I first decided I wanted to own a Volvo 1800, I had never actually been in one either as a driver or passenger, or even sat in one! I just liked the look of them! I did, however, know which year model I wanted. An 1800E would have been too new at the time - 1988 - I wanted the car to slot into the 20 year plus old category for limited mileage insurance purposes. I didn't want one too old, as I was specific in my mind as to the styling of the front grille that I wanted. It had to be 1967 or later to suit my preference.
First Driving Impressions
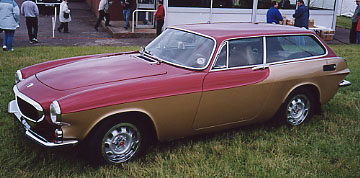
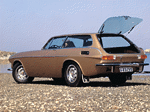
I eventually found one that I liked and was taken for a test drive. When I first got in, I realised just how low one appears to sit in the car in relation to the design of the window layout. Short people beware! You almost have to peer over the top of the steering wheel, and the front wings seem to tower almost above you. Another aspect of the design renders the interior mirror to be less than useful than in other cars due to the relative height of the bottom of the rear window - you just seem to see sky! My car is fitted with period accessory wing mirrors, which not only look the part, but are particularly helpful when driving on busy dual carriageways and motorways. (N.B. watch for rust at the base of the mirror stalks!). Incidentally, this lack of rear visibility does not occur to the same extent with the ES models, as there is a larger and less sloping panel of glass (the tailgate), at the rear. Having become accustomed to the seat-ing position, the window winder is a little too far back for comfort. Answer: Stretch the left hand across. The heavily chrome surrounded dials although stylish, are not easy to read at first glance, but this feature is rectified on 'E' and 'ES' models where the dials are more conventional, hence easier to read, but less stylish.
Routine Servicing
Moving on to the servicing arrangements, there are many similarities to those used in the 120/140 Series as they both share B18/B20 engines. Most items needing regular attention are easily accessible. The battery is near the bulkhead and therefore easy to keep topped up and clean. The oil filler cap is very visible on the rocker cover, but watch the rubber breather pipe fitted on later models, and the dipstick, being straight and solid, is easy to check. 1967 models onwards have a plastic expansion bottle, so coolant level and texture can be checked at a glance. Care needs to be taken with the two air filters - one for each SU (Stromberg on later non injection cars) carburettor as they look similar, but one has a breather pipe fitted and the other does not! These vary slightly from year to year - some are thicker. Whilst on this item - don't forget the carburettor dashpots. You won't find this arrangement on the injection models, they have a single unit reached behind the front grille. It's best to keep note of the part numbers for future replacements. Changing the oil filter is a little more difficult. Make sure the correct Volvo type is used. The good news is that it is the ,unscrew and throw away' type, but the bad news is that it is quite difficult to reach. A useful tip is to take off the rear air filter, thereby giving yourself more room to get your hand/chain wrench/whatever around the oil filter and unscrew it a bit at a time. This task is more difficult on the E/ES models as access is hindered by the inlet manifold. Moral - don't over tighten it in the first place! As far as draining the engine oil goes, the sump drain plug is further back than you think, but, as the car is so low, easily reached by raising the front of the car slightly with a trolley jack to enable your receptacle to slide under the car easily. Point, plugs and distributor cap are easy to replace - as with any other car ensure the gaps are correct. Take care with condensers, these vary from one car to another. Timing with a stroboscope needs care, as the markings on the pulley are very faint. As with the 120 series the steering box oil needs to be checked -easy to reach, and a visual check of the ball joint rubbers is recommended.
Tyres and Suspension

Over the years my car has needed new shock absorbers all round. The rear ones started to rattle - I thought at first the noise was from the boot lid torsion bars rattling about, but in fact the shock absorbers had "dried up". Another giveaway, of course, was the unevenly worn Pirelli Cinturatos (165 x 15) now replaced with a pair of Semperits. Make sure the correct shock absorber is fitted. I made the mistake of getting a pair with not enough travel, thereby allowing the suspension to "bottom" and had to replace them prematurely. Access to the top of the rear shock absorber is from the interior behind the rear seat. The front ones suddenly ceased to work properly not long after, so both were replaced before the tyres (again quite new Semperits) were prematurely worn out - a fairly straightforward job with normal access under the front wings. just a small point on tyres: the coupes have 165 x 15's but the ES should have 185/70 HR x 15, not so easy to come by, but I'm told 185/65 HR x 15's will do.
Bodywork
With cars this old, checking the bodywork is essential. The sills, outer and inner, need to be sound, along with the floor panels and the cross chassis sections. The latter are often MOT failure points, but can be welded with new sections. Pay attention to rot around the head lamp surrounds which can, if left unattended, result in the head lamps being out of alignment beyond the point of adjustment. There may also be rot around the side/indicator lamps causing failure of earth continuity. Look behind the front wheels - there should be splash panels, which are often missing, thereby causing rust traps. Take care with the boot. Rainwater tends to settle inside the rim of the boot aperture. some cars have drain holes fitted but these must be long enough to extend below the bodywork (mine does not have such drain holes) and not into the boot. While looking inside the boot, check the tops of the wheel arches. These may need patching or welding for MOT. On the subject of drain holes, don't forget the one under the petrol filler flap on pre E/ES models - this can be a rust trap as can be the trailing edges of the rear wings. Finally, don't forget the seat belts and latches. I had a spare pair of seat belts for my car, but the latches although looking identical, were not, and didn't fit. Again, check part numbers.
Electrical
Maintain the battery in the normal way and cheek the fuses. These are rather hidden under the lip of the left wing. Here too are the relays, which on my model have blown, possibly due to an electrical short. Make sure you know which relay is for the overdrive/headlamp main beam/horn as they vary from year to year. Make sure you have chassis number to hand when identifying parts in parts/workshop manuals, so you get the correct item.
Conclusion
Finally if looking to buy one of these cars, try to inspect more than the first one you see, even if only for comparison purposes. Ownership along with the attention that the cars attract can be most enjoyable.
Body frame

The Volvo P1800 has an integral body (monocoque) so that there is no inde-pendent chassis frame. The body is composed of a number of pressed steel plates, each of which forms part of the supporting construction. The main parts of the body consist of the floor, side sections, rear section, scuttle, roof section, front mudguards, doors, luggage compartment and bonnet. The floor section consists of the front and rear floor plates and inner cantrail Front and rear cross- members), tunnel and scuttle. The floor plates are welded to the rear seat support. The rear floor plate has longitudinal reinforcing members underneath on either side and a number of cross-members between them. One of the crossmembers is provided with an attaching piece for the rear axle track rod. There is a flanged hole in the rear floor plate for attaching the fuel tank, the upper part of which forms part of the floor in the luggage compartment. The scuttle consists of the bulkhead ,wheel arches , front upper cross-member and side plate as well as lower cross-members . The bulkhead forms the front transverse wall of the body and has welded end plates. Two front side members project from the front floor section. They are joined together at the front by means of a cross-member and are attached at the rear to the front cross-member under the front seats. Two side members project from the upper corner between the bulkhead and front pillar. They are spot-welded to the front pillar, front side plate and wheel arch plates. The front axle member and bumper support bars are attached to the side members. The roof section consists of a number of plates. The roof plates form the upper part of the scuttle, the windscreen opening and the actual roof. The front end consists of the front mudguards, front section and bonnet. The front end is welded to the upper side member, Front cross-member and front pillar. The front mudguards are welded to the wheel arch plates. The front section forms the front part of the front end and the air intake to the radiator. The body is insulated against noise and heat. The insulation consists of chequer board which is stuck to the sheet metal with adhesive.
Bonnet
The bonnet is pivoted on two hinges. In the closed position the bonnet is secured by a bonnet lock fitted on the bulkhead. The lever for the bonnet lock is placed on the left under the instrument panel inside the car.
Doors and openings
The doors are made up of an inner and outer plate which are beaded and spot-welded together. The hinges are fitted on the inner plate. The doors are adjustable both longitudinally, vertically and laterally. The door locks are fitted to the doors with screws. The press button of the outer door handle operates a lever which in turn releases a rotating toothed roller (lock plunger). The inner door handle is fitted to the remote control which is attached to the inner door plate with screws. The handle transmits the movement of the toothed roller by means of a linkage system. The lock insert is fitted in the press button on the door handle. The window winders are of the lifting arm and toothed segment type. When the winding handle is turned, two parallel lifting arms, one of which is attached to a toothed segment, move the window to the required position. The luggage compartment is built up of an inner and outer plate. The lock is fitted at the lower edge: of the luggage compartment lid. The hinges, which are bolted to the body, are fitted at the upper edge of the lid. The luggage compartment lid is balanced by means of torsion rods. The lock shackle for the luggage compartment lid is fitted on the body. The lid is opened by pressing in the lock button.
Interior fittings and upholstery
FRONT SEATS
The front seats are built up on a tubular frame. The padding consists of foam plastic which is covered with fabric backed vinyl. The seat can be adjusted longitudinally by releasing The catch and sliding the seat. The seat can be adjusted vertically by altering the height of the nuts of the attaching devices . The inclination of the backrest is variably adjustable by means of the handwheel which operates an eccentric. The seat is provided with an adjustable lumbar support, the tension of which is adjusted with a screw on either side of the backrest. The squabs are attached to the seat frame by means of press-fasteners.
REAR SEAT
The rear seat and backrest have the same upholstery as the front seats. The seat frame consists of a wooden frame and the padding is of foam plastic.
DOOR UPHOLSTERY
The door upholstery consists of two wood-fibre panels lined with non-woven padding and covered with upholstery material. It is secured to the door by means of clips. The front armrest, which is made of moulded plastic, forms part of the lower door upholstery.
HEADLINING
The headlining consists of plastic fabric stretched on a wood-fibre frame provided with ribs and is secured to the upper edge of the body sides by means of clips.
COVERING FOR BULKHEAD AND FLOOR
The sides of the bulkhead are lined with millboard which is attached with clips. The bulkhead is covered with plastic-lined felt matting. The floor is covered with rubber mats.
BUMPERS
The bumpers are composed of three parts which are fitted on four support bars. The front support bars are attached to the front side members and the rear support bars to the rear side members.