Volvo AW7X Valve Body Rebuild Page 6
Aisin-Warner AW-7X Valve Body Service in a Volvo 7XX-940 Car: Page 6
All information written by Brad Wightman and used by his kind permission.
- Disassemble the lower valve body in a similar way to the other two sections. If you have a transmission with lock up torque converter (AW70L, AW71L or AW72L) pay close attention to the signal valve and changeover valve. The changeover valve, in particular, has a couple of small orifices in it that can easily become blocked up. Blow them out with compressed air. Soak the valves and the valve body in your cleaning solution, blow dry with compressed air and you are ready to reassemble.
- Using your diagrams, digital camera pics or whatever method you used to help you remember where things go, reassemble the lower valve body. Do the underside first. Replace the check balls into their correct locations. Use new gaskets when replacing the covers and torque the covers to 3.5 - 4.5 ft lbs. (5 - 6 Nm).
- Turn the valve body over and replace the parts taken out. When this is done you are ready to reassemble the valve body.
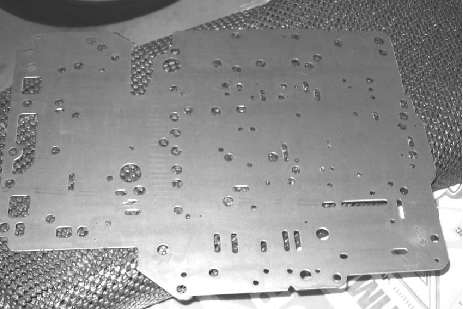
- Place the lower gasket on the lower valve body. Then place the separator plate on top of the gasket. See pic below.

Valve body separator plate. This goes between the lower and upper gaskets as noted in the text.
- Place the upper gasket on top of the separator plate and put one bolt into the area of the upper front valve body to hold everything in position.
- Position the upper rear valve body on the bench then grasp the lower valve body, including separator plate and gaskets, pick it up and turn it over and place it on top of the upper rear valve body. Put the bolts in and do them up finger tight.
- Turn the unit back over and put the top bolts in and do them up finger tight. The reason you do them up only finger tight is to allow for some movement in the gaskets and separator plates to line up the holes when putting the upper front valve body in place.
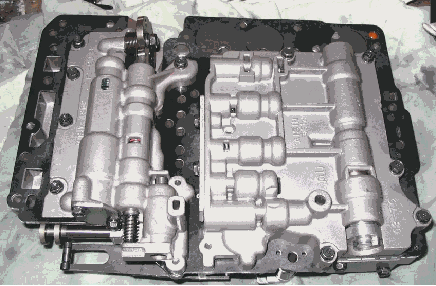
- Remove the bolt from the lower valve body that was put there to hold everything in place. Position the upper front valve body and pick up the lower valve body and turn it over onto the upper front valve body. Put in the bolts finger tight. Turn over the whole unit and put it the upper bolts. Torque all bolts alternately to 3.5 - 4.5 ft lbs. (5 - 6 Nm). See pic below.
