Interior Trim and Panels
Instrument Panel and Dash:
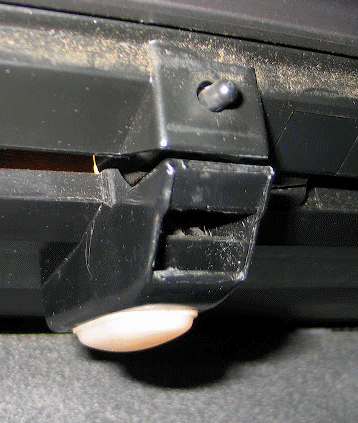
Headlight/Fog Light Switch Trim Removal
Headliner:
Trim:
Interior Trim Panel Removal Notes
Sedan Rear Deck Panel/Package Shelf Removal
Wagon/Estate Tailgate & Trim Panel Removal and Access
Carpets:
Interior Trim and Panels PDF
Useful Tools. [Fred Corn] A useful set of tools for interior trim panel removal is the 4-Piece Nylon Pry Bar Installer Kit from Harbor Freight, about $7. [Editor] IPD also sell a reinforced plastic "bone knife" for scratch-free trim removal.
Instrument Panel and Dash:
Heater Control Trim Removal. [Tip: Peter Gotseff] Start from inboard side (heater control unit side) rock up and down and pull gently to unclip the upper and lower right side panel clips. Now grasp panel firmly and pull out and left to unclip the big center spring clip holding panel to the dash panel cutout. It often feels like its sure to break but hasn't yet.
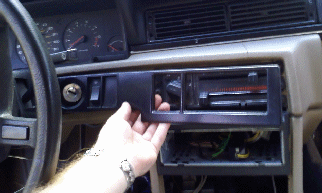
Headlight/Fog Light Switch Trim Removal [Tip: Peter Gotseff] As with the Heater Control Panel there is a large and stubborn spring clip. You must start from the inboard side (heater control unit side) and either pulling by hand or prying slightly with a flatbladed screwdriver unclip the clip and remove the panel. Don't start near the steering wheel since the panel has plastic clips that slide behind the dash cutout .. and they will break if pried too hard.
Wood Trim Removal. [Dan Ray] In 760/960/90 cars, there may be a wood trim surrounding the instrument cluster or the switches on either side of the steering wheel. This will have to be removed in order to remove the cluster. It may not be for the faint hearted. Go slow and never force anything, the wood trim clips are in the very center of each piece, so that is were you want to concentrate your force. I used a small screw driver for the initial prying, then used my fingers for the heavy pulling. It might be easier during first time removal to undo the knee bolsters to gain access from below, in case something falls in. It seems that all the dash parts are sort of lightly glued together with a combination of dirt, grime that sticks together with time, and cleaning detergents. 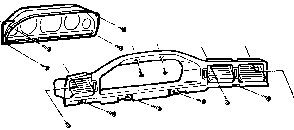
There is one steel tension clip that holds each piece of the wood trim, one clip for each side of the steering wheel. They pull straight out. With the wood trim the switches pull out too, and the light bulbs that light up the switch tops. Every thing must be disconnected from the switches. Don't worry about what goes where, each plug is unique.
[Dave Hunter] The wood trim is also held in place by tabs that need to be released. I accessed the tabs by removing the panels under the dash and reaching up to depress them. They're not easy to see, but you'll need to feel around for them and look with a flashlight. I think I may have even had to remove the metal bar by the knee bolster to get better access (don't remember). If I recall one set of tabs is near the headlight switch. To remove the trim piece on the right of the steering wheel, slide out the radio, remove ashtray, carefully pry up and backwards to pop out the cover at the shifter. This will expose 2 torx screws which hold the bottom of the large trim piece. Remove 'em. There are 2 metal springy things one on each side where the radio was. Spring them inwards (towards center)with a screw driver while gently pulling on the large trim piece. The bottom of it will now be free and the top will easily release as you move up towards the switches. You will have to unplug a few wires as you go such ashtray lights etc. The ECC is then easily removed, just take out 4 torx screws
[Inquiry:] I just noticed a hairline crack in my dashboard. It starts where the metal leaves the windshield and is heading toward the air vents. Its tiny, only an inch long, but having owned Volvo's before I want to catch it before it starts looking like the Grand Canyon. [Response: Zee] While I had the broken windshield out of my project, I used GE Silicone II as a filler for the 1/8 - 1/4" wide cracks it has. I believe this will remain flexible and yet be tenacious enough to stick to the edges of these cracks as they expand & contract. In former attempts with my '78 244DL, I tried one of those fill 'n color match vinyl
If I wanted to preserve what I could on a nice car like yours, I believe what I would try if the GE Silicone II caulk as a filler and adhesive, then use the color agent from one of these vinyl repair kits to help blend the repair sit
One tip: Before applying the silicone caulk, mask the area either side of the crack so you keep the caulk down in the opening, not spread out over good vinyl. The GE product tends to dry clear, but shiny. If your crack is narrow, you may get away without needing to use the texturizing procedure of the vinyl repair kit (heating the repair while pressing a grained material over the patch.)
[John Sargent] The good upholstery shops have upholstery dye that is sprayed from a paint gun. The dashboard on our VW Dasher was replaced with a wrecking yard unit which was the wrong color. I took it to a friend of mine who has an upholstery shop and had it sprayed black. The 2 small, fine cracks did not propagate further in the next ten years. These dashboards are notorious for terrible cracking.
[Sean Corron] I used paintable silicone to fill the cracks - reasoning that it was flexible enough to hold up to the weather changes and had good adhesive qualities - and painted the whole mess with Krylon Fusion. It actually came out quite good for an $8 fix, even now, 6 months later, it looks far better than before I got to it. Fusion, with proper preparation, sticks extremely well to plastic and vinyl. BUT, the silicone handled the weather changes better than I'd hoped...when it got good and hot, the silicone expanded and rose above the level of the crack. So, no cracks, but seams where they were.
[Rick Baines] Triumph cars suffer from similar cracking in their dash panels. Owen Lloyd of Park Lane Classics in the UK sells vinyl repair material and provides instructions for dash repair. Owen advises to glue polystyrene into damaged sections and sand it back, which I’m sure will work fine but I didn’t really like the idea so used car body filler. The lower edging on the dash was so badly damaged from aggressive removal of the centre support (radio panel) that I used a combination of expanding foam and Isopon P-40 filler. This worked brilliantly as the P-40 is so easy to sculpt into shape, yet the foam has a degree of softness to it. The cracked top section was easier as it was just the hard plastic that had sustained cracks/damage, so I used P-38 filler instead. There’s a lot of sanding involved whether you repair or not since the vinyl adhesive needs a good key, so the repairs weren’t too big an issue. Applying the vinyl was fairly straightforward; what surprised me most was how little pressure it took. The adhesive Owen recommended cost £1.95 from B&Q. All assembled, the new vinyl both looked and felt 100 times better. Much more luxurious, and left untreated, compared to the rest of the vinyl it had a matt dark grey look to it that resembled a more modern car interior.
Dash Covers for Cracked Vinyl Dash Panels.
[Inquiry] I've been looking at a nice 1990 740 Turbo. The only thing that bothers me about the car is that it has a severely cracked dash. Is this common in the 740's? Is it difficult to replace, or not worth the bother? [Response 1: Landon Sheely] From what I have read in this group over the past year and my experience with my '88 744, I have been able to gather the following: This is a very common problem. (Mine has done it in three places to date.) According to popular thought, there seems to be some correlation between using the Armor All branded product and the cracking. (FWIW, I used it on mine) I have seen a number of folks in the group warn against Armor All and recommend the use of another, more beneficial product. (Meguiar's) You can obtain a replacement dash from Volvo, but it is prohibitively expensive. The most popular fix I have heard of is the installation of a dash cap. As soon as I can get the time, I will probably end up purchasing and installing one myself. Available from IPD (http://www.ipdusa.com) for around $100.
[Response 2:] J.C. Whitney carries them for some Volvos http://www.jcwhitneyusa.com/ Also the following company carries a wide assortment, but a bit more than RPR at about $99 http://www.dashboards.com/ IPD also carries them, $99 for your car
[Response 3:] The consensus on dash caps was that they last not. The mechanical forces exerted on a cap by the fissures under it are irresistible with the passage of many moons. IPD or others, dash caps are ultimately doomed to buckle and/or crack verily even unto themselves. What works instead is to buy one of those arguably tacky tight-loop carpet dash covers as soon as you buy the car. Keep thy dash cover on and thy dash will crack not. It it's already cracked, cover it and the cracks will recoil from thy sight.
Hinge. Is the visor hinge repairable? [Editor] Not really. It is a one-piece unit that generally fails at the horizontal hinge. This hinge consists of a horizontal plastic rod extending into a hidden spring steel holder. It fails by cracking inside the holder and is not repairable. High OEM cost will force you to use a recycled unit from a breaker yard. To remove the visor, determine whether you have an electrical unit with an illuminated vanity mirror. If not, just unscrew the visor at the hinge and install the new one. If it is illuminated, first remove the A-pillar trim panel. Pull the vanity lamp fuse (if equipped), unscrew the visor and pull it down enough to expose the wire to the vanity lamp. Cut this about two inches below the hinge. Remove the old visor. Insert the wire for the new visor into the hinge hole and splice it into the old wires using butt-end crimp connectors and heat-shrink tubing insulation. Install the visor, then the trim panel.
Visor Replacement. [Editor] Later 93-95 940 models without sunroofs and wagons may have curved visor mounting plates, not flat ones, so visors from earlier model cars will probably not fit. [Jay Simkin] The sun visor mounts are secured by two screws. These pass through plastic "cans", which serve as spacers. These "cans" come in two formats: tall (about 3/4" & 3/8", respectively) and short (3/8" & 1/4", respectively). I believe the tall-format visor mounts are for cars with sunroofs, while the short-format mounts are for cars without sunroofs. These plainly do not interchange. The only way to be sure, if you cannot see the replacement, is to ask for careful measurements of these "cans". If the tallest is 3/4", then that visor will not fit.
Vanity Light. [Tips from John B] The vanity light wire pair goes down the right A-pillar and is connected to a chassis connector right behind the glove box. The same chassis connector supplies the glovebox light power and ground. In many models, the visor lamp is controlled by a mercury switch. Test the mercury switch in the vanity mirror (if so equipped) is bad by grounding the lower (visor down) set of contacts; if the lights go on, the mercury switch has failed. Later models don't use the mercury switch; they have a weighted switch. Earlier models have an on-off switch that may fail.
Removal. [Tips from Matt Cary] The glovebox is held in place by two screws and two nuts. The two screws are hidden under little 1-inch square trim pieces that you see when the glovebox door is opened. These trim pieces are easily removed with a small flat-blade screwdriver. Then you can remove the two phillips screws. The two nuts are hidden at the bottom of the glovebox... you have to look up from the passenger floor to see them. There's one on each side (10 mm). With the fasteners removed, the glovebox slides out easily. [Rick Faltersack] On my 87 740, I found an additional glove box fastener. To the right of center, near the latch mechanism and under a black plastic cover, there was a white plastic body fastener which is rotated with the screw slot to remove.
Door Closed and Won't Open. [Inquiry]The glove box on my 940 turbo is stuck. The knob will turn and the resistance of the return spring is felt. However, the door catches do not release and the door will not open. Using the ignition key in the lock does not do anything. [Response: Jay Simkin] I'm pretty sure I know what happened to your lock. At the back of the lock body, on one edge, there is an aluminum stud, shaped like a capital letter D. The rounded edge fits into a recess in the locking bar, which is made of plastic. When the key is turned, the lock body rotates, and pulls the locking bar downwards. That allows the angled lip of the locking bar to disengage from the latch, and enables you to open the door. The aluminum stud has broken-off from the lock body. As a result, when the lock body turns, there is nothing to pull down the spring-loaded locking bar. It will not disengage from the latch.
Before anything can be done, you will need to open the glove box. That can be done by taking a 1" wide rigid blade putty knife, and gently inserting it between the
 top of the glove box door, and the under edge of the glove box opening. You will need to press downwards, gently but firmly. You are using the give in the door, to press it down far enough, so that the locking bar will clear the latch. When that happens, the door will open. If you own a Dremel Moto-tool, are handy with it, have miniature drill bits (Nos. 60-80), and have some experience taking locks apart and re-assembling, them, you can repair the lock. If not, then you should go to a salvage yard, and remove a lock from a glove box, to which lock the salvage yard owner has a key. You can install this lock in place of your broken lock. If the salvage yard owner does not have the key, you can take the VIN from the vehicle, and get the key code from Volvo. With the key code, a locksmith can make a key. You can install that lock in your car. You will need two keys: a door/ignition key, and a glove box key. If the salvage yard owner does not have a key to the glove box lock, you can take the lock to a locksmith, and ask them to re-key it, so that it matches your door/ignition key. [John] Using a piece of venetian blind, slip it in next to the latch, move it
sideways behind the latch, pull UP to release the latch and the door.
If you have a standard door jimmy it should work too. [Don Hogdon] I was able to open mine by carefully pushing down on the door on either
side of the lock, then pulling back. You must be careful, the older plastic is
pretty brittle.
top of the glove box door, and the under edge of the glove box opening. You will need to press downwards, gently but firmly. You are using the give in the door, to press it down far enough, so that the locking bar will clear the latch. When that happens, the door will open. If you own a Dremel Moto-tool, are handy with it, have miniature drill bits (Nos. 60-80), and have some experience taking locks apart and re-assembling, them, you can repair the lock. If not, then you should go to a salvage yard, and remove a lock from a glove box, to which lock the salvage yard owner has a key. You can install this lock in place of your broken lock. If the salvage yard owner does not have the key, you can take the VIN from the vehicle, and get the key code from Volvo. With the key code, a locksmith can make a key. You can install that lock in your car. You will need two keys: a door/ignition key, and a glove box key. If the salvage yard owner does not have a key to the glove box lock, you can take the lock to a locksmith, and ask them to re-key it, so that it matches your door/ignition key. [John] Using a piece of venetian blind, slip it in next to the latch, move it
sideways behind the latch, pull UP to release the latch and the door.
If you have a standard door jimmy it should work too. [Don Hogdon] I was able to open mine by carefully pushing down on the door on either
side of the lock, then pulling back. You must be careful, the older plastic is
pretty brittle.
760 Glove Box Trim. To remove the horizontal trim with the chrome that runs from the far right passenger (LHD) side of dash, under the right vent, above the glove box, and around the curve of the dash under the two center vents in an 89 760, remove one or two screws, accessible at the top of the map compartment, which hold two tabs on the back side of the trim.
Panel Vent Removal. See Heating and Air Conditioning.
Headliner:
Headliner Tips-DIY?. Repair the Headliner Yourself or Have a Shop Replace It?
- Headliner Board alone NEW will cost around $ 850.00 that price ( does not include Sunroof Insert)
- 1/8" Material IS A MUST; don't let anyone suggest 1/4" since your car is designed for 1/8"
- Knowledge of Your Sunroof is a Must.
- Call the Volvo dealer nearest youand ask the SERVICE MANAGER for the names of the Trim Shop ( Upholstery Shop ) they use.
While they may be referred by the Volvo dealer, it's still your responsibility to check them out. Remember to insist on the 1/8th inch material . Most Upholstery Shops don't always use the 1/8th inch material because most of their headliner work is domestic vehicles using 1/4". You want them to use new, first run material. not blems, not over runs, and not their old stock that has been sitting on their shelf for the past few years.
Headliner replacement for sedans or wagons usually costs around $ 325.00 which includes the sunroof panel and a full service to the sunroof. I would also recommend you have your sunroof seal replaced at the same time This costs around $ 80.00 and will minimize the water flow into the sunroof carriage. This will extend the life of the new headliner.
Repair It With Adhesives? I, like all other 8+ year old 740 owners, had the same problem with my headliner coming apart. Adhesives will NOT hold it up, even temporarily, since the layer of disintegrated foam that remains attached to the headliner board will continue to flake off and not provide anything for the adhesive to stick to (believe me, I tried!!).
Repair It with Pins? [Sean] I fixed my 91 sedan headliner with spiral push pins from Walmart. They have a clear head and a wire spiral sticking out of them. You twist them in. I used two or three packages to fix the area above the passenger seat where the liner was coming down. I spaced them apart evenly side to side and ended up with an upholstered pattern look. Several pins broke while pushing them into the liner, but they came back out easily enough. For about $5 and 10 minutes of your time this is certainly well worth considering. They are almost invisible.
Headliner Replacement. [Editor] See the excellent illustrated article on Do-It-Yourself Headliner Replacement from DIYNetwork.Com, which summarizes an episode of Weekend Mechanic. This has been edited to include Brickboard tips from Volvo owners and is included in the FAQ at Headliner Replacement.
[Tips from David Jeff who ignored the above and bravely did the headliners in three 740s on his own] [Editor's note: the Volvo OEM Body Fittings, Exterior technical manual has an excellent series of illustrations and procedures for those interested in DIY headliner repair or replacement.] I will gladly share my headliner experiences. My family fleet of Volvos (6) is made up of '85 to '88 740s and 760s. I don't buy Volvos until they are 10 years old and beyond 100,000 miles; but, I've concluded that all 700 series headliners regardless of care or climate, will sag before 10 years of service. Sagging generally starts in the domed section of the headliner over the backseat passengers. The foam usually initially stays glued to the headliner board. The fabric just separates from the foam. The weight of the sagging fabric and busy young hands in the back seat pulling at the sagging fabric quickly accelerate the process.
If upholstery pins or small screws can be carefully installed to better secure the fabric to the board, I think the sagging process can be slowed down significantly. However, the only long term solution is to remove the headliner board from the car and glue new headliner fabric. I've done 3 - 700 sedans. Last year I priced a replacement board at the local Volvo dealer. I remember something like $350? (parts only - not installed) Local upholstery shops that advertised headliners as low as $99 were in the $450 range for my Volvo. Thus my decision to replace it myself.
Material:
Entire Kit: See http://www.ipdusa.com/ for 700/900 headliner kits of very high quality with all needed components. Their online instruction page is required reading too: http://www.ipdusa.com/uploads/sku_files/5278_INST.PDF
Fabric: [Rick Tilghman] Let me just say that you want to use 1/8" headliner EVERYWHERE, not just on the sunroof. Don't listen to what anyone else tells you... trust me and ask for 1/8" material. The reason for this is that the headliner must go under various edges around the car (including under that plastic edge at the sunroof opening) and the 1/4" is too thick to fit. Also, the 1/4" material is much heavier and will pull off the headliner backing board over time faster than the 1/8".) [David] I bought three yards of new 1/8 inch foam-backed headliner fabric at an auto interior supply store for $7 per yard. I've read on SB that most fabric is thicker than that used by Volvo. I have discovered several headliner suppliers on the internet: Headliner Express in the Orlando area at 407 786-4090; Gilbreath Upholstery Supply in Des Moines, Iowa at(515) 288-6001 (http://www.upholsterysupply.com); Heads Up', from HeadsUp Industries in Florida (305) 472-3300; and Your Auto Trim http://www.yourautotrim.com/
Adhesives: you MUST use a quality adhesive that is specified for automotive headliner use.
3M makes two grades of suitable spray adhesives:
- 08088 General Trim Adhesive: A rapid drying, high strength, light colored adhesive. For bonding most types of material used in automotive trim operations except unsupported vinyl. Great for fabrics, upholstery, styrene foam, jute pads, carpets, rebonding vinyl top sections.
- 08090 Super Trim Adhesive:
A fast acting, high strength contact adhesive for two-surface application. Resistance to heat and plasticizing oils. For attaching vinyl tops, headliners, vinyl trim, insulation, foam, padding and rubber parts to metal and other surfaces.
Cheaper grades or brands WILL fail and this is not the place to economize. I've found these at WalMart cheaper than the auto interior supply store. You'll need at least two cans for the boards and a third for the sunroof.
Adhesive Remover. [Shannon DeWolfe] Use 3M General Purpose adhesive remover in quart cans to remove dried adhesive on the headliner board. Be sure to have lots of rags on hand as well as some chemically-resistant gloves and a good cartridge respirator to filter out all of the DEADLY VOC vapors that the 3M adhesive remover puts out. Use this stuff with caution; it is highly flammable and outside is the safest place to use it.
Removing the Headliner from the Car:
[David] To begin, I think you need to completely remove the headliner board from the car. To do this, you will have to remove both front seats and the entire backseat (the upper half obstructs removal of the trim pieces around the rear side windows). Remove all the trim (8 pieces, 4 each side) the visors, the mirror and the sunroof trim (don't forget the fastener at the back of the sunroof.) I'm not sure what the headlinerboard is made of but it's fragile and somewhat brittle. It's not particleboard, nor fiberglass, but some kind of molded pressboard with a brown wax paper glued to the top side. The board is secured on plastic strips above the windshield and the back window. At the rear there is a square plastic fastener about 1" from the edge in the middle of the back window. Plastic trim pieces screw in above the doors holding the sides and a plastic molded trim strip secures it to the sunroof opening. The electric sunroof motor cover, the dome light and the sunvisors and rearview mirror secure the rest. All this has to come out. To remove the sunroof headliner or the sunroof pan and sunroof assembly, see the FAQ section in Body-Sunroof. With a helper, attempt to carefully lower the headliner and pass it through the passenger front door (biggest hole) or, if you have time and ambition, through the back window which you must remove. Without excellent help and great luck, you will break the board where the rear view mirror attaches and along both sides of the sunroof opening. [Tip from Lawrence] The only way I could get mine out was to bend it. Just pick a spot that won't be noticeable when it's back in the car. Bend a bare minimum, just enough to get it out. Try not to break (you may have to crease it). But even if it breaks, it will be easier to fix the one crack and not a jigsaw puzzle of broken pieces. [Jim Egelston]What helped me was that the car I bought spent most of its life in a garage and is a Northwest car. I think the cooler climate here might have kept the headliner board from baking and becoming brittle, as opposed to a southern car. My car does have a sunroof, but I had no breaks anywhere. I did have to bow the board slightly to get the corner to clear the door opening. Having two helpers was important. [Wade] You will need to break the board to get it back in a sedan. It is just a tiny bit too wide to fit in with the doors in place on the sedan. I got it out by dropping it and sliding it back into the rear window bay, then dropping it beneath the steering wheel (both front seats fully reclined). From there I raised the passenger front edge to the upper door corner and rotated it so that the driver front was at the lower, front corner of the passenger front door with the driver rear door open. It had broken corners and tears in the paper board in several places, and getting it out was difficult but do-able because of these breaks.[Bryan Warfield] I used a couple of yardsticks, taped to the underside of the headliner board after the side trim was removed to keep it from breaking around the sunroof opening in my wagon. With this method I was able to get the board out in one piece, working by myself. You have to wrap the tape all the way around and stick it to itself---it won't stick well enough to the board. [Wade] A few summary thoughts: 1. The front and rear trim/clips do not both have to be removed. I pulled the front one because it was easier to reach. I left the rear one in place, which saved at least a half hour of sweating and swearing. 2. The front and rear trim had thick, nasty black stuff all over them. I imagine that our Mississippi summer heat and humidity had caused the (at that time) 15 year old windshield sealant to ooze a bit. Do not get this onto the trim piece or onto your clothes as it is very hard to remove. It is even pretty hard to get off the glass. I used denatured alcohol and mineral spirits (NOT together) and cannot remember which one ended up removing the greasy sludge from the glass and plastic strip. 3. This plastic strip is fragile and the clips on mine held QUITE well, and after I got all the nasty stuff off I realized that I had cracked it. Then it broke in half. I got another one from a junk yard, thankfully. It came off quite easily as I had some familiarity with the dang clips by that time. 4. Make certain that you have a very clear understanding on how the dome light attaches to all of this as it holds up the center of this board and it will sag by about two inches if you fail to replace the clips correctly. 5. The A pillar trim (and all of the black trim pieces) are held in place with a bunch of white one-way push connectors. They are very inexpensive from the dealer, though you might need to order them due to the age of the fastener. Get a bunch (like ten or so). If you do not use them I will buy them from you. Just post back here with some way to contact you. These little wonder fasteners are harder than the brittle trim plastic, which is very expensive. If you pull off a trim piece in anything other than a surgical manner you will probably crack or break the places where these guys pin the trim in place. The plastic trim is NOT easy to glue. I ended up cracking one piece and ordered the fasteners. then I just cut the dang fasteners for removal and replaced with new ones. Much faster and less damaging.
Repairing the Headliner Board:
Once out of the car; it's time to repair the board and prepare it for re-gluing new headliner material. Coarse sandpaper or a stiff new wire brush and a vacuum cleaner will quickly remove the foam and dried glue. Sanding and painting should be all that is required for most boards. Some present greater challenges and require more patience. My first board was busted up before I even tried to get it out. I laid the pieces out on a flat table. I used wooden yardsticks and paint stirrers for support on the top side of the board. The yardsticks ran from front to back providing additional support to the board along the sides of the sunroof opening. More support may be needed around the rearview mirror and sun visors. Drilling holes and securing the boards with flathead machine screws are excellent in re-establishing the headliner board. Carpet seam tape also does great to secure this extra reinforcing. Also, try fibreglass mesh and compound to repair breaks.
[Tip from Bill] Any repairs to mend cracks in the board should only be done from the back side of the board. If you use tape or any type of strapping on the front side this will show through the finish when completed and installed. After sanding down the bottom side getting it ready to reglue; I used yellow mesh sheet rock tape (real sheetrock men use paper tape. This is the stuff sold for those of us with less sheetrock savy) Anyway, this mesh tape provides a great foundation for bondo. I used bondo to re-construct the board. I sanded the bondo smooth. Duct tape can be used to redefine the edges of the board. Then I painted the board with latex paint just to be sure my new headliner fabric would have a good surface to stick well so it wouldn't sag again in a few years. Hopefully, you won't have to totally rebuild your board. But, I still prefer this over $350.
[Tip from Chris] Use duct tape to repair the board. It works. The headliner board does not bear any weight so there really is no need to make it very strong. The material will hold it together, the duct tape will do the same as well. [Wade] I cleaned and repaired the board with plain old Elmer's and brown paper strips clamped with small wood clamps to compress it like the original board, surprisingly easy but tedious.
[Jay Simkin] A nephew re-built the backing board with an epoxy resin and fiberglass fabric. The epoxy, applied as a "liquid" bonded with the fiberboard. The fiberglass fabric, bedded into epoxy, reinforced the weak sections of fiberboard and made them as strong, or even stronger, than new. He sanded the down-ward facing side of the repaired backing board. Once it was perfectly smooth, he applied new headliner fabric to the backing board, and re-installed.
[Tip from Dan Williams] I bit the bullet when I did mine and made it a two piece assembly. I cut laterally across the liner at about 4 inches behind the light assembly. I put a couple of velcro fasteners to help hold the 'center' in place on reassembly, but not sure it was necessary. I wrapped the fabric over both edges at this point and the seam is not very obtrusive. Afterall it is a 16 year old car, and I believe that this looks better than some random wrinkles from bending or breaking the backer board on reassembly. My mechanic also reminded me to be very cautious with the opening where the lamp mounts.
Glueing and Installing Fabric:
The glue is sprayed uniformly on both the fabric and the board. It sets 1 to 3 minutes. Follow the directions on the can! You get one good chance to place the fabric where you want it. I cut the fabric 6" longer than the board. I then fold the fabric in 3 sections - no cutouts for sunroof. I glue one section at a time. I get my helper and start at the rear being sure to totally anchor the molded section allowing headroom for the backseat. After doing all 3 sections, trim to 1" around edge and flip over and spray glue to secure. For the sunroof opening - cutout leaving 6" fabric to secure to the roof opening in the sunroof frame. (The first time, I neatly trimmed to the board and figured out I didn't leave enough fabric after I got it back in the car.) [Fabric Installation Tip from Ira Eisenberg] Here is a tip passed along by an auto upholsterer. Assuming you have the backer board out of the car and nicely cleaned up, run one pass of adhesive along the backer board midline.....one end to the other..... and then one pass on the new headliner material along its midline. Glue headliner to backer board. Then fold one half ofthe headliner material back from edge to glued midline, spray adhesive on half the backer board and the folded back part of the headliner. You may want to place clean paper around the headliner edge between the two layers before spraying adhesive so it doesnt get on the other half of the headliner which is facing up. Then, roll the headliner back onto the backer board starting at the midline. Slow and steady, light pressure with your hands, and it should lay down flat and smooth. Then repeat for the other half. Let the glue dry for a day before you reinstall into the car. [Wade] Applying the adhesive and the fabric was by far the easiest but most stressful part of the job. Do not stretch the material; it will fit with very, very minimal stretching. It just fit in and molded to shape with zero distortions. The IPD kit has more than enough fabric to do the job. You must remember with the foam-backed fabric that you MUST NOT press the work down hard or you will saturate the foam with the spray adhesive and it will smash flat on you. It will NOT come back up, ever. I was warned about this several times by the IPD guys and was very careful and got excellent results smoothing in the manner that they recommended over the phone. I did two dry runs before spraying the adhesive to see where the stuff might want to pull and distort. Take your time. [Bryan Warfield] Do not cut the hole for the sunroof opening in the main panel until after it is installed. This should be the very last step. DO NOT cut the material even with the edges of the opening!!! It is necessary for it to span the gap between the edges of the hole in the headliner board and the sunroof pan. The white rubber edging strip holds the material to the pan. Study the existing one thoroughly from both sides, with the roof open, until you understand how it is supposed to go together.
Installing the New Headliner:
[Chris/Jamie] I put the board back in the car through the front passenger side of my sedan, the same way I took it out. I moved the seat as far back as possible, and lowered the back as far down as possible. It does go in without taking the seats out. Try real hard to get the new headliner board back on the roof without breaking it. When you are hanging the board, don't support the weight of the board with your fingertips or you'll have indentions all over. They'll go away eventually, but they aren't pretty.
Replacing a headliner takes me most of a weekend. The sunroof is a project all by itself. I've done one sunroof. The 1st headliner job I did was a little over a year ago. There is no evidence of any sagging. [Bryan Warfield] To get the newly recovered board back into the wagon and attached to the roof use one person in the car and one right outside, at the rear. Take the board in further than it needs to go, then back, to get the back end of the board seated in the slot in front of the tailgate. If I remember correctly, the wires for the rear dome light should hang down below the headliner---don't cover them up by mistake. Go back too far, then come forward again to get the front edge into the white plastic trim at the top of the windshield. Make sure the two square plastic clips that go into the roof halfway back from the sunroof are handy---you do not want to have to waste time looking for them at this point, when you can't let go of the headliner. Put them in, then the metal clip that goes in the dome light hole, and it will stay up by itself. [Wade] Some later models of 740 and 940 sedans have different interior configurations that make it impossible to reinstall the headliner board with breaking a corner to get it in the car. I ended up carefully breaking the front driver's corner about 1.5" across in a triangle. It was a hard thing to have to do after all of my repair work to that dang board. But the new fabric kept the part from coming off and after I got it in I sort of repaired it again, leaving it clamped overnight, snugly in the car but not installed. The next morning I installed the whole assembly. [Tip] I noticed that the headliner board wanted to sag and the lamp assembly would not stay up and flush because the plastic clips were broken. So I dropped a steel wire down through the lamp housing, where there were already gaps, then bent the wire ninety degrees to secure it to the headliner so the housing can't fall down. I pulled it all up with a strong magnet (now stuck to metal roof). The magnet was removed from a hard drive, had holes and is a flat shape.
Headliner Cleaning. [Bill Stauffer] You shouldn't attempt it: it will dissolve the glue and make the headliner fall down. Note that most headliners have been cooked for years under sunlight striking the roof of the car and hence have weak adhesive bonds. Using any kind of liquid that can be absorbed by your foam backed headliner will accelerate the breakdown of both the adhesive and foam and cause the adhesive between the cloth and the foam backing to likely fail. Brushing the surface of the cloth will have similar effects. If you feel you absolutely cannot live without a clean headliner, either take it to a specialist or replace it.
For ideas on interior trim cleaning, see the FAQ Section. For tips on removing tobacco smells, see the FAQ section in Preventive Maintenance.
Trim: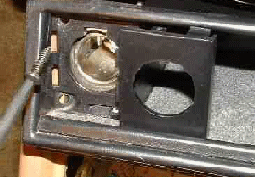
Storage Tray Under Radio. To remove the storage tray under the radio in order to access the relays, remove the snap-on cover over the 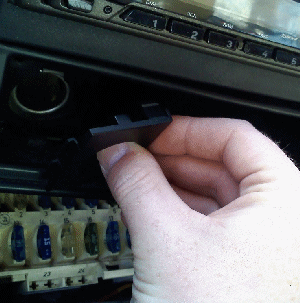 cigarette lighter with your fingernail or a small screwdriver. Remove the two philips screws securing the storage box: one of these is angled in. Remove the storage box by gently tugging on the left side, pulling it and the cigar lighter wire out from the console.
Center Console Tray Removal. To remove the center console box:
- Pry up the screw cover in the bottom of the storage box and remove both screws.
- Remove both screws in the bottom of the handbrake tray and the plastic trim cover in the handbrake slot.
- Pull the console back, being careful to disconnect wiring to the seat heater switches and lamps.
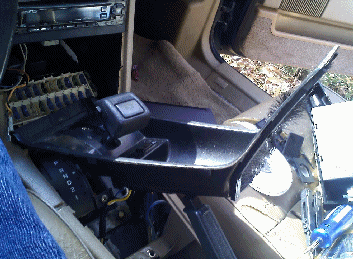
Center Console Removal. To remove the entire center console:
- From the back seat, remove the ashtray
- Using two small flat-head screwdrivers, pry up the two clips at the bottom of the ashtray holder assembly; remove the assembly.
- From the front driver's seat, remove the fuse cover in front of the shifter knob
- Raise the emergency brake handle and remove the two screws found under where the emergency brake handle was sitting.
- Partially lower the emergency brake handle.
- Pry off the black metal clip found under the fuse panel that helps locate the central piece of the console. Caution: don't drop this or let it fly away!
- Stepping on the brake pedal, move the shifter out of park, to neutral.
- Very carefully lift the black center portion of the console and slide it forward into the fuse area (be gentle!) There may be two clips on the front portion of the back colored piece of the central console, or they may be locating nubs.
- Put the vehicle in park, and feel free to move about the cabin. Open the storage compartment on the upper part of the central console.
- Locate the small panel at the bottom of the compartment, toward the back.Using a small flat-head screwdriver, push the clip under the forwardmost slot toward the back, and gently remove the cover.
- Remove the two screws found under the cover.
- Gently remove the center console, being careful to remove the lamp and seat heater wires and fasten seatbelt panel from the back of the console.
Consider vacuuming before reassembly, or at least retrieving all the loose change. If you are replacing your emergency brake cable, you will need to pry up the top metal tang that holds the locator pin in place.
Center Console Footwell Side Panels. To remove the footwell side panels on each side of the radio (so as to expose the innards of the center console and radio/fuse box):
- Remove the ashtray and fuse box cover
- Pull back the center console tray (see above) to expose the two screws fixing the footwell side panels
- Peel back the carpet at the front bottom corner of the panel to expose another screw
- Remove the radio and radio box. Remove the two side screws holding the panel inside the radio compartment. Unfix the metal strut at the bottom rear of the fuse panel holding the two side panels together.
Interior Trim Panel Removal Notes. {Editor} To remove various panels, follow these instructions:
A-Pillar Trim Covers. Pry off the grab bar screw hole covers (driver's side) by pushing down on the cover while prying up with a screwdriver slightly inserted under the bottom of the plastic cover. The cover snaps onto an underlying plastic holder. On the passenger side, remove the trim strip in the grab handle and unscrew the handle. In both cases, remove the screws holding the top molding piece in place, then move this aside and remove the hidden screw holding the A-pillar molding at the top. Things interlock, so don't force it too much. Slide your fingers down behind the A-pillar molding to pop off first one and then two metal clips. Then pull the unit up and back to slide it off the remaining trim fastener at the bottom of the A-pillar. Push back the rubber defrost duct and pull straight back to remove the bottom of the molding from the flat trim spring holder at the very bottom of the panel. To reinstall, make sure all wiring is stuck to the pillar with putty, then reinstall as the reverse of the above. You will probably have to remove the bottom panel fastener to place it correctly and reinstall it. Warning: it is wider than Ford or GM fasteners, so if you break it pay close attention to the diameter of the replacement. Note: there may be a bottom hidden screw near the kick panel.
Door Top Panels. [Rick Tilghman] The panels above the windows are held on by the screws for the handles. You have to remove the trim in the middle of the handles to expose the screws underneath (there are two of them on each handle).
Window and Headliner Trim Panels. You have to start in the back with the tower panels (at least in the wagon) and work your way up to the front. The panels are generally an overlapping system, with the front pieces on the bottom and the rear pieces on the very top.
Climate Control Trim Surround. [Note from Pat Dwyer] The plastic trim piece that goes around the heat-A/C control switches and goes leftward , ending at the left edge of the ignition slot, is difficult to pry out, and probably fragile, but it did NOT break under my ministrations. I used a knife blade to pry the plastic 'somewhat' loose, all the way around, but it felt like it was stuck somewhere...and it was: just to the right of the rear window defrost switch, where the plastic trim piece meets the vertical console, there is a spring-tensioned clip holding the whole trim piece in place, and it will take some wiggling and jiggling and cussing to pop the plastic off, but it does come off, and all in one piece if you do it right!
Headlamp Switch Trim Surround. [Bob/John Shatzer] On 740/940 cars, pull the headlamp knob off and gently pry the trim from the left side. On 960 cars with wood trim, remove the narrow dash trim just above the headlamp switch trim surround and be very careful of the wood veneer on the surround.
Kickpanels and Side Trim under Driver and Passenger Dashboards. To remove the front trim panels where your feet are extended on either side of the front seats: remove the large plastic body fixing plugs holding the kick panel to the upper instrument panel. Pull down on the rear edge of the kick panel and maneuver this backwards: some foam will be in the way and the panel itself is mounted in two guides on each side on the left side and in one guide and next to the blower housing on the right. Remove the panel. To remove the side trim at the bottom of the A-pillar, unscrew the front two sill trim screws using a Torx driver. Carefully maneuver the side trim out from under the sill trim, then pull back gently to remove. The top of the side trim is inserted under the A-pillar trim: bend this slightly to remove. On reinstallation of the right side trim, make sure the plastic catch on the side trim engages the metal frame attached to the ECU mounting frame.
Door Panel Removal. The door panels are very easy to remove after you've done it once.
1. Later Cars. [Tip: Peter Gotseff] These instructions are primarily for 85 and newer 700 models w/ one piece door panel i.e. w/o a door strap, mine is an '89. Remember don't force too much or you'll break the trim clip.
- Remove plastic screw at the bottom of the door handle cup 1/4 turn and lift out the whole cup. The p/w switches can be removed now by removing their cover plate. This always seems awkward but push the carpet cover back and remove the p/w switch cover up and forward.
- Pry speaker cover off by sliding forward only. There are two trim clips beneath the forward edge of the speaker cover which help hold the door panel on.
- Unscrew lock knob.
- Unclip the three white door panel base clips with a small flathead screwdriver. These are located at the bottom of the plastic door panel (look up at the bottom of the panel.) They are removed by inserting blade and prying straight down to completely remove the clip (Haynes manual has a figure for this, 11.7)
- Remove the red edge marker light lens by inserting flat screwdriver or knife and prying straight out. The lens cover also acts as a clip.
- Remove entire panel as one by pulling out on the bottom of the door panel and pushing upwards making sure to free the p/w switch assembly at the same time. Watch out for the speaker and marker lamp electrical wires inside: disconnect these as you raise the panel.
2. Earlier Cars. (<=1988 model) Pull the speaker cover straight out. There may be a screw under the speaker cover; remove this if you see it. Remove the plastic screws beneath the door handle. There's another hidden clip behind the red door open warning light lens on the aft edge of the panel; in later model cars the clip is integral with the red lens. This is a good time to R&R the window switches and lube the power window mechanism: see the glass and switch sections of this guide for that.
Sedan Rear Deck Panel/Package Shelf Removal. [Editor]
- Remove Center Mount Stop Lamp: Push up on locking tab beneath, pull entire stop lamp assembly toward front of car.
- Remove Rear Seat Bottom Cushion--About 6 inches in from either side, on the leading edge are latches that hold by way of foam compression. With the palm of your hand, PUSH IN...Then DOWN, Then lift up and away, both sides.
- Remove Rear Center Headrest--Extend upwards...lift and unsnap lower section of plastic cover. Then remove 2 phillips trim screws on upper part of plastic cover..really have to pull up on the headrest as you do this..set plastic cover aside...Remove 3 bolts w/10mm heads...withdraw center headrest.
- Remove Seat Backs--Find metal tabs at right and left lower corners, bend slightly upwards and pull lower part of seat backs outward. Lower the center armrest to about 45 degrees. Push up on seat back until upper corner tabs/slots come free, pull entire seat back ass'y forward over and away from center armest. CAUTION.. feed 3 seatbelt straps carefully over seat back as you withdraw it from car.
- Remove 2 Remaining Headrests--Take out 2 bolts w/ 10mm heads, each side, remove reinforcement plates, withdraw headrests and set aside. Remove 3, T-25 screws that secure Rear Deck Panel.
- Remove Deck Panel--CAUTION Feed 3 seatbelt straps sideways and CAREFULLY out of the plastic grommets. The right and left grommet/'wing' extensions are VERY weak and will break. Be careful when withdrawing Rear Deck Panel from car: the side molded extensions are likewise very weak and may break if they contact the car frame.
- Remove Insulating Pad--Just lift it up and away.
- Remove Speakers.
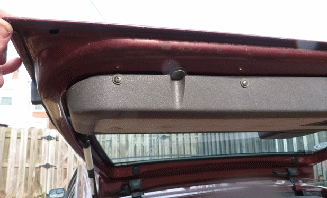
Wagon/Estate Tailgate & Trim Panel Removal and Access. [Tips from Bill Peyton]
Removing/Repairing Tailgate Panel.
[Tips from John Hibbert] The following applies to a 93 940 wagon, and I would think, to all 700 & 900 wagons. You will need a small to medium flathead screwdriver & a torx screwdriver found in Volvo tool kits. A CAUTION before you start. When steps 1 to 4 are completed it will be time to remove the trim. This MUST be done by sliding the complete trim including the brake light
Step 1. Open the tailgate fully.
Step 2. Remove the plastic surround which is part of the housing for the lever which opens the tailgate from the inside. This surround is held by 9 shallow 1"(2.5cm) long plastic lugs. The centre of these lugs is found at- TOP EDGE ie edge closest to glass. (3 lugs in total). One lug can be found 2 3/4" (6cm) in from each side. The third lug is in the middle, 6"(15cm) from the edge.
SIDES: One lug on each side 1 1/2" (3.5cm) down from each top corner.
BOTTOM: (4 lugs in total) One lug can be found 1 1/2" (3.5cm) in from each side. The other 2 are to be found 4 3/4" (11.5cm) in from each side.
Start at the top right corner by sliding the flathead screwdriver between the carpet trim and the plastic surround 2 3/4" from the side. Push the screwdriver in firmly and gently twist at the same time. You will feel the lug come free. Repeat this process at the centre of each lug. (measurements given are the centres). The surround will come free. It is fragile; if it breaks, a replacement may be had for about US$11.
Step 3. Move to the bottom of the tailgate. With a 1/4 turn the 4 plastic fasteners can be removed.
Step 4. With the plastic surround removed in step 2, this has revealed 2 torx head screws. Remove them. The only thing holding the complete trim to the door now are the four fragile plastic tabs at the top. DO NOT PULL THE TOP OF THE PANEL. These four fasteners hold the top of the panel at the bottom of the window and fit into slots where the open side faces the top of the door. The trim panel is slid upwards to disengage these fasteners. Before sliding the trim up, you must support the trim while you disconnect a power supply connector on the right hand side. This can be done with one hand. Then slide the whole panel toward the top of the door, working the fasteners out of their slots. This is the only way you will remove this panel without breaking the panel itself. The trim is very light and will now come away.
With the trim removed it is a good opportunity to apply LocTite to the 3 screws that hold the wiper motor in place. They have a tendency to work loose. You will also find a small phillips head screw between the opening lever and the latching mechanism at the bottom of the tailgate. This can work loose. Tighten but do not overtighten. As it is housed in plastic, Loc Tite is not recommended. A spray of lithium grease to moving parts is also a good idea.
Step 5. On reassembly do not forget the need to reconnect the power supply to the window heater.
Repairing Loose Tailgate Plastic Panel:
Operation Tip: Don't slam the tailgate!
[Rob Bareiss] There is a repair kit available for all Volvo 700/900/850/V70 plastic hatch trim panels, since they ALL are doomed to come loose at the holes securing the body fasteners. The kit runs about $20 and replaces the inside corner plastic with little metal reinforcing tabs. Try any of the Brickboard advertisers for this kit. It's not really a Volvo part number- it's aftermarket, in response to large demand for it. [Another Approach] You can also cut two wooden battens about 1 inch X 2 inches x 5 inches and screw them into the inside of the tailgate interior either side of the wiper pivot point at the centre. Attach each of the two pieces of wood directly into the tailgate (just below the window line and between where the 2 clips normally fit on either side). Use 4 metal self-tapping screws to hold the wooden battens to the tailgate (having first drilled 2 small holes into each of the wooden battens and then use the battens as guides to drill into the tailgate's internal frame). The tailgate is aluminium and is easy to drill into with a small hand-held manual drill (careful you don't use a power drill which may go through the outer panel of the tailgate!) With the 2 battens secured, reinstall the plastic trim panel and refit the 2 torx screws in the centre. Then drill 4 small holes (2 on either side) through the top of the trim panel so that the 4 screws are screwed down through the holes in the panel and into the 2 wooden battens to securely hold the panel and keep it from rattling. [ Chris Own ] My trustworthy Volvo tech uses sheet rock screws, say 1.25 inches in length, to drill through the fabric finish and plastic near the bottom of interior trim panel, making sure to penetrate the metal frame of the tailgate. For extra strength, place small washers under the screw head. The screws are near invisible and hold well. I've since made that repair several times. Just remember the screws are there next time you attempt removal of plastic tailgate panel. [Jay Simkin] The only way to fix the bottom attachments, is to find some very thin plastic sheet material (say, 1/16" / 1.5mm thick). Cut discs from the sheet plastic, that are the same diameter as the missing tabs. Drill holes in these plastic discs, making the holes the same diameter as the openings in the broken attachments. Glue the plastic discs to the top of the broken attachment. Position the disc, before the glue sets, so that the hole in the plastic disc aligns with the opening in the steel. Once the glue sets, use the plastic fasteners to secure the tailgate cover to the steel frame.
Repair Kit Tips. [Adam Heller] If your stand-offs are severely broken, the repair kit alone may not fix them - prepare to use some 'glass or JB to re-fab them. My tailgate was already repaired by PO's mechanic. Try to maintain a relatively constant thickness of material where the oval hole is, similar to the original ABS. Thick globs will keep the spade from seating right. The thin metal sheet from the kit alone may not generate any "holding friction" with the clip spades where they go through the oval hole. The spades will invariably turn or fall out of such an oval, or the sheet metal will rip out - it is that thin! The metal reinforcements are much thinner than the plastic of the tailgate, so if you just put it back together, per the instructions, the panel will rattle. Mind where you drill and screw with the stand-off repair screws that they don't interfere with the spades from the trim clips.
Installation Tips. [Adam Heller] DONT try to slide the trim panel back on with the clips already in the trim! Re-installing in this way with the aftermarket clips gave me a pretty lame result - at least one of the four crucial clips would spin and seat badly, or miss the metal seat altogether. Instead, take the clips out of the trim and put them securely in the tailgate. If you are using the aftermarket clips especially, you will notice they are flimsy little pieces of crap. Now they're not going to turn or miss the slots! When you observe how much force is required to get them in the seats, it will be no mystery why they are so hard to install the other way (use silicone on the metal if needed to avoid deforming the plastic). Lift the trim panel up into place, align the holes with your fingertips onto the spades from the clips. Check alignment and push or gently hit with the heel of your hand, forcing the oval holes onto the spades. Best installation I ever achieved! The trim is tight and even at the base of the glass, and ALL FOUR of the clips are straight and seated! [Editor] Replacement round clips are Volvo p/n 1345955 (black) and -4 (blue) from a dealer or IPD. If you installed washers to reinforce the slots, you will have to trim down the tabs on the securing clips.
More Lasting Reinforcement. [John Martin] My 945 came to me with the anti-rattle kit already installed and completely ineffective. I experimented with double-sided tape and adding shims to the anti-rattle add-ons, and none of it lasted more than a few days. My solution is to install reinforcing screws through the face of the panel into the structure of the tailgate, two on each side and four on the bottom. Placement of the screws up top is key. There's wiring and wiper system stuff that you absolutely do not want to damage. Mine are not elegantly arranged but these were the best placements I could find where there was a reasonable margin of safety that the drill bit would not go rogue and ruin something. See the photos for the locations on one side. The big screws are all #12 2" or 2 1/2", the small ones are #10 1 1/2". It is important to add a little nickel anti-seize to the stainless screws to reduce the likelihood of galvanic corrosion in the aluminum tailgate. It doesn't look very nice, but it is finally quiet.
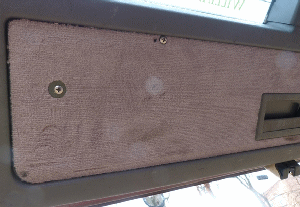
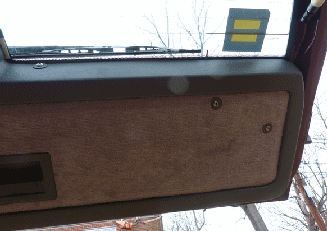
Removing/Repairing Left Cargo Area Trim Panel. This is the panel behind which is the gas filler tube. Note that there is not much reason to remove this panel, as the filler cap hinge can be repaired from the outside. This must be why it is so hard to remove. Removal instructions:
- Remove the left cover on the cargo area floor. Remove the plastic oval piece on the D pillar. Pry it out gently. Work the upper trim piece away from its clips. You can pull this out and nothing should break. Remove the three screws holding the aluminum trim piece on top of the tail gate gasket.
- Fold the left hand passenger seat forward to expose the seat latch. Using a Torx screw, REMOVE the lower front Torx screw. Slide the rubber piece off of the seat latch and REMOVE the rear screw. Now LOOSEN but do not REMOVE top front Torx screw. This should loosen this panel sufficiently.
- Remove the fasteners holding the front, and the rear of the panel. Turn 90 degrees with a flat head screwdriver.
- Now the fun begins. Pull the panel by the seat out and behind this at the front of the panel we are removing. You should see a white fastener. Pry this out with a screwdriver, needle nose pliers, or both. You will probably need to replace this fastener, as it is very brittle. Once this is out, slide the panel forward, working the three remaining clips out of the slots minded into the panel. You will need about an inch of movement. You may need to pull the bottom out to clear the gas pipe, etc. But, this panel will break if you pull up, or out. You can only slide this forward!
Removing Rear Floor Panels for Access to Fuel Tank and Pre-Pump:
[Tip from Rick] The access panel to the fuel sending unit is beneath the frontmost of the three panels covering the back/boot area. To remove it:
- remove the headrests and put the middle seats down using the levers on each side of the seats
- lift up the spring loaded trim panel just behind those seats
- unscrew the three nuts holding the panel assembly down
- lift the panel up about 10 degrees until the metal tabs clear the bolts that stick up, and then pull the panel assembly towards the front of the car. The panel is secured to the floor via two tongues that slip into brackets just ahead of the middle hinges between the wheel wells. The unit will just slide towards you and can then be put aside.
- beneath this panel you will see a square metal panel with 4 bolts. Undo the bolts and use a screwdriver to pry the panel up. it should just come right out.
- directly beneath you will find the fuel sending unit mounted on the fuel tank.
Cupholders. [How do I add cupholders to my 7xx/9xx car?]
[Solution 1:] I think I got the same cupholder, also from Caldor. A black plastic ring with a multitude of little fingers inside that grip the can or bottle or cup. I peeled the double sided tape off, opened the glove compartment, and stuck the cupholder to the inside of my glove compartment door, on the left side closest to the driver. The glove compartment door still closes if you're careful where you place the cupholder. This worked fine on my 1992 940GL.
[Solution 2:] I found an adjustable cup holder that is designed to mount on a flat horizontal surface. I then used plastic zip-ties to secure it to the e-brake handle in the center consol (each if these cars were auto trans equipped and using the e-brake was a rarity anyway). If you do it right, when the e-brake is down (off) the cup holder edges will be resting on the consol and be level and stable. Of course, you would have to remove the cup when pulling the e-brake (minor inconvenience for me). A bit of compromise here if you use your e-brake much, but this has been well worth it for me.
[Solution 3:] Use one of the generic cupholders with the strap through the top, designed to be held by the window glass. Discard the strap, cut the top off and round the edges with a file, and secure to the driver's door panel with 3M trim adhesive tape.
[Solution 4:] Buy a Husco Trac-Top armrest/cupholder combination for around $70. See http://www.husco.com/
Plastic Trim Repair. Adhesives. Some good adhesives for plastic trim repair: Goop; plumber's pipe adhesives (match the adhesive to the plastic type if you can ascertain it, for example ABS adhesive for ABS plastics); [Robb Roehrich] Aron Alpha by Elmers. This is the best super glue I have ever used. It requires great care, but generally ends up stronger than the latent material.
Reinforcements. [Tip from Allen Hendry] Plastic interior parts do break and crack. For weak areas(i.e. console tops, door pockets, etc.), or areas that have already developed cracks but are still intact, use a combination of expired plastic credit cards and five minute epoxy to repair/reinforce such areas. Just cut the card to fit the area, apply the two part epoxy according to directions, push the cutout repair piece behind the area you need to reinforce in a manner so that it does not show, and let it cure. You're done, and the area is now much stronger than before. I probably have about six square feet of such material in my old 300k 740 -- but the plastic still looks good! [Editor] For door pocket reinforcement, use the same technique but substitute the carbon-fibre reinforced plastic strips used to build model airplane wings. [Adhesive Tip from Don Prociuk] I have found that because so much of the car is ABS plastic you can use the ABS solvent that the plumbers use to join pipes. It sets solid and water does not bother it. It also works well to replace the lens covers on the tail lights. [Ted Yaffo] Use double-sided body adhesive trim tape and some reinforcement behind it.
Armorall on Trim. I decided to wean myself from Armorall after reading the BMW digest FAQ on leather and Vinyl care which severely criticizes its use. I have just started using Summit Industries' Vinylex. They're the same cats who make Lexol leather cleaner and conditioner. What I noticed was how it smells exactly like BRAND NEW VINYL.
Carpets:
Carpet Removal. [Editor] Carpets come in three pieces: front left and right and rear.
Front Carpets. To remove the front carpets for cleaning or replacement, move the seats all the way back, remove the kick panels on both sides, remove the covers to the front outboard seat tracks and the door sill protectors, and pull each side carpet out. You may need to remove the front seat bolts if the carpet is notched around them.
Rear Carpet. To remove the rear carpets, move both front seats all the way forward and remove the seat cushion. Remove the center console and tilt this forward on its front edge. Pry off the seat track covers by opening both front tangs and pulling back. Remove all four rear seat bolts. Unscrew the door sill protector trim. Gently pull the carpet out of the car. Installation can be a little tricky and may require removal or loosening of trim pieces to push the carpet edges back in place and of the front seat bolts to slip the carpet back under the rear rails. See tips in the seat section regarding how the seat track keys are mounted in the body if you move the seat tracks.
Carpet Cleaning. Once removed, the carpets can be easily vacuumed and shampooed. I use a hose to blast dirt out: it works very well. If you have odors in the undercarpet pads, clean them and use Febreze to absorb odors. Many detail shops will clean carpets for nominal costs.
Replacement Carpet Source. I found the web address of a company that sells molded replacement carpet for Volvos. $225 + $24.50 for shipping for a kit for my 740 seem reasonable for all new carpet. http://www.salesco.com
[Tip from Greg McNair] Get your carpet from ACC Carpets in Anniston AL....www.accmats.com or call them at 1-800-352-8216. I JUST installed my carpet from them, $175 delivered to my door. Very nice carpet, molded fairly well. Plan on spending at least 5 hrs doing this yourself, not including pull out time. I ordered the Sandalwood color for mine, took 2 days to make it, and 3 more to get it to my house. Despite a couple of mistakes I made around the shifter area, it looks factory new, and surprised the heck out of my local Volvo dealer. This is one piece, not 2 like the factory setup. If you aren't sure of the color, let them send you color samples free....any color you want. I am very pleased and will recommend them to anyone.
Water Leaks. [Dave Stevens] Most water leaks result from clogged air conditioning evaporator drains, leaves in the cowl screen, or leaking side vent panel gaskets. Before you tear apart your interior, first try to find the A/C drain grommet in the firewall, poke it clear, suction it out. If you're chasing a wet carpet problem like I was, then rather than methodically following the water leak back to its source, start with a quick and easy check like this. Excess moisture in the A/C condenser cavity will also lead to mold and associated odors which can be difficult to eliminate. Other tips are in the FAQ Heating section.