Radio and Antenna
Radio and Antenna PDF
Radio and Speakers:
Antenna:
Radio and Speakers:
[Inquiry:] After replacing my car batteries my factory stereo will not turn on. It displays EEEEEE message. Can you please help me fix this?
[Reply: Steve Ringlee/Rob Bareiss/Mike Heaton/Bob] You need to enter your four or six-digit radio anti-theft code after you turn the radio on. The unit will display Code or "rpt", after which you punch the four digits. If the unit won't accept the correct code (you have three tries before it chokes and displays Eeeeee) then turn the radio on, leave the ignition key at KP I for two hours(or go for a drive) to reset the unit and try again after two to four hours. On the CR-814 radio or SR-7145 radio/equalizer/cassette deckj, you have to enter a 6-digit code, then push the aut button after entering the code. The aut button is the upper button just to the right of the 3 button. To unlock the CR-814 radio, it has to remained connected and turned on for just one hour, during which time the code shows OFF. The SR-7145 has to remain connected and turned off for 24 hours. If you've lost the code, see below.
[Problem: Lost radio security code.] [Response: Bob] Codes are available from your local Volvo dealer if you have the car's VIN or the radio serial number. When a dealer replaces a radio, they are supposed to update the Volvo data base with the new radio code, but most seldom do this. If you don't have the VIN of the donor car, you must supply the dealer with radio model and serial numbers. Pull the radio and look for the serial and model number pasted on top. To remove it, follow this link.They may ask for proof of ownership before they give you the code. They should do it for free. While they are on the computer, ask them also to get your key code #'s if you don't know those. They could come in handy some day.
Radio Removal. [Inquiry] Does anyone know how to remove the radio from the dash of the 940 Turbo Wagon?
Earlier Radios. [Response 1: George Chow/Mike Gambone] To get the CR-814 out (and nearly all decks from the 7x0 and early 940), pull out the two knobs on each side. Pull off the knobs, and the rings behind the knobs (the AM-FM adjuster and the loudness control switch rings). To the outside of each of the shafts, in the unit, are metal spring tabs. Use a flashlight to see them. Use two very thin screwdrivers to hook each tab and lever towards the middle of the radio. This releases the spring locks, and the unit will slide out. You have to pull out while you lever the screwdrivers toward the center. Beware of the trim piece: don't flex it too much else it will break, nor should you use the trim piece to pull the radio out:: it's held by four tiny tabs at the corners, which will certainly break. Note as well that the top of the radio has two flat springs that act to dampen vibrations. They may hang up on the trim surround: just flatten them with a thin putty knife blade. [Tips from Jeff Pierce] If you still can't remove the radio, try this:
- Get some reasonably strong metal wire. I use the 14 gauge copper ground wire from Romex electrical cable. The chrome spring wires from the thick black paper clips also work: just bend them into shape. Or an old bicycle spoke.
- Cut 2 8"-10" pieces
- Bend one tip -- at about 1/4" to 1/2" in -- of each of them at least 90-degrees (100-110 degrees is even better)
- Remove the knobs and outer rings on both sides of the radio face.
- Insert the bent ends of the wires into the tabs.
- Pull toward the center of the radio, and then out. The unit should come right out. Watch out for the flat springs on the radio top: use a putty knife to compress these.
[Response 2: Red Fox] If it is the SC-810 radio, the vertical bars on front plate are the releases. Push them in with a screwdriver and they will pop out, then pull them out a little farther and this releases the radio to slide out. Note: If you don't know the security code for the radio, do not unplug it.
Later 940/960 Radios. The later 940 radios (CR-915) have two narrow slots on either side of the faceplate. Look inside these with a flashlight and you will see a flat metal spring. Insert a screwdriver into each slot and lever the spring inwards toward the center of the radio, then pull the chassis out. The cautions about trim pieces and flat springs above apply here too. Do NOT jam a scrwdriver into the hole as far as it will go: you will bend the spring clip and make it very difficult to remove the radio. [John Marshall] To remove the CR905, firstly pull the unit forward (very slight amount only is possible), by putting some fingers in the cassette opening; this moves the tip of the spring clip away very slightly from the side of the housing and helps in getting the screwdriver tip behind it. Using 2 very thin-shafted flat tipped screwdivers, put these into the slot openings each side of the stereo, angling the drivers at 30-45 degress inwards (handles towards each other) The screwdrivers need only go into the slots approx 1/4 of an inch, and their tips have to be pushed outwards against each side ot the stereo console housing as much as possible, so they slip behind the tip of each spring clip. When they have bottomed out, the screwdriver handles can be straightened out, away from each other, to bend the clips in against the radio chassis. It helps to have an assistant with their hand in the cassette slot gently pulling outwards on the unit at the same time, and voila, the unit releases. With one person, it is possible to release one clip on one side, and then the release the second clip whilst using the spare hand to pull the stereo out via fingers in the cassette opening.
Radio Box. Remove the radio box by removing the screws in the back holding it in place, then pulling it out while pushing the wires out through the hole in the rear of the box.
Radio Light Bulb Replacement.LCD Bulbs. [Tip from Colin Roberts :applies to UK cars] I posted a msg here some time ago about my radio LCD display not being lit up, seems other people had similar probs, all the buttons were lit, but not the lcd, i have now stripped the radio down and found out how to replace the lights, Well, no one could help me, so out came the radio! All that is behind the display is 2 capless bulbs (12v.) Here is the method for those of you that are good with a soldering iron and can do very fine work.
First obtain 2 or more 12v very tiny capless bulbs, these are about 4mm long with just wires coming out from the bulb, ( i have these as I work for a company that used lots of different types of bulbs) Remove the top and lower panels, and also the facia panel , (after removing all the knobs and tape button). Disconnect the 2 plugs from the tape unit, then remove the 2 bulbs (could have yellow wires on) from the front of the tape unit. Remove the tape unit complete, on the front main inner panel there are 3 screws that have to be removed, this allows you to pull the panel out from the chassis, (not too far though) on the back of the pcb there is a black plastic panel, this has to be eased away from the pcb as well. NOTE : the pcb will only come out about 1/2 inch as it is connected to the main pcb by 2 ribbon cables, DO NOT OVER STRETCH! Now for the tricky bit, look at the lcd display, it has a box round it, this has 4 tabs holding it to the pcb, carefuly prise the tabs up and then remove the box, and you will see the 2 bulbs !
It is a bit of a job to desolder the bulbs, but it can be done and fresh bulbs fitted, the old bulbs will have a green rubber cover on them which should be put onto the new bulbs before they are fitted. If you feel that it is a bit too tricky to replace these bulbs, I would think that a local radio repair shop could do it, if the radio was stripped down right up to the point when you can see the old bulbs, all he would have to do is de-solder the old bulbs and fit new ones, then you could re-assemble the radio yourself. PS: If you took the radio to a local repairer, not stripped down, he would probably say it could not be done as it needs special bulbs. But I now know better!
CR 915 Radio Bulbs Burned Out. [Inquiry] A couple of the microbulbs that light up the facepate of the radio have burned out. I replaced with 12 volt bulbs (required some soldering) and they work but are too dim. Have learned that they should be 6 volt microbulbs. [Bob Kraushaar] Radioshack.com has what you are looking for: Miniature Lamps, 6 Volts Catalog # 272-1140 for $1.29
SC 815/816 Radio Bulbs Burned Out [Tip] Today I took on the challenge to open my SC-815 to replace the burnt light bulbs in my 96 960. Every single bulb was out and it became especially irratating when the LCD light went out last night. Southwest Automotive suggested the HONDA dealer where each bulb (bracket/socket included) is sold for $1.50 each. Simply remove the old, and insert in the new. The honda socket is a little smaller but fits perfectly. You'll need to use the blue rubber bulb covers from the old bulbs because the honda dealer bulbs are clear. [Oliver] Volvo part number 9148908 (Bulb SB021) which lists for 11.76 is a perfect fit. Use the blue bulb covers from the old bulbs on the new, clear ones.Radio Static in 740. [740 has radio static on the AM band; how do I fix it?]
[Solution 1:] I use to install car stereos and one way I used to get rid of the audio tach was to clean the terminals on the alternator. If your Volvo has a separate voltage regulator, unplug the regulator and twist the wire bus one or two times. So it looks like a rope. This will screw with the RF radiation that the alternator makes. Make sure you clean the contacts and put some dielectric grease on them prior to connection. Make sure you DISCONNECT THE BATTERY before starting or you could fry the regulator. If anyone has questions about stereos problems, feel free to e-mail me KEITHPOND@aol.com
[Solution 2:] Regarding Kirk's recent AM radio static in his '90 740, I had an identical problem. I have no idea what precipitated this, but I had been doing the normal tuneup items like replacing cap and rotor, plugs, etc. The only real before-after delta was some body work which required re-aligning the front driver's door hinges, and I suspect that the body guys mucked around the wiring harnesses in the process. I ended up ameliorating (not fixing) the problem with the following:
- antenna filter from Radio Shack on the antenna lead behind the radio
- power filter (also RS) behind the radio
- additional radio chassis ground from the back of the radio to the chassis on the left side of the passenger footwell; this is just a wire, two lock washers and two screws.
- follow the Volvo TSB number 39-112 dated January, 1990 about how to solve the same problem: solder an additional antenna housing ground from the antenna bottom tube (inside the car, where the telescoping tubes go up through the body) to the body of the car using a wire, screw and lockwasher.
Radio Static in 960. [Paul Guzyk] The radio in my 1993 960 Wagon would only play static. I though it was the antenna but changing antennas didn't help. I found after opening the case that a daughter circuit board on the right hand side would short out against the right side of the radio case, mainly in the rear section of the radio where there are metal components on the daughter card. Using a piece of thin cardboard, I pulled the daughter card to the left and jammed in the cardboard to prevent it from shorting. Problem solved.
Radio Cassette Flashes Head. [Inquiry:] Shortly after we bought the 745 this past June, I noticed the word 'HEAD' flashing on the stereo when a cassette was playing. [Response:]As I recall, this head indicator is connected with a timer built into the stereo. After 20 hours of tape playing, the player indicates a cleaning is in order. The timer must be reset manually. All you have to do is press the right right hand tuner button while the tape is playing and hold it in until the head indicator resets itself.
Radio FM Section Failed. [Tip from L.K. Tucker] I finally took the covers off a pushbuton Volvo radio. The problem with no FM in most alll Volvo radios is probably an ignition noise suppressor diode package in the antenna circuit. (Failed shorted) A fifty cent part. From the schematic symbol silk screened on the circuit board it is a switching diode pair. Removal brings the FM back as long as the engine is off. The spark plug pulses suppress the gain control circuits and the radio won't work well on the road without this diode package.
The part id is AG 20 and the name is TAIYO. I think any small voltage switching diodes can be wired to replace this part. I have down loaded Mouser and ordered Digikey but not located a close replacement. Does anyone have a supplier for this particular part? A radio repair parts site emailed me that Clarion, California is the US supplier for Volvo radio and Robert Bosch, Chicago is the US company for Blaupunkt.
CR-915 Failures. [Dave Stevens] Depending on the market, many later 940's got the CR-915 with auxiliary CD capability and an integral amplifier. While some people are lucky, the CR-915 is rather failure prone suffering from dead front panels and locked up tuners and can be quite problematic as they age. Symptoms include all (or some) front panel buttons locking up, stations not changing, no volume. One radio totally locked up and had to be replaced. On two other radios I've had erratic behaviour -the radio would not work for a few days, weeks or months and then would suddenly start working. One of those radios I've replaced. The other I'm still living with as the problems seem to have subsided except for lack of volume after the car has been sitting for a while, but just turning up the volume to full blast for a second seems to cure that. There seems to be no pattern related to hot/cold/humidity. Disconnecting the battery and attempting to reset the radio didn't help.
Opening up the radio and wiggling/reseating connectors and re-soldering some of the major components didn't help. I highly suspect that failed/failing capacitor(s) are the source of the problem. Few shops will work on them -not worth the labour charges let alone the parts, although Volvo did offer a "rebuilt" exchange program for about $150 through dealers.
For now I've found it simplest to keep replacing the radios with used Volvo ones (maybe $50+ ea) despite their mediocre sound quality. As you know, it's unlikely you'll find an aftermarket radio that will control your existing Volvo cassette player. Most aftermarket radios will of course have MP3 capability. Many will also have integral CD players. Note that the CR-915 has a built-in amplifier -you'll normally want/need to go with a separate amp. Most will have four channel output, so for the dash tweeter speakers just wire them in parallel with the front door speakers. I also understand the Crutchfield adapter face plates may not sit as flush in the dash.
For diagnostics, the harness wiring for the CR-915 according to the green bible is as follows:
Main radio harness 13-pin connector (for large 14-pin radio connector):
pin 1 (brown/white) left dash speaker (+)
pin 2 (grey/red) right dash speaker (+)
pin 3 (brown) left dash speaker (-)
pin 4 (grey) right dash speaker (-)
pin 6 (yellow/white pair) night dimmer (from headlight switch & relay)
pin 7 (white) dash dimmer (+) (connected to dash lighting rheostat)
pin 8 (blue) dash dimmer (-)
pin 9 (green/red pair) +12v from battery (and to optional CD player)
pin 10 (black pair) chassis ground
pin 11 (orange) +12v from ignition (via fuse 14)
pin 12 (green/grey) power antenna motor control output (switched on/off with radio on/off) or power for in-window antenna amplifier (see note below)
pins 5,13 (not connected)
Speaker harness 13-pin connector (from small 10-pin radio connector):
pin 2 (green/orange) left front door +
pin 6 (orange/black) left front door -
pin 3 (orange/white) right front +
pin 7 (black/orange) right front -
pin 8 (blue/pink) left rear +
pin 12 (brown/pink) left rear -
pin 9 (pink/white) right rear +
pin 13 (pink/black) right rear -
pins 1,4,5,10,11 (not connected)
The DIN connector on the back of the radio is for the optional Volvo CD changer. There were only one or two models of aftermarket CD changers that worked with that connector. In the later 940 wagons there is no power antenna to bend or break. The radio antenna is in the left rear quarter panel window glass and has a signal amplifier at the window antenna connector.
In sedans, any rear shelf (low ohm) speakers are simply connected in parallel with the rear door speakers. In alternate radio configurations with only 4 output channels, the front dash (low ohm) speakers can simply be connected in parallel with the front door speakers. The front/rear fader control can be used to adjust for these extra speaker small loads as needed.
[Inquiry] I have a 1992 960 and it has a problem with the amplifier circuit. When I try to put a fuse where the amp circuit is - fuse 32 I believe - it fries instantly. Does anyone know what this can possibly be? Or where the amp is located?
[Response: Jeff Wickersham] Your amp has probably short circuited somehow and crossed a soldered positive lead with a ground. The amp is located above the drivers side knee panel, to the left of the steering wheel. There are two bolts holding it to a securing point, and a Bosch relay or something is attached to the amp itself. The amp has a rectangular connector which connects it with power and the speaker wires, and a din cable coming from the radio. Disconnect the amp, then turn the key to acc and put a new fuse in. If the fuse blows the problem is in the wiring, if not, it is in the amp somewhere. You can find a used amp for a reasonable price.
Radio Wiring Color Reference. Your Volvo uses unique non-DIN connectors in the radio and amplifier. To wire an aftermarket audio system correctly, you should have a good wiring diagram (the OEM Volvo wiring diagram book is the gold standard). For 940's with CR-915 radios, see above. Always test wires to make sure they are correct. To check hot, ignition, lights, dimmer, use a test light or voltmeter. To check speakers use test radio. To check speaker polarity (assuming you don't have a polarity tester): Touch (for a very short period of time) one wire to the positive side of a 1.5-volt battery (any size), and the other wire to the negative side. If speaker pops out, then polarity is correct. If speaker pops in then polarity is reversed. Make sure that the wires you are going to check for speakers do not have any power.
Adding an Aftermarket Radio. [Mike Heaton] To replace your radio, you'll need a new radio and a kit / harness. You may also need a mounting kit. You can add a new radio without a new harness but go ahead and pick one up as it makes life much simpler, especially if you ever want to put the factory radio back in. Which kit / harness? To find out which kit and harness works on your car, go to http://www.crutchfield.com. Enter your cars information, then add any head unit to your cart and proceed to checkout. At that point the right kit and harness will be added to your cart, you can click on them to see them. You can buy them from Crutchfield for $20 each plus shipping, or for $15 or so from a local stereo installer. If you buy from the installer make sure the harness looks like the one from Crutchfield. Behind the radio there will be a wiring clip and a round plug. The round plug contains the speaker wires which goes to the amp and then to the speakers, and the wiring clip will contain the remainder of the wires. Your harness will have two clips, one of which will go into this clip behind the radio, the other of which will connect to the clip that is in the amp. So, find the amp (a silver box ~ 1" x 4"x 4", with silver vents all around, located just behind the dash above the driver's left knee), it will have a clip in it plus the same round plug you saw in the back of the radio. Undo the clip and connect the harness clip to it. You may need to add wire extenders to get the wires from the harness (the speaker wires) back up to the back of the radio. The amp will be disconnected (by-passed) at this point. Connect the other half of the harness to the clip behind the radio, connect all of the appropriate wires and put the radio in with the kit. For my '93 945T, the harness was a Metra model 70-1120. This is the same harness as is used by the 240 series; it is different than the harness used by the '93 960.
Tutorial for Installing Stereo into Volvo 940: see Kevin Sullivan's writeup of his experience, including wiring guides. Another very good source of information fromThe Install Doctor: http://www.installdr.com/InstallDocs/Volvo/PDF/865001.pdf
Adding an Aftermarket CD to Volvo OEM Head Unit. [Editor] Your OEM stereo unit is made by Alpine. The only proven CD changer that works with these Volvo/Alpine OEM head units is the CHM-S620/630 series. Whatever add-on CD changer you buy, make sure that it is compatible with the M-bus electronic data bus used by your factory radio. For more information about system compatibilities, see the following links:
See also the following links to understand more about integrating CD players with Volvo radios:
Adapter Needed to Integrate Aftermarket CD with OEM Head Unit. [Inquiry:] What adapter do I need to add an aftermarket CD player to my 91-95 Volvo 700/900? You need the VOLALP adapter from one of the peripheral interface companies (who also selll kits for '96 and newer Volvos that need the digital converters):
- Stinger Electronics http://www.stinger-aamp.com
The retailers listed above carry this part along with cables and other parts. Caution:[RJK] Be careful which adapter you get. There are 2 versions of the VOLALP adapter, one with DMX & one without. I was warned by the local Hi-fi Buys installer against using the DMX type adapter in the 700/900 series. It can ruin your day as well as the components. The adapter without DMX may be had through the retailers above who are supplied by Peripheral Electronics. [From Blitzsafe] Volvo radios with CD changer controls from 1991-1995 can interface using a VOL/ALP V.1 with Alpine changers S600, S601, S611, S620, S630 (S604, S614, and S634 require Alpine adapter KCA-130B.) This interface is designed to plug directly into the Volvo radio and to the aftermarket CD changer cable (not to the factory cable if prewired)
Cable Needed. Adding an aftermarket changer in a car with the Volvo OEM cable will require a new cable: Volvo thoughtfully made the ends reversed to prevent exactly this situation. Buy an Alpine-compatible cable and install it with the VOLALP adapter at the front, near the radio.
Where to Mount It? In a sedan, mount the CD changer horizontally under the rear package shelf in the trunk/boot by screwing the mounting bracket to the metal frame on one side. In a wagon/estate, mount it vertically in a rear side compartment under the removable floor board. These units really do not fit in the glove box or under the seats.
Routing the CD Wiring Cable. [Tip from Paul/Peter] I ran the CD changer cable from the radio to the trunk down the right side sills of my car. It's a simple matter of popping off the door sill plates and running the wires under them and around the B & C pillar trim. It's a pretty quick job. [Chris Herbst] It's much easier to route the cable around the sides than to bring it down under the center console. Pick either side: the only harder thing about the left side is the driver's side knee bolster for the SRS system. Other than that it is pretty easy. Also don't mess with the wires for the seat belts (92 and up models) as they can cause an SRS light. [Jay Simkin] On the driver's side, the door sills form a conduit, along which the radio antenna wire runs from the trunk/load space to the underside of the dashboard. To access this area, you'll need to remove the three plastic caps over the screws, that hold the the front door sill moulding (plastic). You'll also need to remove the bottom cap in the "B" pillar (use a small, flat-blade screwdriver, to pry out the cap). Once you remove the screw (T-20, I believe) you can gently pry loose the bottom of the B-pillar cover.
Once that is loose, you should remove the plastic cap, over the screw, that secures the rear door sill moulding (plastic). To remove the moulding, pull it gently, towards the front of the car. You should now be able to run the wire from dashboard, to the point where you need to fish it into the trunk/load space. Working from the point, where the wire heads under the rear seat, you should be able to push a piece of coat-hanger wire - the end of which you've doubled-over, so the tip is rounded - along-side the antenna wire. When you double-over the wire, put the end of a length of nylon seine twine and crush the wire over it. Once you push the wire past the rear seat and into the trunk / load space, you'll have a piece of seine twine, to which you can tie the ends of your new wires. Make a slip knot in the seine twine. Put the wires through the loop. Fold the the wire over on themselves, leaving a 2"overlap.
Use electrical tape to form a smoothly tapered "cone" (like the nose cone on a rocket) in front of the loop in the seine twice, to the point, where the ends of the new wires are covered up. You should be able - from the trunk or load space, to pull the wires past the seats. If the wires stick, resist the urge to yank. Go back to the passenger compartment, and pull back a couple of inches. Then, try again.
CD Errors and Malfunctions. [Inquiry] What does E01 designate on my CR-814 (trunk mounted) 6 disc changer? Tape and radio are working fine, but can't get the CD player to even pop out discs. [Response: Brandon] Take a look inside and see that all the CD's have gone completely into the cartridge. It's usually disk 1 that doesn't go all the way in. Use a very small screw driver to get that disk in so you can pull the cartridge out.
[Response: Brian] When I had that code, the eject button on the changer didn't work. You can use a credit card to eject the cartridge - slide it under the cartridge and it will pop out. Empty out the CDs and put the cartridge back in, then use the credit card to eject again... any more CDs show up in the cartridge? The other thing I did was spray contact cleaner on the cable end and socket at the back of the changer. Has been working great since I did this 2 months ago.
[Rob Bareiss] If the factory CD changer has a disc jammed inside, look on the front of the case for a very small hole, below where the cartridge slides in (on the inner part, inside the door) into which you can insert a paper clip or other stiff wire to release the changer mechanism. If this doesn't do it, I'd recommend going to a shop that sells Alpine units- the Volvo unit is an Alpine 6-disc and they would have the best chance of getting it open for you with the least damage
[Scott Pilkington] With the ignition off, pop the CD holder unit out, and reach in and turn the disc inside the player a few turns with my fingers. When I power the car back up, the disc always has ejected.
Adding an iPod or MP3 to Your Radio/CD. [Editor] You can use an iPod with your radio by buying one of several adapters made for this purpose. The cassette and FM radio antenna adapters, while cheap and widely available, appear to lack audio fidelity. A more labor intensive solution is to acquire one of the M-Bus Alpine-compatible wire-in adapters and add the iPod tap to the CD wiring port at the back of the radio. This apparently also keeps your iPod charged, but disconnects your CD player if so equipped.
Theft Concerns. [Tip from Chris Herbst] Some moron broke into my mom's car last night. I went to check it out--the usual damage. Passenger side window broken, CD player torn out of the dash. The SMART thing I did when I replaced the stereo was, I didn't bolt it to anything. I just put it into the dash with the aftermarket install faceplate and left it sitting in there. I have done that kind of installation a million times. Never, EVER bolt your stereo into the dash in the hopes that it will save it from thieves. They will hack the dash before they give up on the stereo. One stereo gone, one window broken--but that's where it stopped. Other than a little inconvenience and about $150, the problem was minimal.
Speaker Removal. [Tip from Tom Irwin. Applies to 960 and in some cases 940]
Front Dash Speakers:
- Use a thin blade to lift up the edge of the plastic strip at the bottom of the grill. Rock it side-to-side...it pops out. Remove 2 T-25 screws that hold bezel in place...remove bezel by lifting slightly and withdrawing towards you. Speakers are held by a slot at the top and 2 trim fasteners at the bottom. Use a pen or slim screwdriver to push the center pins down on these fasteners, then lift the outer edges up with a screwdriver. NOTE (to reuse these clips, once removed, push the center pins back up and out of the clip, squeeze the expanding portion of the clip and they are ready for reuse.) Slide the speakers out DONE!
Rear Deck Speakers:
- Remove Center Mount Stop Lamp: Push up on locking tab beneath, pull entire stop lamp assembly toward front of car.
- Remove Rear Seat Bottom Cushion--About 6 inches in from either side, on the leading edge are latches that hold by way of foam compression. With the palm of your hand, PUSH IN...Then DOWN, Then lift up and away, both sides.
- Remove Rear Center Headrest--Extend upwards...lift and unsnap lower section of plastic cover. Then remove 2 phillips trim screws on upper part of plastic cover..really have to pull up on the headrest as you do this..set plastic cover aside...Remove 3 bolts w/10mm heads...withdraw center headrest.
- Remove Seat Backs--Find metal tabs at right and left lower corners, bend slightly upwards and pull lower part of seat backs outward. Lower the center armrest to about 45 degrees. Push up on seat back until upper corner tabs/slots come free, pull entire seat back ass'y forward over and away from center armest. CAUTION.. feed 3 seatbelt straps carefully over seat back as you withdraw it from car.
- Remove 2 Remaining Headrests--Take out 2 bolts w/ 10mm heads, each side, remove reinforcement plates, withdraw headrests and set aside. Remove 3, T-25 screws that secure Rear Deck Panel.
- Remove Deck Panel--CAUTION Feed 3 seatbelt straps sideways and CAREFULLY out of the plastic grommets. The right and left grommet/'wing' extensions are VERY weak and will break. Be careful when withdrawing Rear Deck Panel from car: the side molded extensions are likewise very weak and may break if they contact the car frame.
- Remove Insulating Pad--Just lift it up and away.
Remove Speakers-- 2 Screws 2 Slots each No sweat. New 6"x9"'s fit the hole perfectly w/o mods..BUT, the screw holes don't line up. (Euro Spec) A Drill w/Right angle attachment would be nice...or drill from underside, in the trunk. - Electrical Connections-- I used the Factory Wiring Diagram. GENERALLY the wire with Black Stripe is Negative. BUT DON'T TRUST THAT!! Check it out for YOUR CAR SPECIFICALLY. Lastly, I recommend using a layer of double sided mounting tape (or Equivalent) where the speaker frames rest against metal. Keeps everything nice and tight and eliminates source of squeaks and rattles.
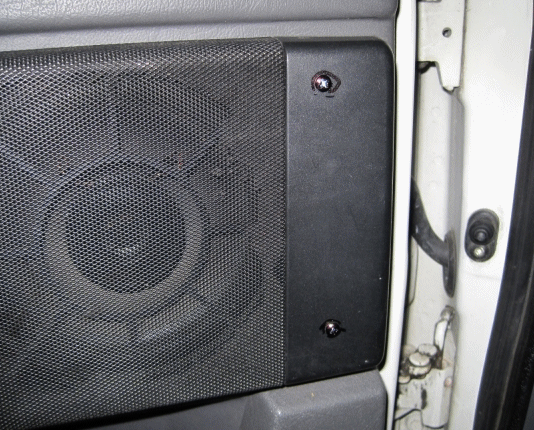
Door Speakers:
- Push the plastic speaker cover forward toward the front of the car to pop it off the mounting posts. If stuck, push in on the door panel while pushing the cover forward. The 5-1/4 inch speakers are riveted into the door panels. Drill out the rivets to remove the speaker or cut off the rivet heads with a cold chisel and a sharp tap with a hammer. Replace either with new rivets or screws and nuts with Loctite to prevention loosening. Inspect the harness to make sure the insulation is intact as it passes through the door post. [Herb Goltz] Speaker covers often break at the bottom mounting clip, causing them to loosen or fall off. The red plastic studs sometimes break too.
Door Speaker Cover Removal and Repair.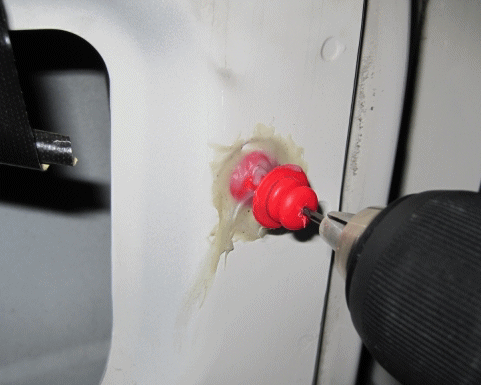
- Removal: Push the plastic speaker cover forward toward the front of the car to pop it off the mounting posts. If stuck, push in on the door panel while pushing the cover forward.
- Repair.[John Sargent] As anyone who owns a later 700 series, any 940, or an early 960, the
front speaker grills are junk. They are used to hold the door panel
on and over 90% of them are broken. New front speaker grills at $25
at the dealer. Not bad, but you can save some money with my method.
I glue the red mounting posts to the door with epoxy so they won't spin when you turn a screw into them. The picture shows the epoxy and drilling the center of the mounting post. I started with a small drill bit, and finished with a #30. I drilled the speaker from the back side, so I could see the approximate
center of where the head of the red mounting post would be. I used
#6x1" sheet metal screws to mount the speaker cover and touched them up with a Sharpie. An alternative would be to epoxy (using Devcon brand Plastic Welder) a speed nut on the back side of the
door, in place of the red post, and use longer sheet metal screws.
Speaker Installation. Crutchfield has an on-line "what fits my car?" application to help you purchase the appropriate sizes. Note that door speakers are shallow and that only those less than two inches deep will fit. Installation is the reverse of removal noted above. Note as well that many 700/900 cars have rear door speaker wiring already installed; you can add the speakers to fit the space. Just make sure you buy the correct size and depth.
Antenna:
Antenna Won't Fully Retract. I futzed with both power antennas on my 740's, and have come to the conclusion that the mast must be kept meticulously clean, otherwise it will may not fully retract. So, whenever I tank up the car with fuel, I grab a paper towel, wet it, and run it up and down the mast a few times. Also, it took a lot of cycling of the mast(s) to get them completely cleaned of years of accumulated pukey. I used WD40/Liquid Wrench/ other similar spray lubes on either a paper towel or shop rag. Then commenced to cycling the mast(s) and rubbing (Imagine what the neighbors were thinking: some sort of fetish, rubbing your mast with a rag...!) But, it worked. Usually, I wipe them down/clean them about once a week as a part of the routine carwash/vacuum. [Editor] My favorite antenna lube is one of the mountain bike wax-based chain lubes, such as Pedro's Ice Wax. Works great.
[Another note:] I have also seen it recommended (in the Popular Mechanics Auto Column) that after you clean off your antenna mast that you get a piece of waxed kitchen paper (such as Cut-Rite) and rub it on your mast. The paraffin off the paper keeps the mast slippery.
[Another note:] I had little success in getting my 780 antenna to retract completely, despite numerous attempts of all sorts. The PO had had the mast replaced (after it was broken off because it didn't retract completely...) but he never got it to work right before or after the replacement. I have now solved the problem and, since I understand it is a fairly common one, here are the steps (usual disclaimer - this is for extreme cases):
- Make sure that the mast is not in any way bent. Check by putting something straight (such as a ruler) against the mast and turn it - do not trust your eyes.
- Remove all the grease from inside the main assembly (the black thing inside the car) - the grease prevents proper grip on the mast's tail and isn't necessary to lubricate a mainly nylon mechanism.
- Cut off whatever is not useful from the mast's nylon tail (about 2 inches in my case). This is a simple way to reduce drag. To find out how much you can cut off, extend the antenna completely (I did that by turning on the radio and disconnecting the antenna in extended position). Check 5 times before you cut!!!
- Keep cleaning the mast. I have taken to wiping it off every other day or so with a dry tissue and there is still a little dirt coming out (even though I cleaned it frequently both before and during opening up the whole thing...).
Upon reassembly the antenna retracted completely most of the time. Now, a few weeks later, It retracts 100% of the time. At this point, I am not using any lubricant when I clean the mast. I will of course have to in due course, but an excess of lubrication seems to create problems.Leaving the Antenna In the Up Position. [Inquiry] I would like to disconnect a wire or in some way disable the power antenna when it is in the UP position so it will be up all the time. Can this be done? [Chris Mooney] With the antenna fully extended (radio powered on), disconnect the 3-wire connector in the trunk/boot which powers the antenna motor.
Antenna Mast Basics:
The mast and the nylon line come in one unit - about 20 bucks or so, so don't bother trying to fix the existing one. The mast is attached to a nylon cog line that rewinds down 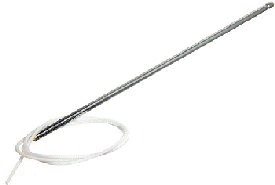 into a housing attached to the motor. When the line breaks, the end can remain in the housing, in which case you need to loosen the unit to open the housing enough to get the piece out. The nylon cog has gear teeth on one side: these teeth face the front of the car and are gripped by the rotating gear inside the motor case.
Removing the Mast:
[Kenric Tam] To remove the old mast, turn off your radio to retract the antenna as far as possible. Undo the fixing nut at the antenna base on the fender or roof top and remove it by pulling it up and over the retracted antenna. Then have someone turn on the radio to raise the antenna and while you hear the motor going, pull up on the extending mast to remove both the mast and nylon cog line. You can do this by yourself too if you're quick enough to run back and forth. Once you get it out, remove the small metal retainer sleeve at the bottom of the old mast for use with the new one.
Compare the old mast with the new one. If the nylon cog line is shorter on the old one, you've got plastic cog left in the motor assembly and you mayl have to open the motor case and pull it out (see instructions below.) Don't cut the new line to match the old one unless you KNOW it is too long. First try removing the interior panels to get to the bottom of the antenna tube and removing what's left of the nylon/plastic cable. If this does not work, you have to remove the power unit.
Inserting the New Mast:
The insertion part is a bit easier. Make sure you have inserted the little metal sleeve from the old mast onto the bottom of the new mast. Then, with the radio "on" and the teeth of the nylon mast cable facing the front of the car (not left, right or back) feed it in while turning the radio off, trying not to rotate it. It may take a couple of tries to get the feel of the end of the cable going through the tubing and hitting the spool of the power unit. You know you're there if your assistant turns off the radio, with you pushing gently down on the plastic cog cable, and the cable gets grabbed by the spool. Once it is, (watch out the mast doesn't whip around and get you), insert the mast as it is winding up. Then tighten the mast nut and cyle the radio power 5 times or so. It will eventually take up the slack it detects, and you're done. This part is really only five to fifteen minutes, even for a mechanical klutz. Lubricate it afterwards (but see below: not too much).
Mast Won't Catch in Motor:
[Editor] If you can't get the motor to catch the nylon mast end, it's probably because of accumulated dirt and grease in the motor takeup reel. Remove the antenna motor from the car (see instructions below) and degrease the takeup reel. Don't overlube your antenna to avoid similar problems. Clean the exposed section of the mast regularly (like every oil change) using a rag moistened in WD-40.
Piece of Old Antenna Caught in Motor:
[Inquiry] While trying to insert the antenna mast the motor seemed to stop with about 3-4 inches left over. Do I need to trim the white part or is there something obstructing it in the motor? [Response: Dave Stevens] A broken piece of the old tail gear is likely still caught in the drive mechanism. If you compare the length of the tail gear on the old and new masts you should see the difference. You'll need to open the gear case at the motor to pick it out (see below)
Mast Stuck and Won't Come Out: Removing the Motor Unit
[Inquiry] I can't get the mast out of the holder. I think it is bent: if I pull it, the fattest tube (the last one) only comes out about 4 inches, and then it gets stuck. [Response I too had trouble getting the mast out, and so resorted to taking out the whole unit from the car, and opening up the motor. It sounds scary but it is not a big deal. The inside of the unit is basically a plastic basket or spool, that simply grabs the teeth of the cable. Disconnect the wiring, antenna cable, and the big nut on the body which is holding the unit. Unbolt the motor in the trunk. The bracket that holds the antenna motor can fall through the holes in the sheet metal, if you are not careful. [This necessitates fishing it out from between the molding and body and then figuring out how to get it back into the holes. Putting in the lower one first, then rotating the threads until the upper stud is in the hole will do the trick. Avoid this issue by putting the nuts back onto the threads, so that they don't fall back out.] Disassemble carefully, keeping all parts in order, by removing the central nut from the round takeup device. There is a silicone gasket, so try not to pry it. No need to remove the motor itself. There is one snap ring inside holding the takeup reel on the main shaft. Remove this reel (the large gear) and degrease it, along with the circular mast storage reel above it, the small guide rotor, and the input shaft. Carefully lube the shaft and reassemble. Then follow the instructions above for reinserting the antenna mast.
[Inquiry] I was cleaning and lubricating the antenna on my '91 740 sedan as a part of routine maintenance when I got distracted and the radio got turned on or off - I don't recall which. But it caused the plastic strip that pushes the power antenna up to come completely out of the tube. I assume this goes down into some sprocket or geared wheel of some sort. I tried to simply place it back into the tube but it doesn't grab or do anything. I also turned the unit on hoping it would grab and re-feed itself but nothing worked that way either. The plastic piece I am referring to is has notched teeth on it just like a timing belt. The end, strangely has no metal piece or any special shape to it that would connect with any part down in the tube in any special way. It just is a certain length of plastic with these notches in it, that feed into something. There must be some kind of gear down in the tube? Or is there a hole that I am missing and need to get in back into?
[Response 1: Rick] You're on the right track (no pun intended). Turn the radio on and push the plastic feed into the hole until it stops, then turn on the off and it will feed it self into the gear box. If it doesn't work then take the cover off the box and hand feed it.
[Response 2: Tom Irwin] Rick is completely correct. The length of nylon track goes through a couple of guideways on the way down, so don't be shy about giving it a gentle push to ensure the track is in the gearmotor assembly before switching off radio and engaging retractor motor. Only one more thing to mention, if it doesn't work at first...change the orientation of the track/gear/teeth. That is, if it doesn't grab right with the teeth facing the back of the car...then turn the assembly 180 degrees around so the teeth face the front of the car. Then, turn the radio off and the retractor motor should grab it up right away and pull it back down the hole.
[Inquiry:] The power antenna on my '89 760 is stuck in the fortunately) up position. The motor still cycles on and off, but the antenna doesn't move. There's some play (up and down) in the antenna, and before it stopped moving it sounded like a gear in the unit was trying to engage but couldn't. The unit (in the trunk) looks sealed. I haven't removed it - yet. Can I rebuild it?
[Response 1: Michael Pardee] The power antenna unit can be opened, but the usual failure mode is the breakage of a plastic caterpillar track which changes the rotary motion to an extend/retract motion. Repair is probably hopeless. [Response 2: RLS] Volvo sells a replacement mast, including the nylon caterpillar, which can be (carefully) wound back into the motor/gear housing. It costs about forty bucks. I replaced my antenna, which would only extend about 2/3 of maximum, with a $9.95 permanent mast purchased at AutoZone.