Volvo Headliner Replacement
Page 1: Headliner Repair: Introduction and Prep
Page 2: Removing Headliner Panel and Sunroof Headliner
Page 3: Headliner Repair: Board Repair, Fabric Replacement, and Reinstallation
Note: this excellent illustrated article on Do-It-Yourself Headliner Replacement from DIYNetwork.Com summarizes an episode of Weekend Mechanic. This has been edited to include a variety of Brickboard tips from Volvo owners and OEM instructions from Volvo Technical Manuals.
1. Headliner Repair: Introduction and Prep
The problem: Our project car, a 1990 Volvo 760 Turbo, has one of the more aggravating problems that can occur in a vehicle's interior: a sagging headliner. This sagging typically starts at the dome section of the car's ceiling and works outward as the fabric cover separates from the foam backing on the contoured board. Though some people try temporary or partial fixes using tacks or T-pins, that solution is never permanent, and sticking pins throughy your headliner could damage electrical wiring. Permanently fixing this problem, and doing it the right way, requires removing the headliner board from the vehicle so that new headliner fabric can be glued on. The headliner should never be repaired inside the car.
DIY Difficulty Rating for Repair: This job is fairly straightforward, and something that seasoned or novice do-it-yourselfers can undertake. We gave it a difficulty rating of 2 on a 5-point intermediate-level scale. Depending on the severity of the difficulties encountered, this project should be one that can be finished in a single weekend. Allow yourself about 12 hours to complete this project. Estimated DIY cost for the repair is around $100. The trickiest part of the procedure is removing the headliner board from the vehicle without breaking it.
If you choose to have this job contracted out, expect a price range between $300 and $450 for the entire job.
Materials:
IPD sells a complete headliner repair kit for about $175 including instructions and all the materials you will need. If you do this yourself, you MUST use 1/8" headliner EVERYWHERE, not just on the sunroof. Don't listen to what anyone else tells you... ask for 1/8" material. If the fabric store you visit doesn't have it have them order a new roll or go elsewhere. The reason for this is that the headliner must go under various edges around the car (including under that plastic edge at the sunroof opening) and the 1/4" material is too thick to fit. The 1/4" material is also much heavier and will pull off the headliner backing board over time faster than the 1/8". For adhesive, 3M makes a spray glue (3M General Trim Adhesive - Clear Part No. 051135-08088) made specifically for this purpose. Use this glue; do not use cheaper grades or brands since they will fail.
In addition to standard auto-mechanic's tools, some of the specialty tools that will be needed for this project include glue gun, torx screwdrivers, wooden spatula for prying trim panels, steamer or hot air gun, whisk broom, coarse sandpaper, duct tape, and heavy-duty scissors. Safety equipment includes ear protection and eye-goggles or protective glasses. Removing and installing the headliner board itself is a two-person job.
Prep Work
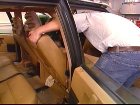
- Begin by removing the front seats from the vehicle (figure A). This will make it much easier to get the headliner board out of, and back into, the car. Removing the rear seat in a sedan will make it easier to remove trim panels. Also recommended is removal of the center console. With these out, you can remove the headliner through the passenger door with only very slight bowing. In a wagon of course, you can remove the headliner out the back hatch.
- It is possible to remove the headliner through the front or back window openings by removing the glass. Because a rear window is more costly than a front windshield and is held in place by tough urethane adhesives (and your sandblasted front windshield may need to be replaced anyway), consider removing the front glass instead. This clearly does not apply to a wagon/estate in which you can open the rear hatch for headliner removal.
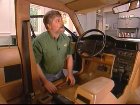
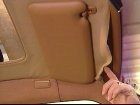
- With the seats removed (figure B), there is more room to work. In order to get the headliner out, it will be necessary to remove the interior side-trim pieces, sun visors, and the dome light assembly. In some cases, the headliner may not merely be sagging, but may actually come detached from underneath trim pieces (figure C). This can interfere with driver sight-line and cause a driving hazard.
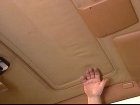
Since our vehicle has a sunroof that is also covered in fabric (figure D), the sunroof panel will need to be removed and re-covered as well. (The sunroof has a vent panel inside the sunroof headliner.)
While the sunroof is off, it's also a good time to inspect the working parts, cabling and drain holes to make sure that they are all in order.


