Volvo Headliner Replacement and Repair Option 2
Page 1: Headliner Repair: Introduction and Prep
Page 2: Removing Headliner Panel and Sunroof Headliner
Page 3: Headliner Repair: Board Repair, Fabric Replacement, and Reinstallation
2. Removing Headliner Panel and Sunroof Headliner
Though this is the most difficult part of the project, this step is necessary to properly repair a sagging headliner.
Safety Alert: As a standard safety precaution, always disconnect the vehicle's negative battery cable before you begin work on any electrical or mechanical components.
Materials:
Standard mechanic's tools (wrenches, ratchets, extenders, screwdrivers, nut-drivers, etc.)
- Headliner tool (or wooden spatula)
- Scissors
- Marker
- Needle-nosed pliers
Removing the Headliner Panel
- Begin by removing the trim pieces in the front of the car using a torx driver (figure A).
- Tip: Loosen, but do not remove, the vertical trim pieces that can simply be pushed out of the way.
- Remove the rear-view mirror.
- Remove the sun-roof motor cover.
- Since the sun visors are mounted into the headliner, they will need to be removed also (figure B), as well as the sun visor clips (figure C).
- On the passenger-side sun-visor, there may be a wiring harness for the visor's vanity mirror. Most will have a disconnect plug, making it easy to detach the wiring harness when you remove the visor. Avoid cutting the wiring harness. Tip: You can use a pair of scissors to cut a slit in the headliner board and fabric to make it easier to move the wiring harness out of the way (figure D). The cut can later be concealed under the plastic trim piece.
- In the back seat, remove the covers from the grab-bars so that the mounting screws can be removed in order to take down the grab bars. Remove the rear courtesy light and detach it from its wiring harness.
- Remove the side trim-panel (figure E) first, followed by the rear trim panel.
- Use a headliner tool (or wooden spatula) to loosen and remove trim panel pieces (figure F). These pieces are removed by popping out the retaining clips behind each panel. Remove the three square retainers at the rear by rotating them 90 degrees and pulling them out.
- Remove the dome light (figure G), taking care not to avoid chipping the cut-out in the headliner board that accommodates the light assembly.
- Tip: This is a good time to check the wiring connections in the dome light, inspecting closely for any cracks or breaks.
- Remove the flexible edging around the sunroof that anchors the headliner cloth to the opening in the roof (figure H).
- Note: Replace the sunroof edging if it is hard, cracked or broken.
- With the sunroof liner and all of the other trim pieces removed, the process of dropping and removing the headliner can begin by pulling downward in the center of the headliner board (figure I). Flex the board gently from the center, allowing the board to bow and begin to come loose.
- Take your time as you remove the headliner board. The corners of the board are the areas most likely to break.
- Important: The headliner board can be taken out in one piece by curving or bending it, but only if this is done slowly and carefully. Bending the board too abruptly will cause the board to crack (figure J), particularly if it is old and brittle. The trick is to bend the board slightly, but not in ONE single place. If you bend it sharply in one spot, it'll break. Picture curling a piece of paper, as opposed to creasing it, and you should have a good mental image.
- Since our board did, in fact, break apart upon removal (figure K), repair would be required. This situation is not uncommon since sun and heat damage typically causes headliner boards to become brittle and increasingly fragile over time. Many are simply made from a pressed-cardboard material. However, the damage to this board was repairable.
- Note: Breaks around the sunroof opening are among the most difficult to repair.
With the main headliner board removed, the sunroof panel can now be removed as well.
- With the sunroof in the vent position, use needle-nose pliers to release the springs so that the sunroof headliner will lay flat.
- Slide the panel back so that the top can be removed.
- Mark the locations of the sunroof mounting screws carefully (figure L), then remove the screws.
- With the screw removed, carefully lift off the top of the sunroof (figure M).
- Remove the sunroof air-dam.
- With the top portion of the sunroof removed, the sunroof headliner simply pops out (figure N).
- Inspection of our sunroof headliner reveals that it is in fairly good shape. The fabric on the sunroof headliner is actually attached to a metal framework (figure O). Repair for the sunroof headliner should be fairly simple when compared to the overall headliner repair.
Volvo OEM Instructions. Below are the Volvo OEM manual procedural steps for removing the parts and panels noted above, from the exceptionally illustrated "Body Fittings-Exterior" (TP 8202201) available from Volvo Tech Publications:
- Sedans/Saloons:
- Remove sun visors with bracket;
- rear view mirror (slide cover to one side by prying, then remove attachments)
- front grab handle above passenger door and cover above driver door
- A-post pillar panels (insert spatula between panel and molding at top and pry; or remove screw in retaining panel for later cars)
- Rear seat lamps and reading light
- Rear seat grab handles
- Headlining top side panels held by clips (use fingers to pry off)
- Rear center clips for headliner and rear window top molding, which may be stuck to butyl tape on window
- Sunroof: open sunroof and remove clamp and edge molding around sunroof opening
- Secure drivers seatbelt to outside of door pillar.
- Transmission: engage 4th gear (manual) or position 1 (auto)
- Remove top windshield molding
- Lower headlining and pass through the roof lighting unit while pulling out headliner from rear side panels.
- Remove headliner diagonally through passenger side door OR remove windshield and pass it through the front: this is a two person job!
- Vehicles with sunroof: remove traces of adhesive from edges of base plate.
- Wagons/Estates:
- Sunroof equipped: open sunroof completely. Remove sunroof motor cover or manual crank and cover
- Remove front grab handle and cover above driver door
- reading lamps over rear seats
- roof light (note two u-shaped plastic retainers for this unit
- rear grab handles by prying off cover strip
- plugs in top of B- and C-post panels, then the screws retaining these panels. Pull out panel at top.
- Insert spatula at front roof panels, pry and pull straight out.
- Loosen A-post panels at top and remove
- sun visors, brackets, and rear view mirror by sliding casing to one side. Loosen mirror attachments.
- cargo space light and disconnect wiring from light. Remove clip behind light by turning 1/4 turn.
- clips retaining rear top panel and remove panel.
- rear roof panel by inserting spatula under the edge and prying.
- Sunroof equipped: remove joint cover retaining edge surround molding, then remove molding . Detach fabric material at sunroof (which may be glued into position: use a hot air gun on the metal to loosen).
- clips in roof above rear seat; and molding above windshield by pushing forward.
- Push headlining forward so it hooks onto attachment at roof light, then pass roof light through hole.
- Pull headlining back through hatch: this is a two person job!
- Vehicles with sunroof: remove traces of adhesive from edges of base plate.
In the description that follows, the work begins on uncovering and repairing the damaged headliner board, and re-covering it with new headliner fabric.
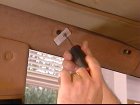 Fig A |
) Fig B |
) Fig C |
) Fig D |
) Fig E |
) Fig F |
) Fig G |
) Fig H |
) Fig I |
) Fig J |
) Fig K |
) Fig L |
) Fig M |
) Fig N |
) Fig O |