Changing a Volvo B230F Water Pump
Changing a Volvo B230F Water Pump PDF
This file and pictures are courtesy of Cameron Price and Brickboard contributors, to whom thanks are given.
Symptoms Showing You Need a New Water Pump:
- Noisy water pump
- Leaking or loss of antifreeze
- Green residue around water pump seals
- Wobble or movement in fan pulley
Options:
- Take it to a garage - cost $190 - $250
- Replace the water pump yourself - cost <$100
Volvo has used virtually the same water pump on all four cylinder engines, from the B18B until the B230F. Volvo rates this job at 1.6 hours of labour and the cost of a new factory water pump is about $125 (Canadian). Add to this amount if any of the hoses show any signs of cracks. If you haven't had the timing belt changed in 80,000kms, then this might be an opportune time to replace the belt. Count on your garage to add the customary shop supplies. If on the other hand you would like to save the high cost of labour ($55 per hour plus 15% tax in Canada) and experience the satisfaction of doing the job yourself, read on. This job can be easily performed in an afternoon providing you have all of the parts on hand. See the FAQ Cooling file for more tips on water pump replacement.
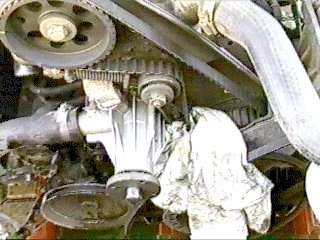
1. The water pump is attached to the front face of the engine block, by six (6) nuts and bolts, with an orifice on the top to the cylinder head, 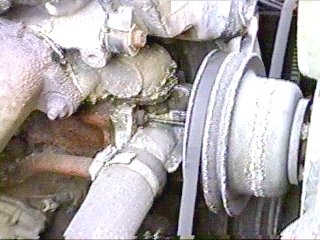 another on the right rear where a metal pipe is joined to the pump with a bolt, and the bottom radiator hose connection, also on the right hand side.
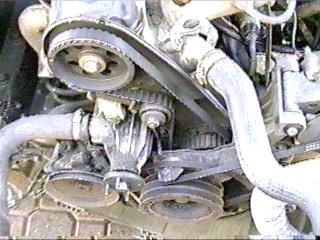 2. Remove the fan, centrifugal clutch and loosen the fan shroud. If the bolts attaching the clutch are rounded, be prepared for a long ordeal (or take it to a reputable garage). Use a high quality 10mm open ended wrench for the fan bolts. Slack off the power steering pump (loosen top front bolt before loosening the adjusting screw), remove the fan pulley and the top part of the timing gear cover.
3. Remove the bottom plastic splash pan, if attached, then drain the antifreeze/coolant by undoing the radiator hose connection at the water pump. Place a pan under the hose to catch the coolant.
4. Remove the 4 bolts, 1 nut and bolt (for the rear metal pipe) and the bolt near the timing gear belt. I suggest you place a rag under this bolt, otherwise the bolt and washer could drop into the bottom timing gear cover. At this time inspect the timing belt and if it appears worn or it hasn't been changed in 80,000km, you should consider changing it now. Mine was changed 40,000km ago, so I decided to leave it for now.
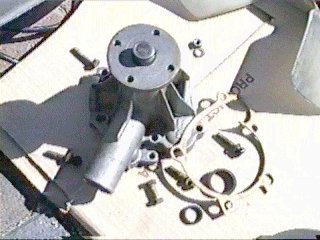 5. Make certain that you have new rubber seals for the top connection and for the metal pipe. You will also need a new gasket for the surface mount onto the engine block. I suggest you buy new studs and nuts for the fan/clutch. I didn't do this and had difficulty removing the old studs without damaging them.
 6. The most important thing to remember when installing a water pump, is to clean the block and head (not visible because of angle) surfaces as carefully as possible, before installing the new pump, to remove all traces of the old gasket or grease. This is where a small Dremel grinder with a brass brush for surface cleaning comes in handy. However, you can easily adapt any other tool to the task, including a putty scraper, a dull razor blade, copper wool, or very fine sandpaper to remove any trace of the old water pump gasket. Do NOT use steel wool or aggressive sandpaper. It is also important not to neglect the underside of the head mating surface, where the mushroom seal at the top of the water pump joins to the head. Often there are traces of old coolant deposits or gaskets left behind, and as a result the new seal starts to leak much more easily, especially in cooler weather. If the head mating surface has any imperfections due to old coolant deposits or gasket material, it is much more likely to leak. Needless to say, you need to clean carefully, since any gouges or cuts you make in the surfaces will increase the likelihood of a leak.
Clean the metal hose flange with sandpaper or a metal brush.
7. Before installing the pump. grease the seal and the hole where the heater pipe o-ring seal enters the pump body as well as the top mushroom seal that seats under the head. This is important to seat them properly. The best grease to use is silicone or a clear synthetic grease, although RTV or petroleum grease will work as well. One tip is to grease the paper gasket, which helps hold it against the block without shifting. By the way, no gasket sealing material is required: these merely help to hold it in place. Do NOT use shellac or any other gasket sealers.
 8. Install the new water pump after installing the new rubber seals and gasket. First make sure that the O-ring on the heater bypass pipe seats properly in the back of the pump. Then install the nut and bolt that hold the joint of heater pipe and water pump together. Tighten them up; this is better done before installing the pump so that the gasket in the heater pipe hole doesn't get shifted. Install the pump from its bottom, bringing it upward to compress the seal at the cylinder head. If the pump is a brand of reasonable quality, you will have to lift up on the pump once you hang it on the existing studs, in order to be able to put the new bolts in. Otherwise the bolt holes will not match properly and you will be forced to apply more upward pressure on the unit to make it seat against the head. First stuff a rag in the timing belt opening so you don't drop a bolt or nut into the timing belt. Using a 12-18" pry bar or screw driver, lever against the bottom-most portion of the pump and the crankshaft pulley or power steering pump and lift the pump upward. You need to get compression on that flanged o-ring. You don't have to use terribly much force, but it should be very snug. Start the remaining bolts in their holes while levering upwards, using a small amount of thread sealer on several as they do protrude into the water jacket. Now tighten the two nuts, still while holding pressure. Install all of the nuts and bolts, tightening them uniformly to achieve a proper seal with the block.
Attach the radiator hose.
9. Install the pulley over the studs, attach the steering pump belt and then tighten the steering pump. Put the fan shroud in place (don't connect it yet) and then attach the centrifugal clutch and fan. Use new bolts and be careful not to overtighten them. 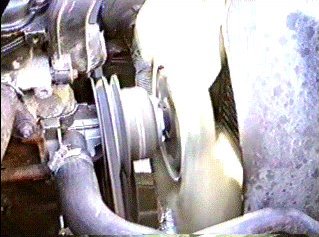
10. Bolt the fan shroud or electric fan in place, attach the splash pan, then fill the overflow tank with new antifreeze.
11. Start the engine, allowing it to reach operating temperature, checking for leaks and top up the expansion tank if necessary.
Cost Breakdown:
- Remanufactured Water Pump (UAP/NAPA P1381)...$59.90
- New studs and nuts for mounting fan... $10.00
- Miscellaneous supplies, cleaners, etc...$5.00
- 4 litres Prestone Antifreeze...$8.88
- Total cost + 15% PST/GST =====================> $96.35