Volvo 700/900 Heater Core Replacemen
Volvo 700/900 Heater Core Replacement PDF
Heater Core Failure Diagnosis and Replacement Procedures
[contributed by Dave Stevens and Ari Rocchio]
How about this for a nightmare: You’re heading off for work on a dark, cold morning. The windshield is badly fogged, so you’ve turned the heater off, the AC is on full blast, the side windows are down, but it’s not doing much good so you’ve got a rag in one hand. Your passenger just felt a drip of fluid on his/her feet and tells you the carpet is wet and feels slightly sticky. There’s a faint, sickly sweet smell in the car. You’re starting to realize you’ve got a leaking heater core. Although a nasty job, you can replace it yourself. The following comprehensive guide should allow even a relative novice to succeed at the job.
Things You’ll Need: Tools and Parts
A failed heater core will result in one or more, if not all, of the following symptoms:
· Radiator fluid level is dropping for no other apparent reason.
This by itself is not necessarily a heater core problem, but it can be an early warning sign before the problem is otherwise apparent. The coolant could be evaporating due to a failed or loose radiator cap. The cooling system could also be leaking at an inconspicuous location such as the heater control valve (located in the heater hose at the firewall below the heater core connections) or, worse still, the head gasket. If the source of the problem isn’t apparent then have the system pressure tested.
· Windows are fogging up.
Defrost/AC is needed much more than usual, even on warm/dry days. Often starts happening soon after the engine is fully warmed up. Again, this by itself or coupled with wet carpets is not necessarily a heater core problem. It could be that the AC evaporator core housing drain is blocked causing it to fill with condensate, but it will be water not anti-freeze. See item a) in the following note.
· Carpets are wet.
By far the most common area is the tunnel/firewall corner area of the front passenger footwell, but fluid may also migrate into the rear floor carpeting and/or the tunnel/firewall corner area of the driver footwell.
First you need to determine if it’s coolant or water. Anti-freeze will be slightly sticky as it dries on your fingers. It may also have a sweet, sickly, hint of caramel odour. When blotted with a paper towel it will be colored like the coolant (green or orange) rather than clear. There may be liquid visible at the floor vent outlets, especially the passenger footwell.
If the only symptom is wet carpets and it’s not evident as anti-freeze then it’s more likely one of the following:
a) The drain for the AC evaporator core box may be plugged. Condensate can fill the lower half of the box until it eventually overflows, either into the intake air blower air box section or the air distribution box section, running onto the passenger floor area. The drain pokes out through a rubber grommet in the firewall, about one foot below the AC receiver/drier just below where the firewall starts to slant in. On some models a plastic hose may be attached to the drain. On turbo’s that drain hole position is next to a heat shield on the firewall behind the exhaust manifold –you may want to loosen the heat shield for better access. Poke a small screwdriver in and around to move any blockage. Parking slightly downhill will maximize drainage. You may get quite a quantity of water out. Ideally, the drain should be periodically suctioned to try to remove debris then blown clear with compressed air.
b) The drain for the cabin air intake cavity (in front of the windshield) may be blocked and water may be backing up and running down into the blower housing, especially during a downpour. It is not uncommon for the screen under the venting to have dropped allowing debris to get in. The entire cowling will need to be removed, the debris cleaned out and the drains on either side (in particular the blower motor side) will need to be cleared. See elsewhere in the FAQ for detailed procedures.
c) In the engine compartment, a stream of water may have been aimed directly around the heater core connections allowing water to be forced past the gasket into the heater core box. Typically this will be after having pressure washed the engine compartment. For later production cars the heater core necks are caulked to the firewall so this should not happen.
In any case, you should lift the carpets to dry both the carpet and underpadding to avoid the possibility of floor rust.
Even if coolant is evident, there is one final thing to check before condemning the heater core. Fortunately, there are no interior connections on the 700/900’s heater cores. The heater control valve is in the engine compartment, unlike 240’s where it’s behind the center console near the gas pedal. However, coolant may be still entering the heater box from the engine side of the firewall due to a leak at the heater core hose connections in the engine compartment. A heater hose may not be properly sealed on the nipple allowing fluid to squirt out from under the nipple and run down the neck into the interior heater core box section. Typically this will be because a nipple has been crushed out of shape in some previous effort, a hose is damaged or a clamp isn’t tight. Wrap something like a paper towel around the base of the hoses and check for coolant leaks after the engine has had a run. If a leak is detected, simply moving the clamps out a bit and re-tightening will often solve the problem. Or carefully use needle nose pliers to make the pipes round again. More than one person has been fooled by this situation and unnecessarily removed a heater core. As mentioned, for later production cars the heater core necks are caulked to the firewall so leaking coolant should not be getting into the heater core box from an external source.
Heater core failure will often be associated with:
· A recent flush of the cooling system.
- Scale protecting a weak joint or dried silicates plugging a pinhole leak may have been flushed away.
- A pinhole leak may heal itself within a few days of flushing. Most good anti-freeze fluids will have a certain degree of leak stoppage ability (at least the green stuff). When anti-freeze is exposed to air, it dries to form silicates that can plug small leaks. A sealed leak may or may not return.
- There are also numerous aftermarket products (like Bars) that also claim to stop minor leaks. There are varying opinions on these. Some say they’re just temporary fixes. Some fear they might plug up or at least restrict the heater core or radiator passageways. After all, these magic elixirs work when exposed to air and there can easily be pockets of air trapped in the cores. The decision is yours.
· Rarely flushing the cooling system.
- Old anti-freeze loses its ability to protect against corrosion. Avoiding flushing does allow a build-up of scale to provide some degree of surface protection, but that is most certainly false economy.
- Galvanic corrosion is exacerbated if the cooling system is filled and topped up using very hard water, which has an excess of free ions. Additionally, the excess of minerals in very hard water promotes scale build-up, which can eventually plug core passages.
- Electrolytic corrosion is exacerbated if there is static build-up due to such things as a head gasket leak, a faulty electrical ground or dry bearings. You can use a voltmeter to check if the anti-freeze is no longer protecting against this. With one probe in the coolant and one on chassis ground you should not get a DC voltage reading. Any significant reading (say over about 100 millivolts) is cause for concern.
· AC system losing its charge (less likely).
- In 900’s, if the AC system loses its charge, the electric fan will no longer operate after the engine has been turned off. If the engine compartment is articularly hot, this may allow an overheat condition that can stress cooling system components and could cause a weak heater core to leak.
- For 700’s, tough luck, fan operation is independent of the AC system. An overheat condition after engine shutdown can stress the cooling system.
Once you’ve diagnosed a bad heater core, you need to decide on your next step. Replacing the heater core on a 700/900 is about the most tedious job you can imagine. There are no decent shortcuts I know of, such as cutting an access into the plastic duct boxes. With time and patience and a moderate variety of tools, a half-skilled DIY’r can do the job. Certainly this is not a job for those with anger management issues. You’ll want to set aside at least an entire weekend, maybe half that if you’re experienced, the carpets aren’t soaked, you have all the right tools, know the minimum components needed to be removed for access, everything comes apart easily and you remember exactly what goes where on reassembly. The cost of a heater core is anywhere from about $150 to $400. Having the dealer or an independent shop do the job is obviously not going to be cheap –in fact some busy shops may simply not want to take on the job. Let’s assume you can’t resist the challenge of doing it yourself. [Editor] Recent Brickboard reports note that the Nissens aftermarket core has plastic inlet and outlet pipes. Given the effort involved in changing this part, consider paying extra for OEM which is all-metal. The typical failure mode of plastic parts is at the hot water inlet: the plastic embrittles and fractures.
Here are some initial steps you should take if you need to delay starting the job. If you are lucky enough to live in a warm climate and can live without the heater then you could even declare this the entire job.
1. Stem the tide:
Remove the heater hoses from the heater core nipples at the firewall. This is usually easier said than done. You’re working in cramped quarters behind the intake manifold. Typically the hoses will be thoroughly frozen on the nipples. Caution: Old hoses are more fragile and the copper nipples are easily crushed. There are two approaches:
a) You can cut the hoses off at the nipples. You’ll then need new heater hoses, preferably pre-formed from Volvo. BTW Getting the other end of the wrap-around heater hose off for replacement is no picnic either.
b) You can try to work the hoses off the nipples without damaging the hoses. If the hoses have been off recently this should be relatively easy, otherwise try the following:
· Starting with the upper hose, loosen both clamps and slide them out of the way down the hoses.
· Remove the upper hose from the nipple. It will be difficult to work at freeing the lower hose until the upper hose has been removed. Realize that the copper nipples have a formed ridge sitting inside the rubber hose just beyond the clamped area. In theory you could try hose pliers meant for the job to help prevent crushing the nipples, but you typically won’t have room to work and the hoses will simply be too frozen on.
· You need to attack hose removal by breaking the bond first so you can twist the hose and work it off. Start by working around under the hose with a bent tipped tool (perhaps sacrificing a small slot screwdriver) to break as much of the bond as you can. Then twist the hose to break the final bond so you can pull it off. Many people like to use something like penetrating oil or WD-40 to help dissolve the bond while they’re working around the nipple, but realize that these may not be heater hose rubber friendly so clean the hose ends when you’re done to wick out any excess. Use curved jawed pliers to get a good grip on the hose, but avoid tearing into the rubber and splitting the end or you’ll be in for a new hose. Remember that if you twist the hose too hard you risk tearing it. Also, grabbing it over the ridge in the nipple will make it more difficult to pull off. If you’re sure the core is gone there is probably no need to be neat –you can crush the nipples all you want if that speeds removal.
· You’ll need to catch any coolant that comes out the hoses when they are removed, especially once you let them drop down. When they come off, keep them held high and plug them or join them as in the following note. Using a piece of tubing (even a garden hose), blow out any remaining coolant in the heater core, catching what comes out the other nipple for proper disposal. Draining the coolant level down a bit before removing the hoses may be neater.
· You can easily put the car back on the road until you can order a new heater core and make time for doing the job. You’ll have air conditioning, just no heat. Do this by simply bypassing the heater core, joining the heater hoses together. The hoses will nicely fit over a 1/2" copper plumbing elbow (household plumbing type). Push the hoses on as far as possible and clamp in place. If you solder two elbows together to make a “U”, you will be able to do a better job of clamping the hoses and without bending them out of shape. Alternatively, you can disconnect the short hose from the heater control valve and fasten the other hose to the valve. It doesn’t matter whether the heater control valve is left opened or closed at this stage. Top up the coolant level and remember to check it over the next few days.
2. Dry out the carpets:
Blot all excess coolant from the affected carpets. If you can, suction out the moisture from the carpet using a shop vac (with paper filter removed) or a carpet shampooer with an upholstery cleaning attachment. Rinse the carpet and repeat until it blots clear and feels clean to the touch. Lift the carpets. You can normally pry out enough carpet from under the trim. The carpet by the front seats at the tunnel is normally under the front seat rail and to remove it properly you will need to loosen the front seat, but the tab of carpet under the rail is so small it’s often simpler just to cut or tear the tab. In severe cases it may be best to remove an entire carpet section from the car for proper cleaning and drying. Blot/rinse/suction all foam under-padding –the floor boards could rust if moisture remains trapped too long. You can use a household carpet cleaner if desired to properly remove coolant residue and odour. If the problem has been going on for a while there will likely be mildewed spots on the under padding. In such a case you may want to rinse them with a dilute bleach solution or mildew cleaner. Prop up the carpets so that the underside and the under padding can air dry. Leave the doors and windows open for ventilation (don’t forget to switch off the dome lights). Overnight drying may be adequate on warm, dry days. You can speed drying with fans and heat lamps (make sure they’re securely positioned and guarded so they can’t damage, burn or melt anything). Remaining small damp areas can be touched up with a hair drier. When you later open the air distribution box to get to the heater core there may be some additional fluid to wipe up, so have shop towels handy. Please remember to properly dispose of all coolant and thoroughly clean or dispose of contaminated items. Keep pets (and children) away from coolant spills. Ethylene glycol based anti-freeze tastes slightly sweet and is attractive to animals. Even small amounts (like a few teaspoonfuls) can be highly toxic.
Estimate between 8 and 12 hours for the complete job. Mine was completed and back together in 10 hours spread over two days. A FULLY ILLUSTRATED VERSION OF THE INSTRUCTIONS BY ARI ROCCHIO IS HERE.
1. Disconnect the heater core plumbing and evacuate remaining fluid from the heater core.
2. Disconnect the battery.
3. Remove the tunnel console: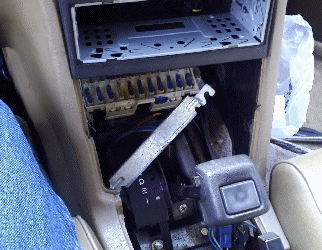
a) ash tray and holder
b) shifter/park brake cover panel
c) tunnel console housing.
4. Remove the center console components (see the FAQ file on Interior Trim removal:
a) storage compartment
b) radio
c) heater control panel (the two bottom screws on each side also hold the side kick panels in place)
d) relay tray and tray holder. Once this is all free, move the assembly out of the car. See photo
5. From the driver side:
a) Remove driver footwell upper panel and knee bolster assembly (turn the plastic screws 90 degrees to remove)
b) Lift driver side carpeting along tunnel
c) Remove driver side center console side panel
d) Remove plug holding driver side rear floor duct.
6. From the passenger side:
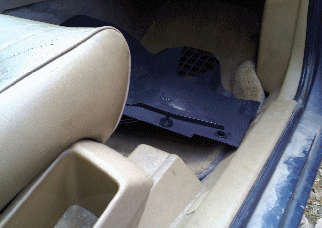
a) Remove passenger footwell upper panel
b) Remove glove box (two hex screws on each side beneath the box and one on each front side)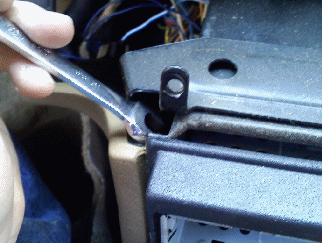
c) Lift passenger side carpeting along tunnel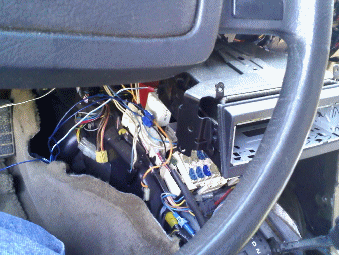
d) Remove passenger side center console side panel
e) Remove plug holding passenger side rear floor duct
f)Remove passenger side dash support structure. See photo for hidden screws.
7. Gain access to the heater core box section:
a) Free floor vent box section and face vent box section from main distribution box. This
can be brittle, so don't break it during removal.
b) Disconnect rear floor vent ducting and remove floor vent box section.
c) Disconnect face vent ducting and remove face vent box section
d) Remove air distribution box section (this is the tricky bit).
8. Remove the heater core from the heater core box section.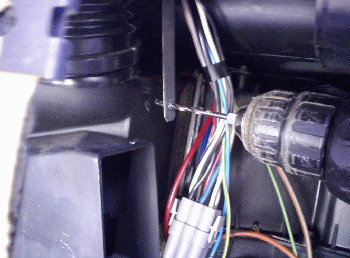
9. Install the new heater core:
a) Verify heater core fitment
b) Pressure test heater core
c) Install and re-connect heater core plumbing.
10. Clean and dry carpets and underpadding (if not already done).
11. Repair air distribution box foam gasketing (as needed).
12. Reassemble:
a) air distribution box components and ducting
b) passenger dash support structure and glove box
c) center console
d) tunnel console
e) driver side knee bolster
f) driver and passenger side under-dash panels.
13. Re-fill/flush coolant.
14. Re-connect the battery and enter the radio security code.
15. Watch the expansion tank coolant level over the next few days and top up as needed.
Parts. Replacement heater cores are the same for 700’s and 900’s. You can get them from Volvo (p/n 1308374 for left-hand drive with A/C), through aftermarket sources and on-line from places like FCP Groton, ipdusa.com, AllOEMVolvo.com, carparts.com, global4auto.com and others. Among the aftermarket brands are 4-Seasons (variously as p/n 94734, R3000-62353, 1307236), Everco (p/n H5121), Proliance (p/n 1307236), and Nissens (p/n 57806). [Editor Note: there is one Brickboard anecdote of a catastrophic failure of a new Nissens plastic/aluminum heater core with split plastic end caps in a 940].Prices are between U$125 and U$350. Naturally, top quality can be expected from Volvo. When buying a heater core, especially the cheaper ones, there are considerations of coolant compatibility with the type of solder used –see elsewhere in the FAQ under radiators. Although a minor detail, a small sign of a good heater core design is the longer lower nipple soldered to the tank at its mid-point to prevent bending (Volvo’s is). [John Sargent] The cheaper plastic and aluminum heater cores are a lousy fit, and I recommend getting a brass and copper heater core.
Used heater cores are available starting at around U$100, but are probably not such a good buy when you consider the labour to remove a used one of questionable soundness from a donor car plus the repeat labour if it fails soon after installation. Even if someone will let you take a used one from a donor car for free, it’s just not worth the risk of having to repeat the job again in the near future.
If you buy an aftermarket brand or have one shipped to you, make sure the necks have not been poorly assembled or knocked out of alignment. You should try to have the supplier verify the nipple location and neck spacing before shipping. Definitely verify this again upon receipt and match it up carefully to the old one at installation time. The necks should be approximately 1” to 1.25” o.c. through the firewall gasket. They should be close to 1” o.c. at the ends of the nipples. At a point approximately 1” up from the face of the heater core (where it will go through the firewall) the necks should be close to 1.25” o.c.. At that same point (approximately 1” up from the face of the heater core) the outer edge of the necks should be even with or extend slightly beyond the perimeter of the tank profile. The soldering at the base of the necks can be delicate, especially the upper neck. A drop during shipping or any attempt to bend the necks can crack the solder joint and it may not be visible. No matter how nice it looks, it’s a very good idea to have the heater core pressure tested again for leakage before installation –I would say 20 psi is the minimum test pressure. Radiator shops will often do this for free. Radiator shops can also realign and re-solder the necks if needed. You absolutely don’t want to do this job twice in a row -consider yourself warned
Time Estimates:(your mileage may vary)
- First time replacement (novice): 20+ hrs
- First time replacement (expert): 12+ hrs
- Experience with recent replacement (novice): 10+ hrs
- Experience with recent replacement (expert): 7+ hrs
Tools and Necessities: Metric 3/8” drive socket set -basic
Metric 1/4" drive socket set –enhanced (including 7mm and 10mm sockets, nut driver handle, short/long extensions including a 12 inch extension, and perhaps a universal joint with wobble extensions for angled use)
Torx bit set and hex driver handle
Screwdrivers –very small slot, medium Phillips (plus large Phillips for earlier 700’s) and assorted small/medium/long slots for prying
Flat blade knife (putty knife)
Replacement foam gasketing -1/2" x 1/2" or 1/2” x 3/8” self-sticking black rubber foam weather seal will do nicely
Black mastic sealer (or black butyl ribbon caulk) –small amount needed to re-seal nipples and boxes
Pop rivet (or stubby #10 round head screw) to re-fasten support bracket
A small collection of 4" to 8" nylon zip ties
Good work area lighting, portable lighting, flashlight (aka. torch to some of you)
Agility for working at odd angles for extended periods of time –this is not a job for someone with a bad back.
Helpful items:Exploded view diagram of air box components
1/2" copper plumbing 90 degree elbow –for temporarily bypassing heater core
About 10” of 1/4” i.d. metal (copper or aluminum) tubing to fashion a nut driver extension tool for 7 mm screw heads for improved access using angled socket extensions
Ratcheting 7mm box end wrench
Swivel-head, extendable hand mirror (mechanics “dental” mirror); Pick-up tool (claw and/or magnet)
Tape, ziplock bags, boxes for labelling and sorting removed parts
Long arms with small hands and long thin fingers
Fluency in foreign language profanity (for the sake of those within earshot).
The 700/900 heater cores are located at the far back of the air box behind the center console, on top of the tunnel, flat against the firewall. Unfortunately, to gain access to it means removing everything in front of it and that requires tearing apart seemingly half the dash. Some of the work can be done blind in cramped quarters, but for a first effort you may want to remove more of the dash than is necessary to better see what you’re doing. The heater core itself is relatively small. It’s constructed much like a radiator, approx 8” x 12” with copper side tanks and two nipples that extend out through the firewall behind the intake manifold. Once you gain access to it, removal and replacement is relatively easy. It certainly helps if you’ve had experience tearing into your dash going as far as removing the radio and center console side panels. [John Sargent] I've replaced 5 heater cores in 700/900 series cars. You may find it easier to pull the dash, although I haven't been doing that for replacing the heater core. Accessing the top screws holding the heater box together is difficult with the dash in place. I replaced the dashboard in 740 last summer and it took just under three hours. When the dash is out the access for replacing the heater core is easy.
It would be a very good idea to have on hand these instructions (at least the overview page) plus a diagram of the air boxes to see how the sections go together. The green Volvo Heating and Cooling System Service manual will have this with detailed instructions and diagrams. For 700’s, the Haynes 740 ’82-’88 manual is probably the next best, especially the air distribution box exploded diagram on page 89 (Fig 2.8). For 700’s and 900’s (and also 200’s), the Chilton’s Volvo Coupes/Sedans/Wagons 1990-93 Repair Manual has a long chapter on heater cores in chapter 6, pages 14-24. The Chilton’s manual is good in that it has diagrams for the various styles of air boxes used, but only brief descriptions of the procedures. There are differences in air boxes for different climate control systems, models and years. The central section of the air box with the heater core is basically the same for all models with air conditioning, but the ducting evolved over time. Ducting changes were made when air bags were introduced so certain sections of an air box shown for an ECC (Electronic Climate Control) system (for a 960) might actually match the later air boxes used with a manual system. You can try your local library for Haynes and Chilton’s as well as free access to the AllData subscription service (assuming their heater section is not too pitiful). A few basic diagrams are included here at the end. Another source of useful information is the Volvo VADIS service and parts CD available on EBay.
Some descriptions in the following notes are only applicable to a 900 with dual air bags and manual AC. If there seem to be differences then just take a good look and think it through. It may take a little trial and error to figure it out.
1. Preparation: You're going to be working under the dash from both footwells. You can do most of the work either sitting on the seats or kneeling on the ground next to the car. Both front doors will need to be fully opened so ensure you have sufficient space on both sides of the car before starting. As you will often need to move the shifter back out of the way into 1st for proper access, remember to block the wheels and on 900’s you will need to depress the override button with the key in the ignition to get it out of Park. Some people find that removing the front seats makes the job a little easier with fewer contortions. If you decide to remove the driver seat, remember to take extra care not to abuse the SRS control module underneath. You will need good lighting: a flood, a spot, and a little LED gooseneck for those troublesome screws at the top of the heater box. All lights should be affixed and focused, leaving both hands free.Even so, with black parts in a black interior it will be, as Rowan Atkinson (aka Mr. Bean) once said, "Like a blind man in a dark room looking for a black cat that isn't there." See above for a list of some of the tools and supplies that will be needed. Don’t forget anti-freeze for topping up and/or a final rad flush. For those so inclined, verify a sufficient inventory of your favourite brew and brush up on your four-letter word vocabulary.
2. Disconnect the heater core from the cooling system: If there is any pressure in the system then let the engine cool sufficiently before loosening the rad expansion tank cap and re- tighten to minimize coolant loss at disconnected hoses. Locate the heater hoses attaching to the heater core necks extending through the firewall behind the intake manifold (up behind the trans and oil dipstick handles). Just loosen the clamps and pull the hoses off the nipples (yeah, right). Be prepared to catch escaping coolant - a few well placed shop towels will do nicely. Old hoses can be a real pain to get off (the copper nipples are delicate; cut the hose if needed; be prepared to catch fluid when you succeed). While you work, to prevent coolant escaping from the hoses either use proper hose clamping pliers, plug the hoses with stoppers or, better yet, join the hoses together so you can still drive the car. As noted above in the First Aid section, a 1/2" copper plumbing elbow works well for this. You can also remove most of the coolant from the heater core by inserting a spare hose onto one core outlet and blowing hard into it: this will push most of the core coolant out through the other outlet. It keeps your interior clean when you do arrive at pulling the core out.
3. Disconnect the battery. You will be working around live connections on the relay tray. Disconnect the battery negative terminal and secure the cable safely out of the way. For cars with air bags, as you will be working around SRS components and their connections, this step is required to disable the SRS control module.
SRS Warnings and Disclaimers: The SRS control module must be properly disabled to prevent accidental deployment if you are going to be working near any SRS components (such as airbags and electrical connections). You must work carefully around SRS components, wiring and connectors to prevent compromising the integrity of the system. You must avoid any stray electrical currents or static discharges from contacting the SRS system to further prevent accidental deployment. SRS integrity should be verified when the job is complete. Use the OBD diagnostic socket if the SRS light won’t go out -see elsewhere in the FAQ for procedures. Refer to the Volvo SRS technical literature for details. A certain level of caution and competence is required to work around SRS; otherwise the job should be referred to a qualified technician.
4. Remove the ashtray and the holder behind it.
5. Remove the shifter console panel: Remove the plastic insert below the brake handle –careful, try to pull it straight up as the tabs easily break (use mastic on re-installation if this happens). Pry up the metal clip that attaches the front edge of the shifter console panel to the cross bar between the center console side panels (under the ashtray area) –try not to let it fall down inside. Remove the two retaining screws in the face of the main recess. Remove the console panel, sliding it forward over the brake handle. Disconnect the seat heater switches and their lighting (if present).
6. Remove the tunnel console: There are two retaining screws located inside the storage compartment. They are hidden under the pry up insert in the bottom toward the rear (may be obscured by dirt). Use a small screwdriver in the slots to carefully pry up each edge of the insert until released. Remove the centre console and swing back out of the way. It’s best to disconnect all wiring going to the rear of the console so you can completely move it out of the way. To do so, remove the rear ashtray and holder by gently prying down at the top until the two tabs are freed from the tunnel console. Reach up inside and remove the clip holding the lights so it can be left hanging on the rear floor.
7. Remove the driver and passenger footwell under-dash panels: Turn plastic studs 90 degrees to release, pry front panel edges down with fingers and slide forward. Note rear side retaining slots for reassembly and note how passenger side panel goes around the ECU side panel and blower motor housing.
8. On 700 models without SRS, remove the driver side lower dash panel: If there is a knee vent in this panel, the duct will need disconnecting from behind.
9. On later 700 models with SRS and all 900 models, remove the driver side knee bolster assembly: Under the back edge of the knee bolster pad, right by the door, there is a largish clip holding the knee bolster pad to the dash panel; that needs to be removed, but this clip is often missing. Remove the lower Torx screws and pull the panel out. Note the plastic nose on the backside and how it went into the rubber insert in the metal panel. Remove the left and right pair of Torx screws holding the metal panel. Note for reassembly that the longer screws go on the console side. Note also that the plate is behind the bracket on the console side. Remove the final Torx screw from the upper edge –note which hole it was in and note that it goes back in first for loose alignment.
10. Remove the glove box: There are two 10 mm retaining nuts underneath, one on each side. There are two retaining screws behind the glove box door below the hinge arm slots, one in the middle of each side edge under the felt coated plastic covers. To remove these covers, pry up the thin end a bit to release its tab then slide the clip out toward the glove box opening. Now pull the entire glove box forward onto your lap and disconnect all wiring. Tape a note on the glove box door to remind you to reconnect the wiring –it’s easy to forget.
11. Remove the center console storage box: Remove the lighter. There are two retaining screws underneath the lighter bezel. Pull the square plastic lighter bezel straight out. Remove the two retaining screws. Note how the lower long screw goes in at an angle to its clip. Do not let the screw clips on the side panel get knocked off and lost during subsequent handling. Swing the tray out at the left to free the grips on the right. Note how the upper edge of the storage box grabbed over the exposed bottom edge of the radio tray (under the face of the radio).
Now is a good time to make sure all items removed so far are stored with their fasteners tagged, bagged or taped in place.
12. Remove the radio: There are longish spring metal strips fastened on the sides of the radio chassis as locking tabs. The open end of each tab is forward and the front lip is turned in toward the radio. The part of the tab behind the front lip is sprung out into a slot in the side of the radio tray. Your job is to press these tabs in close to the sides of the radio chassis so they won’t catch in the slots thus allowing the radio to be pulled out. Free one side and pull it out a bit then do the other side and the whole radio should easily slide out. A radio that has never been out will often be more difficult to remove. It can take some time to master this at first and it will all make sense once you’ve seen it out. There are two common ways that these tabs are accessed so they can be forced in toward the radio and out of their slots. See elsewhere in the FAQ for more details on dealing with radio removal.
a) If there are no side slots in the radio bezel (as is typical in many 700 and early radios) then you pull off the tuning and volume knobs. The retaining tabs are accessed through the holes behind the knobs. You should be able to see the lips with a flashlight. Insert a very thin screwdriver through the knob pointing it out and slightly down to get outside of the end of the spring tab then push the tab in toward the radio and pull that side of the radio out a bit (grip into the cassette opening or carefully pry the side of the radio bezel). Alternatively, using a stiff wire hook, you fish through the hole to grab a side hole punched near the front of the tab and pull it toward you to free the tab from the side slot and continue pulling so that side of the radio comes out a bit. Repeat on the other side then pull the entire radio straight out.
b) If there are side slot holes in the bezel (as is typical in the later 900 radios) then, using a small flat screwdriver, insert it into the slot and pry the tab close in to the radio chassis to free it from the side slot. While holding the tab in with the screwdriver, slide that side of the radio out a bit, either carefully pulling/prying at the side of the radio or by inserting a stiff wire hook into the slot alongside the screwdriver to grip the bezel from behind. Repeat on the other side then pull the entire radio straight out. The bezels are plastic and attached with arms to the corners of the radio. If you pull or pry too hard at the corners the bezel can break away from the face of the radio (use epoxy to stick it back on if this happens). The slot can get damaged or the bezel scratched if you get too rough.
Remove the radio and disconnect the wiring. Remove the radio tray. The early trays have a single retaining screw in the upper right rear corner. The later radio trays have two retaining screws upward at an angle in a recess in the top.
Tip: For the later Volvo radios, you will have to enter a 4-digit security code to re-enable the radio upon installation (it will display “Code”). Normally it will be recorded in the owner’s manual or radio manual. If you don’t have the security code you can get it from Volvo through your dealer if you provide the VIN and possibly some proof of vehicle ownership. There should be no charge for this service. Also note the serial number on the top of the radio. If the security code from the VIN doesn’t work then the radio may have been changed. Volvo can also look up the security code using the radio serial number. To save time, have the dealer get Volvo to lookup the security code both by VIN and by radio serial number just to be sure. See the owner’s manual (available on-line at the Volvo owner’s circle) for details on entering the radio security code and what to do if you are having trouble.
13. Remove the console side panels: Detach the lower crossbar down by the relay tray. To do so, push the side panels slightly together and lift up the right side of the cross bar (it’s got a slotted end). Remove the left and right side panel retaining screws/bolts. Each panel has two 10 mm screws at the lower front, 1 bolt on an arm down along behind the carpet, and 2 bolts on the inside of the panel where the radio tray came out.
Now is a good time to take digital pictures from every angle under the dash to document wiring harness and vacuum hose routing.
14. Remove the relay tray: Unclip the relay tray (front tabs on each side), lift up, pull out and swing out of the way to the left (for now). Remove the relay tray holder. Note the routing of all wiring and locations of connectors in this area (document as you go with a digital camera as this area is a little fussy to re-install correctly).
15. Remove the heater control panel: Remove the ignition/switch/heater control panel plastic bezel. Carefully snap out the thin area of the trim above and below the heater control panel with a protected blade, gently prying inward and lifting out to release that entire area. There is a good-sized metal retaining spring clip on the back side next to the electrical switches solidly holding the middle of the trim panel -release that clip from behind the dash by pushing it firmly toward the switches so you can push the middle of the panel out, allowing you to swing the whole panel away so the grip tabs will release from the ignition switch end. Don’t force this delicate panel too much -look underneath if you have problems figuring out how to depress the release clip. Disconnect the switch wiring and lighting to allow complete removal of the panel. There are four retaining screws (Phillips), one in each corner of the control panel. Remove the lower ones to detach the metal bracket that held the console side panels. Remove the heater control panel and swing out of the way. Note the routing and connection of the heater control panel vacuum hoses and the wiring harness around the ducting (document as you go with a digital camera).
16. Remove the passenger side dash support structure: Only remove three bolts so that alignment of the whole unit is preserved: one bolt is on the front leg attached to the tunnel, one on the back leg attached to the tunnel and one on the outer door side of the dash. There is a fat retaining pin on the door side of the dash near the bolt -it will slide out of its slot when you pull the support structure forward a bit.
Now the fun begins. It’s time to start removing the sections of the heater and AC air distribution box to expose the center rear section containing the heater core.
17. Tips on duct removal:
- The ducts are quite sturdy and can take a fair bit of twisting and crushing.
- Ducts are normally attached to their inlets and outlets with slots in the ends of the duct tubes fitting over molded tabs (bevelled ridges) in the connection stubs. There are two tabs per connection, one on each side of the connector stub, where one is typically accessible and the other usually not. A slot screwdriver or flat blade can often be used to pry open the accessible side. If you can pry open the opposite tab then great, otherwise you’ll need to forcefully twist the duct until the other slot pops off its tab. This can turn into a bit of a wrestling match.
- At the face vents, the duct end is ribbed and simply fits over a lip in the face vent connector stub (this is certainly true for the wide centre face vent duct on 900’s). The connector stubs behind the face vents are stapled to the back of the face vent dash inserts.
- There should be no need to remove the face vents during heater core removal unless a duct connection stub accidentally gets ripped off the back of a face vent insert. Pulling out the face vents can easily damage the area surrounding the dash opening. If you really need to remove them, here are some notes. On 700’s, the face vent dash inserts are held in place by stubs on the sides that simply grip into the dash material. To remove, simply push the vent to one side then the other while prying out at the other side using a flat blade to keep the stubs from tearing into the dash material. On some 700’s, there may be a lower trim strip that needs to be removed first -the trim strip retaining pins will easily break so you may need to use mastic (or perhaps silicone sealant) on reassembly. On 900’s, the dash vent inserts have the same stubby grips on the sides, but are primarily held in place from behind with a metal clip on the top of the duct connection stub -these seem particularly difficult to remove and this should probably be avoided at all cost. On 900’s, if the face vents become loose in the dash then the metal clips will need to be pushed further out from the connector stub –this can be done relatively easily by reaching up behind the dash and pushing the clips tightly against the face vent insert. [Monty] The duct to the driver's side face vent can stay in place. It looks like it would be a bear to remove and there's no need to.
(NB. Some of the foregoing is based on vague recollections of commonality between the 700 and 900 systems, so there may be inaccuracies)
18. Remove the passenger right side face vent duct: It’s a two-piece duct. You really only need to remove the piece that attaches to the air box, but for needed visibility later on you might as well remove both pieces now.
19. Free the face vent box section: Remove the screw in the center front of the face vent section holding it to the rear distribution box. Take note, the screw also holds a plastic retainer for the heater control panel wire bundle. There’s also a metal support bracket on the passenger side of this box. It attaches above to the defrost vent (leave that upper end alone). The lower end of the bracket is riveted to the side of the face vent box section. Drill out the rivet to free the bracket and bend it out of the way. On re-installation, you can use a pop rivet for a professional look, but a stubby round head (#10 or #8) screw gives a better bite. Also note, on re-installation, the rivet hole in the bracket may not align with the old rivet hole in the box. In that case, just make sure the box snugly fits all around after the floor vent box section has been installed then make a new hole (the box may not have been perfectly assembled the first time).
20. Remove the floor vent box section: Remove the retaining screw located on the flat alignment tab in the face of the floor vent section box. Release the rear floor vent ducts –lift up the carpet next to the tunnel just in front of the seat rail; locate the plastic retaining plug holding the duct to the floor; remove the screw from the plug; pop up the plug (grab under the outer lip with bent nose pliers and pry up). Pull back hard on the rear floor vent ducting while pushing the floor box section away so you can disconnect the rear floor ducts from the floor vent box section (it may take some effort –your only other choice is to lift the front seats and free the floor duct at the other end first). Cut restricting nylon ties as needed. Remove the floor vent box section from under the main distribution box. Push down, pull forward and twist/slide out to the left. Note that there are plastic studs on the bottom of this box on either side that easily get caught on the under-padding -use your fingers underneath to keep them from digging in.
21. You can now remove the face vent box section: If you haven’t already done so, unscrew the face vent box section from the distribution box, release the metal support strap riveted to the passenger side of the box section and remove the passenger side face vent duct (as noted above). Pull out the passenger side of the box section from the metal retaining clip on the distribution box. Pull out the box section at the bottom so you can disconnect the duct going to the left side face vent. Firmly push the top of the box back as you rotate the bottom out to disconnect the upper duct from the center face vents. The face vent box section can then be removed.
Optionally, on 700’s (older ducting) after freeing the left face vent duct that goes over the steering column behind the instrument panel, rather than just leaving it there hanging in the way, you can remove the entire duct for better access and viewing. If you don’t remove it you can still work around it so it generally isn’t worth the effort. If you feel the need to remove it, pull the duct off the left face vent then remove the entire duct to the right twisting it as you go over the steering column. Note that on 900’s (with newer ducting) this is not possible.
22. Remove the air distribution box: The distribution box cover is sealed with mastic. There are either 11 or 12 screws (7 mm): 4 spaced along the top edge, 4 along the bottom plus 2 close together on each side. Access to all but the 3 top left screws is relatively straightforward. You’ll want a 1/4" drive 7 mm socket, a medium-long extension (assorted lengths preferred) and a nut driver handle. A ratcheting 7mm box wrench will also help. Tape the socket on the extension so it doesn’t fall off, especially when you’re working on the top screws. Use putty in the socket to keep the top screws in the socket so you don't lose them. If you have difficulty getting the socket to sit over the 7mm screws then here are some tips. The 7mm socket should be six-point (almost all are). The socket tip should not have a rounded lip (unfortunately, quality sockets often do). The screws are set fairly close to the box cover walls so a narrow profile socket is ideal (some sockets are a little fatter than others), especially when attacking the screws from a slight angle such as the tricky upper screws. It would not be a bad idea to take a cheap socket, grind the tip flat and grind the sides around the 1/4" socket insert end to a tapered narrower profile. A 1/4" drive wobble extension and/or a universal joint are almost a necessity for accessing difficult screws, especially if you haven’t removed the entire dash support structure. I found a homemade tool, basically a thin profile combination socket and extension tube, can greatly simplify access to the upper screws: take a medium length (say 8-9 inches) of 1/4" i.d. copper plumbing water supply tubing (the kind used for sink water supply lines); crimp one end to accept the 1/4” drive head and crimp the other to accept the head the of the 7 mm screws; as copper is soft you may need to re-crimp the ends occasionally; if you’re good at crimping, the tubing will also firmly hold the 7 mm screws for re-insertion. Additionally you may want to use some putty/mastic inside the socket to hold loose screws.
Note the cable clamps and contents (a good time to take close-up digital pictures). Remove all accessible screws on the bottom, sides and the top right of the distribution box using the nut driver and extension at the appropriate angle. About now you will realize that access to the remaining top three screws would be easy if the defroster duct wasn’t in the way, but you’re not removing the box the way the factory installed it so that simply isn’t possible without major destruction. Now for the top three screws: For the upper left screw, push the colored pneumatic tubing and wires out of the way to expose the upper left screw for removal (it’s usually holding the plastic clamp for the tubing). Next, with a flashlight, if you peer over the top of the box from the far right, you will be able to see the screw on the back edge, more or less in the center of the box and just to the right of the foam collar. With a socket and extension (or the magic tubing tool) you should be able to reach the screw for removal.
There’s one more hidden screw on the top back edge of the box to locate and remove. It’s more or less directly behind the foam collar. There is roughly a 3/4” gap between the defroster duct and the top of the distribution box cover. Pushing your fingers into the gap may trap all but the smallest fingers –consider yourself warned. The defroster duct has the foam collar stapled around it to cover this gap. You could try removing the staples holding the foam collar and pull the collar out to gain a view through the gap, but you’ll end up having to rip the foam out of the staples on the back side resulting in a lot more work trying to get the foam back in place and properly sealed. It’s simply not worth the effort as all it affords you is a slightly better view. From the passenger side, use a flashlight to spot the hole again for the top right screw you just removed. Now as you move your face far to the right, look left along the back edge with the flashlight and you should be able to see the last screw (failing that try a dental mirror). In theory, someone with tiny hands and amazing skill with a universal joint could access that screw, but few (if any) will have ever succeeded. To access that screw you use a socket on an extension (or the magic tubing tool) straight through the defroster gap. If you use a socket, tape it on the extension so it won’t fall off while you’re poking around. Lift the front foam edge and carefully work the socket through the small gap between the distribution box and the defroster duct and keep going out through the back edge, poke it out under the rear foam toward the screw. Rolling the socket as you poke it through the rear gap will avoid tearing the foam at the back as it sits flat on the top rather than being tucked over like the front foam. Now while looking at that miserable last screw at the back with a flashlight, work the socket around until it’s visible and seat it onto the screw head (it may take some force) so you can remove the screw. This is where the magic tubing tool really pays off -it has a narrow profile and will sit flat on the box and slip right onto the screw. There’s no need to bring the screw or even the socket out through the foam, just leave it up there until the box is removed. That is by far the worst step and anyone having done this job will have a vivid memory of trying to remove that screw. If you didn’t know about that screw you could spend hours trying to pry the box off until the plastic edge around the screw finally broke. Ignore the vertical screw visible on the top of the air distribution box. Only the screws on the perimeter need to be removed.
Separate the cover section from the box by prying around it with a blade (putty knife) inserted into the sealant (starting at the lower right and going up the right seam then along the bottom seam) allowing you to remove the cover by hand. Take careful note of the locations of the four coloured vacuum hoses on the servos on the left side of the box before removing them. There are retaining loops on the ends of those hoses that need to be pulled around off the stem (except the one on the back side of the middle servo where the loop is just back over a knuckle). For ACC equipped models, disconnect the aspirator hose from the cover. [Otis] I didn't disconnect the vacuum lines as their terminals looked brittle, yellowed, and likely to crack. The cover of the heater box can be moved out just enough to remove the heater core without actually removing the cover from the car.
23. Remove the heater core: It’s held in place by the tall vertical straps (brackets) on each side. The upper screws are a bit difficult to reach, especially the left one. In that case just remove the lower screw and bend the strap up for full clearance. The heater core nipples go out through a foam collar sandwiched between the heater core box and firewall –that foam collar is visible from the firewall side. As noted above, the foam is not a perfect seal when pressured coolant is shot into the nipple openings from the engine compartment. To correct this problem in later production cars the nipples were caulked to the back (core side) of the foam insert. If you have difficulty pulling the heater core out then from the firewall side you will need to break the caulk seal by poking in a small screwdriver working all the way around between the nipple and the foam. If you still have difficulty pulling the core free because you can’t get a good grip on it then you can push in hard on the nipples from the engine compartment side: use a hammer to strike a block of wood placed over the nipples or insert a long handled bent needle nose plier into a nipple and push hard.
24. Mop up anti-freeze as you go: If you didn’t blow the old core clear of anti-freeze you may easily spill its contents and end up cleaning carpets and underpadding (yet again).
25. Replace the heater core: Top hose is the inlet hose.
26. Repair the distribution box foam seals:
The foam at the distribution box face vent shutter door will typically be soaked, at least along the bottom. Old or wet foam is also easily damaged. The flat foam on the shutters is basically soundproofing and should be carefully blotted dry. The rectangular foam gasket around the door opening will typically be mush. It will almost always need replacement. Scrape off the foam gasket and the backing glue –a hot hair drier or heat gun on low is useful if you need to soften it. Use 1/2" wide by 3/8" or 1/2” deep, closed cell, self-sticking, black sponge rubber foam tape sold in small rolls as draft-stop in the insulation/weather-strip section of most decent hardware stores. For better adhesion, use hot melt glue (hobby glue gun) on both edges of the box where the tape will sit. Apply the hot melt glue for one piece at a time. Before you are able to push the foam piece in place, the first of the glue may be setting –if so just re-melt the whole application of glue with a hot hair drier or heat gun on low then firmly seat the foam tape. Use strips a little longer than needed and cut off the excess after gluing. Glue the corners together so the ends won’t separate and pull away.
Reassembly, as they say, is simply done in the reverse order. Well, maybe not so simple in this case. Tips for reassembly have been included above.
Additional Tips:
- When reinstalling the heater core, there are some wires and vacuum hoses that run BEHIND the heater core and come out at the top left. There is a notch in the heater box for them to live in. After the core is in and you're replacing the front of the heater box, move it into place laterally, but with the bottom kicked out, then slide it up and into place. Otherwise, you risk pinching those wires and vacuum tubes
- When re-installing the heater control unit, put in the top two screws first, then fit the console side panels, then fit the radio bracket whose top holes are held by the bottom screws of the heater control unit and whose side screws go into the console side panels.
- When re-installing the relay tray, carefully compact and route the wiring harness underneath and fold the excess at the rear so that the tray will be able to be pulled forward for access. Consider replacing the plastic heater control valve while you have easy access below the heater core nipples –these are a common failure point.
After you’ve got it all back together and regained your composure, it’s an ideal time for a complete rad flush: drain the system and flush clear; top-up with 100% pure coolant measured to 1/2 the cooling system capacity (typically 4.25 litres or 5 U.S. quarts for a 50/50 mix); top up the remainder with water (ideally distilled or de-mineralized water, but not de-ionized water). Whether or not you’re flushing: top up the rad expansion tank with coolant mix; tighten the cap; warm the engine fully with the heater control wide open until heat comes out; check for leaks; let the engine cool so you can open the expansion tank cap safely; top up as needed; watch the coolant level over the next few weeks as trapped air works its way through the system.
700 and 900 owners can take some pride in outdoing 240 owners with this project. Heater core replacement is about twice as involved as the infamous heater fan replacement on a 240. In both cases there’s a tendency to believe that Volvo started with the heater section in the middle of the factory floor and built the car around it. In actuality, it was installed before the dash and windshield were installed.
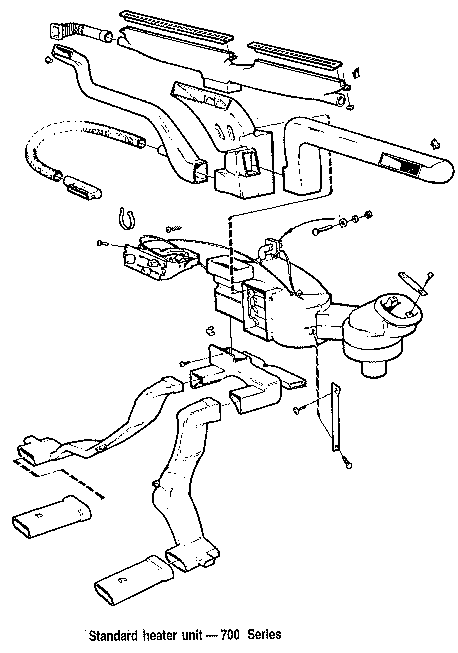
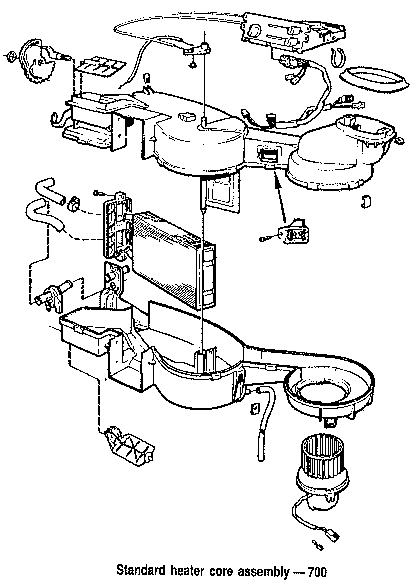
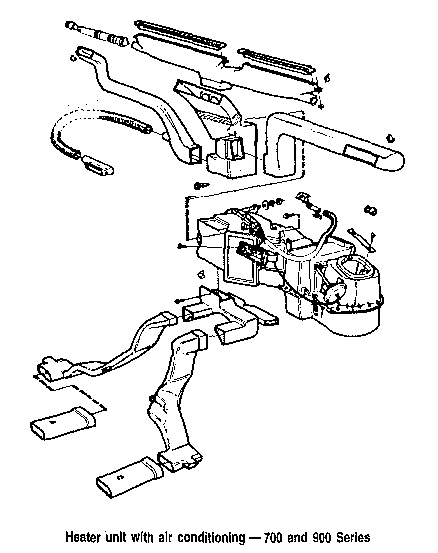
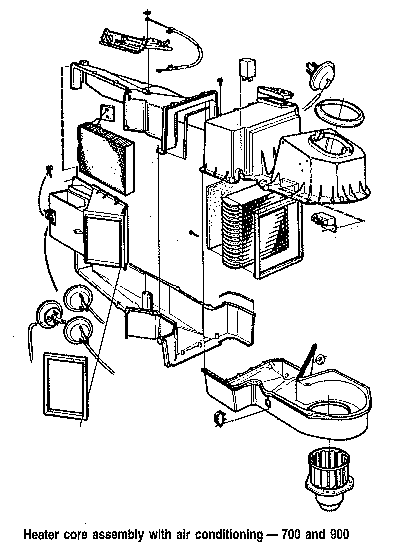
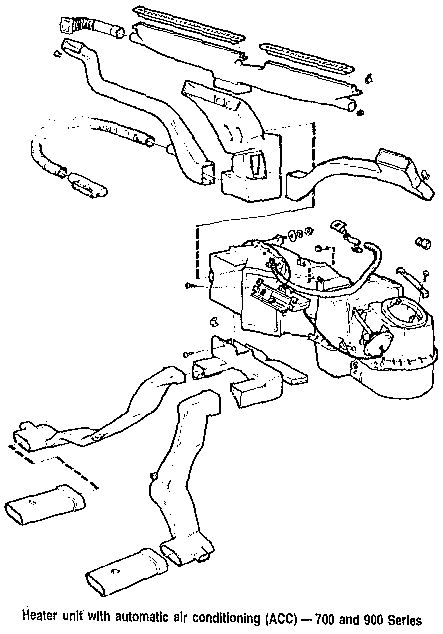
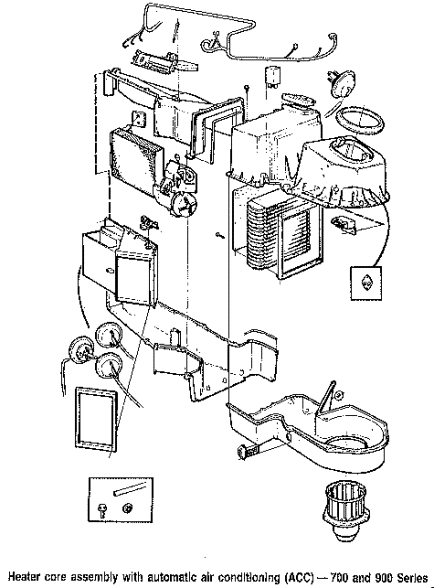
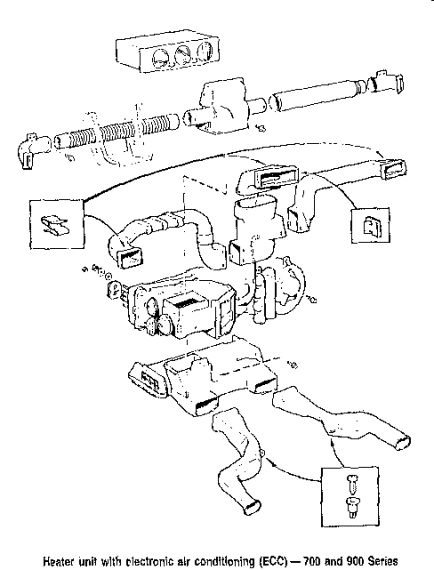
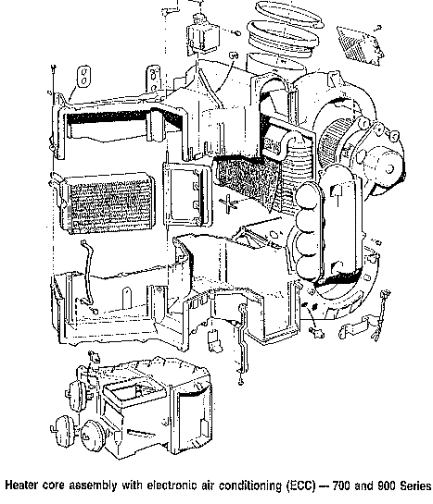
These are a selection of standard exploded view diagrams for the air distribution assemblies and heater core boxes for the various types of heating, air conditioning and climate control systems. You may not find a diagram that exactly matches yours, but many sub-assemblies will match from the various systems. Somewhere in these diagrams you should find the ducting that matches your car. In particular, some ducting assemblies shown for the more advanced systems, like the automatic climate control (ACC) and electronic climate control (ECC) diagrams, may have been used on the AC/MCC system in later years.