Volvo B230 Valve Train Maintenance
Volvo B230 Valve Train Maintenance PDF
Replacing the B2XX/230F/T Valve Train Wear Parts
[John Sargent/Dick Riess]
 I checked and adjusted the valves on a B230FT this week. Two valve shims needed changing, and I also installed new rubber hushers. The rubber hushers fit into the top of the valve keeper and under the valve depressor. As long as I am changing the valve hushers, it isn't much more work to do the valve guide seals, and then you have a complete job.
 Rubber Husher Cushions. [Dick Riess] The B21/23 and B200/230 series of engines are overhead cam with solid cam followers. Valve adjustment is made by changing shims held in the valve depressor. The valve depressor looks like an inverted straight sided bucket, and the shim snaps into the shallow (up) end. Under each valve depressor there is a little rubber cushion which serves to take the "click" out of the actuation of the valve. This little rubber cushion is called either a "husher" or "valve absorber" depending on who your are talking to. These hushers snap into the valve keeper. The rubber looses its elasticity over time and heat, and you get noticeable valve noise.
 The husher is a rubber flange shaped device that sits on and around the top of the valve stem which keeps the stem and lifter from clattering against each other. The actual valve stem seal is located on intake vales and is on the guide and under the spring---more difficult to reach. If you start to hear some valve noise in your car and it is high mileage, you might want to seriously think about replacing these little rubber hushers. They are inexpensive and do not change your valve clearance. Your engine will be quieter too. To change, first remove the cam. If all you are doing is replacing the little hushers, just remove the valve adjustment discs and keep track of which valve they go to. Be sure to clean out the buckets which slip over the valve and remove all the husher pieces before reassembling and installing new hushers. Your clearance will not change, but measure if you like. You are only inserting a rubber shock absorber not modifying the cam or lifter. However, if you have new hushers installed it makes it tough to feel properly with a feeler gauge, although they will compress down after a few minutes of hot operation and the valve clearance will revert to normal. I complete the valve clearance process before I install the new hushers. Do not overtighten the cam bearings -- 14 lbs only. You might use some Hylomar sealant between the front cam bearing caps to eliminate oil seepage.
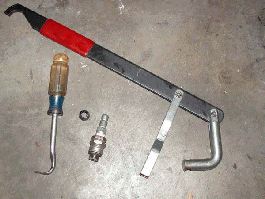
Valve Stem Seals. Only the intake valves have guide seals on these engines. The picture below shows some the special tools I used. The valve compressor is left over from VW days, and it works well on the Volvo heads by squeezing the fingers together. The air fitting for using compressed air to hold the valve shut is made from an old spark plug and a male quick disconnect air fitting. The tool that looks like a screwdriver with a hook is a Craftsman Cotter Pin Removal Tool, and I use it to remove the old seals.
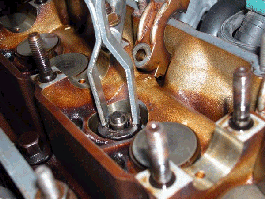 The next picture shows depressiing the valve spring. I am using compressed air to hold the valve shut. Usually you have the bounce the valve compressor a few times to get the keepers to unstick from the valve retainer.
The picture below shows using a magnetic pick up tool to pick the keepers out of the valve retainer without dropping them. You could use 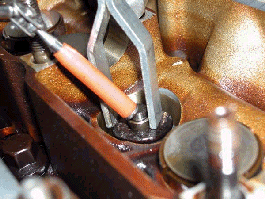 some needle nose pliers, but the magnetic pick up tool works best for me.
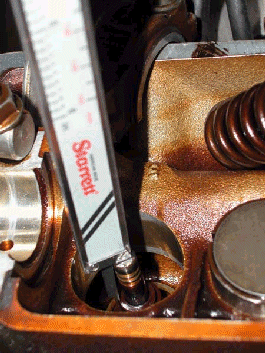
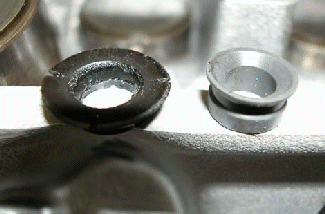
If you haven't done this job before you might want to check the seated depth of the seal be measuring from its top to the end of the valve stem. You want the seals fully installed. I had a machine shop not fully seat the valve guide seals on an engine once. All the seals came up in 50 miles. You never saw so much smoke!
Use the cotter pin removal tool to remove the old seals.
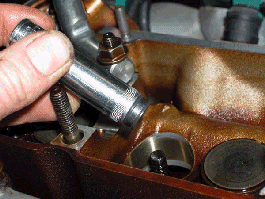 This picture shows using a 12mm deep socket as an install tool for the seal. The socket works well for this, but make sure that the little spring on the top of the seal sits up inside the socket. You don't want the rim of the socket pressing on the spring at the top of the seal. Volvo sells a special tool for this, but I don't have one. Sometimes the valve guide seals are supplied with a little protective sleeve to help keep from damaging the seal on the grooves in the top of the valve. The grooves aren't too sharp, and I use a little grease or motor oil to help the seal over the top of the valve. Push the seal carefully over the top of the valve stem.
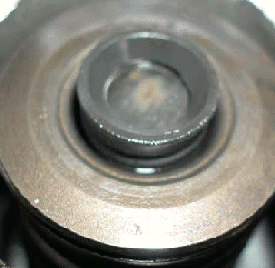
 This picture shows using the valve compression tool to press the seal over the top of the valve guide. You can also push them on by hand. If you use the tool, feel what you are doing and quit when resistance gets high. You don't want to over do it and damage the seal. Don't forget to check the distance from the top of the seal to the end of the valve to insure the seal is fully installed.
Now it is time to put it back together.