Volvo 960, S90 and V90 Information and Maintenance
Maintenance:
Engine Problems:
960 B6304 Intake Manifold Gasket
960 B6304 Head Gasket Replacement
960 B6304 Fuel Rail Leakage Problems
960 Charcoal Vapor Canister Replacement
960 Too Hot or Cold: Stuck Thermostat
960 Coolant Loss: Coolant Reservoir Cap at Fault
Coolant Loss Behind Water Pump
960 B6300 Leaking Oil Cooler Fitting
960 B6304 Leaking Rear Main Seal
960 Oil Pressure Problem: O-Ring Problems
960 Oil Pressure Problems: Failing Oil Relief Piston
960 Engine Won't Start: Sticking Valves
960 Engine Won't Start: Loose Starter Bolt
960 Engine Stalls and Won't Restart: Wiring Harness
960: Transmission Lights Flash, Cylinders Quit: Bad Ground
960 Sudden Idle Surge: ECT Sensor Failure
Changing Engine Mounts on 960/90
Transmission Problems:
960 Automatic Transmission Questions
960 Won't Restart: PNP or Harness
960 Flashing Transmission Lights
Other Concerns:
Unexplained Driveability Problems: Rotten Battery Cables
960 Driveline Noise: Failing Grease Seal at Rear of Driveshaft
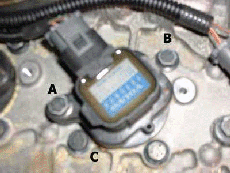
Removing the Camshaft Position Sensor
OBD-II Scanner for 96+ 960/90 Cars
960 Air Conditioning Failure Points
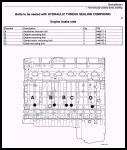
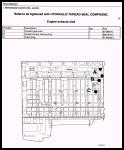
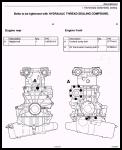
Torque Values for B6244, B6254, and B6304 Engines
[Editor's Note: See specific functional areas for more information about particular 960/90 systems, including automatic transmission and heating-air conditioning.]
Maintenance:
Checking Transmission Fluid. [Inquiry] How do you check the transmission fluid level on a 1997 Volvo 960? (I've looked everywhere for the dip stick) [Response: Warren Bain] It's accessed from below on the drivers side. I had this problem at first as well. It's a small yellow 'dipstick' that's way down there, if looking from above.
Coolant Replacement. [Editor] Lots of reports of leaking, porous blocks are appearing in Vovo enthusiast sites such as Brickboard. Many of these failures are in low mileage, late model B6304 engines. Consensus opinion is that these are due to failure to change coolant regularly and to use the proper coolant. Contrary to your owner's manual, the coolant is NOT "lifetime" and has to be replaced. This aluminum engine is subject to electrogalvanic corrosion and coolant breakdown, so make sure you change the coolant every three years or so. Use ONLY Volvo Type C blue coolant and distilled water. Do not under any circumstances use orange Dexcool or "all applications" coolants. For more information about leaking blocks, see the link.
960 Spark Plug Removal. [Inquiry] How do I change the spark plugs on my 960? [Responses: Carlos Torres/Tom Irwin/Warren Bain] The plugs are on the middle of the engine.
- Remove spark plug access cover. (Black cover on top of engine.)
- Once you have the black plastic cover off, number the coil packs with a magic marker 1 - 6 front to back so you can correctly replace them.
- Coil packs are held in with a
pair of 10mm bolts (A and B in the illustration. Later 960s have only one
bolt at A).
- Once you have the bolts out the pack should just pull out. A little twisting may help as there is an "O" ring seal at the top of the valve cover and a big boot at the spark plug.
- Remove coils from spark plugs. Do NOT disconnect coil wires. (VERY IMPORTANT)
- Inspect the condition of the wiring going to the coil pack. Look for crumbled insulation or charring. See 960 FAQ file for information on failing engine wiring harnesses.
- If you have comprssed air blow out the plug cavity before you take the plug out. As an alternative use a vacuum cleaner and brush to clean any "stuff" out of the hole to avoid having it fall into the cylinder.
- Remove spark plugs. Use a good quality, rubber insulated spark plug socket. Once they are unscrewed, you have to haul them up out of the hole.
- Check and adjust spark plug gap to: 0.030" (.75 mm)
- Install clean, "un-oiled", spark plugs and torque to: 18 ft. lbs .
- Refit ignition coils.
- Reinstall spark plug access cover.
960 Parts Sources. [Tips from Rafael Riverol] Don't pay dealer prices for parts such as rebuilt heads, pistons, piston rings, and the like that are sometimes necessary for your 960 after a timing belt failure or overheating incident. Check the following for exceptional prices, service, and willingness to source in Sweden if necessary:
- Import Parts Specialists (Idaho) http://www.importpartsspec.com
- Foreign Car Parts of Groton (Connecticut) http://www.fcpgroton.com
[Note from Tom Irwin] There is some evidence that Volvo OEM brake rotors for 960/90 cars are of lesser quality; buy aftermarket for better quality and lower prices from reputable suppliers such as IPS, FCP, IPD, RPR.
Online Maintenance Manuals. For online 960 Volvo maintenance manuals, see: http://caunter.ca/volvo960/
960 Flame Trap Maintenance. See Flame Trap in B6300 Engines for more information.
Serpentine Belt. [John Shatzer] Just a cautionary note to check your serpentine accessory belt for inside edge fraying. Apparently when you begin to accure higher milage (in exess of 100K), the tensioner begins to sag, it will cause rubbing along the inside edge (toward the engine) of the belt surface. Replacement of the tensioner is called for. We've heard about at least one (rare) instance of a broken serpentine finding it's way into the timing belt housing, and the rest, as they say, is history.
Timing Belt/Tensioner Changes. See 960 Timing Belt Change for important information regarding the timing belt change interval - which varies by model year for the 960 series - as well as the tensioner and idler pulleys which, upon failure, will destroy the belt and the cylinder head at great cost. More and more reports of pulley and tensioner failures are being heard, even as low as 95k miles. So the importance of changing these components cannot be overstated.
960 B6304 Cam Gear Timing. [Inquiry: JT] I removed the cam gears from the head of my 960 and now can't figure out how to get the gears back on with correct alignment so the cams and valves are timed right
[Tip: Tom Irwin] Make sure and scribe the bolt positions on the gears before removal. There is an awful lot of adjustment in there
[Self-Diagnosis: JT] I took a look at the 960 again last night and I cam up with a way to solve the problem. The problem was that I took the cam gear off of the camshaft and did not know that it was not pinned or marked. This meant that it could go on the camshaft one of 3 ways at 120 degrees out of phase. With the intake manifold and exhaust manifold off I could see the valves. Had to use a mirror for the exhaust side. The spark plugs were out also. I set the timing marks and hoped for the best with a 1 in 3 chance of getting it right. I did not get any interference when I slowly turned the crank by hand, so feel will not work. I checked the firing order and compared the exhaust valves openings to the intake. Used a flashlight to shine in the plug holes and look in the ports to see when the valves would open. I found that the cam gear was off, making the intake and exhaust valves open and close at the same time. This is why there was no interference. So the intake valves were opening to soon. So I went back 120 degrees to the next hole and retested. This time the timing was correct. I then marked the cam gear to the camshaft so I would not have this problem again. So all you 960 owners out there be careful with the cam gears. I do not know but the 850s may be the same way.
[Response and Caution: Jim Bowers] The Volvo tools to set the cams cost about $250. There is a tool for locking the crankshaft in position, about $50, and one that attaches to the back ends of the cams, almost $200, and puts everything in sync. In addition to the three possible choices with the holes in the gear/pulley, the holes are elongated so you still have several degrees of choice once you get the correct holes lined up. The car will probably run, but will not be set at factory settings if you don't use the tools. Maybe you can find a place to borrow the tools? Or, once you have it in running condition get to a dealer and have the timing set. I just ordered a set from Kent-Moore, the Volvo tool supplier. Same tools are used for the 850 and probably for the S40? All that having been said, you would have saved your self a lot of hassel if you had spent the few $ to get the Volvo Service manuals for the engine. One of the books I have (TP31714/2) takes you, in pretty good detail, through changing a head gasket.
[Tip from Tom Irwin:] I've heard the following is critical to re-assembling the head: bottle of gasket goo, rollers and tension spreaders? The stuff I have is "Volvo #1161059-3, High Temperature, Chemical Gasket", it comes in a 50ml tube.
Engine Problems:
Sticking Valves. [Summary of tips from Tom Irwin] To avoid the sticking valve problem in the B6304 engine which causes valve and piston collisions and consequent head meltdown, follow carefully this advice for 960 owners from Mr. Barrington of Barrington Engine of LA, rebuilders of many toasted 960 heads:
1. The Abe Crombie Tune-Up is
a GOOD thing!
2. Put a fitting behind the AMM for occasional, brief WATER introduction
to the Hot engine...while
running Shatters and blows away the carbon build-up.
3. ALWAYS ALWAYS use PURE SYNTHETIC OIL! VERY insistent on that one!
Failure of Timing Belt and Bent Valves. If your timing belt in the B6304 engine fails, your engine almost certainly has experienced major damage including multiple bent valves, cracked valve guides, possible damaged pistons, and head damage. This will cost a fair amount to repair since it is both labor and skill intensive. Some tips: [Chuck Jeckell] Any guides that need to be replaced CANNOT BE HAMMERED OUT AND BACK IN!. The head must be heated and the guides cooled/frozen to replace them properly. Volvo has had a problem with people experiencing oil leaks when their valve guides leak after being installed incorrectly. Most machine shops are not set up to install them properly: ask around (and see the note above). Once the head is off, the broken guides will obvious to the shop. Be aware that piston damage is possible, but not likely. Use the orange glue/sealer with a roller when reinstalling the head: nothing else will do.
General Diagnosis. When diagnosing engine oil leaks on the B6304, first make sure the flame trap and all associated vacuum lines connected to it are clean. Then consider the following sources:
- [Warren Bain/Jim Bowers] The oil filter cooler/adapter O-rings may be leaking. If the oil filter gets stuck at oil change, the oil cooler can loosen. Remove the belly/splash pan to check this area. If the "O" rings have been disturbed, they may need to be replaced to get a perfect seal. This shouldn't be more than .5 hours of labor and $2 in parts. (Then tell your "oil change mechanic" to lubricate the filter gasket and hand tighten only.)
- The rear cam seals can leak, especially if the flame trap was clogged.
- The rear engine seal can leak.
- The oil fill cap gasket can harden and allow blowby.
Clean off your engine and carefully trace the oil leak before concluding the worst.
Cam Timing Sensor. [Inquiry] The cam timing sensor on my 960 is leaking oil when the engine warms up. I have checked the location with a telescope mirror and is not from the seal around the block. Could it be an inside seal? [Response: Abe Crombie] There is a seal deeper in from cam sensor. It is a bear to reach. Go to dealer, they have a tool that presses it in. There is no room to tap it in with engine in car. The shutter wheel must be put back correctly also.
Valve Cover Top Recesses. On removing the valve cover, I discovered oil pooling on the spark plug cover. It turns out the screws holding the cover were loose and mounted in holes drilled too deep into the head (a manufacturing problem from Volvo). I reinstalled them with Teflon sealant tape and that solved the problem. Note that you have to re-tape the bolt threads every time you remove the plastic cover. You may want to replace the torx bolts with regular hex bolts to make removal easier. The torx heads can't take the torque of repeatedly rotating a stud with the tape on the threads. [David Hunter] Those bolts can leak even when not stripped. There is oil under pressure very close to the 4 bolts around each of the plug holes. If the sealant used between the upper and lower head fails the oil will run up the unthreaded portion of the bolt and out under the its head. Then some ham handed "mechanic" comes along and says "oh better tighten that" and he strips it. Before it is stripped though it is quite easy to withdraw the leaking bolt a bit, apply a sealant under the head and retighten to 13 ft/lbs. [John Roberson] If a previous owner has stripped these bolts, here is how to solve the problem of continual oil leaks. You will need a couple of 7x1.0mm bolts about a 1/2 inch longer than the bolts that are in the head now. They should be full threaded parts. You will need a few washers of good strength as well as a couple of hex nuts. You will also need a 7x1.0mm tap. Get them at Fastenall or a machine supply store.
Take the bolts out and retap the holes as best you can and as deep as possible. Clean everything with brake cleaner. Using a Dremel tool, cut the heads off the longer bolts you bought. Wrap the side going down into the hole with teflon tape, put two of the hex nuts at the top of the other side of the bolts and jam them together tight and then run the bolt down till it just bottoms out, but do not overextend and possibly crack the aluminum casting. Do this on each bolt, then take the hex nuts off and use the bolt now as a stud with a washer under the hex nut and tighten down. By the way, you can use knobs instead of nuts to hold the cover down: Monroe Engineering
Mix up some JBWeld epoxy and apply to the leaking area and let set up over night. I would also use the JBWeld around the hex nuts and washers to make sure it doesn't leak through again. If necessary, you may have to retap with an 8mm tap and install a larger 8mm bolt instead of the loose 7mm OEM bolt.
[Caution: David Aidnik] The oil you are seeing in #5 plug well is creeping across the interface between the upper & lower head sections that is supposed to be glued together with chemical gasket. It is creeping past the o-ring seal around #5 plug well indicating that the upper head section is lifting and also that the o-ring gasket is probably brittle & hard. I would estimate the longevity of any fix other than the correct fix by removing the valve cover and helicoiling all loose holes to be temporary at best. The fact that you are seeing oil seepage means that the chemical gasket is compromised (seperated). This is not going to be fixed by tightening bolts. I'm not a fan of funky fixes, so I would recommend the removal and proper fixing with helicoiling.
Vacuum Leaks: Diagnosis. [John Roberson] I had a difficult-to-trace vacuum leak in my 960. I finally found the last of my leaks--and the last one was a doozy-- on the backside of the intake manifold. On the driver side is a vacuum block that has 6 vacuum hoses coming off it. I found two hoses that were cracked by taking a tube and putting it to my ear, I could hear air hissing. Found the two hoses that were cracked--but the interesting thing was after doing the fix --put the tube back to my ear and could still hear air moving. Unhooked everything and took the vacuum block off-it's held on by one 10mm bolt. I pulled the block out of the intake. At the base there was a disintegrated rubber O ring. A new number 30 o-ring from Lowes hardware and the fix is now complete--no air leaking now.
Porous 960 B6304 Blocks. [Tip on used car purchase: Kelvin Kean] We purchased a 92 960 station wagon in 1985 with about 30,000 miles from a Volvo dealer. In the summer of '98 the coolant started needed topping up about once a week. By October, it needed two quarts a week. After removing the exhaust manifold our mechanic found the leak, a line of pinholes in the side of the block. He attempted to seal the leaks using a compound often used by truckers to seal small radiator leaks. The fix lasted a week. From then until January, we used the car but had to add increasing quantities of coolant to the radiator. In January we took the car into our mechanic and went through five gallons of water keeping the radiator from boiling over. When the mechanic looked over the engine block again, oil was now bleeding from an identical line of pinholes on the same side of the block and parallel to the line of pinholes leaking coolant. The engine block is defective. There is no fix short of replacing the entire block, which means an entirely new or rebuilt engine.
[Editor: See Repair Notes Below] And this failure is a fundamental failure in manufacturing or design. No engine block should ever leak coolant or oil short of a million miles! We've contacted Volvo of North America and their position is that the warranty has expired and that besides we did not have the car serviced at an authorized Volvo dealer. We are now in the process of filing a formal complaint in court against Volvo and its dealer. Within the last month, our Volvo mechanic has had another 960 station wagon towed in that was leaking coolant even worse than ours. Volvo has also given that owner the run-around, but he did get a member of the staff of Volvo North America to admit that they had heard of "...four or five..." 960's having the same problem.
[Response: Tim] Click and Clack the tappet brothers had a caller a few weeks ago with a similar problem. Seems there are problems sometimes with the castings on the 960 engine. [Editor's Note: Too many reports of casting porosities in 92-95 B6304s have appeared on the Brickboard to dismiss these as related to a short run of early blocks. If you are considering buying a 92-95 960, do some serious investigating and take a hard look at the engine block for coolant leaks, patches, attempted repairs, service records, etc. to pin down whether the car has this problem.] See the notes above regarding the requirement to change the coolant regularly and use proper coolants.
Where They Fail. [Tip: Tom Irwin] The 960 failures always occur directly beneath the exhaust manifold. Go outside and jack up the R/F corner, pull down the splash shield and look under the exhaust manifold, between ports #4, 5 and 6. Thats where your porous block will present itself. But really, it's not all that common. Don't confuse it with other potential leaks nearby: check the coolant return pipe under the front of the exhaust manifold; if it leaks, the o-ring could be bad.
Which Engines Are Subject to This Problem. [Tip from Tom Irwin] The early run '92's, maybe 10,000 units worldwide had metallurgical and dimensional deviations. That was corrected quickly and all subsequent castings have been more or less to print [But see the update below!]. Having said that...let's address the coolant. I have been told by reputable sources at Volvo that anything other than Volvo Blue, Type C coolant could begin to attack the block alloy with time. This reaction is accelerated as the coolant degrades. (Note, this applies to aluminum, modular engines, B6304, etc.) Naturally, if you have one of the early 92's this chemical reaction could damage the block faster. The same source also cautions against using anything but Volvo Brake Fluid due to the potential for reactive damage within the ABS pump. The only constant that remains is that in EVERY case of porous blocks, the owner followed the Volvo guideline of NEVER changing the coolant.
[Update Notes from Tom Irwin: There are two TSBs addressing this issue, 221943 in March, 1997 and 221945 in June 1997. The one from March 97 was superceded by an internal document dated November 1998, that was a Service Bulletin, titled as a "troubleshooting procedure". Here is the BAD NEWS guys...it covers 960 from 1992 through 1994... they went cheap even at that stage and authorized only a block swap with some incidental parts...the original engine gut pack had to be swapped. They called it a "defect" and allowed 20.4 hours for the swap. [Further reference:] Internal Volvo Warranty Claim Documents address block casting porosity issues in one document as a 1992 ONLY issue. The second internal document, Volvo tech paper 2120-001, covers block replacement, under warranty for 1993, 1994, and 1995+ 960's. This references block numbers 25000 to 52873.
[Finding the Block Number: Tom Irwin] Under the exhaust manifold in the webbed casting. Use a mirror and light. Or, Underhood, front body stretcher in front of radiator on your left. Riveted aluminum placard, Right column, top line, last 5 digits.
Preventive Maintenance. [Tip from Tom Irwin] Flush and change your coolant regularly and use only Volvo Blue, Type C on these engines.
[Repair Notes from Tom Irwin] I've seen 3 of these buggers come through the shop in 2 weeks. Guess what? They are 94, 95 and 96 Model years!! But.... we have had VERY good luck using "JB Weld" (heavy-duty epoxy) after very careful surface preparation. My "Mad Genius" boss has perfected THAT treatment... So, this doesn't necessarily mean a $5,600 short block... more like $3.99 at Pep Boys. To get good access, you must either go topside and pull the exhaust manifold out, or, go underneath and drop the subframe. Once in there, hit it good with solvent and clean it up with a wire brush. Some guys still peen it up first, but the mad genius strafes the surface with an abrasive flexible wheel in a die grinder.. Criss-Cross, buffet, tap-tap-tap, til it is crosshatched enough to anchor the goo. Mad Genius uses JB Quik, I would prefer the 15 hour cure stuff, but, time is money! The one today, was actually a comeback... not that the repair failed, but because another leak sprung up, missed it the first time. I found it down in the gulley of a casting extrusion, easy to miss when looking upward at it. So, learn a lesson and use a mirror to see what you might be missing.
Cracked Blocks. [Inquiry] My 92 960 block cracked just below the exhaust manifold. Is this repairable? [Paul Golden] I have about 24 cracked B6304 engine blocks on the back scrap pile and they range from 92 to 97. They all cracked in the same place. I also cracked one when I did a headgasket. I have tried welding, however, with very little success. The aluminum is a cast, so it makes it difficult to weld a nice pretty bead. I only got about 8000 miles out of the engine before the oil and water started mixing. I would not weld another one. You would be wasting your time and money. The engine blocks are hard to find, but not impossible. Look for a 6304s block instead of the 6304f block. The s has a beefier web and a better breather box. The only bad part is the main bearings are different from the f on the lower half of the block. Look for a block with less than .006 of wear in the cylinder. Try to find a c marked on the piston, or an A. These are the smaller pistons. Then you can use the f or k pistons and will be able to hone and fit pistons to new tollerance. A new set of oversize pistons and rings will set you back 800.00, plus the cost of machining. By looking in the different core piles, you will be able to piece together a great engine for less than 300.00 with no cracks. Soak the old pistons in carb cleaner with the rings still on, wash in warm water and then dry, wipe them down with a transmission oil soaked rag so they won't rust. A steam cleaner works perfect to get all the old gasket material off the engine mating pieces, other wise you will spend hours scraping. Resurface the cylinder head and torque the new head bolts to only 45 degrees at a time. Do each headbolt three times. Don't torque the bolts to the final factory spec. It is too tight and tends to crack the blocks. I have a customer that has my first 960 engine job. It is still going strong with 109,000 miles on it since the rebuild with a 100.00 core from Muse Core Suppliers. That was 5 years ago. I do about 1 every 2 months now and so far have only cracked one block. I am always amazed how little these engines wear with the proper oil changes. I hope this helps you decide what to do.
B6304 Compression Test. [Inquiry:] Anyone know the correct procedure for disabling the electronic ignition and whatever else is required to check compression w/o damaging anything. [Response: Abe Crombie] There is a terminal in that electrical box on driver's side under hood. It is a single terminal that points up with nothing plugged to it. 12V will trigger starter. w/o key on and all coils and plugs removed and throttle opened while cranking you will safely, accurately get a comp test result that is valid. Warm engine also.
960 B6304 Intake Manifold Gasket.
Diagnosis.
[Tip from Jim Bowers] My '96 960 with 66K developed a rough idle last week. My friendly Volvo service mechanic suggested it was most likely a bad intake manifold gasket when I took it in to have the codes pulled. I fashioned a diagnostic tool for pressurizing the intake system with 4 psi and the problem was easily confirmed to be the intake manifold gasket. When I took the manifold off I found several of the bolts to be less than finger tight!!! The gasket had sucked in and bulged out at the number 1 cylinder. I may have avoided the considerable project if I had tightened the bolts when I first got the car last summer at 58K! With that background I also pulled back the heat shield on the exhaust side and tightened the nuts on the exhaust manifold nuts as well. Most were still tight but 3 or 4 turned up some. One turned up a full half turn! [Mark Stites/David Aidnik] First make sure you actually have a leak at the intake manifold. The easiest test method for this is to spray the region of the intake manifold & rubber sleeves with brake cleaner or propane while the car is idling. Do it when the engine is stone cold as the leak will be worse at that time. Don't look for a rise in RPM as it is not going to happen: instead, the engine will stumble. The worse the leak, the worse the stumble
Parts Needed
[David Aidnik] You'll need a new manifold gasket; new rubber sleeves, new non-resuable Oetiker clamps for the rubber sleeves (12 clamps); Oetiker clamp pliers. (Although see the notes below about reusing these clamps). The flame trap has an Oetiker clamp, but you might want to change this to a screw type band clamp as the Oetiker clamps are not re-usable. You might also pick up a few throttle body gaskets, and clean the throttle body while you have everything out. Order the parts from Volvo, then you would be sure to get the right size Oetiker clamps & the OEM rubber sleeves. You can buy the pliers on Ebay as I did for ~$20.
Replacing the Gasket. [David Hunter] The gasket is easily replaced by removing the 9 or so manifold bolts, pulling the manifold away from the head slightly and inserting the new gasket. Some bolts are a bit difficult to access, so I used a 1/4" drive set with a universal joint. It would not be necessary to undo the hard to reach lower support bolt as it is on a rubber bushing that will easily flex The job looks like it should be a one day type job the first time.
Tips. [Mark Stites/David Aidnik] If the manifold gasket is failing it will usually do so at the #1 or the #3 cylinders in that order. I have replaced the gasket both ways: removing the entire intake assembly, or just pulling it back a little. I prefer the former method. A few things to pay attention to if you remove the whole manifold:
- If you do decide that you must change the manifold gasket and the rubber sleeves, consider getting the Volvo manual on the B6304 engine. The procedure is about 4-5 pages long with good pictures.
- The outer manifold with the big plenum chamber has a "bottom mounting screw" underneath next to the motor mount which is not obvious except from the OEM manual.
- First remove the EGR pipe from the rear/center of the manifold to the EGR valve.
- While you can do without replacing the special holders to keep the injectors in the rail, it might be good to replace them.
- Reusing Oetiker Clamps. When undoing the clamps an ice pick or similar tool can spread the crimped feature enough to un-hitch it so as to be able to reuse it. Once off, use two pliers to reform the bent features and open up the crimp features some more. I use a pair of end cutting electrical cutters for the crimp tool.
- Only disconnect the outer end of the hoses and use a suitable pry tool to maintain control over the manifold as it takes some force to break it free.
- Make sure that you have all six of the rubber hoses back onto the manifold and none are crooked on the bottom. It is very easy to get one crooked and then clamp it down. Put a light coating of Never-Seize on the inside of the hoses and a little on the manifold to ease the re-assembly process. Use a light and an inspection mirror on every inch of all six of them to make sure before you use that single-use Oetiker clamp.
- Iif you do pull the entire manifold make sure that you improve the ground for the black wire that mounts onto the engine mount bracket. Consider relocating it to the back of the starter and put a star washer on it to ensure a good ground.
- I use a magnetic socket when pulling the actual manifold bolts. Loosen, but don't remove, the lower bolts on the inner manifold section; they have slots for the screws on the bottom and are slotted into the manifold itself. It makes for a handy situation when you can install the lower bolts and gasket and then carefully set the little short manifold in against the head. Torque is 15 ft-lbs on the bolts.
- Make sure that you route the oil trap/breather hose through the manifold runners BEFORE you get the main manifold installed. Have the correct Oetiker clamps for the connection on the top of the oil trap. Inspect that oil trap closely as they are known to leak and now is a good time to replace it.
[More Intake Gasket Notes] I elected to try the shortcut procedure for replacing the intake manifold gasket described by David Hunter elsewhere in this section without disturbing the Oetiker clamps or rubber sleeves. It involved removing all nine cap screws holding the manifold to the head. Upper screws were not difficult; some of the lower ones were hard to access. I would not have been able to loosen some of the screws without a 1/4 inch swivel 10 mm socket - that's the key to this approach.
I removed the MAF assembly and the throttle assembly for easier access. Then I removed the fuel rail, forgetting to relieve fuel pressure. The rail came off the fuel injectors, and I was able to pry out the two fuel feed line fittings after removing the retainer clips. I left the injectors in the engine. The job may have been a little easier if I had removed the injectors, but I didn't have any replacement o-rings, so I didn't want to risk disturbing the seal.
Even though I couldn't see some of the lower bolts, I knew where they were because of the pattern in the replacement gasket. By threading an extension with the swivel socket to where I thought they should be, I was able to get the socket on the bolts and loosen them. One word of caution, though: I dropped one of the wire clips on the fuel injector, plus a couple of bolts, while removing them. They disappeared somewhere in the lower (inaccessible) part of the engine. I found all parts except one and was able to retrieve them with a two foot extension claw.
The manifold could be pulled back about an inch and a half on the rear side, and only a quarter inch or so on the front because of interference with the coolant fitting. I considered removing the fitting, but didn't want to go to the trouble of draining the cooling from the system. The original gasket was red and stuck to the manifold when I pulled it back. It came loose from the manifold with a little encouragement from a scraper. Fortunately, it all came out in three major pieces. I did not have room to fit a scraper back there in the event that little bits needed to be scrapped off.
I was able to carefully work the replacement gasket behind the manifold and hoped that the surfaces were clean. I didn't use any adhesive to hold the gasket in place. Rather, I put two of the top bolts back to hold everything in alignment while I finished with the other seven bolts.
I stuffed some rags underneath the manifold to catch anything I dropped, since it would be next to impossible to find a bolt that fell back down into the abyss. I didn't have a magnet to hold bolts in the socket, so I folded little bits of Duct tape inside the socket, sticky side out, to retain the bolts while trying to get them started. This seemed to work well to keep from dropping the bolts.
Someone suggested that the manual says to only loosen the lower bolts, since the manifold flanges are slotted on the bottom. This may be helpful in removing the manifold, but the gasket required that the bolts be removed completely so they can be threaded through the holes in the gasket.
I snugged everything back up, and the car is running well again. I was a little concerned about reassembly of the fuel rail, though. I couldn't find the proper procedure anywhere in the FAQ. Each of the six fuel injectors pokes into the hole of the fuel rail and is secured only with an o-ring to prevent leaks. The injectors didn't want to go back into their holes. I sprayed a little WD40 to lubricate the seals. Then I snugged down the rail to provide some pressure to the injectors, and was able to individually work each injector back into its hole. The o-rings barely cleared the outer edge of the hole. I'm not sure how far into the holes the o-rings should be seated.
I carefully inspected for fuel rail leaks, both at cold idle and after running the car up to temperature. I'll continue to monitor for leaks and/or fuel smells to err on the side of caution. All in all, a successful procedure, thoug
960 B6304 Head Gasket Replacement . [Tips from Tom Irwin] If this is your first time replacing a 960 head gasket, then plan on a full day for takedown. Then however long at the machine shop. This is a good time to at least check out the exposed parts while the head is out. Then plan on 2 full days for buildup.
Tips. See Engine: Mechanical for detailed tips on head gasket installation on 960/90 cars. For a homebrewed cam cover compressor tool, see the FAQ Section in Special Tools.
960-90 Cylinder Misfire. [Symptoms] I have a 1996 960 with 206k miles. It began to idle roughly and then the check engine light came on. I hooked up the OBD scanner and it said P0305 Cylinder 5 Misfire. So I swapped the spark plugs in 5 and 6 to see if it followed the spark plug and it still ran rough and the code was Cylinder 5 Misfire. So I replaced that coil pack over the weekend. This morning, it started running rough again and the check engine light came on again. Same code, Cylinder 5 Misfire. I am out of ideas. [Walt Posluszny] Switch the Ignition Power Stages front to back (they are located on the front and rear of the intake manifold 'ball'). They are easy to change out. If the miss moves to a different cylinder, then you have found your problem. The IPS are known issues on these engines. When a cylinder misfires, that is the second place to check after checking the spark plug. Remove the air filter ducting to get to the front unit. If you can't get to the rear unit, driving the car up on ramps will allow you access from below. 2 screws and 1 connector each.
960 B6304 Fuel Rail Leakage Problems. [Editor's Notes] If this condition occurs on your car, GET IT FIXED IMMEDIATELY
since you are driving a potential bomb. [Tip from Tom Irwin re: 1992+
960] I've been trying to trace the source of a raw fuel smell coming from
my car. It always got too hot and evaporated before I could find the liquid.
This morning, I found it alright. Front of the fuel rail, there is a plug,
steel or aluminum which is inserted sometime after the machining process and a
flange of excess extruded aluminum from the body of the fuel rail is sort of 'stretched'
and crimped over the plug, thus forming a "permanent seal". The pressure test
fitting is installed and crimped in much the same way.
Fuel is simply POURING out of that plug. Because the engine is tilted slightly
backwards, the stream rolled back down and under the fuel rail where it disappeared
due to evaporation. Go check that manufacturing plug in the front of the injector
rail for leaks... remember, the system won't pressurize until it sees a spark
impulse, so run it first. This sucker spews liquid fuel... FORWARD INTO
THE COOLING FAN... WHICH VAPORIZES IT... AND BLOWS IT BACK ONTO THE MANIFOLDS
AND CAT!!!!!!! Repair tip: use JB Weld epoxy repair for a very temporary
fix, and replace the fuel rail for a permanent repair.
[Tip from Neil Noonan] Mine was leaking at the plug on the very end of the fuel
rail towards the front of the car and could be seen dripping at start up. [Fred Corn] Volvo make a repair kit for this, PN# 9179348.
Repair Notes from Tom Irwin: After I finally received all the correct
parts, it would appear that Volvo has known about this possibility for some time
as the Fuel Rail Ass'y for 92-97 has been pulled from inventory and superceded
by the 98 up design. Looking at the two, side-by-side, it would appear that
this plug failure was thought to be caused by excess transmitted vibration. The
new version has no direct contact with the manifold. Instead, you must thread
in two wide shoulder spacers into the foremost and rearmost mounting holes and
the rail then bolts to the top of the spacers. It ends up being rather suspended,
over the intake runners, instead of being bolted to it. You
will need at least two of these spacers, not 1 like the parts guy swears it calls
for. Get three since they are cheap and VERY easy to break off. I broke one. Had
to drill and retap the hole.
Also, when mounting the injectors into the rail, the retainer strip no longer will wrap around each injectors body. Instead it slips in to the slots up near the tail of the injector. There are two slots on each injector. LEARN FROM MY MISTAKE. Align the strip with the lower most slots, nearest to the injector tail. If you align with the upper one there will not be enough reach for the injector noses to seat firmly within the runner(s). Then, if you are dumb, like me, you will turn each spacer a few more times to grow some clearance and you will snap it right off. Once done, it ran great! No Leaks, No Problems.
960 Gas Smell After Fillup. [Inquiry] I get a very strong gas smell right after I fill the car up, seems to come through the vents. Lasts just about 5 minutes or so then slowly goes away.
[Response: Tom Irwin] This happened to me when I first got my 95 960. It was a bitch to find and fix too! There is a rigid plastic pipe that ties into the fill neck, behind the opening where you stick the nozzle. It is only accessible from underneath and by tearing out the lining on the left side of the trunk. It cracks. I'll just bet you $50 bux when you top off the tank you have a puddle of fuel under the center/rear of the car! Also, expect it to set a "Check Engine" code real soon. Get it fixed. You are a road hazard. [Response: R.W. Reagan] I had a similar experience with the 94 960. Except mine wasn't a cracked plastic tube. There's also a rubber hose that looks similar to a radiator coolant hose that connects the rigid filler tube to the inlet on the gas tank. You can see it by removing the access hatch in the trunk floor underneath the hat rack. This hose is about two inches in diameter, but has a smaller hose coming out the side - sort of in a "Y" configuration. It also connects to a fitting on the tank in the single most inaccessible part of the car. The small part of the hose had split where it connects to the tank. I was able to locate the leak by pressurizing the gas tank with a compressed air hose inserted into the filler tube and sealed with plumber's putty. I could hear the hiss of the leak, but couldn't see where it was because of the location. I used a short length of hose as a stethoscope and probed around until I located the problem. I'm guessing that filling up the tank displaces the fumes in the tank out your leak and causing the smell. Filling up to the neck also will cause a puddle to appear under the car.
960 Charcoal Vapor Canister Replacement. [Kevin Kazanjian] If you have a smell of gasoline from under the hood, check the charcoal vapor canister. I have a 96 964 Volvo. I took the stamping numbers off the top of my charcoal canister and was able to cross reference it to a known good GM part number of 17113065. I am fortunate to work at a dealership that is Volvo / GM. The Volvo part, dealer cost is $ 98.00 and lists for $160.00. The same canister from GM is dealer cost of $45.00 and lists for $98.00. I was able to get it for around $55.00. This canister fits all 96 / 97 960’s without return less fuel systems, which would be where the canister is up front next to the air cleaner unlike the return less system which the canister is on the fuel filter housing under the vehicle. I took the lines off the canister and found that the canister was saturated with fuel. I took the line off of the canister, going back to the tank, and attached a low pressure gauge and regulator. The procedure is that you pressurize the tank with 7 kpa for 5 minutes and then clamp off the supply line from the regulator to see that the system stabilizes and holds at, at least 5 kpa for 5 minutes. Mine held pressure and I was satisfied that all I needed to replace was the canister. The motronic 4.4 diagnostics of the evap system, for 96 / 97 models, is crude and only recognizes that the solenoid does not have open or shorted windings (26 ohms is spec) and that there is a low level drop in the short term fuel trim when the evap solenoid is activated. When starting the vehicle, within one minute, the solenoid should start pulsating to pull the vapors into the intake to a max of 33% duty. I did not actually check the duty cycle but found a build up of engine vac on my gauge that was approx. 20 in. I have not ever seen any 96 / 97 964’s set any codes for the evap system and had not checked one on these models for several years,
960 Fuel Filter Change. [Inquiry:] Can someone outline the procedure for changing the fuel filter on a 1995 960. I plan to remove the fuel pump relay, run the car till it dies replace the filter, and put the relay back. Does that sound about right? I noticed what appears to be some sort of pressure relieve valve on the line in from the tank to the filter. Is this valve used when changing the filter? If so how? Also do I need a special tool for disconnecting the lines from the filter? [Response: JT Charger] Leave the fuel pump relay alone. After unbolting the fuel pump bracket, simply squeeze the rubber connectors back while holding the fuel lines. Its like connecting an airhose to an airgun, spring loaded, compression fitting. The other fitting you see in the fuel line is for us superstar technicians to check fuel pressure with. Leave it alone. Put rags under the old fuel filter before disconnecting the lines, to soak up the normal spillage, perhaps use a pan.
960 Temperature Too High or Low: Stuck Thermostat. Symptom: Overheating: [Tip from Bruce White] 1992 and up some 960's are starting to have overheating problems. I have seen about 4 in the past 2 months that have overheated and warped the cylinder head. The problem appears to come from a failing thermostat that sticks closed. Had one yesterday that came in overheated and blowing water out of the coolant bottle. The t-stat was stuck closed and replacing the t-stat fixed the problem. No major engine repair was needed. I would highly recommend that all 960 owners have your t-stat replaced immediately. There are others reading this that have had 960 heads warp and major repairs were needed. Don't let your repair center tell you that the t-stat does not need to be replaced. Don't take a chance. I would replace the t-stat every 60K miles. Other Symptoms: Too Cold. Symptoms My '93 960's engine was very slow to warm up in cold weather. The colder the ambient temperature the colder the gauge indicated. The interior heater was also not very functional at these times as the ECC system sensed the cold coolant and would not start the system. I deduced that the thermostat was staying open and allowing coolant through the motor even when the motor was cold.
Replacing the Thermostat. [Procedure from Randy G.]
Remove the Old Thermostat. Remove the splash pan under the radiator and remove the coolant overflow tank cap. Place the cap on top of the upper radiator shroud so you don't forget it. Drain sufficient coolant to below the thermostat level. The radiator drain is on the bottom, rear of the right-side tank. Remove the three phillips-head screws on the plastic protective cover under the air conditioner condenser in front of the radiator. This makes it easier to access the drain valve on the radiator. Place a short length of hose on the drain valve and put the hose into a clean drain tank. Drain about 1 to 1.5 quarts (or liters) of coolant out of the radiator. It doesn't have to be empty. Close the valve and tighten it CAREFULLY! DO NOT OVERTIGHTEN! It doesn't take a lot of torque! On the right side of the block under the exhaust manifold, near the front of the engine is another drain. Place the drain hose on this valve and drain about one pint or so. Close and tighten the drain valve. This one is metal and can take a bit more torque. The thermostat housing is at the motor end of the upper radiator hose. Using a T-40 Torx tool, loosen and remove the two bolts that hold the thermostat housing to the block. If you drained a sufficient amount of coolant there should only be a drop or two left in this area. There is a little bypass valve in the thermostat itself that allows air to flow out of the thermostat. Lift the thermostat housing upwards with the radiator hose attached. Do so carefully so as not to stress the radiator's upper hose bib. The thermostat can now be lifted out of the block along with its gasket. There is no paper gasket for thermostat in these engines. After doing this, I found that the thermostat metal strap had failed and caused it to stick open.
Install the New Thermostat.
Check the mating surfaces to be sure they are clean. Clean the two retaining
bolts with a fine wire brush and coat them with some quality anti-seize. Check
to see that the gasket is properly installed on the thermostat and drop it into
the block with the curved retaining strap upwards. The thermostat upper housing
will not go into place if you put the thermostat into the block upside down.
Make sure the little valve is
at the top of the thermostat to allow air to bleed. If there is an arrow,
it means water flow out of the head to radiator. Replace the thermostat housing
over the thermostat (again being careful of the radiator's upper hose bib) and
start the two bolts into the block with your fingers for the first three or
four turns. After that, use the Torx tool to finger-tighten the two bolts, turning
them evenly until the housing is seated. Torque to specs (Chilton's states 7ft/lbs
- 10Nm for the 960's 2.9L motor). That's not much!
960 Coolant Loss: Coolant Reservoir Cap at Fault. See link.
Coolant Loss Behind Water Pump. [Inquiry] I've got a coolant leal at the connection of a "U" pipe and the back of the water pump. I unbolted the branch that runs to the cylinder head, between the exhaust manifold and timing belt cover. Now it can rotate within the water pump connection, but it won't come out. How do I remove this? [Response: Jim G and Tom Irwin] Remove the exhaust manifold heat shield (8 bolts, 12 mm). You'll need to move the secondary air pump out of the way. You don't need to remove the exhaust manifolds (so long as you don't need to the "U" pipe completely out). There's a bracket on the back extension of the U-pipe. It's under the back manifold, next to cylinder #5. (This is why it wouldn't come out.) Unbolt this bracket and the 2-bolt connection to the front of the cylinder head. Disconnect a compression-type coolant hose connection, just below the "U" pipe (22mm compression nut). Take all the hoses off the "U" pipe. It should pull out of the back of the water housing: it's a tight tolerance interference fit; no snap rings or retainers. It will rattle around underneath the exhaust manifolds. (If the "U" pipe must come out to be repaired or replaced, the manifolds must come out.) There is an o-ring in the block opening that the "U" pipe fits. I replaced the o-ring since it seemed to "take a set", with flat spots. (Please forgive me, all you Volvo purists) I matched the o-ring size at local auto parts store. The size I used is OD=39mm ID=33 3mm thick, BUNA N. I used a small amount of RTV as the lubricant to noodge the pipe back into the socket. Clean off any crud or corrosion on the pipe ends. Clean up the mating surfaces very well with a wire cup brush chucked in a drill motor.
960 B6300 Leaking Oil Cooler Fitting.
[Inquiry] My '96 960 Wagon has a slight oil leak at the oil cooler. It's been weeping ever since I bought it. Is this a common problem? Do you use some gasket sealant when replacing the sealing rings? Does anyone know what the torque specs are on that HUGE bolt that holds the oil cooler in place?
[Response: Tom Irwin] VERY common problem. Count on it every 50k or so. There is a repair kit with one large block cut o-ring and one smaller, corded o-ring. Pull the whole damn thing out, with the filter attached. Change the coolant lines too. To re-torque the large bolt, set your big-ass channel locks on about 2nd position from maximum. And tighten until you fell a reasonable amount of give in the o-rings as they squeez
[Tip] The oil cooler o rings can fail over time and need to be replaced. The first time I did this I put a little oil on the o-rings and buttoned back up; they always seeped thereafter. The last time I cleaned the surfaces really well, oiled the small o-ring and applied a thin coat (very little so you hardly know it's there) of RTV silicone to the edges of the larger o ring (gasket) where they mate with the surfaces; tightened the large bolt and no more seepage. I also hand torque the filter now so as not to stress the large o-ring.
[Response: Warren Bain] If you are going to replace only the two lower hoses it won't take too long. If you are going to replace all the hoses, it can take a while. The heater hoses at the back of the engine have their clamps aligned for easy assembly at the factory, but not replacement. They are aligned 90 deg. to the engine and you have to use a universal joint, and a 7 mm socket. I realigned then to a 45 deg angle so it will be easier the next time. Also the lower radiator hose had the clamp aligned so the frame rail was blocking it. Use a 7mm box end wrench to loosen it. I realigned that one too. Get a new thermostat too. You will need Torx bits, an oil pan for the adapter, and a catch pan for the anti freeze. Don't tighten the radiator hoses too tightly or you can break the inlet/outlets.
960 Rear Cam Seal Repair. [Long, Involved Tale from Tom Irwin] First, many thanks go out to Steve, Abe and the other generous tipsters without who's help I would have had a bit more difficulty. .
OK, the heater hoses are in the way so in preparing to disconnect and remove them I drained ~6 litres of coolant from the petcock on the Ex. side of the block. Make sure you have a jug of Type C Blue sitting around before you start, if you choose to do it this way. Well, then I noticed that with the coolant drained, the hoses became soft and flexible enough to be squished back/down out of the way. So I did that and left them connected.
Don't even think of doing this job without a telescoping inspection mirror, preferably a self-illuminated one.
The 2 T-40's that hold the cam sensor housing to the head...these are BIG mamajama's! They are made of soft metal and are easily deformed. And I promise you, they are frozen in their threads. Breakaway torque is considerably stonger then the set torque values. **CAUTION** if you strip or otherwise wreck the bottom T-40 fastener, you will likely have to PULL THE ENGINE to complete the job...'Nuff said.
Also, DO NOT use an El Cheapo T-40 driver
bit either...if it comes out of a kit with a bazillion other parts...uses
different adapters to connect it to a plastic handle and says "made in
China"...GET THEM OUT OF THE WORK AREA..
Luckily, I went after the top T-40 first
and the bit yielded under load and wrecked the head of the T-40!! Because
it was the TOP one I was able to grab it hard with a monster vise-grip
and bust it loose, after which it spun right out, no problem. My
wife went out and got me a hardened, impact grade T-40 x 3/8" ratchet drive
bit. Made ALL the difference! Even after I cheezed up the lower one a little,
this quality bit grabbed it's target and brought the lower bolt out.
The Cam Sensor cover may be a bit gummed up with oil residue, so it may want to rotate a bit instead of withdrawing from the head. Fine! Rotate it CCW a bit and you can tap the upper and lower mtg. ears with a drift and light hammer alternately, until it walk's out. Set this aside.
Remove the 10mm bolt that retains the "shutter wheel" this is kinda like taking out a rotor from a distributor housing. no problem. Set the shutter aside. Wipe out the pooled oil.
If you are smart you'll have a seal picker kit with many different parts to make many different articulated angles...you will need them. If you are *me* you'll waste an hour sacrifice two craftsman screwdrivers in a vise with an Acetylene torch, trying to fabricate the same thing. For the record, the smaller one worked better. Use a Dremel tool or equiv. to de-burr and hone the business end of this thing so as to not damgage any sealing surfaces.
Now is when you MUST have an inspection mirror. Get on back there, work carefully as you are working a mirrored image. Hook that sucker under the garter spring + up behind the metal ring and it pops right out real easy. Wipe the cavity out again and reinspect the sealing surfaces for damage.
Lube up the new seal with... I dunno...I
used heavy weight petrolatum..and ease it over the cam shaft. Try and jam
several fingers back there and push evenly on different point on the seal.
Make sure it doesn't cock in the bore. Stop and use your inspection mirror
frequently to check it is even. To bring it home...again, if your smart,
you'll find a way to get a hold of Volvo Tool P/N 999-5450. It has a perfectly
dimensioned steel cup with a hole in the back to put your cam shaft shuter
bolt thru temporarily to tighten the cup down and push the seal in to place.
If you are me, you'll hack a piece of nylon bar stock at work and while
the prototype machinists are on break and "borrow" a CNC Vertical Mill
and fabricate same based on Seal dimensions and your best guess from a
picture in the service manual.
Anyway, my best guess was about .250"
off, but before I ran off to get a longer bolt, I put both hands on it
and squeezed it against the head and ... "Whump" it popped right in.
Check it again with the mirror for even seating.
Put the shutter + 10mm bolt back in. Fit
the tabs squarely in the milled slot on the end of the cam. Tighten.
Clean the rim on the sensor cover and
gently fit it over the shutter wheel being careful not to damage
the magnetic pick up chingas inside. Align
the holes and replace the T-40's.
Fill-up your coolant. Take a Prozac. Start your engine. Check your work.
960 B6304 Leaking Rear Main Seal. [Inquiry:] It appears the rear oil seal is leaking on moms 95 960 65k. This appeared all at once. It seems to be coming down from the flywheel ispection cover. I cant identify a drip while running but it pools while sitting. She just had the oil changed then this happened
[Tip from Rob Bareiss] The reason for the sudden blow out is... it's the same rear main seal as an 850 engine. Which is to say, subject to unexplained and sudden oily failure. I dunno, I can't really adequately explain it. They just let go, it seems completely at random. We've just done our 5th 960 rear main seal in the last 6 months, and I don't even want to think how many leaky 850 rear mains we've seen- it's gotta be 30 in the last year. At the minimum. I had 4 850's we sold this summer, everything from 48K to 114K miles, and we bought the cars because they were blessedly dry at the engine/trans split... and they came back, from 1-week to 2-months later, well within our warranty period (lucky us!) having sprung leaks. And I've had 150K mile 850's and 960's which have never leaked. I do not understand it, or know of a fix or cure for it. I'm sorry it happened to you- hope it doesn't dim your opinion of an otherwise great car. If you were to bring it to my shop, you'd be looking at ~$21 for the part, and about 6.5 hours labor. And, be glad that went instead of the catalytic converte
[Tip from Tony Symons] Flywheel bolts on this engine are drilled all the way through the crank flange and can leak oil. Seal their threads on installation with Hylomar or Loctite sealant that will prevent oil leaks and keep the bolts adhered in place
960 B6304 Oil Pressure Problem: O-Ring Problems. See link.
960 Oil Pressure Problems: Failing Oil Relief Piston.
[Tip from JT]
As you know I have had some problems with no oil psi after I got the 2.9l back
together. I thought that the oil pick-up was plugged with sludge or something.
I know I did not want to drop that oil pan so I figured that I had nothing to
lose by trying to clean the sump. I put in 6 quarts of the gunk parts cleaner
(comes in 3 qt cans) thru the dipstick hole and let it set for 2 days. When I
drain it the oil sump was spic & span! I flushed it with oil, then tranny
oil, and then with oil again. I then filled two caulking tubes with mobil-1 0w-30
oil and with a rubber stop (with a center hole) pressurized the oil system thru
oil filter inlet. I put the filter on, filled the sump with oil, and cranked the
engine. No oil psi! I had to know what the heck was going on with this no oil
psi. Still not wanting to drop the pan I went after the new oil pump. When I got
the pump off it did not look right to me. What I thought should be the oil psi
relief valve looked strange. Never seeing one of these before in the new Volvo
engines I was not sure how it was suppose to work. What I found was a cylinder
in a cylinder with a spring going thru it. I went to Volvo and ordered everything
I could (except the pump) that was associated with the pump. It was clear when
I got the new parts. The inside cylinder used to be a piston. The wire snapring
chipped away at the piston top everytime it would hit the stop. Since the relief
valve is made out of PLASTIC with the force of the spring behind the piston top,
it was chipped
away until the spring blew the top on the piston off! No oil psi. The new piston
is made out of steel. So this will not happen again. This was a new oil pump that
had this plastic piston in it. I am told that the 850's use the same pumps. My
sisters 850's oil pump took the big vacation about 2 years ago and I wonder if
this was the cause. The casting date stamp on the oil pump in the 960 with the
plastic piston was 98. So formational purposes, the next time you do a timing
belt, you may want to check to make sure you do not have a plastic piston relief
valve
chipped
away until the spring blew the top on the piston off! No oil psi. The new piston
is made out of steel. So this will not happen again. This was a new oil pump that
had this plastic piston in it. I am told that the 850's use the same pumps. My
sisters 850's oil pump took the big vacation about 2 years ago and I wonder if
this was the cause. The casting date stamp on the oil pump in the 960 with the
plastic piston was 98. So formational purposes, the next time you do a timing
belt, you may want to check to make sure you do not have a plastic piston relief
valve
Techniques:
[From JT] The good news is that you do not have to take the oil pan off to check/replace the relief valve piston. I never took my pan off. I am really happy that I did nót have to take that step. I do not know how many oil pumps came with plastic pistons or when there was a change to metal ones, but I say rather safe than sorry. If you are coming up on a timing belt change, pull the crank pulley and the crank timing belt gear. You will see four Torx head bolts that hold the oil pump in. Remove the bolts and the pump slides straight out. The piston was about $12 and the oil pump kit was about $23 (including front seal, oil pump seal, oil pump gasket). If you have a plastic piston in the relief valve you will have to separate the oil pump by removing the back gasket and removing 2 small hex head screws. Push the piston out and put the new one in. That's all. When you get ready to install the oil pump back into the engine you will need a special tool to get the front seal over the crankshaft. I used a thin walled piece of pipe but I think the book called for Volvo tool #5455. It makes the job real easy to get the oil pump back on.
960 Engine Won't Start: Sticking Valves. [Inquiry:] We have had two instances of sticking valves preventing the engine in our 960 to start in the past two years. This has caused the engine to flood, fouled plugs, and with several attempts to start, gas in the oil. It is getting expensive at $500 a pop to "fix".
Changing to synthetic oil
Rinsing the engine with a Blistein cleansing/filtering system
They also stated that these cars were meant to be driven hard (o.k.), as on the autobahn (Montana here we come!). So I guess my wife will have to become a bit more agressive on the trips to the grocery sto
What gives? [Editor's Note: see 960 Valve
and Head Problems above.]
Abe Crombie
Tuneup Solution:
The 4 valve/cylinder engines use small valves and the accompanying lighter valve springs. The exhaust valves will on any engine get some accumulation of deposits, primarily from fuel combustion with some portion from oil that seeps through guides for valve stem lubrication, that in some situations can cause the valve to slightly bind in guide. On a cold engine the guide-valve clearances are reduced due to temperature and the fact the metals of guide and cyl head shrink more than the metal of valve stem. You attempt to start engine and the oil system can and does build oil pressure on these engines in one crank revolution. This leads to the hydraulic valve lash adjusters ("lifters") filling and extending ("pumping up") while the sticky valve is closing sluggishly and not following the cam profile
A strong contributing factor is excessive fuel system cleaning additives. I know this flies in the face of what has been said loudly and often for the last few years but it is the truth according to a recent study on this very no-start, low compression problem. The additives used for fuel system cleaning make the deposits on exh valve stems worse. If you don't have a fuel system problem with symptoms then don't add anything to tank in the form of a cleaning additive.
Premium fuel has lower volatility and is harder to ignite in cold weather. This can make engine not fire as strongly on initial cranking and less than stellar starting performance give the "lifter" pump-up problem time to occur. If the engine fires off and reaches speeds over 600 RPM the lifter filling time is lessened enough to diminish the odds of the pump-up. Cold weather also reduces the need for higher octane anyway as spark knock is less likely in colder air temps.
Regular operation of the engine at eng speeds over 4500 RPM for 5 minutes or more will cause valve rotation that will clean stems of valves somewhat. This can be done by driving with cruise set in "L" position on gear selector at 55 MPH. THIS WILL NEVER HURT THE ENGINE! QUITE THE CONTRARY, IF YOU DO THIS, I GUARANTEE YOU WILL NOTICE A SMOOTHER IDLE WHEN YOU STOP AFTER THIS EXERCISE OF ENGINE!!! I was amazed at the difference when I tried this on my parents' 95 960
If the no compression, no start condition occurs you can usually get it to start if you will keep your foot on throttle 1/4 open and operate starter for 30 seconds at a time with a 1 minute rest. Keep throttle open until it starts. If 6 attempts (3 minutes starter time) have been made and it is not running then you will have to have a tow to a service shop. If cranking speed becomes slow during this time indicating you have a severely weakened battery, stop and charge battery or give in and have it towed to service shop.
[TSB Reminder from Jim] Volvo TSB #TP 31714/2
"Deposits on Exhaust Valve Stems"
"M/Y 1992 960's [dated 8/93] which are subject
to driving conditions consisting of short, low speed trips may experience reduced
performance or vibration as the engine warms up. Another possible symptom may
be a sensation that the transmission lock-up is engaging and disengaging.
In most cases, this is caused by sticking exhaust valves due to deposits on
the exhaust valve stems. This condition, in most cases, can be solved
by replacing the engine oil with synthetic oil (see Service Manager Bulletin
22-3) and driving the car at a high RPM (5000-6000 RPM) for 12 minutes in low
gear. This test drive will remove the deposits from the exhaust valve
stems. The synthetic oil will help prevent new deposits from being formed on
the exhaust valve stems." [Editor's Note: probably applies to every B6304
ever made, not just model year 1992.]
Deposit Removal Methods. See the FAQ section on Fuel Intake Carbon Removal for some techniques.
Don't Do Short, Cold Runs. [Tip from Abe Crombie] There have already been a few postings about turn over, won't start, has no compression on five and six cylinder Volvo engines. This always surfaces in cold weather. The thing that almost always precedes this no run condition is that the car was started and run a couple of times, each time for less than a minute. These short runs do two things: 1. they set the stage for fouled spark plugs, and 2. normal exhaust valve stem lube oil deposits get partly dissolved and form a sludge (GOO) that makes the valve just sluggish enough to allow the hydraulic tappets the opportunity to fill ("pump up") and hold the valves off seat 1 mm or so as the cams rotate and move the valves up and down.
Starting an engine and running it for a brief period IS NEVER GOOD! The engines are punishing you for doing this by not running. If you need to start a car to move it in the driveway then start it and let it run for several minutes until it is warm. Better would be to start it and drive it a few miles if you have any reason whatsoever to do this. I had a 96 850 do this to me once when I had mistreated it to a couple of very brief crank-up-and-move cycles. It failed to run the next morning when I was in a rush to get to work. I deserved it. That was outright abuse. Volvo and many other car makers with 4 valve per cylinder hydraulic tappet engines (Volvo quit using hydraulic tappets in 2000) have had this phenomenon in their cars. They started using more foul-resistant spark plugs to better allow the plug to fire when the compression is low , just barely averting this trouble. Most of us will not have it happen, but if it happens to you then you caused it. The car didn't just up and decide to not to have compression enough to run that day for absolutely no reason............ Enjoy and be kind to your motor and it will be kind to you.
If Your Car Has Had This Problem: Check Exhaust Manifold Pipes. [Tip from victim Tom Irwin] As a result of a sticking exhaust valve, the exhaust pipe broke, internally, just inches below the cylinder head. The resulting backwash of resonating exhaust caused symptoms of lost performance/compression. Symptoms of break: radial cracks around the pipe.
960 Engine Won't Start: Loose Starter Bolt. [Pieter Pate] When warm, the starter operated but the engine did not start. After a long search I found out that the cause was a loose bolt in the triangle which connects the back of the starter to the engine. This bolt grounds the starter and the engine. When the bolt is fitted tight, the engine will start as usual; when the bolt is loose the starting problem only occurs when the engine is warm because the engine does not ground correctly even though the starter operates.
960 Engine Stalls and Won't Restart: Wiring Harness
These brief notes are in honor of Tom Irwin, who suffered more grief from the engine wiring harnesses and connectors on his 1995 960 than any one person should bear! All of us 940 owners salute you, Tom, for extraordinary patience and hard diagnostic work, much done late at night.
[Inquiry from Tom Irwin:] I stranded in 100 degree heat. Got the car 4 blocks to home (thanks Triple A). Ran the codes and came up with DTC's 113 and 115. This points to Injector groups 1 and 2. Twice before, only 113 came up. I've done everything I reasonably can. Checking all connections and ohm specs. I greased the 55pin connector at the ECM. [Responses: Abe Crombie, Tom Irwin, Rafael Riverol, DanR]
Removing Intake Manifold to Access Harness. Unfortunately you have to remove the intake manifold to get access to the wire bundle. It is pretty straightforward in removal on the top side, but the one nut at the bottom of the ball-like part of the manifold is a bear to get to. In order for me to get at it, I had to kneel on top of the engine (careful not to break the plastic cover) to get my hand contorted to get a box end wrench under there. The nut only needs to be loosened, it does not have come off.
Wiring Bundle Chaffing at Manifold: Check the wiring harness on engine where it comes up through intake between the # 4 and 5 intake runners. It may have rubbed through and grounded to engine. About a .750"d loom. I had just enough clearance to sneak in a bentnose plier and move it around. The loom cracked away like egg shells. I could not see the rub point on the wires, but right at the head casting extrusion was a bright, shiny, rub spot. I pulled the loom/harness away from the head. And BOOM! Christine sprang to life. This makes total sense. It has always died upon acceleration. The torsional moment of the engine would tend to bite into anything against it. I lost only group one the first time because only one wire was worn through. With time, two wires, thus both groups lost.
Tie Points: This is where all 6 GRN/RED wires join together. It occurs once up on top of the engine and again down the side of the block, under the intake manifold. Both can rot. Both can cause ghost problems in the EFI and ignition. The secondary tie point is buried inder the intake manifold. Must remove for access. The wires were stripped, twisted, crimped and ultrasonically welded. The welds APPEAR to be solid, but microscopic corrosion occurs between the individual wire strands, you know, where the SHOULD BE solder. No easy fix. I literally cut out the whole joint, re-stripped the wires clean. Braided the wires in between with copper rope, twisted tight into a mass. Then I silver soldered the living hell out of it! Heated it thoroughly and just flowed a couple ounces of high grade solder into the joint. I wrapped it in that stretchy, silicone, self-fusing stuff used on Hi -voltage wires, then tape and loom.
Motor Mount Ground Point: While you are down there do NOT miss the chance to clean and tighten the left motor mount ground point, that nasty little ring terminal that bolts on the lower left motor mount. This is ANOTHER source of impossible electrical problems. And clean and protect the connections to the knock sensors.
Coil Pack Connectors: [Tip from Rafael Riverol] If you have a 960, I please take off the plastic cover atop the engine that reads "24 valves" and examine the female connectors at each of the six coils. I suspect you will likely find crumbling insulation, brittle barrels and poor connections. I can tell you these can fail you anytime. You will also likely find crumbling wire sleeves that will allow wire chaffing againt the engine head. Parts Source: [John Randstrom] Borton Volvo gave me this Volvo part #3523813 (List $6.10ea, net $2.76) as the replacement ignition coil female terminals for my '93 960. These have the rubber isolators on them. You need two per housing. The connector socket housing Volvo part # 9144275-6 is $1.25 Experience with Radio Shack and other sources is not good: the female connectors de-tension and fail to maintain contact.
Cam Carrier Ground Leads: De-ox and dress the two ground leads atop the cam carrier edge. Both, if corroded or broken, will kill an EFI system right quick. I cut mine off and soldered in some solid copper lugs.
MORAL: If you own a 960, watch your engine wiring harness, connectors, leads and all other electrical components very carefully. If you suffer from unexplained driveability problems, start with a careful check of every bit of harness and every connector near the engine. If the wiring is failing, you may want to consider a new engine harness.
960: Transmission Lights Flash, Engine Stalls: Bad Ground. [Steve Wilson] Symptoms: Transmission mode selector lights would start flashing as soon as the key was turned on; the up-shift arrow on the dash would flash on & off; and occasionally the engine fails with no spark on 2 adjacent cylinders at the same time. Diagnosis: Since the ignition control modules for the even & odd cylinders are separated, that eliminated that possibility. The only thing those have in common are the ECM & a ground connection at the left (driver's side) motor mount just above the steering rack. There are 2 black wires (the individual grounds for the separate ignition control modules) that exit the harness approximately 3 inches long with a crimped terminal on each. The fixing bolt also acts to secure a corner of a plastic shield for the wire harness. I had checked continuity previously from the bolt to ground and gotten a good reading. This time I removed the bolt and connected both ground wires to a common ground back to the battery negative terminal. As soon as I turned the key and the transmission mode lights didn't flash I knew I was on to something. The 2.9 sprang to life on 4 cyl, the 2 plugs were still removed and were firing like crazy. This is the ground Volvo identifies in their schematic as a "power ground". If your car just sputters and dies and won't restart, look here before buying any parts.
960 Sudden Idle Surge: ECT Sensor Failure. Symptoms: sudden very high idle surges (2500-3000 RPMs) while sitting at idle and hot-start problems. See the fix.
Changing Engine Mounts on 960/90 Series Vehicles. See the link to the Engine: Mechanical file.
960 Engine Swap. [Inquiry] I just purchased a 1995 960 with a B6304 engine 150,000 miles. The block is leaking coolant and is clearly porous. I'd like to swap this engine with one from a 1998 S90. Will this engine be a direct replacement or will it need modifications or not fit at all? [Jim Bowers] The S90 engine will be a direct bolt in for you. Just keep all the electronics and wiring harnesses from your present '95. 19'95 was the last year they made any "improvements"/changes to the engines they put in the 960 chassis. '96 got the OBD-II electronics but no other changes. The S/V90 got another external ambient temperature sensor for helping optimize control of the AC but no other engine related stuff. [Patrick McGinnis] I have pulled the 960 motor three times and always with the transmission...up and out of the top of the hood opening.
Transmission Problems:
960 Automatic Transmission Questions. See the FAQ file for Auto Transmissions AW 30/40 for more info. 960 cars have experienced a far higher rate of transmission troubles due to overheating.
960 Won't Restart: PNP or Harness? [Inquiry] My '92 960 wagon will not start after short trips. The gear shifter will lock when placed into "park" and the car will not make a sound (other than the "click" when I turn over the ignition) when I attempt to re-start it. Usually, after sitting for about an hour, the car will start normally. However, today it refused! Could this be the PNP switch? [Response: Etherman] Put the trans in PARK. Turn the key to #2. Step on the brake and attempt to shift out of Park. Does it happen? I think it will. If so, your PNP is working. In this case, look to a bad battery and/or voltage drop in the batt cables which may or may not exhibit signs of corrosion. Check the voltage drop on both cables. Greater than .40 volts is bad. $5.00 says your positive cable needs to be spliced or replaced. [Quick Fix Tip] Cycle yourshifter back and forth a bunch of times (I did it with the engine off) to clean the PNP switch contacts. It works!
960 Flashing Transmission Lights. [Inquiry] After selecting low gear and accelerating, I get a series of flashing lights: the instrument panel arrow flashes, the lights alternate between "E" and "W" on trans selector, switch positions "E" and "S" will stay depressed when depressed, but "W" will NOT stay depressed. The tranny shifts normally. What is wrong?
[Response: Tom] You have a faulty gear position sensor. I had mine replaced at around 68000 miles, but some last longer. It is on the right passenger side of the tanny, next to the fluid cooler line.
Other Concerns:
Driveability Problems: Rotten Battery Cables. [Tips from Tom Irwin]
Symptoms: No Hot Restart
My '92 960 wagon will not start after short trips. The gear shifter will lock when placed into "park" and the car will not make a sound (other than the "click" when I turn over the ignition) when I attempt to re-start it. Usually, after sitting for about an hour, the car will start normally. Is this my PNP switch? [Response: Etherman] Put the trans in PARK. Turn the key to #2. Step on the brake and attempt to shift out of Park. Does it happen? I think it will. If so, your PNP is working. In this case, look to a bad battery and/or voltage drop in the batt cables which may or may not exhibit signs of corrosion. Check the voltage drop on both cables. $5.00 says your positive cable needs to be spliced or replaced.
Symptoms and Problem Diagnosis.Stalling
and Random Electrical Problems
960 showed occasional cutting out, complicated
by intermittent ABS warnings without any codes set. Engine
dying at intersections, etc. Apparently "ABS WARNING" when
translated from Swedish means "Low Voltage". As with the FWD
Volvo's, the battery cables rot inside the crimps, where it's not visible,
and they exhibit voltage drop across the length. Volvo knows about
this and specs a max drop of 0.09v end to end. Beyond this limit
everything gets squirrely.. the ECU turns inside out, etc. Below
10volts, the ABS trips out and sets a code that's the Swedish way of suggesting
you have a battery problem. This will kill your voltage regulator
too. My Red cable was showing 0.34v drop, four times the limit.
I touched the negative battery clamp, it was cool. Then I touched the positive
clamp and it was HOT! Looked real good... clean and tight and whatnot...
but that internal ROT is blocking most of my current, so the voltage drops...
My friend, the master tech says he replaces them all the time on 960's
and 850's. But, he added, the part that goes bad is always at the terminals,
inside the crimp. So a repair in situ was in order.
Repair Procedure for Battery Cable Ends
Procedure 1: I bought a Pep Boys 25 inch "NASCAR" Battery cable with two ends crimped on it. I cut it to about 12", then I put red shrink tube around all three conductors, boom! Instant positive cable. Outside I cut the battery cable on the 960 and instantly, this powdery, fluffy powder fell out. It was greenish white and several of the conductors inside were clearly over heated and discolored. I noticed that the Volvo cable was a very fine grade wire filament, braided like a rope, whereas my "NASCA" cable had much thicker conductors bunched up inside the jacket. But 2" down, the wire was in good shape. So I stripped both ends and took 2 small fuel injection line hose clamps and slipped them over each end of the cable. Then I I fanned out the conductors and smooshed them together at equal length. Using both hands, I twisted the cable ends together into a more or less even mass of perfectly meshed wire. Now the trick... I slipped the EFI clamps down over the repaired section, about 1 inch apart, and tightened them, forming the repaired section in to a tight mass of copper. With the clamps in place I lit my torch and adjusted it so that about 1/2" of inner, light blue flame was present. I preheated the repair section and gently flowed in enough silver solder to petrify this repaired section into an impenetrable mass. The solder flowed smooth and perfect underneath the EFI clamps. After about 5 minutes of cooling I loosened the EFI clamps and remove the screws. The clamps can now be peeled away from the repair section because the galvanized coating resists the solder mass. Once removed... a solid, cylindrical mass of copper and silver solder is there. I slipped a pre-positioned section of shrink tube over this and heated it up. I added multiple layers of red tape, then stuffed into two sections of loom. I repeated this procedure on the two adjacent branch circuits from the battery to chassis electrical and EFI. Smaller gauge wire, same process. The car acts very diferently now. It cranks over like a spastic rabbit. Whereas before, it sounded like an old tired V-8. The cold idle RPM's are much higher, but settle right down to 850 when warm. Overall, better performance and pickup. Also, I took apart the alternator connection, de-ox'ed and sanded it, then flowed a solder joint into it as well. This problem is very widespread and was at the root of many vague problems the car has had for over a year. Worth checking out.
Procedure 2: [Rafael Riverol] Let me suggest a repair for voltage drop from corrosion inside battery cable connectors. I has worked perfectly for me and it can be done with things that a DIY generally has ready at hand. So he need not go anywhere or spend any money. Take battery cable out of the car. Drive a small drill bit into the cable strands along the direction they enter the connector. Do not drill through the connector or make any holes in it. Push solder flux down the cable strands inside the connector. Hang the cable from your work bench or other place so that you will be able to apply a blow torch to heat the connector where it holds cable strands. Do so until flux boils over. Continue to apply heat and put in solder until it fills space around strands inside the connector. The flux cleans the cable stands and inside of the conector. The solder fills all empty space around cable strands inside the battery connector. Let the cable cool for a few minutes and then put it back on the car. You should have absolutely no voltage drop between cable and connector. This has worked very well for me and it takes only a few minutes to do and no money.
Painted Bumper Cover Repair. See Painted Bumper Cover Repair for more information.
Headlamp Wiper Motor Removal. See Headlamp Removal for more information.
960 Brake Pulsations. 960/90 series front brakes are sensitive to rotor runout: see the FAQ Section describing this.
960 Driveline Noise: Failing Grease Seal at Rear of Driveshaft. [The Tom Irwin Chronicles, Ch 47: Tom finds a "tink-tink" sound coming from somewhere under the 1995 960. After repairing a cracked exhaust manifold, he starts examining the drive shaft and multi-link suspension.]
Continued: THEN, at THE VERY END OF THE DRIVESHAFT, just before it mates to the Rear end... I push up and down on it..... "TINK-A TINK-A TINK-A TINK"... and it moves a bit... That's "TINK-A TINK" under ONE 'HAND POWER'... start applying HORSEPOWER to it and the sound might EASILY sound like what I'm getting.... YES, this is it... Now... WHAT's Going on??? This driveshaft end looks different from the book, it tapers down from a tube to a solid rod, then it terminates at a LOBRO-looking joint with 6 or 8 HEX Screws and a few shims... it's only when in motion, or rather under acceleration.. REALLY LOUD "TINK-A TINK-A" noise. Like an exhaust pipe... But I just replaced EVERYTHING North of the Resonator... This end of the driveshaft SEEMS to be a tube welded around a shaft rod, like a modified Constant Velocity Joint, with a rubber boot and the works..?? What's inside the cadmium-plated cap? A Bearing/Bushing? Did something possibly break in there? Do you just need to re-pack the grease sometimes? There is a LARGE AMOUNT of dried, caked grease all over all around this thing and the gas tank tunnel where that bugger sticks out... Looks like it has been SLOWLY losing a bit of grease every so often over 5 year and 125k miles. The boot looks ok... probably out of the end cap... I'll use the RTV.. Interestingly the spray pattern of the grease is fairly widespread, fore and aft span totals about 18 inches. I'll bet tomorrow I'll find it dry as a bone... hope there is no galling or pitting of the balls. THIS appears to be the cause of the "TINK-A TINK-A TINK-A" sound, previously blamed fully on the broken cat pipe..... That little burp up to 6,200 RPM dropped me crisply into 1st gear and must have WAILED the shit out of that shaft, displacing enough grease to allow the bearing to slap. The noise of course would be amplified by yet ANOTHER STEEL sleeve tube over an inner pipe/shaft...
[Comments from Abe Crombie] The end of the shaft is welded to a splined shaft to accept the joint. It is a CV joint with the inner 6 slot hub driving the outer 6 slot housing via 6 10mm +/- ball bearings. The grease can dry out and the joint will wear a bit and the driveshaft will actually begin to move axially and make noises. If you are lucky the grease will fix it indefinitely. Does the grease deposit line up with the CV joint-pinion flange joint or does it look like it escaped through the boot? The boot on those should last almost forever unless road crap maybe damages it. If it looks like it seeped through the cap then seal it with silicone sealer on outer perimeter to prevent this loss of lube again.
You can remove rear section of shaft from pinion flange via the 6 Allen bolts. Tap the end cap off the joint. Once the shaft is removed at rear you will see the back end of this joint is closed by a cadmium-plated cap. You should be able to tap around the edge of the cap and get it off. Wipe out the grease and then pack it full of wheel bearing grease and then place cap on and reinstall shaft on pinion flange. Oh, BTW if it's not too late you should mark the joint to the flange to preserve balance if it was dynamic balanced. It will be paint-marked if the paint has lived this long.
These assemblies have no history of failure so piece service parts aren't available. The whole shaft would need to be replaced. The CV-jointed rwd driveshafts like this are rarely serviced on any of the Euro (Volvo,Benz, or BMW) models.
[Comment on Grease from Jim Bowers] I believe the grease for CV joints is something more than axle grease. Years ago, I used to get some special stuff from the dealer for the CV joints on the axles of my Porsche. It looked like it was loaded with Molybdenum Disulfide. Anyway, I think the parts store should have something recommended specifically for CV joints.
Removing the Camshaft Position Sensor. [Inquiry] How do I remove the exhaust camshaft position sensor (CMP) sensor?
[Response:DanR] I had to remove mine once and it was a bear to get out. Use a high quality T-40 bit (the T-45 is too loose); you want the tightest fit possible. I ended up botching the top bolt and having to saw it off.
[David Aidnik] Get a ratcheting 1/4 inch box end wrench. Snap On makes one which is 1/4 & 5/16 and is a short flat thing about 1/4 inch thick and about 4-5 inches long. The wrench flips over to select tightening or loosening. Mount in the 1/4 drive end a short (less than one inch long) T-40 Torx bit. Hold the bit firmly in the Torx screw with the end of your finger while you carefully crack the bolt loose with the wrench.
Camshaft Position Sensor Connector. [Inquiry] My connector disintegrated; can I obtain another? [Response] Volvo sells most of the connectors used on the car. Look it up in the dealer's parts diagram and visually identify the one you need. You can order it separately. If the wires have come out, the colors from left to right, with the two bumps or notches and spring clip on the connector up, are: grey (ground), green (+5V), red (+12V).
OBD Code 2-1-2 for "Faulty Oxygen Sensor" in 960 Cars. See the discussion regarding cleaning the connector.
OBD-II Scanner for 96+ 960/90 Cars. See the FAQ section under Engine and OBD Diagnostic Codes.
960 Fuel Tank Hose Failure. Symptoms: All Cars: When the tank is filled all the way up gas can be smelled inside the car and sometimes there is also a leak. [Diagnosis: Walt Poluszny] The rubber hose from the filler to the tank has a "Y" in it, which sometimes cracks at the "Y" or where it connects to the tank, and leaks fuel. You can view the rubber hose by taking out the carpet in the truck and removing the 4 bolts that hold the Fuel Pump/Level Sending unit access hatch on the rear upper level of the trunk.
[960 Repair Tips: Michael Diamante] The small hose was torn at the clamp close to the fuel tank. The clamp uses a small torx screw. The head was facing the body of the car and was not accessible. Out of desperation I tugged on the hose and it came right off. Without lowering the fuel tank, I wasn't able to reinstall the clamp as it came from the factory.
When I changed the hose I first thought that I could do the job entirely from the top. I soon discovered that I needed to be under the car to see the small hose connection. I put a jackstand under the right rear jack point and was able to see the access hatch and hose connection. I used a torx bit on a ratchet with extensions to remove the screws to the valve that hangs down in the way on the right side. I disconnected the small hoses surrounding the fuel filler hose. I disconnected the hoses from the valve and set it aside. I disconnected the fuel filler hose from the fuel sending unit. Using a combination of offset screwdriver and flexible driver, I disconnected the fuel filler hose from the fuel filler tube. I then discovered that I couldn't unscrew the clamp to the small hose and thought that I might be able to cut it off. As a last attempt before cutting, I tugged on the small hose and it easily came off. If I had to do it again, I would tug on the small hose before disconnecting anything else. Installing the new hose wasn't the easiest thing in the world. The large section of hose fits tightly. Fit the hose over the fuel sending connection. Leave it loose so that you can twist it into position to slip over the fuel filler tube. I had to wiggle and push and finally got the hose to fully cover the fuel filler tube. When replacing the valve, attach the hoses before tightening the screws. There isn't clearance to attach the hose at the front of the access hatch if you tighten the valve bracket first. I would consider using a different type of clamp for the small hose. Something easier to tighten and loosen. When I was attempting to attach the small hose and clamp the first time, I discovered that the body dips down and gets in the way of the clamp. A thinner clamp would be good. The hose was about $45.00 + tax from the dealer. The part number on the new hose was the same as the original. On my 93 960 there is a valve of some kind on the right side under the lip of the access hatch. Its bracket is attached with two torx screws. I removed it to ease access to the small hose connection. [Editor] For access to the clamps, you may have to drill a hole in the trunk deck, to be rustproofed and filled with a rubber grommet afterwards.
940/740 Notes: If your Y-shaped fill hose has failed, see above for replacement tips. Your clamps will be normal socket-head worm drive clamps. They will be completely corroded. See tips in the Fuel Sender and Pump Replacement section as to how to access and remove these clamps.
960 Air Conditioning Failure Points. [Rafael Riverol] See the discussion on steel bolt-to-aluminum tube corrosion leaks in 960 air conditioning compressors. See the separate discussion on 960 air conditioning compressor clutch failures.
Torque Values for B6244, B6254, and B6304 Engines. [Alex] See note below on bolt sealing requirements.
| Components | Nm (ft. lb) or degrees |
|---|---|
| Exhaust manifold, at cylinder head | 25 (18) |
| Exhaust manifold, at heat shield | 15 (11) |
| Cylinder head, stage 1 | 20 (15) |
| Cylinder head, stage 2 | 60 (44) |
| Cylinder head, stage 3 (angle tightening) | 130° |
| Cylinder block, intermediate section, stage 1 (M10) | 20 (15) |
| Cylinder block, intermediate section, stage 2 (M10) | 45 (33) |
| Cylinder block, intermediate section, stage 3 (M8) | 25 (18) |
| Cylinder block, intermediate section, stage 4 (M7) | 17 (13) |
| Cylinder block, intermediate section, stage 5 (M10) (angle tightening) | 90° |
| RPM Sensor | 5 (3.5) |
| Intake manifold | 20 (15) |
| Camshaft carrier cover | 25 (18) |
| Camshaft pulleys | 20 (15) |
| Timing belt, tensioner pulley | 25 (18) |
| Timing belt, tensioner mounting | 25 (18) |
| Timing belt, idler pulley | 30 (22) |
| Knock sensor | 20 (15) |
| Coolant pump | 20 (15) |
| Carrier plate, stage 1 | 45 (33) |
| Carrier plate, stage 2 (angle tightening) | 50° |
| Torque arm, stage 1 | 50 (37) |
| Torque arm, stage 2 (angle tightening) | 90° |
| Torque converter | 40 (30) |
| Flame trap | 15 (11) |
| Oil sump plug | 35 (26) |
| Oil pump | 10 (7) |
| Oil sump | 20 (15) |
| Oil pressure sensor | 25 (18) |
| Flywheel, stage 1 | 45 (33) |
| Flywheel, stage 2 (angle tightening) | 65° |
| Vibration damper, center nut | 300 (221) |
| Vibration damper, flange bolt, stage 1 | 35 (26) |
| Vibration damper, flange bolt, stage 2 (angle tightening) | 60° |
| Spark plugs (do not oil) | 25 (18) |
| Conrod bearing caps, stage 1 | 20 (15) |
| Conrod bearing caps, stage 2 (angle tightening) | 90° |
| Gearbox, to engine | 50 (37) |
Hermetically sealed bolts are used where a perfect seal is required. Replace bolts once undone or seal with new sealing compound: HYDRAULIC THREAD SEALING COMPOUND part number 1161056-5; follow instructions on pack. The service bulletins include a list and illustrations of hermetically sealed bolts on the B6304 engine. Click on the thumbnails below to see the list and illustrations of sealed bolt locations on these engines