Volvo AW71 to M46 Transmission Conversion
Volvo AW70/71 to M-46 Transmission Conversion PDF
Converting an AW-71 Automatic to an M46 Manual Transmission by Paul Demeo (with thanks to Paul and George Holmer)
This all began about 2 years ago, when I finally bought my ultimate Volvo, a 1990 780 Bertone Turbo. I had been lusting after 780's for a bit, and once I finally came to the realization that they didn't make one in a manual, I bought one. I intended to change it over to a manual immediately, which, of course, took two years and three afternoons.
The first two years were spent gathering parts at a ...ahem. leisurely pace. The parts required are as follows:
- M46 transmission
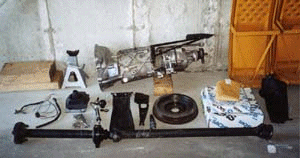
- M46 transmission mount
- 58-hole Flywheel (more about this later.)
- Clutch, pilot & throw-out bearings from iPd
- Driveshaft, from Jeff Canter's Car World
- U-joints, center bearing, & support
- Master Cylinder
- Clutch Pedal, also from B & D
- Slave Cylinder, new from Volvo
- Clutch Hose, new from Volvo
- Clutch fork, new from Volvo
- Shift Lever and interior trim bits...
- M46 Overdrive Relay, from Car World
Those are the major bits. Everything else (while a lot) is just little stuff you'd have to pick up from the dealer for any job of this type. (Flywheel bolts, clutch bolts, new driveshaft bolts, new nylon and steel shift-linkage parts, snap rings if you trashed the ones on the junk cars you pillaged, tranny fluid, locktite, grease, etc.) The crossmember is the same regardless of manual versus automatic, although Volvo changed it in 1987. You may need to buy the bracket which bolts to the M46 and then to the crossmember. Recognize as well that if you have an LH 2.4 car with a bellhousing-mounted RPM sensor, one key will be finding a later model transmission with the cutout for the crank sensor in the top of the bell housing. Earlier transmissions usually have a relief cast into the bell housing, but do not have it punched out. It can be knocked out with a hammer and chisel or a dremel tool so that you can mount the sensor.
Notes on Parts
- Use the pedal assembly from any manual 700 series. The brake pedal in your auto car is too big to fit a clutch next to it.
- Use the centre consol trim from any manual 700 series. The 760 mk II will not work; I am also unsure if the 780 got the updated interior from 1988 onwards but I doubt it.
- If the donor car is a 240 with NA B230F, then that box will not work, it is too weak for a B230FT. The overdrive unit in the 740 TIC is a stronger type.
- You will need to use the propshaft off a 740 with M46 box. The 240 will not fit nor will your present one.
The Driveshaft: The driveshaft for an M46 7-series Volvo connects to the transmission by way of a 3-bolt flange and a big rubber bushing thing. Now, I didn't think Volvos were that unusual, but every driveshaft shop in the Manchester, NH area that I took it to to have it balanced looked at me like I had brought a live tuna into their shops. None had the equipment to balance a driveshaft that didn't have u-joints at either end. They couldn't deal with the 3-bolt flange. Finally, I ended-up driving an hour down to Shrewsbury, MA to have it done.
Rear Axle: [John Sargent] Later automatic cars will have a 3.73 ratio Eaton locker. Lockers are nicer than open rear ends. If you install an M46, the 3.54 ratio rear end is a good choice. The 3.54 ratio came in turbo 740s with manual transmission. Only 1991 740s with M46 came with the Eaton locker in 3.54 ration. If you installed an M90, which has a slightly lower fifth gear ratio that the M46's OD ratio, the 3.31 Eaton locker is a good choice. Those came in 1992-94 960 wagons.
The Swap Itself:
Step 1 : Remove the AW-71. This went fairly smoothly. I unbolted the driveshaft and removed it from the car, disconnected the shift linkage, removed the shifter from the center console, and removed the lines up to the transmission cooler. This was the first thing I wasn't expecting: I had to remove the intercooler in order to remove the cooler from it's home. The auto tranny fluid also makes a trip thru the right side radiator tank; after removing the lines I simply plugged up the nipples on the radiator with rtv sealant.
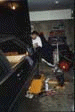
The second thing that threw me was the procedure for removing the torque converter from the driveplate, which involves undoing bolts from the backside (engine side, front relative to the car) of the driveplate. This was only discovered after tugging on the tranny with a confused look on my face, and resorting to reading a shop manual. That done, the slushbox slipped free, and after Andy (RTFM'ing in the photo) cut the dipstick tube off, (which was sticking up into the engine compartment ) we slid it out from under the car.
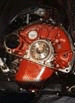
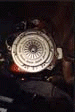
Step 2 : While you've got the tranny out, and the driveplate off, replace the rear-main seal. (No, this is NOT a Batman camera-angle. Note the front-crossmember toward the bottom of the picture, a B230FT is a slant-four, remember?)
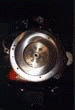
Step 3 : Bolt the new flywheel in place. This was my next big stumbling point. I had taken care to get a flywheel that had the perimeter holes next to the starter ring for the flywheel position sensor found on 1990 and later cars. What I didn't know, and what the dealership didn't seem to know either, was that there was more than one pattern of holes! I had bought a flywheel with 40 holes and two gaps, what I needed was a flywheel with 58 holes and one gap. Sadly, I only came to this conclusion AFTER I had the auto out, and was staring at the 58-hole driveplate. Needless to say, the car wouldn't start. Panic and despair set in. A morning of frantic phone calls led me to Don Weaver at Lamar Automotive in Kansas, who was able to ship the flywheel right away! [Editor] Note as well that Bosch and Regina ignition systems use different flywheel hole patterns: if your car is a Regina, you will need a different flywheel than the 58 hole unit noted above.
Step 4 : Bolt up the clutch. Nothing exciting here. Use brake cleaner to make sure the flywheel and pressure plate are clean. Use of a clutch alignment tool should be considered mandatory.
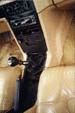
Step 5 : Install the clutch-fork and release bearing. My bellhousing had been set up for use with a cable clutch, but I wanted to use a hydraulic system instead. If you look at the picture to the right, this meant I had to move the pivot-point from A to B. Simple enough, but it involved removing the bellhousing from the transmission.

Step 6 : Wrestle the transmission up and into place. I usually use the grunting bench-press method, but you can use whatever's good for you. (a jack, some sort of tranny-stand.)
Step 7: Install the driveshaft. With the 780's 21 gallon fuel tank that lives on *both* sides of the driveshaft, this involved bringing the shaft under the front of the car and "threading" it up and thru the fuel tank and it's supports. Thankfully, Volvo was nice enough to put the IRS differential in exactly the same spot as the live-axle car, so I didn't need to go find some ultra-rare IRS/manual driveshaft. (finding a driveshaft that wasn't either buried in mud or mangled by a forklift was hard enough.)
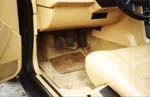
Step 8 : Install the clutch pedal, hydraulic lines, master and slave cylinders. This was all fairly easy. Volvo left a simple bolt-in blank in the firewall for the master-cylinder to bolt into, although it's kind of a pain to get to from the engine bay side, it's kind of down behind the strut-tower. (A big thanks to my fiance Michelle for having hands small enough to attach the hydraulic line to this for me, I just couldn't do it.) As for the pedal: I took only the clutch pedal itself from the junkyard, you may find it easier to grab both the clutch and brake pedal assemblies. I only had to move a computer box (ABS I think?) aside for a moment to get the pedal into place. That still left me with the big ol' auto brake pedal, which I chose to simply cut down to size. This leaves the brake maybe 1/4 inch closer to the clutch than normal, but no biggie. (check out the pic below)
Step 9 : Install the shifter lever. Okay, I lied, this should be step 6.5. This is actually fairly impossible to do after you've put the driveshaft in.
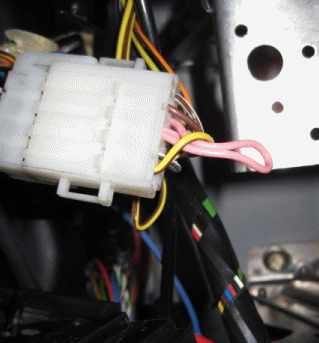
Step 10 : Wire up the overdrive! This was cause for a little bit of apprehension, but it was completely unfounded. The wiring for the AW71 overdrive and the M46 overdrive is exactly the same! The exceptions being that you need to swap relays, and that you should really hook up the sensor on the M46 that tells the relay that you're in 4th gear. (You could leave it out, and drive around with an 8 speed, but I don't think the OD would last too long.) I wasn't able to snake this wire into place in the relay socket with the relay seated normally, so I had to make little jumper wires and lay the relay on it's side next to the socket. (yellow wires) and then I was able to attach the wire for the 4th gear switch (blue wire). You may be able to get the wire into the stock location if you have the center console apart and the relay-board out, but I wasn't about to go through that.
Step 11 : Bleed the hydraulic clutch, install the interior trim, replace the battery you wrecked by leaving the hood light and trunk light on for a week, and it's done!
Note [John Sargent] 1991+ 700/900 cruise controls are connected to the park/neutral safety switch. The cruise control must see an open circuit (car in gear) for the cruise control to work. Anyone installing a manual transmission in one of these cars must cut the pink wire shown in the accompanying picture below for the cruise control to work. The connector is usually just in front of the bracket that holds the cruise control brake switch. If the park/neutral safety switch is bad, and the car will start in gear, the cruise control will not work.