Volvo Turbo Rebuild
The article below is a good one for basic turbo rebuilding. Other more comprehensive resources include the articles by Justin at the exceptional DSM tuners website where they sell turbo units. They also have articles in their Forum under Turbo System and Intercooler which outline the steps to rebuild:
Mitsubishi TD05/TD06 Part 1
Mitsubishi TD05/TD06 Part 2
Garrett T3/T4 Part 1
Garrett T3/T4 Part 2
Volvo Turbo Diagnosis & Rebuild, Boe Kalinoski, ImportCar, December 1999
The basic function of a turbocharger today is essentially the same as the one first designed by Alfred Buchi many years ago. Yet the mechanical design is simpler and the size for a given output is much smaller. Volvo pioneered this technology in 1955 when it launched a series production of turbocharged bus engines. Volvo and other car makers started producing their cars with turbochargers in the early '80s. They were lubricated with engine oil and also cooled by the oil. Eventually, a water-cooled unit was produced, giving the turbo lower running temperatures and longer bearing/seal life. With the installation of an intercooler, the turbo was able to raise the boost pressure by cooling down the charge. Cooling the charge regains some of the density and brings other benefits, as well.
Some consumers were afraid to purchase a Volvo with a turbocharger thinking that when it failed, it was going to be an expensive repair. But they liked the performance characteristics. As a result, manufacturers came out with multi-valve, higher-compression engines and sophisticated fuel systems trying to squeeze more power out of durable engines. But the turbocharged engines were still in demand. Thus, turbo rebuilds represent solid profit centers for shops that welcome the opportunity. Patience and the proper replacement parts and procedures will go a long way toward securing customer satisfaction and increasing your shop's profitability as well.
TURBO DURABILITY
A turbocharger lubricated with clean oil at engine pressure can last many years without visible signs of wear on the bearing journals. But if dirty oil, or no oil at all is supplied to the turbo, even for a short period of time, the chances are the unit will be short-lived. We have a customer that comes to our shop who has more than 300,000 miles on his Volvo and it is equipped with the original turbo! What's the reason for it being so long-lived? It's because the vehicle was properly maintained: Changing the oil every 3,000 miles and letting the turbo cool down after heavy-driving conditions.
PROBLEM AREAS
A common problem with a turbocharger is oil passing by the oil ring seals, leaving a cloud of blue smoke coming from the exhaust. The oil drain inside the unit could be plugged with coke/burnt oil deposits, making the only route for the oil is to dump into the exhaust. Oil must be drained away from the turbo faster than the oil being fed to it. Consider the possibility that excessive oil pressure/volume might be being fed to the turbo, causing the bearing housing to be flooded with oil and the turbo to leak.
Turbochargers won't actually blow a seal; the seal on the exhaust side is usually a simple piston ring with a small ring gap. The seal on the compressor side is either the same style or a more positive carbon seal similar to an air conditioner compressor seal, or even a water pump seal. Before you condemn the turbo, consider the fact that even a good turbo will leak oil given certain circumstances. Here are four areas to look at:
- A restricted air inlet
- A restricted exhaust
- A physical restriction in the oil drain away from the turbo; and
- An effective restriction to the oil drain away from the turbo, such as crankcase ventilation problems or anything that can cause excessive crankcase pressure, like worn piston rings.
In this article, I am going to try to give you some pointers in rebuilding the most popular Volvo turbo units. Volvo used the Garrett T3 unit for some years with great service results. It was used in the 240 series and the 760, and then the water-cooled units were available.
REBUILD PROCEDURES
- Remove turbocharger from manifold and place it on a clean workspace.
- Remove all hoses from housing; carefully mark position of compressor housing relative to turbine. You want to mark the housing to have the correct measurement for reassembly so all the hoses/connections line up for installation
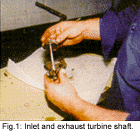
- Remove the compressor housing, and then the exhaust housing. Try to mark the compressor wheel with the exhaust drive wheel so it will be assembled in the same manner as it was balanced from the factory (See Figure 1).
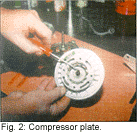
- Inspect worn areas, such as compressor plate on which the seal ring rides (See Figure 2).
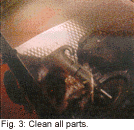
- Clean all parts. Use a glass bead cabinet if one is available. It will pay off in the long run, but it must be fine grit! All parts must be thoroughly rinsed, as residual glass bead will destroy your rebuild in a very short time (See Figure 3). If glass bead is not available, a cold carburetor dip is acceptable.
- Soak all parts until clean. A soft brush may be used to help remove stubborn deposits. Remember, the cleaner you get the parts, the longer the rebuild will last
- Make sure all oil passages are very clean to allow proper oil flow to bearings
- Inspect all parts for signs of abnormal wear. All shaft surfaces should be smooth and pit free. Bearing bores in the housing should not be scored. Turbine seal area in housing should be flat - no grooves. Blades should not be bent or broken and should not have contacted the housing. Do not try to straighten out the blades! They will crack and fail under use.
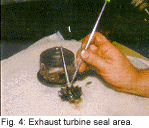
- Inspect exhaust turbine seal area for worn-out ring groove (See Figure 4).
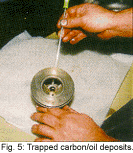
- The carbon/oil deposits trapped in the main housing could fool you, as they look like the casting. Poke all around with a sharp object, and scrape away all the foreign particles! This is a very important step, as the oil has to drain through the housing without any restrictions (See Figure 5).
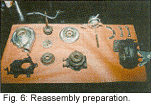
- Lay out the torn down turbo on a clean area with all the parts ready for assembly (See Figure 6)
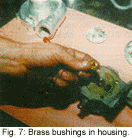
- Replace brass bushings in housing and lube with engine oil (See Figure 7).
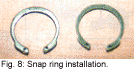
- Install the small snap rings the proper way - sharp/square side out (See Figure 8).
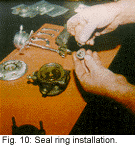
- Install seal rings on the compressor side and the exhaust turbine (See Figures 9 & 10) and lube with oil.
- Install turbine shaft into housing, not forgetting the heat shield. Make sure the seal is centered in the housing. It will slide in easily when it is in position. Do not apply force, or you will damage the shaft, seal and housing
- Slide the compressor wheel on the shaft. Tighten the nut to 18-20 in./lbs., then add one additional quarter turn or shaft stretch of .0055 in. to .0065 in. At this time the wheels should spin freely and not have excess play.
- Install housing with clamps and bolts. Tighten compressor to 145-165 in./lbs. and turbine slide to 185-200 in./lbs. Make sure turbine wheels do not contact the housing in any position.
INSTALLATION TIPS
Change oil/filter and clean or replace oil inlet line going to the turbo. Many times the line will become plugged with coked oil, restricting oil flow.
Do not use silicone sealer (RTV) on oil inlet gasket as it may squeeze out into bearing passages and plug up the turbo.
Do not race engine for 2-3 minutes after start-up.
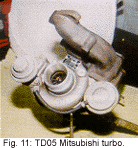
The TD05 Mitsubishi unit is much smaller in design (See Figure 11) and has lineup pins built into the housing to make things easier to assemble after tear down. This unit has a large snap ring and collar-type clamp holding the unit together.
The method of rebuilding is similar to that of the Garrett unit. Clean parts and careful inspection of worn areas are the keys to a profitable repair. I have been rebuilding turbos for some time now and have had good results.
My customers have been satisfied with the performance upgrades and price savings I've delivered to them vs. purchasing a rebuilt unit elsewhere. I found a real good source for turbo repair kits. This company has been around for 12 years and could help you with all your turbo needs:
United Turbo Co., Spofford, NH. Phone: (800) 779-1780.
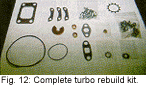
Unlike what other suppliers offer, they come with bolts, seal rings and all the gaskets (See Figure 12) to help you do your turbo rebuild efficiently and effectively.
 |
 |
 |
 |
 |
 |
 |
 |
 |
 |
 |
 |