Volvo Diesel Engine Maintenance
Engine: Diesel PDF
Diesel Lubricants and Oil Fill
Diesel Information Tips and FAQ
Valve Adjustments and Injectors
Faulty Starting: Troubleshooting
Turbo Diesel Vacuum Pump Noise
Turbo Diesel Cylinder Head Removal and Recondition
Injection Pump Seal Replacement
Purchasing Used Diesel. [Advice: Steve MacSween] A diesel with a blown head gasket is a large, difficult-to-move paperweight. You cannot negotiate on purchasing a diesel without a thorough inspection by a qualified diesel mechanic. In most areas of North America (except possibly the midwest US) as a general rule that means NOT a Volvo mechanic, from what I have heard. They simply don't know enough about diesels. Go to a VW diesel specialist, or find a heavy truck shop willing to work on diesel cars.
A thorough inspection must include at minimum a compression test, and that is a bare minimum. You should ideally have a cylinder leakdown test (CLT) done as well. Diesels run at around 20:1 compression -- compression loss means they become difficult or impossible to start in cold weather. A compression test or CLT is pointless, with the head gasket blown. If the head gasket is blown, there is an excellent chance the head is warped and will need to be machined before the new gasket is installed.
You will also need to have a mechanic assess if the diesel injection pump is functioning properly. If it isn't, the general cost to rebuild is in the area of $800-1500. Proceed with caution when looking at a used diesel. Only buy a car with a favourable (read: frequent oil changes), documented maintenance history available. Diesel operating principles may seem (relatively speaking) simple. Repairing them is neither simple, nor inexpensive.
Buying a Used 760T Diesel.
[Tips from Andreas Buchmueller] The problems with ALL VW Diesels are these: cylinder head cracks and excessive wear of the cylinder lining close to the top position in the cylinder, both due to full throttle cold starts. The engine absolutely MUST be warmed up before use. I bought and sold and repaired lots of VW Diesels in Europe. The rule of thumb is never buy a diesel from someone who lives close to a freeway, since this person will of course enter the freeway with a cold engine. The warmup period HAS to be gauge reading operating temperature plus another 10 minutes before you do any full-throttle work.
[Tips from Andre Lam] The other issue is the turbo charger in the 7x0 and 9x0 series diesels, this further added stress to the engine. In their favor, the D24T was an absolute dream to drive on the highway. The engine pulled strongly, and was much more pleasant than a base B23 in a car that size and weight. Off the line with the slush box things were a bit hairy at intersections. The car seemed to wait a second or three for the turbo to spool, then pow... the car started to pull briskly. This car had true turbo lag. Without the turbo... its a dog, with the turbo... very brisk. Noise was very well subdued as well. The engine ran very smoothly. I really liked the car (if only the engine would last). If driven all day long, then the car will last and last. If you drive it shorter distances, be prepared for an early engine death experience. The cold start was an other item that needed to be checked on regularly. If it was not functioning right, it could also contribute significantly to an early death. The wonderful change over in Diesel fuel a few years ago was also a real joy as upwards of %25 of all diesel cars on the road had their pump die shortly after the cutover. Since the pump IS the whole fuel system (pump and timing device) it is a complex beast that costs about $700 to have overhauled, re-installed and adjusted. They normally last about 100,000 miles, so that is not bad, but thanks to the fuel, lots of people got burned.
Would I purchase an other diesel car in the USA. No way. For the last decade regular gas was CHEAPER than diesel, and sometimes I could get premium fuel for less than diesel fuel. Mileage was only so-so. My '84 760TD (w/ 4 speed automatic) got about 17 MPG around town and about 28 highway. I can easily beat that with either my mom's 95 850 (4 speed automatic), and definitely better in my '93 850 (5 speed stick). Here in the USA it is also hard to find good diesel mechanics. I took mine to the VW dealer hoping that at least they would have experience ha! They declared the car in perfect health. Two weeks later my engine is toast with below par compression. Rebuilds are possible, but here again a good mechanic shop is hard to come by. In Europe where diesel is sort of reasonably priced, gasoline is 4 times the USA cost, gas stations are much more likely to also have diesel fuel, then my arguments can easily be beaten with simple economics. The NEW direct injection diesel engines from VW in the 850 are supposed to be really excellent. They run quieter (not really a problem in the 7x0/9x0, but certainly so in the 2x0), don't suffer from turbo lag, and get far superior mielage, and don't smoke up the neighborhood when you take off.
Diesel Lubricants and Oil Fill.
Synthetic Highly Recommended. [Warren Erickson] While many people use normal 15W-40 dino oil in their D24 engines, you might consider a synthetic oil due to a design flaw leading to low startup oil pressure. I just finished a rebuild on a spare D24T that I intend to use as a backup for my 760. After finishing the rebuild, I did a compression check. I previously screwed a gauge in place of the switch to monitor oil pressure. During the compression procedure I was monitoring the gauge, NO oil pressure. I then decided to bench run this engine. I made it a point to monitor oil pressure. It came up after a delay and was where it should be.
But the delay, and a previous note from a friend that showed no oil pressure for over three minutes if the engine is standing on an incline, pointed out that the D24 has a rather strange oiling system. It has an oil pump with a long suction tube. The pump is mounted in front of #1 main bearing and the oil pickup screen is way down in the sump by #5 main bearing. This suction tube is close to 36" long and has an inside diameter of approx. 3/4". I'm not a mathematician, but it's obvious there's a lot of volume to be filled before the pump ever gets primed. And you'd better have a good pump to pull a suction. To make matters worse there is approx. 6" between the level of the pump and the oil level. That's a considerable suction head for a heavy liquid. Most engines that I have rebuilt have the pump located close to oil level or submerged.
Now when the engine was new and pump clearances were tight, oil delivery was probably was not a problem. After thousands of miles, clearances increase and pickup time increases. Multiply these dry starts by thousands during the engine's life and you get reduced engine life - one of the complaints of this engine - despite its robust construction.
I could never figure out why synthetic oil worked so well on these engines. After all truck drivers were using the likes of Rotella Dino 15W-40, and getting 500,000 miles without a rebuild. Well it all makes sense now: synthetic oil's superior film strength and lower viscosity when cold. It's able to handle dry starts better. Hence, longer engine life in our D24's when using synthetic oil.
Now this does not correct the original problem; it's only a good a work around. Probably the best thing one could do is replace the pump during a rebuild and switch to synthetic. I'm afraid even a new pump will not completely alleviate what is in essence a design flaw and that only using a synthetic will keep your problems at a minimum.
Overfill Crankcase to Maintain Oil Pressure? [Tip from Brandon] I've had issues relating to delayed oil pressure while starting on hills or inclines due to the problem noted above and my fix is to overfill by 1 quart of oil and maintain this level. I know it's safe and I've proven this when I bench ran my engine after the rebuild. The turbo oil return was left open by mistake and the overfill by a quart never ran out onto the bench. There is 21mm of clearance from the bottom of the crankshaft at its lowest point to the level of the oil return hole and peeking in with a flashlight and small mirror shows almost 2 inches of clearance from the crankshaft to the level surface of the oil. To hit the crank with oil you need to overfill by 2 1/4 quarts.
Diesel Information Tips and FAQ. See the Volkswagen Diesel maintenance FAQ site at http://www.bright.net/~vwdiesel/ for good information on the VW diesel (a variant of which is used in Volvos.)
For an interesting blog on resurrecting an 85 Volvo 740 turbodiesel, see Ross Winberg's work at http://volvoturbodiesel.blogspot.com/ where he has numerous scanned OEM manual pages covering various procedures.
Diesel Fuel. [Andreas Buchmueller] In most countries, winter diesel fuel has anti-gel agents added to prevent wax formation in cold climates. If you are in an area that does NOT have this, then in cold climates VW allows you to mix the diesel with 30% gasoline to prevent the diesel fuel from getting too thick. BE CAREFUL!!! This is an excellent way to reduce the life of your pump.
Changing the Fuel Filter
[Inquiry] Please advice how to change fuel filter in my 740 diesel ( V 2.4 liter 6 - piston engine ) and what to buy as replacement. [Response: Gutzy] You can get the fuel filter at a Volvo dealer or major parts supplier (may have to order it) Fram P8043 is just one of the aftermarket fuel filters available. Fuel filter is located just below the injection pump on my 85 740GLE. It's a spin-on filter similar to an oil filter. Fuel is sucked through the filter by the transfer pump built into the injection pump. A trick that I found was to drive the rear wheels up onto a set of ramps to raise the fuel tank higher than the filter to assist in filling the new fuel filter with diesel fuel. There is also a small bleeder screw on the top of the filter housing that can be opened to assist in bleeding air out of the filter, be sure to close the bleeder screw prior to cranking the engine or you will suck air into the injection pump that could cause even bigger problems in starting the car.
[Response: Jim Bowers] Before you start, collect enough filtered fuel in a clean container to fill the new filter. You can do this by opening the fuel return line and then run the engine long enough to get the required fuel. Fill the new filter as full as you can (Note: see Diesel Fuel Injector Cleaner tip below) to reduce the amount of air the injection pump must pass through when you start up. It is important to realize that the injection pump sucks fuel all the way from the tank and any air leak will let the pump suck air instead of fuel. The air bleed screw on the housing top is normally used only to drain water from the bottom of the filter. The filter should have a drain cock on the bottom that allows for this.
On my car, I installed one of those heavy-duty glass-cylinder gas filters in the return line in the filter area. This allowed for diagnostic checks. If you see an abnormal amount of air bubbles you have a leak or the injector pump shaft seal is dying. I once saw a few metal flakes indicating the pump was due for a rebuild. Those pumps were designed for fuel when it had a lot of sulfur in it. With the EPA mandated low sulfur fuels it is important to use an additive in the fuel to make up for the lost lubrication provided by the sulfur.
Diesel Fuel Injector Cleaner. [Tip from Jim Barron] Certain VW experts (Volkswagen built diesel motors for Volvo), including factory service trainers, recommend filling the new fuel filter with non-synthetic ATF rather than fuel oil before installing it. They claim that the ATF is a superb detergent injector cleaner, the motor will start and run quite well on it, and the fuel incoming from the tank quickly dilutes the ATF so that the car is completely drivable by the time it's beginning to warm up. But beware of some synthetic special ATF for Chrysler products, etc: they can be hard on the injection pump because of their viscosity.
[Andreas Buchmueller] The camshaft in the diesel is belt driven. This is an interference engine and if the belt snaps the piston collides with the valves and you can say Auf Wiedersehen to the engine. VW recommends change of the belt every 80.000 Km so, about 50.000 miles. It is easy to change the belt for someone who has some general experience fixing engines. To set the right belt tension is however critical.
[Peter KL Milne] The cam and pump belts must be changed at 80,000 miles and every 80,000 miles thereafter. If you have no service information about these two belts after purchasing a used car, then I would have it done straight away as these engines are interference design. If the belt breaks you will almost certainly require at least a new cylinder head and possibly a complete reconditioned engine.
Procedure. [Ross Winberg] It is absolutely essential that you change the timing belt at least every 60,000 miles. If the belt breaks, the valves will collide with the pistons and then you can say good-bye to your engine. The procedure can be found in AllData. I will just give you a few pointers from when I did the job. If the water pump has not been done in a while now is a great time to do it. If the pump is recent, you might want to buy a new water pump o-ring to ensure a good seal.
You must remove the crank pulley to do this job. This is a huge pain. The crank pulley bolt should have been installed with Loc-Tite and torqued to >250 ft./lbs. It was necessary for me to use a chain wrench with a 3' handle and a 3' breaker bar to remove this bolt. YIKES! The other option is to remove the radiator etc. and get in there with an impact. The crank pulley is keyed, but the key is only there for alignment purposes. It has little structural strength, hence the outlandish torque. I torqued mine to 250ft./lbs. and then tightened it some more using the aforementioned 3' breaker bar.
 It is of the utmost importance that the crankshaft is spot on TDC. Buy yourself a small mechanic's mirror and use it to site the TDC mark as if the engine were out of the car and you were looking straight down at it. The manual does not show you how to install the camshaft locking tool . You need to remove the rear camshaft sprocket(make sure to lock the injection pump at TDC with the pin) and I found it necessary to remove the last two valve cover studs. There is a slot in the back of the cam that the tool fits into.
Belt tension: I installed mine too tight and it howled. I kept on loosening it bit by bit until it didn't howl any more. The VW tensioning tool is over $100. Ouch. I can push/deflect mine 45 degrees with one finger-not trying that hard. While doing the belt, it would be prudent to change the tensioner as well. I found it easiest to remove the power steering pump when doing this job. It's only a few easily accessible bolts.
Valve Adjustments and Injectors.
[Question:] How often do the valves need to be adjusted on the D24? Should the injectors just be replaced at some point or just run them until they fail?
[Answer:] According to the book you are supposed to check the valve clearance every 15k mi (25km.) Injectors should go at least 75kmiles before nozzle rebuild. They don't usually fail catastrophically. Usually you start getting smoke or excessive knocking. adding a bottle of Techron to the tank will often clean out some of the nozzle deposits and cut smoking and knock for a while. Bosch rebuilt injectors are a relatively inexpensive swap.
D24 Diesel Valve Clearance Procedure.
[Inquiry:] How do I set the valve clearance on the D24?
[Response: Dimitar/Rich]
Tools: You will need removal pliers for shim plates, a set of shim plates, and a valve lifter tool, the same tools and same procedure as for VW or any Audi diesel. [Ross Winberg] Get the Hazet tool 2574, a micrometer, a supply of VW diesel valve shims, and a shim extractor plier. See Special Tools for diagrams. Cool engine down completely: the clearance specifications are for a cold engine. Remove the rocker cover.
- Using a 27mm socket, rotate the engine so that the Number 1 (front) cylinder is on TDC or top dead center (at this point both cam lobes for the No. 1 cylinder are pointing diagonally upwards and the mark on bellhousing is aligned to flywheel mark)
- Measure valve clearance for that cylinder. "Checking" clearance specifications are 0.15mm-0.25mm intake valve, 0.35mm-0.45mm exhaust valve. If clearance is within these limits, then the valve is OK.
- If too low obtain thinner valve shim plate and exchange the old one with that one. Do the reverse for too high a clearance. The shim plates are inserted "number side down". To adjust any clearances you must turn the engine a further quarter of a revolution from TDC to prevent the valves hitting the pistons.
- Do this until the "setting" clearance is 0.20 +- 0.05 mm cold for intake and 0.40+-0.05mm for exhaust valves.
- Rotate crankshaft for next firing cylinder adjustment (1,5,3,6,2,4 order).
- Repeat procedure
- Rotate engine twice and check everything again
- Check clearances every 20,000 miles or so, although an absence of noise indicates clearances are probably within specifications.
- Replace with new valve cover gasket.
[Inquiry] My water pump is leaking. Since the water pump is driven off of the timing belt, is it a big job to change the pump?
[Responses: Mark Stites] The toughest part of replacing that belt will be getting the crank bolt out. If you are doing JUST a belt and pump you can get away without having to check pump timing. It would be nice if you could recheck your pump timing but I can tell you from experience that if all you do is change out the water pump and belt and you are careful not to move ANYTHING you should be alright. However, if you have no experience with timing belts I sure as hell would not start with a D24 just on the simple fact that you could blow the motor up if things are not right. If you do elect to have it done I would put in a new belt, pump, and idler pulley (the water pump is your tensioner in this set up). While you are there you might as well have the rear belt changed and the pump timing checked and adjusted. If you elect not to have the rear belt changed understand that it will not cause the motor to blow up if it breaks but it will leave you on the side of the road. It is best to do them together.
[Robert Ludwick] If you've never dealt with timing belts before, the D24 is not for the weak-hearted. Timing one of these things is not overly difficult, but it requires having the proper tools, an above- average level of mechanical skill, and following directions exactly in the factory green manual. Anytime that you fool with the timing belt on a diesel, count on retiming the whole engine (special tools required ) You might get lucky and have the new pump be the exact dimensions as the last one and have the timing belt under tension wind up in the same place...but I wouldn't count on it. Often mechanics will try to swap water pumps on these engines and they won't start after completion. If you aren't too far from a t-belt and tensioner change anyway, it might be time to invest in the tools and do it, or find a liberal-minded VW diesel mechanic to do it for you.
Faulty Starting: Troubleshooting.
Glow Plugs.
[Tip from George Holmer]. My very well maintained turbo diesel would start up badly in the morning and smoke, the colder outside the more smoke, lots and lots of smoke. I knew all the glowplugs were brand new so I suspected the glow plug relay. I opened it up and lo and behold, there is a copper plate partially split in two with two contacts at the split end. The smaller bit was seriously affected by heat and had severe discolouration. The contact was badly pitted and the copper had bent downward sligthly causing this contact to meet but not the other one, thus rendering the relay useless. In my case, with severe pitting the relay will soon need to be replaced but just cleaning the surfaces with a sandpaper and bending the two split parts of the copper plate and making them level has made my car start up much, much better and there is much less smoke. Since I did this, a number of other diesel owners have confirmed that their relays have suffered similar fates. If your diesel is a hard to start from cold and smokes badly, the glow plugs are often the culprit but do not forget the relay, it's easy to check and fix.
[Andreas Buchmueller] I recommend changing ALL the glowplugs every 60.000 miles and keeping an extra glowplug relay and fuse in the car all the time. If one glow plug does not work the car WON'T start in cold conditions. A well-maintained diesel engine HAS to start in less than a second after the second preglowing.
[Peter KL Milne] The only things that stop a D24 from firing when cold (ie left outside all night, not in a dry warm garage) are the glow-plugs or the glow plug relay (front of left hand wheelarch above battery). Any poor connection to/from this relay will impair the starting quality as will a couple of glow-plugs gone down.
Changing the Glow Plugs.
[Inquiry] My D24T was suffering cold start problems. My local volvo mechanic has changed plugs 1-4, but says that 5/6 require a lot of dismantling to get to and replace.
[Response: Peter KL Milne] Basically undoing the busbar nut (loosening but not removing) should enable the correct spanner to be fitted to the body nut. With spanner in place slip a noose of string over the plug insulator. This should stop it falling when fully loosened from the head. It should then be easy to remove the glow plug. It should then be possible to (using spanner and pressure from a finger to fit the new glow plug. No 5 is removed/replaced in a similar way but using the busbar (with loosened top nut) to hold the plug as it is removed. Transferring the busbar to the new plug will facilitate replacing it. It would, of course be better to test the plug's resistance before attempting to remove it. It should read about 1.3 Ohms if good and will nearly always read quite high when knackered. Obviously a good Ohmmeter is essential. My 5 & 6 are due for replacement which will be done when the Cam and Pump belt are changed which gives a little more room to reach them.
[Ross Winberg] Contrary to popular belief, it IS possible to replace all 6 glow plugs without removing the fuel pump. You need to purchase a SHORT (or "stubby") combination wrench to fit the glow plugs, remove the rear timing belt cover and go in through the rear timing belt to get glow plug #6. The hardest part about this job is reattaching the glow plug wire for #6. I needed a deep offset box end wrench (Sears sells them, but I used a Hazet). Clean off the electrical contacts while you are doing this job. I use Wurth Contact OL. Replace any missing insulation on the copper strip with heat shrink tubing.
[Response: Robert] I always first remove the buss bar from #4, 5,6, and pull the wire that goes to the temperature sensor on the back of the head and move it out of the way, then # 6 is easily reached with a 12mm angled box end wrench(spanner) turned over ( the end of the wrench that would normally be angled up and out, turn it down toward the head. Slip it in from the back of the pump bracket and you'll be able to work # 6 out from the back without too much trouble at all. The flipped- over wrench helps on #5 too The best way to reach this is to lay some padding across the right-side fender and lay on your stomach and access the #5, 6 glow plugs with your left hand.It's really quite easy this way. Trying to reach them from the other side is a nightmare. A good idea to use a touch of anti sieze compound on the threads of the new glow plugs so the'll come out easier next time. [Mark Stites] Number 6 is a real bitch. I have a piece of flat sheet metal with an 8mm socket brazed onto the end of it that I use to break the nut loose on it. It has been awhile but I think you might have to pull the injector pipes off to get a wrench down there to pull the actual glow plug itself. When installing the new #6 plug affix it loosely to the strip and use the strip to fish it back into the hole. I have also used two long screwdrivers with a piece of vacuum line on the ends of them for traction and put one on either side of the started plug and use them to thread it in until you need the wrench to actually tighten it down. [Robert Ludwick] Do yourself a big favour and get an 8 and 12mm gearwrench: 8 for the wire and 12 for the glow plug itself. Lay a pad across the passenger side fender and engine (US) and reach in with your left hand with the gear wrenches and it's a piece of cake to get 5&6. Pop the rear temp sender wire for the glowplug sensor off and move it out of the way first, don't forget to put it back on after.
 Glow Plug Fuses. [Ross Winberg] Extra fuses are always good to have on hand. You will not find the glow plug fuse in any local auto parts store so all the more reason to have a spare on hand. The glow plug fuse on the D24T is basically a flat strip of metal. It is rated for 80 Amps and available only through Volvo for a cost of less than $3. To replace the fuse you need a 10mm socket to remove two nuts that hold the glow plug relay (located on top of the driver's wheel well) and a phillips screwdriver to replace the fuse. It is good practice to clean all electrical contacts that you disassemble with contact cleaner.
Vacuum Leaks or Fuel Drainback.
[Inquiry] I have a problem with my 1990 760TD (D24TIC) in that when the car is cold or hot it starts fine. But after allowing to cool for say 15 minutes it becomes increasing difficult to start the longer it is left to cool, until the point at which the glow plugs come on for the normal period when it starts fine once more. My local Volvo dealer typically wanted to replace all the parts as a means of testing which I was not going to allow. But I have been letting a local diesel specialist look at it and he has checked the obvious things like glow plug relay (was brand new anyway), injectors, glow plugs etc. and now thinks the problem lies with the fuel pump. He believes that the fuel is draining away back to the tank after stopping because of a potential fault in the vacuum side. He has suggested I try & source a new pump and warned me it can be expensive.
[Response: Peter Milne] Have you checked that the fuel filter is screwed in properly and that the drain screw on the top of the body is tight with the drain tap at the bottom of the filter tight as well? Apart from that the only other source of drain down is perished rubber hoses on the fuel lines between pump and left hand chassis member where the fuel lines affix, or perished hos connections at the rear hwere they enter the tank. A further reason could be one of the injector pipelines has worked a little loose at pump end or one of the return line rubber hoses between the injectors may have perished or is not as tight as it should be. Sometimes a leak can develop in the body of the pump which can be cured by carefully retightening the bolts holding the pump body together.
Excessive Smoking. [Inquiry] After replacing my turbo and reconditioning the head, the engine still smokes. [Response: Peter KL Milne] Under General Fault tracing in the relevant Green Book the reasons for black exhaust smoke are given as follows:
- Excessive amount of fuel injected
- Incorrect injection timing (too far retarded)
- Dirty air filter, too little air getting in
- Worn injectors
- Poor grade or contaminated fuel
- Blocked exhaust system.
The very first thing I would do to eliminate the most expensive item in the list would be to pour into a full fuel tank some fuel and injector cleaning fluid at the recommended dose. I would take the car for a run of about twenty miles to see what effect that has. Then check whether your cold start fuel enrichment is working correctly or if it has stuck in the cold position. Does your car have Exhaust Gas Recirculation? If so it would be a very good idea to disable it. The only emissions valve I know of is a trap in the rocker box vent to inlet. Your engine should have hydraulic tappets and an extra cam belt tensioner under the camshaft wheel at the front. When you have done the above checks then have the car's fuelling set up from scratch, including the cold start fuelling and idle revs (cold and hot). The important things to get right before this are the cam belt timing and the fuel pump timing. Also put in a new set of glow plugs, I know 5 & 6 are pigs but well worth doing as most garages tend to leave them alone because they are difficult.
Excessive Smoking on Cold Start, Lumpy Idle. [Peter K.L. Milne] The cold start depends on two things. Firstly the glowplugs which are energised via the glow plug relay. This is the black box sitting just behind the battery on the forward face of the wheel arch. There is a set way to test the relay and glow plugs using a test lamp (about 5 Watts is plenty). If these work OK then the fuel cold start device needs to be checked. When cold the fuel lever on top of the fuel pump should be about 4-5mm clear of the slow idle stop (engine side of the pump). If this is not so then check that the attachment (on end of cable from start device) is correctly fitted. Then check that the two small hoses are attached to the cold start device at front of pump. If so and there is no movement of the cable between cold and hot then the thermal bulb inside is duff. If everything works as it should then you may need to recalibrate the pump and reset the stops. This is explained rather nicely in the Green Book for the D24.
Excessive Smoking, Poor Low-End Power: Timing. [Peter KL Milne] Make sure that pump timing is spot on. I had very similar symptoms with a 944 TDI because the pump drive belt had jumped a tooth and retarded the timing so that at low revs there was next to no power, but if you managed to wind her up she would do 90 mph all day long. To quickly check you need to remove the rocker cover and pump drive belt guard. Turn the crankshaft so that the timing mark coincides with the two front camshaft lobes pointing equally upwards (like a wide V). The mark on the rear face of the pump drive sprocket should line up with the two marks on the bracket and pump housing. The pump needs to have these three marks line up. Two are set in the mechanical set-up of the pump body and bracket, the third is the mark on the sprocket outer edge, which can be set by the stop pin tool which is inserted through a hole in the pump drive sprocket to lock the pump into it's correct setting - if there is then any discrepancy in the cam to pump timing it will show up with the pin in place to lock the pump setting as you set the camshaft/pump relative timing -done before you use the dial indicator.) I use the Sykes-Pickavant timing tool set with my car and it is pretty foolproof. It consists of the square tool that fits into the camshaft rear sprocket slot and two sets of feeler gauges (as it is a universal kit) and the locking pin
Replacing Cold Start Device. [Ross Winberg] After I determined that my cam timing and injection pump timing were spot on, it was time to figure out why the car started so horribly cold(lots of white/blue smoke).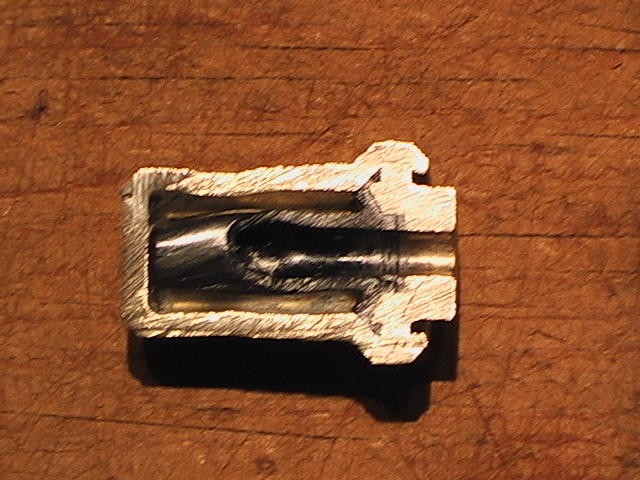
One obvious issue was that the coolant-regulated cold start device was non-functional. It is designed to advance the injection pump timing for cold starts. I called up Bosch and they put me in touch with a dealer that could order the part for me. From the swedishbricks.net FAQ, 1-467-202-302 is the correct part number. It cost me about $50.
To replace the innards of the cold start device you will need a vise, small needle-nose vise-grip, 4mm allen, a hammer and a punch. When you disassemble the device you will quickly notice that it is under a LOT of spring pressure.
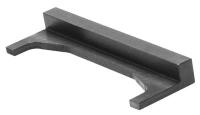
The punch is used to get the wax thermostat out of its housing. Here is a picture of my old one cut in half(above). It has a rubber boot that goes around a sliding rod. I have no idea how this thing works, but I like to take things apart.
When you get the thermostat in the front housing(the one with the coolant ports), take the rear housing with all its springs, cable, etc. and compress it in a vise. The cable should come out the back exposing the stainless steel shaft that the cable is crimped into. Put the needle-nose vise-grips on the shaft so that whe you release the vise, the springs stay compressed. Install with the two 5mm allen bolts and then remove the vise-grips.
I recommend soldering the cable end. It will keep the cable from fraying, which mine is doing.
Injector Rebuild. [Inquiry:] I am looking for a source to either rebuild my injectors or to purchase rebuilt ones. Does anyone have a source that offers good prices? [Response: Dimitar] I would suggest you ask at a VW dealer or preferably Bosch. It is the same injector (or nozzle for rebuild) as in VW Golf or any other VW/ Audi diesel car. For D24 T opening pressure should be adjusted to 155 bar. Bosch part no. of the nozzle is 0 sd 293.
Diesel Compression Test. [Inquiry:] I am interested in getting a compression guage to test the compression. Unlike a gas engine I'm quite sure that the guage would have to come with a fitting to thread it into the injector holes since I doubt that you could hold it in place with the high compression pressures of a diesel. [Response: Dimitar] You are correct. For good engine performance it is rather important that all 6 cylinders has close compression results, 6-8 bar difference between any two. When new compression is 33 bar and low end (per manual and Volvo) is 24 bar.
Procedure. [Ross Winberg] Compression testing this motor is quite an ordeal. Before you compression test, adjust your valve clearances. 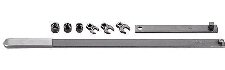 To do the test, you first need to remove the injector lines with a 17mm line wrench, carefully labeling which goes where. Second, you need a deep-well 27mm socket with thin walls. I also found it necessary to use a serpentine belt tool (picture at right) to remove injector #5. The extremely low profile of the 1/2" drive part of the tool(at upper left in the picture) allowed me to squeeze between the injector and the injection pump. I recommend the Sears Craftsman as it was the least expensive tool I found. Be sure to blow out all of the sand/dirt/etc. from around the injectors as you remove them. Once I had the injectors out, I removed the heat shields with a large screw. I threaded the screw into the hole in the heat shield and used a slide hammer to pull out the shield.
 I found it very difficult to find a diesel compression gauge (onethat reads up to 500 psi) at local auto parts stores. You also need the adaptor for injector hole (see pic at right) This adaptor is the same as the VW one. My compression readings (with bad cam timing) were 400 psi for cylinders 1-4 and 360 psi for cylinders 5 and 6. This matches the general consensus that cylinders 5 and 6 can become starved of oil under certain conditions.
Turbo Diesel Vacuum Pump Noise.
[Inquiry:] Anybody out there know how to cure a knocking vacuum pump? It's like a noisy tappet but comes and goes without any pattern: seems to be at engine speed, tap tap, but is much more easily heard at idle.. I have renewed the rod between the camshaft and the pump without success.
[Response: Peter KL Milne] A new vacuum pump is needed, although you may be able to fix it with a repair kit. The pump will set you back around £170. It can be sourced from G,S & F or Eurocarparts in the UK and is made by Pierburg. The pump comes complete with a matched pushrod which must be changed with the pump.
[Response] We used to overhaul the vacuum pump with a kit from Volvo. Occasionally, the big internal spring breaks, which can cause the noise you're describing. You could try a new or rebuilt/junkyard pump from somewhere, if you don't want to overhaul yours. Keep in mind that VW originally built that engine and a pump may be available through a VW parts outlet.
[Response] A new pump is around US$550 and an overhaul kit comes to $350. Also finding one in a junkyard is nigh impossible. VW outlets have similar prices.
Turbo Diesel Cylinder Head Removal and Recondition.
[Inquiry] Any tips about replacing the head gasket and reconditioning the cylinder head?
[Peter K.L. Milnes] Purchase the OEM manual for your engine and follow the instructions carefully. In the front of the manual you will see the special tools that are required. I would personally use all the special tools they specify as they are designed to make the job foolproof. Remember this is a Volkswagen diesel engine, so it needs a bit more care with procedures than a Volvo petrol engine. However, if you follow the steps as in the manual you should have no problems. Just read the section for the job you intend to do thoroughly before you start the job and make sure that the appropriate special tool is there to help you.
[Rich] Having removed and refitted several cylinder heads from the D24 engine I can tell you that it is definitely not a job for the DIYer. Specialist Volvo tools are needed to carry out the job properly. If the head does have to come off then you ought to also renew the water pump o-ring, change the timing and injection pump drive belts and injector heat shields too. Of course, the injection pump will need to be retimed too and this also needs the proper tools to get this accurate. Specialist tools are also needed to reset the valve timing as the camshaft pulley is a taper fit onto the end of the shaft without any keyways.
Loose Prechambers. [Inquiry] I have two loose pre-chambers in my D24T cylinder head, removed for reconditioning. They don't appear to be damaged, push back in snugly, still have their locaters, and fit flush with the head surface. How snugly are these chambers supposed to fit? I'm concerned they might work loose in operation. [Tim Hicks/Robert Ludwick] I removed mine to clean them prior to machining. All of mine would not stay in afterwards. I used a Loctite adhesive to keep them in: clean the joining surfaces with anaerobic activator or acetone; let dry for awhile; then seat them with red Loctite . They will not fall out after the head is installed as they are held in place by the headbolts. [Robert Ludwick]
Then - and this is the bit I wish someone had told me - pull backwards gently on the belt a little against the pump spring until the plug is an easy fit - i.e. easily moveable with the fingertips - and tighten sprocket still holding belt in the same position. Once tight it should be possible to remove plug easily. If not your timing may not be quite correct, so just try again. .
Even the small amount of tension caused by the pump exerting pressure against the plug seems to affect the pump timing quite substantially - it represents about 3mm - 4mm on the outer edge of the sprocket. It doesn't sound important but it is - since learning to simply tension the belt in this way doing this I have discovered to my delight I no longer have to fine tune the pump with a clock gauge.
Just to clarify, I do not using the sprocket holding tool initially but pull back on the belt with one hand, check the plug, tighten the sprocket just a little more than finger tight with a spanner, check plug again, remove plug if satisfactory and then tighten sprocket fully with the sprocket holding tool. This makes it a one person job.
Injection Pump Seal Replacement. [Inquiry] My D24 injection pump front seal is leaking. How can I replace it? [Robert Ludwick/James Souther] Don't waste your money on installing a used pump; you'd most likely just be buying a rebuildable core...which is what you already have. It's not too horribly difficult to remove the pump or replace the seal, but there are a few tools you will need. If you don't already have the special pump gear puller, the easiest thing to do is remove the pump bracket to block mounting bolts (the bolts directly between the pump and the bracket and the one below that holds the dipstick tube). Soak the bolts with good penetrating oill for a couple of days before starting in case the last gorilla to work on it overtightened things )
First remove the belt guard, turn engine to top dead center #1: there should be a mark on the pump gear and the small hole in the gear will line up with the hole in the pump bracket. Take a permanent marker and mark EXACTLY where the pump lines up with the bracket. Feel the existing belt tension so you can get it close on reinstallation. Remove the injector lines (You need at least a 17mm flare nut wrench and a 17m flare nut crows foot wrench comes in REAL handy; the latter about $20 from SnapOn Tools). Then loosen the pump bracket, remove the belt, remove #6 glow plug wire, pull the pump bracket bolts all the way and wrangle the pump out with the bracket.
Now take the whole assembly to a diesel injection shop and pay them to pop the gear off. For a few bucks more, have them replace the shaft seal (or buy the seal and replace it yourself: not hard, but you know the shop will get it right and you don't want to do this job twice)
Reinstallation is the opposite. Two tips:
- When you put the pump back on, loosen the pump fuel input line and gently pressurize the return line to the tank to prime everything. This saves the battery and starter when you fire it up.
- Be sure you are at true TDC if you have to start over because there are two marks on flywheel. I do a mandatory engine turnover with a wrench on the crankshaft pulley a couple of complete turns to know I had everything timed right. If it is not timed correctly, then this manual turnover will allow you to feel a valve hitting the piston rather than crushing one with the starter).
- Do not fully tighten the injector line nuts until you see diesel pulsing out without bubbles when you try to restart the engine. As you tighten the bled ones, it will start to run and then tighten them all.
If you marked things carefully then HOPEFULLY you will get it close enough to run, but if not, you'll need to buy a timing gauge.
Can I Replace My Non-Turbo Injector Pump With One from a TurboDiesel? No: a turbo pump has different parts inside it, uses atmospheric compensation, and is matched to different injectors.
Oil Pump Gasket Replacement. [Tips from Dimitar Vlahov] I will try to give a list of neccessary work to change oil pump gasket on VW/Volvo diesel so that can be compared with gas cousin.
First remove: valve cover, electric harness big connector on firewall, front timing belt cover, front timing belt, rear timing belt, injection pump turn away in bracket, PS pump, A/C compressor and complete cooler and fan system. Anti freeze must be poured down as to change front timing belt it is neccessary to move (and open) water pump- water pump tensions timing belt-. Then, left and right engine mounts are going off in order to pull engine out of bay for about 20-30 cm up. That is needed because to reach oil pump pipe bolts oil sump must be off (and that is not possible with engine in place). Then alternator and fan goes out, together with crankcase dumper which is 2 piece part (and 400Nm or around 350lbs-ft torqued). When engine is almost bare enough only then you can first unbolt carefully oil sump followed by oil feeding pipe inside. Only after all of that oil pump can be taken from crankshaft and crankcase, remove paper gasket and inspect everything.
In process it is necessary to use some special tools and it is GOOD to have factory green manual at least.
Assembly is obvious following the manual (it is easy to say but not so easy to not forget some part or assembly timing).
After everything is back on then you must do proper engine timing of front and rear timing belts, injection pump, cold start device. There is no marks on crankcase or crank dampener but there is alignment point on flywheel. Also there is no any marks on timing belts. When doing timing belts there also must be redone initial injection pump timing.
I think that on D24 it is very complicated to work for everyone who is accustomed to the Bxxx series Volvo engine. It is completely different way of thinking from bottom to top of engine. And prices for engine work seem to be higher then for any other diesel engine around here. And yes, you can drive gas Volvo with slight engine defect but diesel Volvo will not forgive any lack of precise and in time service procedure. It is susceptible to bolt overtension in alu head, to head gasket at full temperature in summer, to cold winter starting, to oil supply system, to cold start device. But if everything is in original specification it has almost flat torque and is vibration free. It is only 82 hp but still you can pull trailer with 1.500kg (3.300 lbs) effortlessly.
Alternator. Diagnosis. [James Souther] I would recommend first getting under and replacing the brush regulator assembly, advice I also give to any B280 V-6 owners. The part is less than thirty dollars and two screws in and out after you disconnect the battery cable. Of around ten alternator failures in my 700s Volvo fleet, one was shorted diode, one was bearings, and all the other were regulator brush assembly, and only one of them had a bad regulator, rest were worn brushes which can be fixed with a soldering iron and a brush kit for less than ten dollars. Do the easy things first as diode and regulator chip fails are rare, bearings can be checked by spinning the alternator pulley by hand with the belt off after/or listening for bearing noise with a cheap HFT stethoscope over the rattle-tattle.
Removal. To remove the alternator in a 765 turbodiesel, from the top you pull the air box (for elbow room) and turbo hoses, remove all the bolts on the tensioning and mounting, move it up and forward slightly, mark the wires as there is an extra wire, pull the wires and lift the alternator out. You do not have to pull the transmission cooler lines.
Failure. The starter may not be the problem; check the wiring harness first.
Removal. [Peter Milne] Starter removal is best done from underneath with the car on a ramp with the exhaust downpipe and clamp removed. [Inquiry] I'm having trouble getting the starter out of my D24T. I have the two bolts out and seems to be loose, but won't come out. What am I missing here? [Response] Loosen the cable, then wiggle and twist; it fits the hole rather snugly. [Brandon] Diesel starter is an easy affair: two bolts plus electrical connections and then wrestle it out. I believe the bolt head is 3/4" compatible so you can use a standard socket. [Noel DeSouza] Don't expect to take those nuts off the 2 bolts that stick out from the back of the starter: I have 2 starters and both had nuts stuck onto the bolt. Use the correct size wrench and you will find that the bolt (which is as long as the starter) will unthread from the other end and the entire bolt will come out.
Starter Rebuild. Hitachi made the diesel starter rated at 2.1Kw which used ball and roller bearings and did not require a support snout on the end making it easier to change. After 1985 all 760 diesels were supposed to have the Hitachi starter and all the ones I've seen had them. It's a snappy little motor but doesn't tolerate long crank times. It's also a bit more efficient than the old Bosch motor that used bushings and tape wrapped coils. Hitachi is a sealed encapsulated part. The picture shown on many online ordering websites is NOT the Hitachi gear reduction starter, it's a generic Bosch for the B2x gasoline motors. The Hitachi has a defined offset look to it along with big mounting ears and lots of space between the motor and solenoid itself into which you can fit a finger. Problems you might encounter with getting the wrong diesel starter: bolt length issues. I don't remember if they were different lengths but in any event the bolt is an M12X1.75. The battery positive cable lug end may need to be enlarged slightly with a reamer to fit the larger lug on the motor. This ONLY applies if you have the older-style Bosch motor and not the Hitachi gear reduction unit.
Starter Motor Brushes. If you are tempted to resolder the motor brushes, do it at your own risk: a lot of current passes the junction and causing heat sufficient to soften the solder. The proper repair is to spot weld the flyleads to the copper bus bar using phospher-bronze based silver solder.
Solenoid. [Noel DeSouza] To repair the solenoid, you will need a soldering iron to remove the contact plate, clean and reinstall it. My biggest challenge was removing the 2 flat-head screws that hold the solenoid to the starter - you need a very good 3/8 or 1/2 flat-head screwdriver with a perfect tip to pull those 2 suckers out as they are really tight, and using anything less than a good screwdriver tip will mess up their heads and result in them being permanently stuck in there. I replaced them with 2 socket head screws.
Diesel Parts. [Parts Source Tip from Kevin Rhodes ] Try the VW suppliers - Rapid Parts and Wolfsports are two good ones - it's just a VW 4 with two more cylinders. Used in VW trucks in Europe. Most parts are interchangable - there are just more of them. The specs are pretty much the same too. My roommate had a 740TD, always bought from Rapid Parts for FAR less than the Volvo dealer.