Volvo 740/940 Side Marker Lamp Wiring
Volvo Side Marker Lamp Installation PDF
Where to Find Euro Side Marker Lamps
Marker Lamp Installation in Fender
Fishing Wires from the Lamp to the Connections
Wiring Flashing Side Marker Lamps
Bulb-Out Relay Circuit Concerns
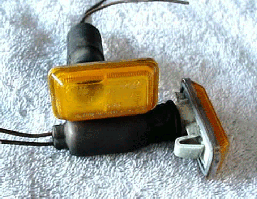
Side Marker Lamps Description. [Written by Dave Barton, to whom thanks are given]
German-made Hella side marker lights look great on the front fenders of Volvo 240's, 740/760's, and 940/960's. Some drilling is required to fit these to a North American 240 made before 1986, but all '86 and newer 240's, all 700/900 Volvos, and all 850's already have the necessary hole behind the front fender "VOLVO" badge. As you may already know, Euro versions of these models did come with similar lights used as turn signal repeaters, thus the reason for the hole in the fender to begin with.
Where to Find Euro Side Marker Lamps.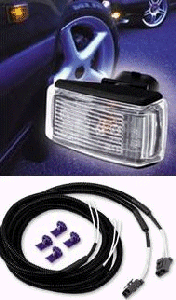
[Editor] New Hella side marker lamps and wiring kits are available from IPD (see the photo for their modern version of this lamp). Lamps without wiring kits similar to the amber version in the photo are available from aftermarket dealers serving Porsche and Audi owners, including Pelican Parts and Vertex. Search their catalogs for European side marker lamps used on mid-1980s Porsche 911 cars. Used lamps and wiring connectors may be had from recycling yards with mid-80s Audi 4000 or Porsche 911/912 cars. To remove these from existing cars, just use your fingers to push the light forward (towards the front bumper) it will then come free on the back side and then it's loose. [Editor] Several sellers on EBay have these units, but note that they often exclude the lamp holders: they include only the plastic shell.
Marker Lamp Installation in Fender. [Written by Dave Barton]
Models With Existing Hole In Fender.This hole is found behind the "VOLVO" badge, which is placed on the fender with adhesive only. The badge should be carefully pried off. A hair dryer will help to warm up and soften the adhesive. Then some dental floss will help to loosed the grip of the old adhesive. I have found that when installing these lights in the fenders with existing holes, as depicted in the photo 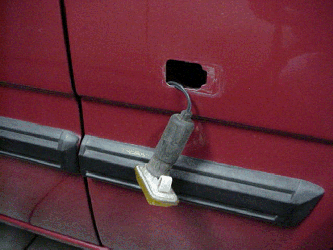 of the red 740 Turbo, it made for an easier fit to slightly enlarge (elongate horizontally) the holes with a small 1/2 inch half-round metal file. This should be done slowly while periodically test fitting the side marker. Very little metal actually needs to come off, possibly 1/16 of a inch or so. This takes only about 5 or 10 minutes, so this should not be of much concern. For those of you concerned with keeping your fender hole intact (due to rust, fear of committing sacrilege against the Volvo gods or whatever), the back sides of these lights are plastic and may also be modified to fit the existing hole by carefully trimming some of the plastic material on the back with a razor or small file. The goal is to be able to install the light with a snug fit, but not too tight as you risk breaking something on the light by forcing it in.
Older 240 Models Without Existing Hole in Fender. The most difficult part of this install is getting over the fact that you are cutting into your Volvo fender! The rest is easy. On my '84 245 I started with a simple 3/4 inch (7/8 inch would be better) hole saw. Drilling the sheet metal on a perfectly good Volvo fender with a standard hole saw is not a natural act and can be unnerving, but if you do it slowly and gently, you will easily cut through without any fuss. A small sheet metal nibber is a good tool to have to elongate the hole horizontally. If this tool is unavailable, a small metal file as mentioned above will work, but will take a little more time. Your goal is to make a rectangle about the size of the hole in the red 740 above. The hole will be about 3/4 to 7/8 inch high and about 1 3/8 inch wide. The hole should be a snug fit for the light, but not too tight or you risk breaking some of the plastic on the back of the light if you force it in. So careful, periodic test fitting as-you-go is necessary. The side marker light simply snaps into place once the hole is the proper size.
Fishing Wires from the Lamp to the Connections. [Modified from Dave Barton's Contribution]
Fishing Wires. Most Volvo's do not already have a wiring harness in the fender for turn signal repeaters. For you 240 and 740/760 & 900 owners, you will have to wire it yourself. You need to fish the two wires through the fender well and run them forward to the front turn signal and ground connectionsl. On the inside fender near the front, there are a number of round plastic plugs which provide access for rustproofing, etc. You can remove one of these, insert a coathanger or electrician's fishtape wire rearwards until it is visible at the hole for the signal. I have easily fed a fish wire from the front toward the rear - much easier than going from the light location forward. Just put a slight curve in the wire so that it rides over the inner fender liner and ends up near the opening for the light. Fasten the signal wires to the fish wire and pull them forward. Then cut a small 'X' in the plastic plug and pull the wires through it. Reinstall the plug and attach the wires. If you do not have the plastic plugs in the inner fender, you will have to first remove the wheel first, then the plastic inner fender liner, a very simple job with only a few screws. You might need to drill a small hole in the inner metal fender if you can't find a place to pass the wire through to the engine bay. If you drill a hole in the inner fender metal it's a good idea to rustproof the hole with new paint and to install a rubber grommet to prevent the wires from chaffing against the metal. 960/90 Note: I used a ~6 ft. long wire and snaked from the front to the rear on both sides. On the drivers side, I went high. Right above the turn signals, where the fender metal bends over and down from the engine bay to the outside fender there is a gap that you can easily snake a long wire into and over the tire.
You can purchase the wiring harness from IPD or make your own assembly. The IPD extension wires are just the OEM Volvo pigtails with some extensions soldered on and the whole thing closed inside some flex or quick loom covering and electrical tape at the ends along with a couple of scotch connectors. To make your own, use extension wires that are correctly color coded for the front turn signals. If the pigtail wires that fit the plug for the turn indicator are not long enough to reach all the way to the front turn signals, you will need to solder some extensions on to them. Be sure to leave enough slack in the wires to allow you to easily remove the repeater from the fender with about 6" of wire. It is also helpful to use some 'quick loom' to cover and protect the wires that are inside the fender. Where the repeater lights go into the fender, there is a rubber plug in the inner panel behind the outer fender. You will need to remove this plug as the connector on the back of the repeater will extend into this hole.
Wiring Connections. Once you've fished your wires, connect ground to the turn signal's black ground wire or to the front ground connection point on the inner fender behind the headlight (several blank tab terminals available). Connect the hot side to the turn signal lead with a Scotch plastic snap-on connector. It does not matter which wire from the side marker goes to the 12v hot wire for your turn signal. On most Volvos I've seen, one side had a green wire and the other side a blue wire. I use an inexpensive 12 volt circuit tester to verify the wires I use. This eliminates guesswork. The type that uses a sharp point to probe a wire is best for this job.
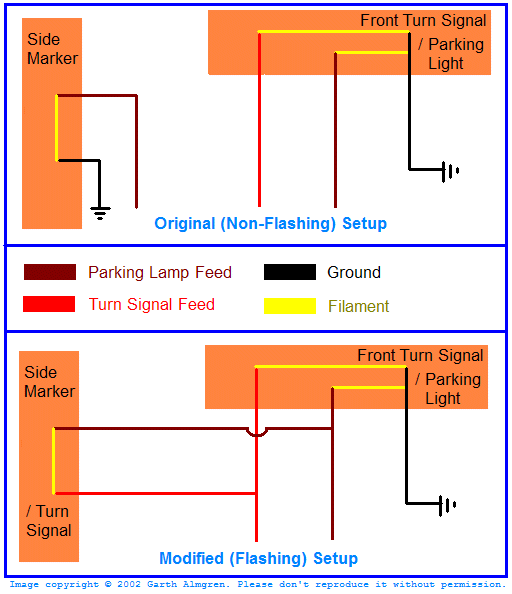
Wiring Flashing Side Marker Lamps. [Written by Daniel Stern, to whom thanks are given]
Non-Flashing Setup. Many cars have amber front sidemarker lamps that DON'T flash with the turn signals. This is permitted by our (outmoded, inadequate) lighting and signalling specifications in North America, but these lamps are also permitted to flash. Having them flash is an advantage, because that way your turn indicators are more visible to drivers who are flanking your car, and cannot see your front or rear indicators.
Flashing Setup. The side marker bulb socket is isolated from ground, and one bulb lead goes to the parking lamp positive circuit. The other lead is tied into the turn signal positive lead. When the parking/running lights are on and the turn signal off, it grounds throught the turn signal filament and illuminates the marker lamp. When the turn signal flashes, it interrupts the ground and the marker will flash. When the parking lights are off, the process is reversed, with the ground being through the filaments of the running light circuit, and the marker will flash in sync with the turn signal instead of alternately.
Bulb-Out Relay Circuit Concerns. [Dave Barton] I have done four cars to date (one 240, two 740's, and one 760) and no problems with the vehicles' "bulb-out circuits" have surfaced. The key with this circuit is to maintain even current draw between the left and right sides of the car. Installing these light as outlined here should not interfere with your "bulb-out" feature.