Body Panels on the Volvo 700, 900 and 90 Series
License Plate Holder Replacement
Front Fender Replacement.
[Qeury] How do I take a front wing off, how many bolts are out of sight etc?
[Response: Peter Milne]
Apart from the six along the top there are two by the door hinges (open door to get at them) one at bottom of rear portion of wheel arch and two under the side bumper extension. I think they are all 10mm head size. {Robert Franklin] Pull the cowl forward and then up and
off. Once that is removed there is another fender screw that is
revealed and must be removed. Then remove the rivet-like fastener at the wheel well. At the bottom of the rear of the well are two
"expanding buttons", the plastic pieces that hold parts together by means of a stick like plunger, which when pushed into the plastic button, expands the end in the same way the plunger in a rivet created the connection.
There are two at the bottom of the wheel well. Only the upper one of the two functions to hold the fender to the well. Punch the plunger out with a thin punch and the fender will drop away from the mounting frame.
[Editor] The two behind the bumper cover extension may require that it be removed. When reinstalling, use some body sealer on the top of the fender mount to limit vibration and squeeks.
Bumper Cover Removal.
[Inquiry] How do I remove the plastic bumper cover?
[Editor] These are generally held in place either by plastic rivets on both top and bottom or by inner bolts behind the side extensions. To remove the rivets easily, drill out the center pin and then pry them off. Buy replacements at an auto store or from your dealer. On some bumpers, the rivets are covered by a separate plastic molding which is held in place by five or six spring clips. These are tough to remove: you have to work from below or behind to pry up the small flat insert securing the molding and then pry off the clip. Be careful: the replacement molding is around $180. [John Sargent] The plastic rivets are on the bottom side of the bumper. They have a
center pin which, when driven in place, spreads the four legs of the
rivet and locks it in place, Drive the center pin out and you can pull
the rivet out. Try to save the center pins for re-use. The bumper skin
hooks over the top rear edge of the aluminum bumper structure. Remove the rivets and pull the bottom bumper skin forward
Air Guide Under Radiator Repair. [Randy] There is a plastic air guide under the radiator. The two tabs on the forward edge that hold it to the back of the bumper were both broken off, and at high speed the panel was flapping and making a racket. I made two replacement tabs from scrap of a corner guard- the 90 degree stuff that you put on corners of walls to protect the wallpaper from wear (also from Lowe's). I cut it to shape with sharp scissors. Using Grip-Ton-Ite super glue for plastic from Devcon (Lowes), I installed the new tabs. With some care and patience, these sorts of repairs can be easily accomplished, and save the unnecessary replacement of expensive parts. You will find this super glue for plastic to quickly become a staple of your repair kit! Look for the adhesives specially made to bond plastics.
Grill Lower Tab Repair.
[Tip from Neal Abramson] Part of participating in the Brooklyn parking wars is having your front grill pushed in by some big SUV's rear bumper. As a result the lower mounting tabs are broken & the grill falls out because there is nothing holding the lower half. I found a solution. I screw plastic license plate bolts (available from auto parts stores) in the lower mounting holes & slots in the front lower body panel with the bolt end facing up. I then file down what is left of the broken grill tabs on the bottom of the grill & then drill a hole that is a little bigger than 1/4 inch where the tab used to be. With the bolt end of the license plate fasteners facing up they go into the new holes & you have a good new mounting for your grill without having to replace it.
License Plate Holder Replacement. I recently had to replace a license plate on my '91 740 wagon that had been in place for a long time. In the course of removing the plate, three of the four studs snapped off. I was able to get a replacement holder from IPD, but the original is held on with 2 flush head fasteners. Do those have nuts on the inside? Or do they snap into place, and I should be able to pry them out? [John Martin] There are nuts on the inside. Remove the trim panel, squirt some PB Blaster on them to encourage them to come loose. Then after waiting a bit, have at it. I expected the new bracket to come with all 6 fasteners, and was annoyed to find it only came with the 4 that hold on the license plate. If your existing nuts are in poor condition, replace them with new. Take the new bracket to the local Ace hardware and get 2 nice new stainless metric nuts to fit those 2 studs. [Doug Wright] A couple things I might add having lived in the rust belt for 30 years. Paint the bracket you got from ipd with a couple coats of Rustoleum or similar anti-rust primer. Don't use plain nuts - salt spray will get into the threads. Use acorn nuts that have a cap on them to keep the water out. McMaster Carr sells stainless Acron nuts. I think the plate holder uses M8 x 1.0 studs to hold the plate.
Cowl Panel Removal. See the FAQ section for instructions on how to remove and replace the windshield cowl panel.
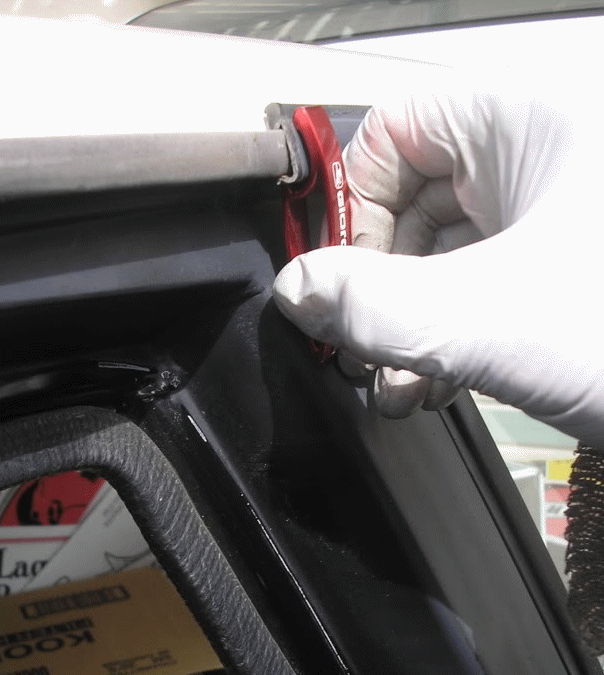 Rain Gutter Trim Removal. To remove the chrome rain gutter trim, use two bottle openers as shown in the photo in order to keep from twisting the trim like a pretzel.
Wagon Roof Trim Tabs. Little trim pieces are near the rear corner of the roof on each side above the gutters. I'd like to paint these as the paint has worn away, exposing the white plastic. Is there an easy way to remove them? [Randy Starkie] They are old and brittle so a little care is in order. The angled piece in the center comes out to reveal a screw. The top of the piece has a little tab on each side at the top and the bottom edge has a tab that tucks behind the outer piece along the bottom.