Body Glass, Mirrors, Moldings, Water Leaks
Power Windows:
Power Window Preventive Maintenance
Glass:
Replacing Window Glass in Track
Windshield Leaks: Installation Safety Tip
Windshield Pinch Weld Corrosion Repair
Vibration Outside the Car: Trim Strip
Replacing Fixed Rear Door Glass
Replacing Glass Molding Trim Strips
Mirrors, Defroster:
Rear Window Defrost Wire Repair
Mirror Glass and Housing Removal
Power Windows:
Power Window Preventive Maintenance.See also the information in Electrical: Circuits, Wiring, Relays, Switches 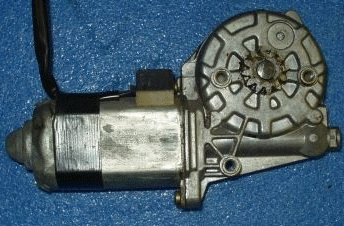
Cleaning and Lubrication. Remove door panel (see Trim section). Using a light grease such as Superlube, grease the sliders on the window jack, and also grease the gears; hit the pivot points in it with good spray lube. There are some bolts which hold the window jack to the door - tighten them. They have been loose, to varying degrees, on every door I have opened thus far. You will be so amazed at how easily the window goes up, you may even be motivated enough to do the passenger side! See the Switch section for preventive maintenance on the window switches. [NA Abdullah] In my case crud, soot, dried grease and the sort practically jammed the regulator gear at the motor. Lack of usage I think also contributed. I find it interesting compared to other makes of car that the Volvo motor will not turn or make any noise if encounters significant resistance. It just stops silently. The moment I unbolted mine from the assembly it was working fine. I have cleaned all regulators since then and not only are my windows working better but I've saved myself a couple of motors.
Tighten Regulator Bolts. [Tip from Art Spon] Here is an ounce of prevention for power window motors and mounts. I have recently had the pleasure of replacing a window motor and regulator. This is not a lot of fun, but a lot of gratification when complete. Anyway, remove your door panels and tighten all four bolts that hold the motor/regulator. This will prevent it moving, torquing and breaking the stupid plastic mounting plate for the regulator. [Editor: I would use Loctite on these since they are subject to vibration.] Also, lube everything up with silicone. Mine wasn't expensive ($50) but it could have been prevented. 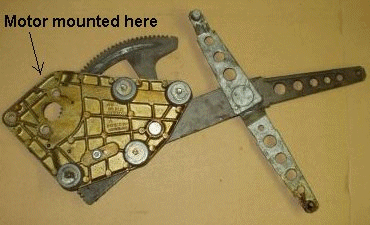
Problem Diagnosis. [Tips from Darius] To diagnose window problems, start with the switch. When you depress either the window or driver's door switch with the key on position KPII, does the motor operate? If not or if it is quite slow, then the switch is bad. Switches are much more prone to failure than either the motor or regulator. When you depress the switch, can you hear the motor running? If so, your problem is the regulator, not the motor. When the window goes up or down, does it make a clunking noise? Your problem may be the plastic slide clips or loose mounting bolts. If it does not stop appropriately, then the regulator may be worn.
Useful Tools. [Darius] If you need to work on the regulator or motor, buy a small "dentist's mirror" which makes it possible to see into tiny, hidden spaces.
Window Motor Slow. [Symptom:] My 95 960 was recently parked outside in the cold and the next day the right rear window would only go down a few inches and very slowly. After a couple of days it would go down to where it's supposed to go but very slowly and it seems like the motor is struggling. I called the service manager at volvo and he said just to spray some lubricants in the window channels. Well problem is I can't see any channels. I took the door panel off but the inside surface of the door had a cover glued on to it. Is there anyway to lubricate the channels without tearing the cover off. Also does anything else in there need to be lubricated?
[Response 1: JT Charger and Gary Heston ] The window channels are at both ends of the glass, one towards the front of the car, the other towards the rear of the car. With the window down, spray white lithium grease, a light penetrating oil or silicone spray, down inside the rubber seals, then make the window go up & down several times.
[Response 2: H H Hansen] With the window at its lowest point, push the up button and watch the window to see if it tips when it first starts up. If it is you have a loose fastener on the window regulator. I have had this on two different volvos. The plastic water shield to is stuck on with a tack strip: just start at a corner and peel up slowly. Then check for any loose bolts or nuts.
[Response 3: Steve Ringlee] Remove the door panel, peel off part of the water shield and lube the window channel and mechanism with spray white lithium grease or Superlube. Replace the water shield, which as noted is glued on with tacky adhesive at the edges.
Switch Failing. See the FAQ section on Power Window Switch repair.
Window Won't Close [Inquiry:] The driver's side window just started not closing flush, causing wind noise. If I open and close it several times it will finally close tight and in alignment and I will not hear or feel the wind. The motor seems to work great and there is no catching, just the window seems to be mis-aligned a little. What caused this and how can I fix it. The noise comes in right at the upper corner above my ear.
[Response: Rob Bareiss] Your forward window track has worn to the point that it's not guiding the window straight anymore. You can try putting the window down, taking apart the door, and bending the metal track a bit backwards. It's welded into the door. The other course of attack would be to replace the felt/rubber window guide, which is probably all worn right at the top front inside the door, just below the mirror. Also involves opening up the door panel. There is a little bit of adjustment in the regulators, but not much, and in my experience not enough to always fix this problem. It's almost like the door's too long for the glass.
[Response: Tom Irwin] I've found that the Volvo White Teflon Brake lube is DANDY inside the window track.
[John Sargent] Take the door panel off. The three 10mm head nuts which hold the electric window regulator may be loose, or will need to be loosened and the fit of the regulator adjusted. The holes in the door are larger than the studs, and allow adjustment
[Steve Irwin] After removing the regulator, I found the center 'pivot' of the "X" to be badly worn. I ended up brazing a 'fender washer' into the support, reaming the hole to fit the old bushing, and reassembling the whole works- this was not an easy fix, and I wouldn't do it again, but it's working great now. I suggest watching that center pivot with a light & mirror while you rock the assembly in the tracks. If you see any slop there, start looking for a servicable replacement.
[NA Abdullah] Try removing the door panel and cleaning the regulator, which can become gummed up and will stop the motor.
Window Motor Won't Stop at the Top. [Inquiry] My power window drivers side does not stop at the top anymore. It tries to drive the last 1/4 inch and bends the big geared arm and makes a hell of a "scrunk" noise. I removed door panel and tightened all nuts. I lubricated all moving parts. No change: it is like the stop switch needs adjusting. I could not figure out how the motor knows to stop turning. If this continues it will destroy the gears.
[Response: Rob Bareiss] 740 driver's window regulators all have troubles like this. Nothing stops the motor. It just runs into the top stop, and tightens up against the window seal, or if it's bent the arm fouls the motor mounting plate in the regulator. Every one in the junkyards is gone, because they go bad so often. The replacement regulator is better, but doesn't look anything like the original: it's mostly plastic. There are some adjustments possible by sliding the motor and regulator around in the mounting holes in the doors. You should be able to get it to at least seal up fairly well, but sometimes you can't adjust them enough to avoid a gap. Save your $$ for a replacement regulator.
[Response: Tim] More than likely you need a new regulator. The gear is worn on the last gear tooth and it is causing the regulator to make a nasty racket & wear out further gears (ie causes a popping sound) - The motor won't stop properly. [Darius] Try to buy an integral motor-regulator unit, which is easier to remove. When changing the regulator, there is no need, btw, to remove the window glass; just use duct tape or something to hold it up when the regulator is removed.
Motor Won't Stop at the Bottom. [Inquiry] The drivers window motor will not turn off when the window is all the way open. The motor cuts out and then back on. [Response: Dick Riess] The stop on the mechanism is most likely broken. What worked for me was to glue a strip of half-inch plastic into the bottom of the door so that the window would bump on it. This takes the place of the metal stop and has worked for at least 4 years. You do need to take off the inner door panel to do this.
Window Stuck at the Top.[Inquiry] My driver's door window is stuck in the up position. I can hear the motor running in both up and down directions so I suspect something is off track or a gear is stripped. [Response] It means a new or good used regulator to replace the failed unit. Depending on the year it may be RIVETED into the door so you will need to drill the old one out and mount the new one using bolts and nuts, well-Loctited. It took me a couple of frustrating hours just to figure out how to get the de-attached regulator OUT of the door. Release the glass, compact the regulator, and undo the 3 nuts or rivets that hold the assembly into the door. Believe it or not, it all comes out as a unit through the bottom hole in the door. If you decide to undertake a fix, it is MOST important to find out WHY your worm gear stripped out or broke, or you will be doing it all again in a matter of weeks. There are small red plastic washers that go behind the regulator anchor points - probably you will not see them as they most likely have disintegrated long ago and are all in little pieces in the bottom of the door. These anchor points travel in slots lined with white plastic tuning fork-looking things which also tend to degrade and break with time. These along with the red washers are available from the dealer. [Jerry Casey] These are held by invisible clips on the outside. When I did mine I put the window most of the way up and applied several lengths of packing tape on the glass, over the door frame and down the other side, to hold the glass up while you work but low enough to get at the clips. Then you can release the clips that hold the regulator to the bottom of the window and the white plastic guides in the door.
Power Window Noise or Movement While Operating. [Inquiry] Front power window when going up or down seems to be catching and binding..there is a rubbing type sound..what is the fix for this? [Response: Tom Irwin] Your blue plastic guide blocks in the lateral channel are either very dried out or are broken. Possible the rear channel guide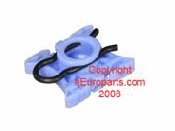 has come loose too. Both are very common failures. Remove the door panel. Once inside, look at the bottom metal piece that the glass settles into. At about mid-position, the two blue plastic guide blocks (see photo right) are clearly visible. They push on over pins and are held with spring clips. Yours may be in pieces already. ANY Volvo dealer will know what "Windows Blocks" are, $10 bux says they have a bucket of them behind the counter. Lube the tracks while you are at it: I've found that the Volvo White Teflon Brake lube is DANDY inside the window track. [Tip: Bill Garland] Just fixed a clunking sound that my 740 driver's side window mechanism made when I closed the window. It occurs just as the window is finishing being closd. I removed the door panel as per the brickboard faq (thanks!) and saw that one of the plastic sliders (shaped like a tuning fork) was broken. Fixed that and greased everything up but the clunk remained. After much pondering I noticed that under the metal clip on one of the sliders that I could see easily was a red plastic washer (p/n 1334889-1) between the clip and the slider. The slider / clip that I had replaced had no washer. It must have disintegrated. So I added a metal washer and Voila! Clunk gone!
Glass Moves Sidewise in Operation[Symptom:]The electric window on the drivers side of my 1990 740 wagon shifts left and right a bit, and when you roll the window up, sometimes it does not fully seat on the back side, and I get a lot of wind noise. To fix it, I roll it down, and roll it back up while pushing the glass towards the back of the car. [Diagnosis:] I think the problem is the plastic roller in a plastic rail (the one which is more or less under the door lock knob).
Diagnosis. [Tip] Before removing the motor you may want to test the leads with a 12 volt source to see if the window moves up or down. If it doesn't then you'll need a new motor and possibly a new switch also. Does the window move with either the front master switch or just the rear or neither? If neither and the motor works with a new 12 volt source then the master switch or less likely the rear switch is at fault. In my case, the motor and the switch failed.
Regulator Removal.
[Inquiry:] The plastic plate that the power window motor mounts to was broken in two places...Where can I get a new plastic plate and how much will it be? Also what is the trick to getting it off of the regulator?
[Response 1: Bob Haire] You're referring to a large heavy (not heavy duty enough) plastic plate that is the main part of the regulator in some 700s. Everything bolts to this thing. Strangely, on later cars some of these are metal and some are plastic as evidenced by the ones I took off an 87 740. Failure of this assembly is a common problem (due in part to bolts working loose) and Volvo switched to a metal assembly due to the premature decrepitude of the plastic ones.
[Response: Sven/Darius] To get the whole thing out, first take the door trim off. Then raise the window to full upright position and secure it there. Unclip the three clips that hold the regulator scissor arms in place. Pop the two bottom regulator retainers out of the plastic sliders that are mounted in the bottom of the window metal strip. You'll break the top lip of the retainer but it will be ok. Unbolt the three or four bolts holding the motor/regulator in place. If you have rivets, drill them out with a 5/32 inch drill bit. With a little cursing and wrestling, the whole thing comes out through the big lower opening. Remove the old motor, bolt it onto the new regulator, reinstall. All should be well without having to remove the window. If you have to remove the window,it is held on to the scissor-like appendage by two clips, facing the outside of the car. Angle it slightly to remove. [Mark Stites] Use new 6mmx1.0 bolts to replace the rivets you drilled out. [Walt Lear] You can remove the motor without removing the entire up/down assembly using a 10mm Gearwrench. With window up, remove 3 bolts on the back side of the motor assembly. Motor drops out. Splice the wiring: only 2 wires, red & black. Slip the motor back in, secure the 3 bolts and you are done. There are 3 brass-looking washers/spacers that sit in the plastic up/down mechanism. Make sure you put those back in. Check the motor tooth gear size. A couple motors I have, the gear is bigger than what I removed.
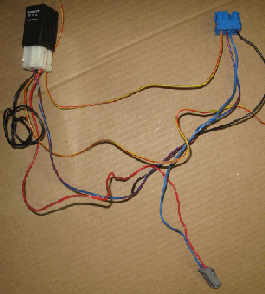
Adding an AutoDown Feature to Power Windows. [John Sargent] I recently added automatic window down to several of our 700/900 cars. The first thing to do is get the automatic window down relay and associated wiring from a 1995+ 960 or S90. I'm sure the automatic window relays from other cars can be used, but I used the 960/S90 relay. Pictured right is the relay and wiring from a 960.
The gray connector goes to the window motor, but the connector won't mate with the 740/940 connector, so you'll have to make a butt splice. The yellow/red wires and the black are spiced into the same color wire at the switch. See left. The picture below on the right shows the butt spices for the motor wiring.

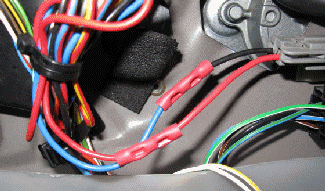
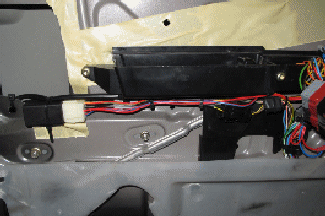
The picture right shows shows a neat place to install the relay. The auto down functions works nicely. If I had the auto up and down relay from a later car, I'd probably install it. The auto window up functions I have tested have a reversing feature. If the window is blocked on the way up, it will stop and go all the way down
Glass:
Window Tinting. I had two cars tinted; my current had tinting from PO when I bought it. If you go for it, do it top-of-the-line, or not at all. None of these jobs have bubbled (all professional), but the one in my 245 is much cheaper material than what I would have spec'ed: it's somewhat dark, and it scratches really easily. Higher-quality films have a higher ratio of visible/UV light transmission: that is, they reject more of the frequencies that heat your car and wreck its insides, while letting you see better. On two cars, I've had titanium film used. It gives the highest UV/vis filtration ratio, looks grey, and is available in three darknesses. Even Sue's car, which has the middle darkness, does not strike the viewer as obviously tinted. When her A/C works, (she has a white 244), the car, even in Florida, can be used as a meat locker. My tan 245, after sitting outside, on a hot, humid day, the A/C can barely keep up. But wagon/paint color make a difference. Also, a good, strong film is a safety feature. I have been emailed that even Volvo's side/rear windows are not laminated, as is required of windscreens here in the US, and of all windows in more advanced countries. A good film will stop bits of glass from flying about.
Removing Tint Film:
[Inquiry] How do I remove old window tint film? [Response: Yvan] Grocery-store ammonia is the solvent for tint removal (but use it outside, preferably on a windy day; very bad fumes). Usually tint will come off in big sheets once you get started. Just take your time. For tint installed below the window rubber trim, remove to within one inch above the rubber line then peel the remaining bit from the window using a razor blade and a syringe filled with ammonia that is deposited in the crack. The ammonia will loosen the film (about 15-20 minutes) and you should be able to peel it up from below the rubber. The remaining adhesive comes off easily with ammonia-based window cleaner and a razor blade. [Tip] See http://www.tintcenter.com/articles/bt_removal.html
Replacing Window Glass in Track. [Inquiry] How do I put the front drivers window glass back in track. The window has somehow came out of its door hinge side track. Took off panel, but have no ideas on how to get it back in.
[Response: Bob] Release the two clips that mount the window to the track, and pull the regulator mountings out of the mounting at the base of the window. Now, tilt the rear edge of the glass upward and front downward till it clears the tracks, re-insert the glass in the track while tilting glass back to horizantal. Once everything is back in place and clips reinstalled, roll the wi
[Tip from Tom F] To fix a loose side window, I had removed the window and the window lift, reinstalled the window into the lift with a little 3M gasket cement, and attempted to put the lift back into the plastic guides. Impossible! It looked different from the Haynes photos. There was nothing to remove or drill out to allow the necessary maneuvering. I removed the window and was able to remove the lift from the window, luckily, because the glue didn't fully cure. First, make sure you mark the location of the lift on the window before you clean all the grime off. Then, the easiest way to reinstall the window is by putting the window into the lift, with the lift installed on the plastic guides. It was a little awkward but I was able to fully seat the window into the lift.
Replacing the Window Lift Channel Rubber Filler Strip. [Inquiry] My rear window came out of its lift bar. It was thankfully in the closed position. The lift bar was still attached securely to the regulator but the hard rubber strip that the window sits in is old and cracking. So it lost its grip on the bottom of the window at some time. How do I fix this? [Jay Simkin] The item you need is Part #1268231, called a "filler strip". It should cost about $20 at a Volvo dealer. It may come as a single length, which you'll have to cut. The glass compresses this "filler strip" when the glass is seated into the "lift rail" (the metal pieces, that link the glass to the lift arms). Use great care when inserting the glass. You may be able to re-seat the glass into the "lift rail", by hand pressure on it. Be careful: tempered glass can shatter when struck on an edge and a replacement will run you $115. You might also go to an auto glass repair shop, and let them do it. Finally, you could use silicone, to re-bed the glass. Clean the glass with rubbing alcohol and clean the rubber strip, as well. [Tip] My glass shop uses an adhesive in the channel. They do this with glass in door so they can get it all lined up then come from beneath with the lifter bar and press up.
Replacement Windshield. [Notes from Bernard Paulson:] It happened to me a few days ago. Saw that iron rod flying through the air, lifted by the rear tire of the car in front of me, right toward my head. It hit the hood and then went right into and half-way through my windshield. Even the glass shops believed that someone has shot at me. After all, this is L.A. Didn't bother to check with Volvo. Used my brains and connections instead in my attempt to find the most reasonable QUALITY windshield. Interestingly, I found out that the windshields for 88 and up 765s are of a different size than the "regular" 700 windshields (no kidding).
Finally found what I was looking for. A brand new, safety windshield, tinted, with shade, and European E11 seal etched it, certifying it as one that meets toughest European standards (yes, they DO check stuff like that). The parts number is FW575. I paid $145.00 installed plus $8.25 tax, and having paid a total of $153.25, I once again cannot confirm that it is expensive to keep a "Luxury Volvo" on the road.
Importance of Cleanup: Adhesive.[Editor] When the installer installs the new windshield, ask them to clean off any adhesive that oozes from the bottom to prevent it from adhering the cowl seal to the windshield glass. If it does so adhere, you will crack the glass when removing the cowl screen.
Importance of Cleanup: Glass Bits. [Editor] Make sure you vacuum up glass bits from heater ducts, carpet, door interiors, etc. as they will make mischief later if left uncollected. [Everett Griffiths] If you replace shattered back tailgate glass, spend the time
necessary to get all the glass bits out of the door, otherwise they
will migrate to the lock mechanism and jam it shut. You will then have
to disassemble the lock.
Removing the Old Windshield. [Tips (edited) from Zee on replacing windshield glass in 240 series cars; 740 are similar. Note the cautions]
Tools. As for "special tools" to remove the old glass, I use a length of thin piano wire. You can also use an A or D brass guitar string. The glass "floats" on the buytl-rubber sealant and can be sliced by the wire by pulling back and forth from inside and outside.
Trim Removal. The metal chrome and rubber trim gasket mounts on little plastic clips that hold the back of the metal channels; these in turn mount on pins in the A-pillar.Remove it by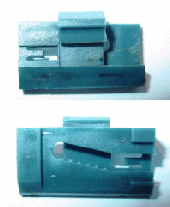 sliding the vertical channels down, across the fender on which you have placed tape to prevent scratching. If your fingers are small enough, squeeze them beneath the rubber and try to gently pull one side of the channel up and out so it unsnaps from the clips. Or follow Jay Simkin's advice below. Do NOT bend the trim abruptly when removing. To remove the clips, lift the small plastic lock tab with a dental pick and slide them off the body pins. It helps to have spare clips on hand (p/n 1342004-7) since they break easily and are very cheap. To reinstall the trim, just replace the clips, push them home against the body pins, place the trim strip in position, then pop it on each clip successively.
Removing Glass. Insert a strong wire or thin screw driver at the top and bottom of the window, near the centerline, being VERY careful not to leverage against the glass. Poke through the sealant, making a pathway for inserting the piano wire. Pass the piano wire in, then across the inside of the glass, then out the opposite hole. Now you have the wire inside the glass, through the sealant, with two ends sticking out, top and bottom, center.
Use vise grips and gloved hands on each of the wire ends or attach the wire ends to pieces of wood. Pull the wire toward you -- from the center of the glass toward the side -- while working the wire back and forth, like you're doing an upper body workout on a ski machine. Repeat on the other half. Go completely around and then some, as it may try to re-stick itself. Pay close attention to what the string is doing inside the car: it can cut into the dash pad or other trim if you are not careful. This method is cheap, reliable and effectively separates the glass from the sticky sealant.
Now, to take out the window, push evenly with gloved hands from inside the car. Begin near the top of the window, and it will naturally stand up for you. When the glass is loose, gently pull it away from the opening. Don't force it or it will crack. There will be places where it is still partially stuck, cut them free with a putty knife or the guitar string. Have an assistant waiting to hold it steady until you come out to help lift it clear of the vehicle, or tilt it forward onto an old blanket laid upon the hood. Any sticky goo on the body work can be removed with carburetor cleaner or acetone.
Preparing the Surface. I removed the thin plastic interior trim piece at the top of the window opening. This piece covers the front of the headliner. It is help in place with 5-6 spring slips which are facing forward. You will get the headliner soiled from your sealant removal, so mask it off. In fact, to avoid getting the sealant goo and particles from falling into the car, I found it useful to mask off the entire window opening from inside using newsprint or craft paper taped to the interior.
I have read where others used acetone to remove old butyl rubber sealant. I found with "pinching" off as much as I could using paper towels, followed with gently "smooshing" using a putty knife, I was able to rub off the rest with a rag or paper towel, and paint thinner. You will not be able to do this if the sealant is urethane, so trim away the old urethane to leave a 1- to 2-mm-thickness on the surface. Do this using a flat razor blade, which will give you a smooth cut and no loose material. You want to provide a fresh, clean surface of urethane on a rust-free substrate for the new urethane to bond to. Remove any rust using a wire brush and a rust-removing primer such as POR-15 Metal Ready. See below for commercial corrosion repair processes. Don't use any Bondo filler on the pinchweld area because it is structurally weaker. Let the urethane sealant fill any gaps. Prime any remaining metal in the 3/4-inch area where the urethane bead is to be located at the edge of the pinchweld with self-etching or epoxy primer; let it dry, then cover it with masking tape. Then coat any rust beyond this using a rust stopping paint, like POR-15 and the correct topcoat. After refinishing, remove the tape to expose the primed-only area where the urethane will go. Prepare this area with a pinchweld primer that's compatible with the urethane windshield adhesive to be used. Use the black pinchweld primer that glass specialists use to enable the new urethane to stick. Don't apply the pinchweld primers until just prior to the glass installation. Apply the primer using a wool or foam applicator. Apply the pinchweld primer only to surfaces where the original trimmed-down urethane bead isn't present. Do not apply it over the top of any existing urethane. [Editor] This may be one instance in which you might consider using an application-specific primer like Dow BetaPrime U-5201. This cures fast, does not pose chemical incompatibility problems with urethane or butyl adhesives, and provides the correct biting surface for the adhesive. POR-15 likely does none of these things.
The primer must be fully dry so all solvents are out of it. You don't apply POR-15 or topcoats here because solvents can continue coming out of them for 60 to 90 days, and you'll likely install the glass sooner than that. Another reason is the urethane topcoats are designed to resist chemicals from biting into them, and they may not get proper adhesion.
Installing the New Windshield. Using Urethane Sealant. Glass shops nowadays use urethane glue to fasten the new window, not least because it adds structural rigidity to the windshield assembly. It comes in tubes, like caulk, and costs about $12 per tube. Buy two tubes. The pinchweld area on the 240 series is nearly 3/4" wide all around the window opening. It's also about 1/2" deep along the outer radius. To prime, buy some Betaprime Pinchweld and Encapsulation Primer.
One suggestion I received privately from a glass shop pro who saw my installation question here on the RWD forum (check the archives, too!), was that you would be better off to install the clips and install the chrome trim to the glass and install everything as a unit. He said to dry-fit the assembly first, marking the outline of the trim onto the body to aid in centering things for real. It will take a couple of shims along the bottom during the dry-fit. You can use masking tape around the chrome trim such that by carefully slicing it along the outer edge, the excess will remain on the body of the car, giving a perfect outline for centering the assembly. Another idea someone had was to get a couple of those rubber suction cups and an assistant to help position the glass. Evidently you only get one chance to do it right.
The only question I still have is exactly where in the width of the pinchweld do I lay the sealant (either kind) so that it keeps water out of there. On one hand, it seems good to place it along the inside radius of the weld to assure no water penetration behind the glass to the interior. This looks like it would leave a considerable gap between this caulk and the outer radius. (I don't know how much the window flattens out the sealant when it is pressed onto it.) On the other hand, it also seems good to place it along the outer radius, where the weld curves up 90 degrees to meet the body surface. (Looking at this, you'll see what I mean). This troubles me because I am less confident the sealant will adequately fill toward the inside and seal the glass against water penetration. It was not much help to look at the old window for help. Someone had put two more sealants around the edge, while leaving the original butyl rubber in place. Before I actually do mine, I plan on stopping off at my local glass shop and asking some questions.
[More Tips] I have done many and feel the best adhesive to use is a primerless quick
cure urethane. It comes in a tube-style cartridge dispensed with a
caulking gun. If you use the short cut method which is favored by most
autoglass installers then the idea is to cut the windshield out leaving as
much butyl on the pinchweld as possible. Next you will lay a 1/4" bead of urethane all the way around across the top of the butyl and then lay on the windshield pressing firmly around the perimeter (there should be two rubber setting blocks along the bottom of the frame aprox 4" inward from each side which will keep the glass from sliding down while waiting for the sealant to dry; if you have no setting blocks then you will need to keep the w/s in place with blue painters tape. Urethane is also great for holding the trim on.
For more installation tips, see the notes under "butyl" immediately below.
Using Butyl Sealant.If you want to use butyl it works ok but you need to remove all the old butyl. The butyl tape that is used on the 740 is 5/16 round or square (it comes on a roll from 3M). You will also need a primer made for butyl: it comes in a can with a brush applicator. Betaprime Pinchweld and Encapsulation Primer works well. While the can notes that it's for urethane, many glass shops use it for butyl as well.
Clean the pinch weld,
prime it and allow to dry. Do not prime the glass; just clean and dry well (keep in mind that using new razor blades will not scratch glass).
Do not mount the new butyl tape too close to the inside edge of pinchweld or you may end up with sticky edges inside the car when you are done. If there are any drain holes along the bottom of the pinchweld do not fill them in. Overlap the new butyl at the bottom joint. Do not mash it down prior to setting the w/s except where you overlap the joint at the bottom and then only enough to make the height of the seal consistent. Do not touch the contact surface of the butyl with your fingers because that can cause leaks.
When using this method cleanliness is everything if you don't want leaks.
You should not have to press very hard on the windshield to get it seated: work around it with the flat of your palms about 8" apart from each other and not too much pressure at any one point. Time,temperature, and gravity will finish the seal for you.
As extra security against leaks you may wish to apply autoglass
silicone around the perimeter of the glass after setting it and then
tool it up to the glass edge. If you choose to use silicone make sure that it is for autoglass use: many silicone products have an acid base to help with adhesion and over
time these non-autoglass silicones will remove the paint from the
surface causing rust and leaks.
Windshield Leaks: Installation Safety Tip. [Tip from http://www.SouthwestAuto.com] If you have replaced your windshield and have noticed water or air (wind noise) leaks, a serious safety deficiency may exist on your Volvo. In the past some windshield installers have incorrectly used aftermarket butyl tape to reseal or install replacement windshields. This material can fail leaving the windshield no longer securely bonded to the body of the car. In an accident or even an emergency stop any contact with the windshield can cause it to separate from the body of your Volvo. Newer technology urethanes correctly installed using primer on both the glass and body flange, produce a bond as good or better than the original factory installation.
Windshield Pinch Weld Corrosion Repair. [Editor] Careless glass replacement or driving in the salt belts can cause corrosion under the windshield trim strips where the glass is adhered. This eventually eats out the support for the windshield itself and becomes not only a repair, but a safety issue. The ONLY way to reliably fix this is to remove the windshield, remove all the urethane adhesive, sandblast or grind off rust in the mounting channel, then prime and repaint prior to reinstalling the windshield. The best time to do it is when you have your windshield replaced due to cracks or pitting. Many glass shops now offer a Dow Automotive process using their BetaPrime U-5201 etching anticorrosion primer: for around $150-$200, they remove the corrosion and prepare the surface for the new adhesive and windshield.
Rubber Edge. [Inquiry] The rubber on my front windshield came loose at least part of it and I pulled on it and then the trim came loose....so I took it all off. My question is can I just replace the rubber trim that was hard and most of it was broken anyway or do I have to replace the metal pieces. I will probably take it to a glass shop to have it done if it is too difficult. [Response: Bob] The metal trim and rubber strip are sold as an assembly and are not available separately.[Response: Rob Bareiss] I would get the windshield replaced with the later style. You won't have to deal with the half-chrome/half-rubber trim stuff anymore. The newer windshields ($10-20 more?) for a 91/92 740 or the 940 should have the black trim glued permanently to the edge of the glass. Should eliminate the troublesome clips and trim pieces. My 88 has maybe 1/2 of the rubber left... I figure it's doing ok for its age. It's due for a windshield this year, I can't stand looking through it any more when the sun is low in the sky. If you need anything for the installation, the windshield shop should be able to tell you, and you can get it either from the dealer (they still sell everything for these cars) or the glass shop if they have it available. Visit the glass installers to see what they recommend, I'm sure they've dealt with every imaginable situation before.
Replacing Trim. [Jay Simkin] You definitely do not have to remove the windshield in order to remove the metal/rubber trim strips. Removing the trim takes "fingertip sensitivity": there is little maneuvering room, and if force is applied, the mounting clips will be broken and the trim strips bent. These trim strips are not cheap. In short, it takes finesse - not brute force - to do this. In terms of tools, you will need a plastic "bone knife" or metal putty knife, with the edges "blunted". Lever under the rubber about two inches from the bottom and lift up toward the outside of the car: you will feel it "pop" off the tab and it can then be levered right off, tab by tab, as you move up the windshield.[Brian Oliver] It's just an exercise in patience. Be very careful when using any metal tool that you don't lever against the windshield itself and crack it. The trim itself will cost about $100 for the entire windshield (three pieces) at Tasca or Borton, so try a scrapyard.
Attachment Clips. You can get new pin-mounted trim attachment clips (Volvo p/n 1342004-7) at the dealership for so little cost that you don't need to worry about damaging them. I recommend replacing them. They usually break when trying to install new trim since they get brittle as the car ages. The clips and trim on the sides and top of the glass are relatively easy to replace. The clips on the bottom are a bit tricky and if not extremely careful, you can crack the glass. [Erik] To remove these trim strips, lift an end and gently pull or slide it to one side keeping it level to the floor. For side pieces slide them down the windshield towards the ground. Do this outside or in a spacious area so you don't bend the moulding in case you have too little room: it bends very easily.
Vibration Outside the Car: Trim Strip. [Inquiry] I have a 1990 740Gl standard transmission, 174,000kms. Perfect car, EXCEPT for the high speed rattling noise that seems to come from the area around the dash, but outside. It sounds like a new year's eve noisemaker, except the sound is metallic. It occurs only at speeds above 60kms. per hour, and is intermittent- could happen several days in a row, then not for weeks/ It could last a few seconds, or an entire highway trip. Sound can be almost imperceptable, or quite deafening.
[Response: Dave Stevens] This is a known problem area for circa-1990 740's addressed in a Volvo TSB. The "official" explanation is that misaligned plastic clips holding the window trim allow the trim to get caught by the wind and vibrate at high speed. You can isolate which piece of trim is the culprit by temporarily covering with a strip of tape to see if the vibration goes away. The passenger side trim seems to be a common area. The "offical" solution is to rotate the rectangular plastic clips a little with a trim tool to improve tension. It might also be a good idea to shoot a little RTV under the clips to hold them in position in case any of the clips have broken fingers.
Replacing Fixed Rear Door Glass. [Tips from Jay Simkin] To replace the small triangular piece of fixed glass in the rear doors, follow these instructions:
Remove the door panel. Put a strip of masking tape along the door and up to the moldings to avoid scratching the paint as you gently pry the trim up. Remove the outside door trim (bottom first then sides then top) with a putty knife bent about 45 degrees a half inch from the edge. Go slowly as it is held by pressure and road grime only. Bending it will annoy you when you try and reinstall it. Unclip the holders of the window to the lift mechinism. Remove the rubber molding that surrounds the rollup window. Remove the rollup window. There is a metal pillar between the fixed and movable windows held by a rivet holding it to the top of the area that the top of the window seats in to when its rolled up. Grind it off with a Dremel tool and with a small punch drive the rivet up into the top of the door. There are one or two bolts or nuts in the door that hold the bottom of the metal pillar. The vertical pillar should now be able to move towards the front of the car releasing the front edge of a big rubber molding that surrounds the fixed window. Gently pull the pillar out. It requires a bit of turning and goofing around but it does come out without bending. Put the molding around the replacement glass and insert it into the area towards the front of the moveable window area. It will just fit as the front area is a tiny bit taller than the back. Go to the hardware store and buy some silicone grease. Otherwise you will spend much time trying to slide the window and molding towards the rear of the car. Unlike regular grease it won't degrade the rubber. Use little and try not to get it anywhere else as it doesn't clean up well. Now just slide it back to its old home. Put it back together. Replace the rivet in the vertical piller once you are sure everything fits nicely. When reassembling the outside trim the top goes first then the sides then the bottom.
Replacing Rear Side Glass. [William Odenweller] This takes about an hour.
You will need: a 10' roll of 1/4" round butyl tape;
a plastic scraper tool to remove the old tape and broken pieces of glass(wear gloves and glasses);a shop vac; and replacement glass.
Once you remove the trim it is pretty straight forward.
Remove broken glass and old tape.
Roll out new tape along pinch weld with a 1/2" overlap seam at bottom.
Do not touch the surface of the tape as that could compromise the seal,leave the protective wax paper on the tape until ready to set the replacement glass.
There should be two rubber blocks below the glass to keep it from sliding downward: set the replacement glass on these and then push it into place evenly with firm pressure. Once the glass makes contact with the butyl tape you will not be able to adjust it much,so try to center it well before total contact.
Do not use any metal tool to try to move or adjust the replacement glass. If you need to adjust the position ,you can use a plastic tool or your own body pressure through your hands,this glass is tempered so it will not crack or break from soft pressure.
Water Spots on Glass. [Popular Mechanics; Mike Allen, June 06] [Inquiry] I have a sprinkler system in my front yard that splashes water onto my car on breezy days. I think the water droplets that evaporate from the side-window glass leave mineral deposits behind. Oddly enough, the paint doesn't seem to collect any deposits, nor do the windscreen or the back glass. I've tried every window cleaner I can imagine, but nothing gets rid of these annoying stains. [Mike Allen]
Bad news: They probably aren't mineral deposits. The glass has been etched by corrosion. Here's the phenomenon: Your municipal water--or whatever water supply feeds the sprinkler system--may have a high pH (it's alkaline, or a base), or you may have had some highly alkaline surface dust on your glass, which dissolved into the water. This high-pH water then slowly dried in the sun. As the volume of water decreased, the concentration of minerals, and consequently the corrosive quality of the solution, increased. This could have etched the surface of the glass, leaving not a deposit, but a ring that is below the surface of the surrounding glass. Worse news: You can't remove these rings with glass cleaners or acid. You have three options:
- Get an auto glass shop to polish the surface of the glass.
- Polish it yourself. This requires a felt wheel, a variable-speed electric drill and a kit of various grades of cerium oxide abrasive. Think of grinding and polishing a telescope mirror.
- Replace the glass.
Why didn't the water also etch the windshield and backlite? They use a more durable, laminated glass. Most important, how do you prevent this from happening again? Keep the windows clean and waxed so the water doesn't pool on the surface in big spots. And, as an aside, the only acid I would suggest you try is straight household white vinegar. Put some on a rag and don't let it dribble. Don't rinse until it has dried, to avoid getting any acid into the door. [Comment] I tried rubbing the affected area with rubbing compound used for the car paint finishing; this is very effective. Just follow the instructions on the label: if you don't have an electric buffing machine you can even do it by hand using clean plain cotton cloth. [Comment] IPD has Water Spot Remover that works to remove spots, old RainX, paint overspray, etc.
Replacing Glass Molding Trim Strips. [Editor] The bright or painted trim strips with rubber seals, located at the bottom of door and body windows, are held on with several molding clips. If the rubber is coming loose, use some adhesive to re-secure it: you do not need to remove the trim strip to do this. Cyanoacrylate superglue works fine. To remove the trim strips, first cut any adhesive at the front of the strip securing it to the body. Then gently pull back the rubber and use a flashlight to locate the clips. Use a putty knife to press down on the clip enough to be able to pull the trim strip away from the body, clip by clip as you move toward the rear. You may need to have a helper lever the strip away from the body, being careful to place a thin strip of wood on the glass to avoid damage. If the rubber is shot, you will need a new molding piece from the dealer: they do not sell the rubber alone.
Water leaks can occur from several sources. Loose water shields, clogged cowl drains, and a plugged evaporator drain are covered in the Heating and Air Conditioning section.
Front Footwell Vent Covers. I assumed the 740 had a windshield gasket leaking problem and I had the windshield reset. That did not stop the water leak and wet carpet in the 740. It turns out that it is leaking, as others have reported, from the unused left air intake behind the panel at the driver's foot. This vent panel, a small plastic panel which has an air grille on it, covers a space between the inner and outer fenders. The water directed down from the cowl into this space is supposed to drain through the rocker panel but the rubber gasket on the plug could let it into the footwell. To discover it I ran a great volume of water through the air intake beneath the windshield and sure enough, after 10 minutes a small, but steady trickle of water was coming in. Unfortunately this has rusted the floor through to the outside. WARNING, if you have wet carpets, get it fixed, the floors will rust through in a very short period of time.
[Another Inquiry:] The problem is water leaking into the interior in the front footwell areas. The problem only occurred when the car was parked facing uphill. It turned out that runoff from the cowl compartment was directed into the car by a plastic tab on the plastic plates used to close off the footwell airvent openings.(Certain models like European 740's without A/C have fresh air vents in the sides of the front footwells.) After removing the plastic tab in the blanking off plates, the water leak stopped.
[Response:] [Gary] Remove right and left front outer kick panels. Remove plastic plug and remove any of the rotten adhesive backed foam seal. Apply silicone sealant to opening and back side of plug. Put plug back in and make sure plug is totally sealed. Then on drivers side pull back rug facing firewall and look up toward windscreen, find the rubber grommet that is supposed to seal water from coming in from just below brake booster area; seal the passenger compartment and engine side of this to stop water from entering and wetting the floor. Disconnect the battery negative terminal. Remove the passenger side kick panel and ECU computer, then the computer cradle. Pull out the plastic body plug and silicone this up like the drivers side.
[Another tip] Replace the plug cap for the fresh air intake with p/n 6848804; it comes with a new seal. It is a common problem. Break the old one out and pop the new one in. It should click in.
[Tip] If you have a tough time removing this plastic cover or fear breaking it, then don't remove it. It will break. Gently pull it away from the body and clean around it. Then hold it away from the body and fill the gap with silicone sealer. I used 35 year silicone window caulking. Let the plug go back in place, then remove the excess with your finger and make sure the silicone has sealed all way around.
Door Wiring Harness Covers. The wiring harness going from the body to the doors (electric windows, speakers etc.) has rubber protective sleeve. This had split open and since the entry point into the car is several inches lower than that of the door, and once it enters the car it no longer has the this cover, the split acted like an open funnel, and guiding water in. Open your doors and check the cover. Duct tape worked like a charm.
Firewall Grommet Failures. [Darius] Had a significant water leak on the driver's side, floor was all wet. Turns out the water was coming through the hole in the firewall where the hood latch cable goes through. The little black rubber sleeve had slipped out and there was an open hole there. The sleeve was in perfect shape so I coaxed it back in and now my problem is solved.
Other Leak Areas. Door Wiring Boots: Turns out the culprit was a split boot enclosing the power window, door lock, and speaker wiring. The split allowed water to enter the boot (a surprising amount at that) and was funneled into the car interior. Cowl Air Intake Seal: [Dick Riess] The sealing under the cowl air intake does deteriorate and I have seen leaks there. You need to take off the cowl vent to inspect. Clean and reseal. Rear Quarter Panel Weld Seams at Trunk Opening: [George Strauser] Water was leaking into my trunk at the body seams near the trunk seal where the rear quarter panels are attached to the body via spotwelds. There are seams just below the back window and further down toward the rear of the car. At the factory, these seams are sealed with a mastic compound that eventually dries out and cracks. Water gets in through the cracks, drips into the trunk and settles in the wells on the left and right sides of the trunk. I swabbed a bunch of touch up paint in the cracked areas until they were smooth again. Silicone would also work.
Windshield Seal Leaks. You may find a problem in the seal around the windshield that's causing a leak. I'll bet if you pull the trim up, you'll find rust. Ever replace the windshield? [Tip] See Popular Mechanics for information about locating air and water leaks.
Wind Noise: Diagnostic Steps. [Tip from Demian Hurst, Motor Service Magazine, July 2001] For diagnosis of wind noise from such things as body seams or window/door seals, the following steps can be helpful:
- Attach cloth tape to panel seams, molding seams, glass seams, body seams and any other protrusion seam that might create wind noise in the area of concern (see illustration). Road test the vehicle and note any changes in wind noise.
- Remove the strips of tape one at a time. Road test the vehicle after removal of each strip, and again note wind noise.
- When wind noise reappears, replace the last piece of tape that was removed. Remove a different piece of tape. Road test the vehicle again. Keep removing tape strips and road testing until the source area has been isolated.
- Once the problem area has been identified, cut the strip of tape into several pieces and place them back over the area. Remove sections of the strip one at a time, road test and note wind noise. Keep removing tape pieces and road testing until source area has been narrowed down further.
- When the exact source of the wind noise has been isolated, repair as necessary using butyl tape, body sealer or additional weather-stripping.
Mirrors, Defroster:
Rear Window Defrost Wire Repair.[How it works: Jim Holst] Each copper line across the grid is a path for electrical current to flow from one side of the window to the other. As the current flows through the copper line, it generates some heat which drives off the frost or fog. If a copper line is even scratched, the path for the current is broken. No current, no heat on that section. The unbroken sections can still work. Each line is fed current from the vertical strip on one side and grounded on the other.
[Inquiry:] An appropriate question for winter, and old stuff. I've got only two of the defroster wires working in the rear glass of my Volvo. What should I do to get the others back "online"? I appreciate your advice. [Response: Ceferino Lamb] I just fixed mine. Volvo sells an inexpensive kit to fix it (also available from most auto parts places; one is marketed under the Loctite name), but the instructions are incomplete. It's just a little bottle of metalized paint and a brush. Here's what you need:
. that kit
. a DMM (digital multi-meter)
. electrical tape
. razor blade
Look over the wires very closely, with enough light outside to reveal any defects. You're looking for breaks in the wires. If you seen any, fix them with a few coats of the metalized paint. typically, the breaks are often caused by corrosion near the sides, where we don't clean the glass as often. Use the electrical tape to mask off the glass on either side of the wire where you apply the metalized paint.
If you fix all the defects you can see, and that still leaves wires that don't work, break out the DMM and test the resistance in those individual wires. You're looking for areas in the bad wires that are "open" but the fault is not visible. [Response 2: Ross Gunn] Turn on the rear window heater, and with one voltmeter test lead on the heavy strip of conductor at one side of the glass, touch the other lead to the trace that you think has is a break. The voltage will either read 0 or 12V. Move the lead along the trace (towards the other lead if 12V, away from it if 0V) . When the voltage flops over to the opposite reading, you have found the break.
[Rear Defroster Grid Repair Tips from Charles Cramer] I just repaired my rear window defroster on my '87 245 about 2 months ago ( I've actually done this on about 4 cars). The job was relatively easy and the repair is working just fine. Here are a few suggestions/comments:
- Often you can identify where the breaks in the grid are simply by turning on the rear defroster when the window is cool and/or damp/humid. Typically, you will see a round, clear patch appear (i.e. defrosted surface) at the breakage point, unless the gap is too wide or a piece of the grid has been damaged/scraped off the glass. What I did was to turn on the rear window defroster, and use a grease pencil (piece of tape, etc.) to mark these gap locations on the OUTSIDE of the glass. If you look closely, you can see the gap (although you may have to use a strong light or flashlight) in the grid. It usually looks lighter than the orangish-brown color of the rest of the grid. If using a voltmeter (analog or digital work just fine) to test for "opens" in the grid , be careful not to scratch the grid with the probe tips! I didn't use the meter method, as all the gaps showed up on close visual inspection.
- Make sure that the grid side of the glass is CLEAN before you use the conductive paint. A good "scrub" with a good quality glass cleaner and a paper towel with some "bite" (those "shop"-type blue paper towels on a roll that you can get at the local auto parts store work well) will ensure that the repair stays put. Don't be afraid to rub fairly forcefully over the grid lines IN THE SAME DIRECTION AS THE LINES (i.e. scrub from the left to the right along the length of the line, and NOT from top to bottom of the rear glass). It's amazing how much crud came off, and the grid definitely clears the frost off the glass faster and more evenly now. If you really want to be sure that the glass and existing trace are grease/oil-free, you can wipe them down with some alcohol. Be sure the window glass is DRY and warm when you go onto the next step. Don't try to do this outside in the cold, because the paint won't dry properly and therefore won't adhere well to the existing grid. [Editor] It might help to remove corrosion by lightly wiping with a fine Scotchbrite nylon pad.
- The mask that is supplied in the Loctite kit has a gap that is really too wide for the existing grid. If you use it, you end up with a VERY large (wide) repair area, which will be both visibly noticeable and will heat up faster than the rest of the grid (makes for uneven defrosting). I used "invisible" type tape (the opaque type "Scotch" brand or the like, NOT the cello "clear" type tape) to mask off the lines. It sticks to the glass very nicely and you can get it right up to the edges of the grid lines. Don't be bashful about a lot of overhang beyond the gap. It will help you avoid accidentally getting some of the repair "paint" on the glass where you didn't intend it to go. Just make sure that the tape is firmly applied to the glass right up to the grid line, so that any paint can't sneak under the tape. Paint away, as directed in the instructions that come with the kit. As indicated in the instructions, you'll need to peel the tape off the window BEFORE the paint fully dries (actually, once it has just "set"). This is where having extra tape at either side of the repair comes in handy. Start nearest to the grid line at one end of the tape and SLOWLY peel it back and AWAY from the grid line. Repeat for the other side. If the tape breaks, CAREFULLY use a pin or single edged razor blade to lift enough off the glass so that you can peel the rest away. Your repair efforts should yield a nice sharp grid line, that looks (and performs) pretty much like the original. Don't be tempted to turn on the defroster too early - wait the recommended time for the paint to fully cure.
[Tip from James Stoney] I found an item that may be of help in repairing rear window defogger on glass wiring...The CircuitWriter a 7ml pen type unit that allows you to draw the line back in to being....part # S-CCW100P cost is $10.95 from Antique Electronic Supply http://www.tubesandmore.com Also may be available at local electronic supply houses.
Rear Window Defroster Failed. [Inquiry:] Last year my rear defroster worked. This year it doesn't. Switch light comes on and fuse appears good. With radio on AM, turning the switch on causes static. Is there away of checking the heat strips on the window?
[Response:] The static on AM is a good clue -- it says you have arcing somewhere. There's a relay that includes a timing function. Find the relay, pop the plastic cover and resolder the connections. Also check the contacts of the relay itself -- they may be burned. If it is the relay, at worst you'll have to buy a replacement. The resistive strips are all but bulletproof. Check the resistance at the window connections; it should be less than one ohm but not zero and not 10 ohms. Runs on about 10 amps (12/X=10, X<1ohm). Sounds like you may also have a broken connection somewhere. Check for voltage at one side of the window connections and a ground at the other; the voltage drop across the strip when it's switched on should be 12 volts. Fix appropriately [see above].
Mirror Motor. [Inquiry] My driver's side rear view mirror does not move when the motor is activated. If you push the buttons, you can hear the motor go, but the mirror only moves back and forth when you push it with your finger. It doesn't stay in place either. [Editor] The electric motor moves the mirror through two small rack gears controlling the X-Y axes of motion. The mirror glass has probably come unfixed from the motor because one or both of the little rack gears have broken. Given the cost of a motor from the dealer, look for a used mirror assembly and install the whole thing instead of replacing just the motor.
Replacement Mirror Glass. [Inquiry:] I stopped in a self serve wash today and broke my mirror glass. [Response: Rob Bareiss] Most windshield shops should be able to replace this glass for you, for 1/2 to 2/3 of the price of the dealer. Of course, if the car's got mirror defrosters, you might be stuck with OEM Volvo. Typically you'll wait 1 day for them to order the glass. Or try an online parts retailer. See below for removal instructions.
Mirrors Tend to Fall Off. [Editor] Brickboard has several reports of mirror glass falling off due to aging adhesive failure. Check yours regularly, especially if you notice the glass wobbling in the slipstream. Silicone RTV can be used to re-attach the glass to the backing.
Split-View Mirror. [Inquiry]Does the split-view (1/3rd wide angle, 2/3rd flat glass) driver's mirror exists for the 940's? [Response ] I just bought one from VLVworld.com. It was the drivers side mirror with the heater element. It is not listed as such on their site, and I was somewhat surprised (and pleased) when it came in, but that is what I received (1/3 wide, 2/3 flat). You may want to email/call them to clarify/confirm.
Mirror Glass and Housing Removal. [Inquiry:] How do I remove the mirror glass on my exterior mirrors?
Earlier Mirror Glass. [Response: Abe Crombie] Press the mirror on the bottom so it moves into the housing. The mirror comes off by using a vary narrow blade screwdriver and going up through the oblong hole on bottom of mirror and moving the white retainer gear to the right, toward the car, about 1/4 inch. That rotates the locking ring and releases the mirror from the housing. [Editor:] Reinstall by engaging the mounting lugs on the back of the mirror and moving the ring gear to the left, away from the car. [Jerry Casey] After you align the pins and then find the little 'gears' on the lockring that you rotate by prying through the slot in the bottom, and you fish around til you get it to turn about 1/4 inch, then it has to turn just a bit more til there's a click and it locks into place. If there isn't that firm click it won't lock and the mirror will fall out.
Later Mirror Glass. [Editor:] Later Mirrors for 940/960/90: I followed instructions in the manual for the later version of the mirror glass without the little gear mechanism in the  bottom slot: "pull straight out." After not very much pulling, the mounting gimbal to the mirror motor cracked apart, leaving me now with BOTH a broken mirror heater and a broken mirror motor unit ($$$).
SO: If you have a later 940/960 or 90, here's how to remove the glass correctly. Activate the motor so that an outside 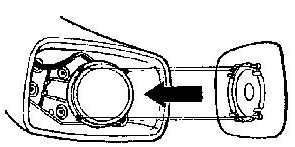 corner of the mirror is way out. Using a flashlight, look inside at the mirror glass mount. You will see a little conical locator pin with two locking tabs on either side. Each corner of the mount has a similar arrangement. Unlock the two tabs with a narrow screwdriver and pull that corner of the mirror just far enough to keep the tabs slightly disengaged. Move the mirror to the next corner on the outside and do the same thing, keeping the tabs just barely disengaged. Insert something between the glass and the mounting plate to keep the tabs from re-engaging. Move to the inside corners. Do all four corners (which can take patience and dexterity) and gently remove the mirror, removing the heater connectors after you can pull it far enough away. The mirror glass will withstand some gentle flexing, but not hard flexing. This procedure keeps the fragile circular positioning ring, tied to the motors, intact. To re-install, just re-connect the electricals, line up the locator pins and push the glass back in place until all the tabs lock. A little dab of grease on each tab will help.
Mirror Glass Separating From Mounting. The 'mirror' is 3 pieces assembled as one unit: the glass, a black plastic backing, and a white plastic lockring or pin assembly depending on the model. I've had both the glass come loose from its backing, and had the lockring come loose. To reattach the glass to the backing I used Barge cement, lasted several years. But if it's the lockring that came loose, that is a PITA. [Editor] Try silicone.
Mirror Housing Removal. [Inquiry] The paint on my side view mirrors is starting to chip away so I'm going to paint them the same color as the car I just need to figure out how to take them off first. [Response: Dick] Take door panel off (door panel does not need to be removed if mirror is manual adjust.) Remove triangular portion covering mirror mount if electric and if manual, remove it including flex handle. For the manual mirror: use care when removing the triangular cover. It is held in place with two friction fit push plugs: one near the lower front corner and one above the flex handle outlet. Gently pry it off. (If you break a push plug, glue it back with a nail for reinforcement.) Unplug cable from mirror if electric. Unscrew 3- 8mm (I think) bolts holding mirror. Mirror should be in your hands now.
Heated Mirrors. [Editor:] Testing Mirrors. To test the mirror electricals, activate the motor to expose the connectors on the inboard side of the back of the mirror. Use needle-nose pliers to slightly expose the metal connector on each. The blue one is powered when the rear defrost switch is activated: use a voltmeter to test at this point for 12volts and for no resistance on the ground tab (black wire lead.) If it is getting power and the ground is OK, then the glass heater is faulty or the connector is corroded; if not, then the relay or door wiring is bad. Resistance in the mirror itself (between terminals) is around 4 ohms. These mirror connectors easily corrode. It helps to remove them, deoxidize, and reinstall with silicone dielectric grease for protection.
Adding a Heated Mirror Kit. [John Sargent] All 700/900 cars except the 1984 760 have the wiring for heated mirrors. All you need are the two heated mirror glasses and the switch. The switch for the heated mirrors has two symbols on it; one showing the rear window defroster and the other showing the mirror heater.[Editor] This may be true from the switch to the door connector, but you may have to add two wires from the door connector (mounted right near the door release) through the door, then through the mirror hollow pivot, thence to the mirror housing. You will have to remove the door panel and the mirror housing to do this. The door connector has two small 3/16 blade terminals; the mirror has two 1/4 connectors: buy female terminals and insulate well using shrink wrap. Use 16-18 gauge wire. And make sure you check your wiring diagram. Note as well that the electrical connector for the switch is different: the non-heated version may be square; the heated version L-shaped. The non-heated switch has three spade connectors, the heated version has four. Remove the wires from the connector housing, shrink wrap to insulate, and reinstall according to your wiring diagram. Record the numbered locations on the old switch: the blue-green wire to the heated mirrors goes into the unused fourth terminal on the back of the new switch.
At one time, Volvo offered a kit. The heated mirrors are a direct replacement and the replacement switch replaces the existing rear defrost switch. [Editor:] All electric mirrors are heated and the electrical connectors are inside the door panels. It is reported that replacement mirrors from Volvo are all heated.