Driveshaft, Rear AxleDriveline, Rear Axle
Lubrication:
Limited Slip Differential Lubricants
Automatic Locking Differential Lubricants
Driveshaft:
Disconnecting Driveshaft for Towing
Center Support Bearing Replacement
Rear Axle and Wheel Bearings:
Differential and Rear Axle Exchange
Automatic Locking Differential
760 Independent Rear Suspension Vibration
Lubrication:
Checking the Oil Level:
- Solid Rear Axle. Remove the fill plug at near the top of the differential cover, insert your finger, and make sure the oil level is up to the bottom of the plug hole. When you reinsert the plug, coat it with antiseize so you can remove it from this rusty environment next time. Add the copper washer, then insert it, snug it up and don't overtighten or strip the threads.
- Independent Rear/Transverse Spring 960 Rear Axle. [David Aidnik] Access is tough because of the suspension components and fuel tank. You will need an integrated short 3/8 drive universal/13mm 6 point socket (not a universal and a socket), along with a fluid extractor pump and two quarts of appropriate oil (preferably synthetic 75W-90). Jack up the rear of the car and locate the fill plug on the front of the driver's side which is about even in height with the pinion and 3 inches to the rear but facing forward (not on the rear of the assembly). Using the socket on the end of a ~6 inch 3/8 extension, get full engagement on the hex head and remove the fill plug. It will be tight. Insert a narrow oil hose (1/4 to 5/16 inch OD) and maneuver it down into the differential. Connect this to your lube pump and remove the oil (around 1.5 quarts). Pump in fresh oil to the spec of 1.7 quarts. The oil level should be just below the level of the fill plug, which you can determine with a white plastic zip tie bent to a 90° angle at the last 3/4 inch. Poke this in the fill plug hole to measure oil level. Don't overfill. Reinstall fill plug. Access is so tough that it is not possible to get the fill plug started in the threads by hand. Use a leftover piece of heater hose ~4 inches long stuck on the end of the 3/8 extension flipped backwards so the the heater hose fits tight on it, then engage the other end of the hose on the 13mm hex nut to get the plug threads engaged in the hole. You can't use the universal socket because with the plug backed out of the threaded hole > 3/8 inch, you don't have clearance for the socket. Tighten securely.
Why Change the Oil?
[Tips from Brake and Front End Magazine, Jul 02 by Larry Carley] [Volvo] differentials use hypoid gear oils that also contain extra amounts of "extreme pressure" (EP) additives. Limited slip differentials also require their own special additives. Most of these lubricants are long-lived and hold up well for tens of thousands of miles. But none will last forever. The combination of heat, shearing action and oxidation eventually breaks down the oil and reduces its ability to lubricate and protect. Normal wear inside the gearbox and differential also produces metallic debris that ends up in the oil. Since there's no filter to remove these contaminants, the fluid becomes more and more abrasive as the miles add up. The only way to get rid of the contaminants and restore the lubricating qualities of the oil is to drain and replace the fluid. The oil level inside a manual transmission or differential is critical for proper lubrication because there's no oil pump to route the oil where it's needed. The oil is churned by the whirling gears, which "splash lubricates" the moving parts. If the fluid level gets too low because of a leak, therefore, the bearings and gears won't get enough lubrication. The result can be galling, seizure and total destruction of the unit. Oil is also necessary to cool gears and bearings. The total oil capacity of most manual transmissions, differentials and transfer cases isn't very much (typically a couple of quarts or less), so it doesn't take much fluid loss before parts start running dangerously hot. If a transmission or differential is whining and making noise, it's too late to add oil. The damage has already been done. Adding a higher viscosity oil may quiet it for awhile, but once wear has taken its toll on the gears and bearings there's no magic cure other than to overhaul the unit and replace the worn parts. Another reason for changing the lubricant inside a manual transmission, transaxle, transfer case or differential is to improve cold weather operation. Most conventional oils thicken as the temperature drops. This increases friction, drag, fuel consumption and the effort needed to shift gears. ...Synthetic gear oils have a lot of advantages compared to conventional petroleum-based oils. Synthetics are more stable, flow more easily at low temperatures, reduce friction and operating temperatures, improve fuel economy and generally provide superior all-round lubrication and protection under a wide range of operating conditions. [Editor] Highly recommended for all seasons, all temperatures, all uses: synthetic 90 grade differential oil. Mobil 1 75W-90, or Valvoline, Castol equivalents in 75/85-90 grades. See below for LSD/ALD oil information. I find that using synthetic oils dramatically increases the lifetimes of my pinion oil seals.
Oil Change Intervals. [Editor] While Volvo does not specify a rear axle oil change interval, you are best advised to do so. I change mine around every 80-100k miles (it takes 1.7 qts) when using Mobil 1. The old oil shows evidence of dirt and wear: it is distinctly darker than the new oil.
Differential Oil Vent Tube. If you change your oil and find it frothy or foamy, make sure the differential plastic vent tube is not allowing water into the lubricant. Re-orienting this might be necessary.
Identifying Leaks. [Tip: Editor] I make a habit of every so often spraying a little cleaner on the rear axle housing just aft of the pinion seal, as well as the gas tank near the seal, and washing the car in one of those car-bottom automatic washes. This allows me to see a clean axle housing when I inspect it occasionally and know at once when the rear pinion seal is leaking. The seal is a wear item and I have gone through them most frequently when the car is used in short trips on bumpy roads. Sure enough, I looked underneath last night and found the telltale spread of dark oil being blown both aft under the axle and sideways onto the gas tank. These are prime indicators of a leaking seal.
Draining the Differential Oil. Before you drain any oil out, make sure you can open the fill plug near the top of the differential rear cover plate. An oil suction gun will leave much of the oil in the axle; draining through the drain plug or lower bolt hole makes more sense.
- Earlier Axles With Drain Plugs. Drain the oil by removing the fill plug at the bottom of the differential case.
- Later Axles Without Drain Plugs. [Inquiry] How do I drain and refill my rear axle housing when it does not have a drain plug? [Response: C. McGrew] The later axles do not have drain plugs so just remove the bottom cover bolt at the six o'clock position and let the oil drain through the bolt hole. If it does not drain because of dirt, secure a new gasket and remove the cover.
Refilling the Axle. [Jay Simkin] If you don't have a suction gun, buy two quarts of axle lube and a five-foot piece of 3/8 inch vinyl tubing at a hardware store. Put a catch pan under the diff. Hook the oil bottle up to the tubing, route the tubing over the rear wheel, have wife hold the bottle in the air while you put the other end into the fill port. You will add a total of 1.45 liters to refill a 1041-type diffential. To control the fill take a full bottle, with the tubing pressed onto the cap's snout, and squeeze the bottle to force oil into the tubing. To relieve the vacuum in the bottle, point the bottle's snout skwywards - as it would be, were it on a shelf - and partly unscrew the bottle from the cap (with the vinyl tubing still attached). Squeeze the bottle back to round. Then, turn the bottle to tighten the cap, with the tubing attached. Again squeeze the bottle, to force oil into the tubing. Most oil bottles have a clear strip on the side, which shows the amount left. Stop, when you get to 500 milliliters: you will have dispensed 450 milliliters (0.45 liters). Take another full bottle (950 milliliters) and - using the method set forth above (squeeze, relieve vacuum, loosen/re-tighten cap) put the entire bottle contents into the diff. Some excess will drip out of the fill hole.
[Tip: Abe Crombie] I've pumped hundreds of quarts of diff/gear lube at home by cutting the screw on top to a size that will take a piece of clear vinyl 3/8" tubing with a very snug fit. The you puncture a small hole near top of gear lube jug. With tube on very bottom of container and sparing application of air from your compressor via a blower nozzle, you can make quick work of adding the lube w/o assistance. Don't rush it or you'll rupture the gear oil jug.
[Tip: Peter Cohen] StaLube sells small pumps ($5) that afix to gear oil bottles; visit NAPA.
Refill with Mobil 1 or Valvoline synthetic in a 75-90 grade. See below for lubricants requirements.
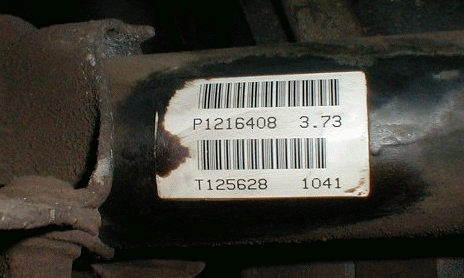
Which Lubricants? [Jay Simkin] Most Volvo rear axles take normal gear oil in a 75W-90 grade. To know if a limited slip additive is needed for proper diff operation, look for the differential identification label, white with black letters/numerals, on the left axle housing close to the control arm. This label likely is covered with grime/undercoating. Clean the area with window cleaner: a strong solvent might destroy the label. If the label bears Volvo Part No. 1216411 and the numerals "1041", the differential is a type 1041 (Eaton auto locking diff). No additives of any kind are needed to your stock 75W-90 rear axle oil. If the differential is a "1031" axle and has the dealer installed option so that it is a "limited slip differential", there should be a metal tag affixed to the diff cover. This tag may specify "anti-spin oil", which means an LSD additive. About four ounces of the limited slip additive is needed.
Note: an "automatic locking" differential, installed in 1041 axles on later 940s, is NOT a "limited slip" differential. The automatic locker can use normal gear oils as below; the limited slip unit requires the additive above.
Automatic Locking Differential Lubricants.
[Note from Michael Asmussen, Torque Control Products Division of Eaton Corp.] We recommend the following lubrications for our 1041 automatic locking differentials:
- Texaco 2276; Synthetic 75 W90; GM Part # 9986115
- Texaco 9622; Mineral based 80W90; GM Part # 9985290
- Texaco 2080; Synthetic 75W140 (heavy duty applications); GM part # 9985991
Note - All of the above lubes are preblended with friction modifier. No additional modifiers are necessary or recommended. As far as other lubes are concerned, any standard GL 5 lube will work, but the units perform optimally with the three listed above.
[Comment from Castrol:] Thank you for contacting Castrol regarding Syntec 75W-90 GL-5 gear oil in your Volvo 1041 differentials with an Eaton Automatic Lock. You may use SYNTEC gear oil with full confidence.
[Comment from Mobil:] Mobil 1 Synthetic Gear Lubricant meets the GL-3, GL-4 and GL-5 API ratings. If the manufacturer requires the use of a GL-4 rated lubricant ONLY, then you should not use Mobil 1 Synthetic Gear Lubricant.
Lubricating U-Joints. [Art Benstein/Randy Starkie] Every Volvo driveline u-joint I've had the pleasure of examining can be
lubed (740 and 940 included). They have plugs (1/4-28 Allen head screws).
I run the screw out and put a zerk in temporarily to squirt in my probably incompatible grease, and then replace the plug.
Use a 1/4" socket that fits in the confined space to install the Zerk.
There is not enough room to get a regular grease gun end in there to lube them. Use a grease gun with a conical tip that simply 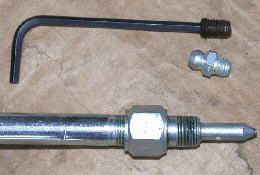 presses against the fitting to pump the grease in.
Driveshaft:
Disconnecting Driveshaft for Towing. [Inquiry] I am in the process of moving and need to disconect the driveshaft on my 740 in order to tow it behind the truck on a dolly. Any suggestions on the best way to go about this? See the FAQ discussion. Reassembly using the alignment marks is important to preserve the balance of the driveline.
Driveline Vibration Diagnosis . [Inquiry:] My 740 has developed a nasty vibration. First of all it acts as if it needs a tune up and I just replaced the plugs and wires. But the vibration that I was experiencing before the plug and wire change did not go away. The car vibrates the most when it shifts from 2nd to 3rd. I can't tell if its the engine or the drive train. [Response:] I have an '87 740 - same problems. Here's what cured them:
- motor mounts
- transmission mounts (change at the same time as motor mounts)
- exhaust manifold gasket
- tighten exhaust heat shields (listen with stethoscope with engine idling)
- transmission to exhaust support bracket similar to 940 (available from volvo dealer for less than $100)
Done. quiet. finally. Sounded like an old tractor before. now a car again.
Diagnostic Tips on Driveline Vibrations.
[Tim K] Join the droning/ vibration club! Sorry about the sarcasm. I too, have this very same problem. Change the rpm range slightly (2500 - ?) I've really never paid attention to the max range on the rpm's. However, I'm getting ready to tackle the problem within the next few weeks. I've decided to let a more seasoned professional tackle this one, though. I've done the research on the archives, put it on the board for feedback and have done some additional research. I've eliminated engine vibration by having engine mounts and transmission mounts changed (recommend you do them all at same time). Since yours is an 87, you are likely to have the hydraulic motor mounts so check to make sure that you have more than 1/4" clearance between the engine oil pan and cross member. If not, replace all the mounts (not just the engine mounts). Second, make sure that all exhaust is intact and matches factory spec as far as exact hangers and routing. Next, check the center support bearing for excessive play. This can be heard usually first when the car is coasting on deceleration as a humming or droaning noise. Lastly, check the transmission tailshaft for leakage. If any visible signs of leakage, it's time to replace the tailshaft bushing as a worn one will allow the drive shaft to move in a more elliptical path -- creating the very noise that you describe. My guess is that a combination of the center support bearing and the transmission tail shaft is your culprit. I hope this helps.
[John Sargent] A friend had experienced the same drive line vibration problem in his wife's 700 series with AW71 transmission, and only 130,000 miles. Rod said the problem was cured by replacing the tail shaft bushing. There was no oil leak, but there was plenty of drive shaft vibration when starting from a stop, especially with a full load. He added that he recently had the same problem on a customer car with 140,000 miles that had half the problem cured by the output shaft bushing replacement, and half the problem cured by the carrier bearing replacement.
[Tip] On both manual and automatic transmission cars, the transmission output flange bearing can fail or move within the flange housing, causing driveline vibration and requiring a new flange housing and bearing.
[Steve Oakes] I started with the assumption that for the shaft to be out of balance it must be deformed in some way. With one rear wheel of the car safely lifted I ran the motor with the car in gear and scribed a mark of the driveshaft in front of the center bearing using an awl: the awl scratched through the paint on one side of the shaft, marking the (presumably) heavier side deforming toward the awl point. I attached a hose clampto the shaft with the heavy side opposite this mark and voila, no more shudder. After replacing the center bearing and the engine and transmission mounts a few weeks ago, I removed the hose clamp and the vibration was obvious as soon as I pulled out of the driveway.
Driveline Take-Off Vibration: Shimming May Be Required.
From Volvo Technical Service Bulletin 45/102 Jan '91. [Symptom:] Take-off vibrations at low speed, especially with high acceleration and/or heavy load, can occur in some cases.
[Solution:] Before you conclude this is the problem, make sure your engine and transmission mounts are in good shape. The level of driveshaft vibration can be reduced by changing the vertical position of the center support bearing. The support bearing is bolted to a bracket, which in turn is bolted to the underside of the car body. Adding shims or washers between the car body floor and bracket will shift the bearing down. Adding shims inside the bracket between the bracket and support bearing will shift the bearing up. Best results differ from car to car. Start with a change of 6mm (1/4") upwards. If results are not acceptable, try positions from 5mm (3/16") downwards to 12mm (1/2") upwards from the original position. Note that clearance between drive shaft and fuel lines must be at least 20mm, and between drive shaft and the fuel tank at least 16mm. Shimming upwards should not exceed 12mm (1/2") and after re-positioning the center support bearing housing should not contact the floor pan.
Center Support Bearing Noise. Symptoms. I have an '88 740 GLE Turbo with 113K miles and a 3 speed auto with electric overdrive. Just the other day, I started noticing a faint whiny noise coming from the front of the car (it wasn't the turbo!). Over the next day or two, the sound became more apparent. It ranges from being a faint whiny sound to a loud howl that turns heads on the street with no apparent pattern. It 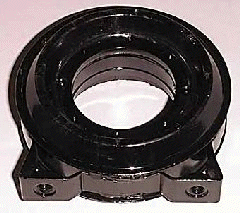 comes from directly beneath the shifter. It is not related to engine speed, and is just as audible while coasting in neutral as it is in any gear. If I drive for more than about 10 minutes, it seems to go away until the next time I drive. I can't get in to have a mechanic look at it until Monday, but in the meantime, perhaps one of you kind folks might have some suggestions as to what it might be?
Diagnosis. [Response: Mike Froebel] Classic hanger bearing noise. This is located just in front of the center universal joint on the driveshaft. There is a plate that is bolted to the frame rails with 2 bolts per side, the hanger bearing support is bolted to this plate with 2 bolts. The bearing lives in this support. [Editor] Don't drive the car extensively when it has a failing driveshaft support bearing. This can fail catastrophically and send the driveshaft flying at high speeds. When it makes noise, it needs repair very soon.
Lubricate It First. [Cliff Pope] Try oiling the carrier bearing first. You don't need to dismantle anything. Drop the cross member, pull back the rubber support, brush off the dirt, and carefully prise back the plastic seal a bit, just enough to get some oil in. Spin it several times and add more oil. I've never had a noisy one that didn't respond to this treatment. Mine squealed horribly at about 200,000 miles. It's now on 355,000 miles and still silent.
Bearing Replacement. It is generally a good idea to replace bearing and support together, especially when the bearing is going bad. It is quite an easy job to do yourself, but you need some kind of puller or press to remove/install the bearing from/to the driveshaft. Just take the driveshaft to a machine shop where they will be able to remove the old bearing for you, and press on the new one, unless you have access to a hydraulic press. Or use the method outlined below. It's a very tight fit pressing the bearing into the mount and alternative c-clamp or mallet and block of wood methods don't work. Do not pound on the driveshaft or new bearing or you could damage the splines so you won't be able to put the two halves back together, or the u-joint, or maybe change its shape just enough to put out of balance.
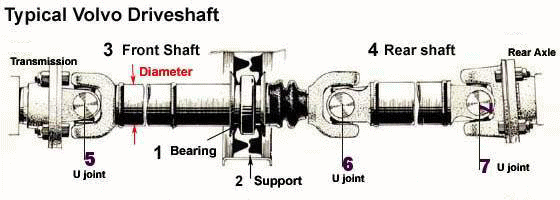
Just to make it more fun, your car could have 2 different driveshafts each of which take a different bearing and support. Measure the distance between the hanger bearing and middle u-joint and use the following Volvo part numbers:
if the distance is:
- 4" --> 1340501 support and 183265 bearing
- 8" --> 1209820 support and 181549 bearing
[Response 2: Zippy] It probably is the carrier bearing. Often they don't act up until they get warmed up from driving. The only real way to pinpoint the problem is to put the car up on a lift and let the car run in gear (wheels are hanging free) and listen with a stethoscope for the noise. Drive train howl is usually the carrier bearing, often a rear wheel bearing and if you have had a differential pinion seal replaced recently, incorrect pinion to ring gear preload.
Other Parts to Examine. [John Orrell] The U joints on our bricks are darn near bullet proof. Since your mechanic will have to remove the driveshaft to replace the carrier bearing, they will let you know if the U-joints need replaced. No slop, no grind, no problem. But check the pinion shaft input on the rear diff. I thought I had a bad carrier bearing, but it turned out that the rear pinion bearing (and gear) was chewed to crap. Usually, a carrier bearing failure is associated with a burning rubber smell. No smell, think pinion. If this is the case, replace the entire rear end with a good salvage unit.
Center Support Bearing Replacement. [Procedure from Dana Manner]
Here's an account of my recent experience in replacing the driveshaft center support bearing and bushing (or carrier) on my '88 740 GLE 155k miles. This process avoids the need for a puller and press. Symptoms: Growling and whining noise that was speed dependant coming from beneath the car. Initially, I lubricated the universal joints and replaced the center U-joint that was very stiff and missing the grease fitting, but this did not eliminate the noise completely.
Parts and Tools Needed. After reading the process described in the Haynes manual, I decided that their method was not going to work for me since I do not have "V" blocks to support the driveshaft bearing while driving or pressing the bearing off of the shaft. I don't have access to a hydraulic press, and I wanted to try and do this myself. My method is adapted for the somewhat crude tools that I have available to complete the task. I used a 6" three legged gear puller to remove the bearing; two short (approximately 1 inch long) pieces of 2 inch Schedule 40 PVC plumbing drain pipe to press the bearing into the bushing cup; and a 12 inch piece of 1.25 inch iron nipple pipe to drive the bearing and bushing assembly back onto the shaft. Warning: This process completely destroys the rubber bearing carrier bushing, so you will need to purchase a new one with the bearing. There are several different driveshaft diameters and U-joint combinations used in the 700 series. [John Sargent] The turbo cars all had the larger driveshaft and it is 2.00" diameter. The smaller driveshaft was used only on the cars with the 1030 rear end, and is 1.75" diameter. The large diameter driveshaft was sourced from two different manufacturers. Neither the VIN code or the VIC (Version Identification Code) tell which driveshaft your car left the factory with. Measure your driveshaft and make sure you buy the correct parts.
Bearing Removal Process. Place the car on four jackstands and the transmission in neutral. Remove the driveshaft from the vehicle, making sure to carefully mark with a punch or awl the original alignment of both the splined end and the transmission flange end to their mating parts, this so you can reassemble the entire driveshaft with the exact same alignment. Driveshaft bolts/nuts can be tight: long pattern wrenches help. Now, take a serrated steak knife (Volvo special tool "Ginsu 2000") and cut away as much of the rubber bushing as possible to expose the metal cup that the bearing is pressed into inside the bushing. Take your time, first cut the rubber holding the outer metal frame of the carrier bushing away and then whittle the rest of the rubber off, bit by bit. This will leave you with the metal surface of the bearing cup that you can now "catch" with the jaws of gear puller [CAUTION: see note below on use of puller]. Clamp the shaft in a bench vice, and apply the gear puller to the shaft so that the jaws are now pulling against the bearing cup that you just exposed from under the rubber, and the puller's center bolt is centered in the recess in the splined end of the driveshaft. Don't set the jaws of the puller on the front bearing protector ring that is mounted on the driveshaft; with this method, you will leave that in place. You will be pulling against the outer race of the bearing, and you are pulling the rear bearing protector ring off at the same time. Caution: There is a possibility that the bearing will come apart and be destroyed under tension, so be careful! Apply liberal amounts of penetrating oil to the shaft and inner bearing race, and give it some time to work. It is helpful to have a second set of hands (a helper) hold the legs of the puller tight against the bearing cup as you get the puller set and begin to apply tension. After the bearing is broken free (after a loud pop, in my case) continue advancing the gear puller bolt until it is completely free from the shaft. [CAUTION from Stephan Brendler] On my '94 Volvo 940 wagon (European spec. B230FB with M47 manual transmission; driveshaft with rubber-cuppling , center support bearing and two u-joints) there is a cap inside the driveshaft separating the forward 'pipe-section' of the shaft and the splined portion. This cap is installed in a relatively loose pressfit inside the driveshaft. Identification of this cap is simple - it has a small bore (about 3 mm) in its center. If you use the puller as described above and you push this cap back into the driveshaft, there is no way other than to cut open the driveshaft to get this thing out. If left there it will wiggle forever and possibly cause an imbalance.
So before you go foreward to remove your center support bearing this way take a look inside the splined end of the driveshaft and make sure there is no cap inside but solid material to use the puller against to.
Installing New Bearing Into Cup. The new bearing and carrier bushing came separately from the parts store, so you will need to drive the new bearing into the cup of the bushing. Based on the diameter of my bearing, I used the two short pieces of 2 inch PVC plumbing drain pipe to press the bearing into the cup in my bench vice. By placing one piece of pipe on either side of the bearing resting against the outer bearing race on one side, and the bearing cup on the other, squeeze this stack of parts in the jaws of the vice until it is seated in the bushing. I applied some silicone lubricant to the rubber to help the bearing slide past the rubber and into the bearing cup more easily. An alternative is to buy a Harbor Freight balljoint press tool, pressing the bearing into the support and constantly checking that it bottoms against the rubber shoulder.
Installing the Assembly Onto the Shaft. Now lubricate the drive shaft and the inner surface of the inner bearing race with some oil to prepare it for being driven onto the shaft. I took the rear bearing protector ring to Home Depot with me, and found that the inside diameter (the diameter of the splined end of the driveshaft was just smaller than the inside diameter of 1.25 inch galvanized iron plumbing pipe. I purchased a 12 inch length that was threaded on both ends (this is a stock item, a 1.25" x 12" iron pipe nipple, the threads are not needed for this at all). Slide the bearing and bushing assembly onto the shaft (make note of the original orientation, the bearing is exposed to the rear and covered by the rubber bushing in toward the front of the car), and seat it by hand. Slide the iron pipe over the end on the driveshaft and onto the inner race of the bearing. Don't install the rear bearing protector ring yet. Drive the pipe evenly with a hammer, tapping (or maybe beating) the bearing home onto the shaft. Then remove the pipe, and seat the rear bearing protector ring (a kind of a half donut shaped thing) onto the shaft.
Drive it home onto the shaft evenly with iron pipe, as was done with the bearing. Check for free rotation of the bearing and for trueness of alignment of the carrier bushing by spinning the assembly around the shaft. If the carrier wobbles (as mine did) because of poor alignment of the bearing inside the bushing's bearing cup, drive the outer race of the bearing into the cup with a punch and hammer, supporting the bearing cup from behind, on the edge of your bench or vice. This may take a little trial and error to get the alignment correct to eliminate any runout or wobble.
Replacing the Driveshaft. Replace the driveshaft, making sure to align it to the makings on the mating components that you made prior to removing the shaft from the car.
Vibration in Drive Shaft. [Note 1:] Even with the 2-piece driveshaft, rear axle pinion angularity is very critical to smooth operation. If the nose of the rear axle is too high or two low, the rearmost U-joint will be extremely "busy", and you often can get this kind of thundering at specific speeds. It's very fiddly to get adjusted correctly, but often paying careful attention to this will solve such a problem. [Note 2:] My first take on all of this is that the driveshaft was re-installed "out-of-phase" when all of the axle work was performed. There is a specific orientation shown in all Volvo service manuals. The driveshaft is balanced as a two-piece unit from the factory...so the orientation between halves must be preserved when servicing is performed. See Driveshaft Out of Alignment See also Driveline Take-Off Vibration: Shimming May Be Required and tailshaft bushing
U-Joints. Failure Symptoms: Vibration in 90 745, AT, that is sort of a low moaning sound. It varies with road speed but not engine speed. It's almost like (snow) tire noise, but doesn't change with road surfaces (and I don't have snow tires!), or a bad wheel bearing, but doesn't change with turns, etc. It's gradually (very gradually) getting worse. If I let up on the accelerator, it disappears for a moment, then returns on deceleration. Finally, the groan virtually becomes a grind with deceleration to a stop. So, U-joint or driveshaft bearing, maybe?
[Diagnosis:] Just went through the same thing. I think you're right about the U-joint. In my case, seized rear UJ; all four trunions/needle bearings dry and trashed. Only way to check is remove rear portion of driveshaft and check UJ for smooth taut movement. In my case, the rear portion of the two piece driveshaft can be separated from the pinion flange (in order to check UJ) without loosening anything else. 14mm?Interestingly, the bad rear UJ was also causing a rear end vibration, similar to warped rear rotors, under brisk deceleration at less than 10mph.
[Response: Matt Cary] In my case a bound-up U-joint was causing excessive driveshaft vibration. Usually a bound-up u-joint will cause rumbling or vibration, particularly at slow speeds and/or hard take-off from a stand-still. The vibration causes excessive transmission output shaft bushing and rear seal wear. If your car is 10 years old or 150,000 miles, it's probably time for driveshaft r&r. It's easy to remove the driveshaft (4 bolts at each end, and the center support: be sure to mark the balanced shaft for reinstallation). Then you can feel the movement of each u-joint by hand, which is the only real way to inspect them. Be careful... sometimes the u-joint feels OK by hand but when it is under torque load it binds up. It's probably better to replace them all... about $12 and 30-45 minutes each. IF YOU REPLACE U-JOINTS: make sure you mark the driveshaft prior to disassembly so that you preserve the balance.
Lubrication. [Randy Starkie] Grease fittings in a replacement u-joint are a good thing. The original OEM u-joints have set screws that can be removed and a 1/4-28 fitting can be installed. An occasional shot of grease from a disposable mini grease guns (which will fit in the limited space) should insure a lifetime of service. On the 740 cars a hole needs to be drilled in the plate blocking a straight shot at one of the fittings once the fitting is installed; a step drill can be used with the plate still in place. You can also just remove the Allen screw and use a grease gun needle fitting to grease the u-joints, then reinstall the Allen screw which will prevent water intrusion through the Zerk fitting.
[Inquiry: I dropped the driveshaft to replace the center bearing and failed to mark the alignment. Now it vibrates. What do I do?]
[Response: Dennis 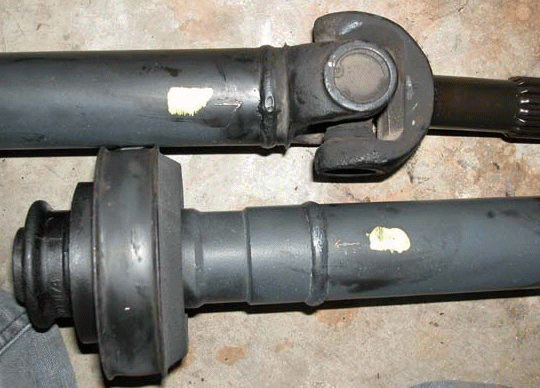 Hamblet:] The front section must be kept in the same alignment with the back section. The only approach I could suggest if yours appears out of whack is to remove the center bolts and rotate the rear shaft 1/4 turn then try it again. If it cures the vibrations you're home free, if not, rotate another 1/4 turn till you've tried all 4 combinations.
[Response 2: Warner Bowles ] I believe that the yokes of the universals at the centre bearing have markings on them from manufacture which indicates the correct alignment. You will have to clean off the paint and any other build up which has accumulated on the yokes to see them. A second alternative is to ensure that the yokes on the universals at the centre bearing are parallel, (ie in the same plane). This will result in the universals working together rather acting against each other. If worse comes to worse you may be 180 degrees out but should still reduce the vibration.
[Tom Irwin] Drive shafts are dynamically balanced, which is why some of the flange bolts are longer than the others. When removing, you should mark the position of each bolt too.
[Response 3: John Yuristy ] Since you pulled the centre connecting spline apart, and there are about 17 teeth on there, you could have got it back together haphazardly in almost that many different orientations. Only one is right, and you can probably find it again by knowing how the yokes should be oriented w.r.t one another. If you did not take apart any U joints while you had it out, and therefore also possibly rotate the half-shafts in the process, then you get to try once or at most twice to get the original position. The vibes come from both the U joint yokes not operating with the right geometry, and also if you have lost the shaft mass balancing which was done originally
So, orientation of U joint yokes should look like this if text can make an image.
[]-o]--------[]---[o-----------------o]-[]
1 2 3 4 5 6 7 8
where 1 is the front flange, 2 is U joint, 3 is front half shaft, 4 is centre bearing and spline, 5 is U joint, 6 is rear half shaft, 7 is U joint, 8 is rear flange.
Put it together this way, and if it still vibrates, take it off again, and reverse one half shafts 180 degrees on the spline so it still looks the same as above. If you think about it, those are the only two positions where the orientation looks the same. Remember when you get it right, mark the shafts with a paint stripe or punch for next time. I would also mark the yoke arms as well, i.e. the ones not welded to the shaft. I expect the balancing allowed for weight imbalance in these too, when they were in the original configuration. You can`t be too careful. I have never found any factory marks, and the rust and crud I have seen would hide them right up until when you obliterate them removing the rust and crud! FWIW I spent over $100 getting two half shafts balanced at a shop here, not easy to find a shop with a lathe that can do this, had to go back twice, and a couple of new U joints died from re-assembly before the day was done. Still not perfect.
Index Marks on Driveshaft. [John Sargent] Every 740 drive shaft assembly which I have seen has alignment arrows. Each drive shaft on either side of the sliding spline has this arrow which is supposed to point at each other when the drive shaft halves are coupled at the sliding spline.Sometimes the arrows are covered by undercoating and grime, but they are there. You can see the arrows by the splotches of yellow paint. Often the arrows and yellow paint are not visible until you do some thorough cleaning of undercoating and road grime. If your own indexing marks have been removed, use these arrows. Note: it appears that 1993+ drive shaft splines are keyed so that they can only be assembled in one way.
Flange Bolt Access. [Tip from Bill D. ] I had to unbolt my drive shaft yesterday to replace the transmission bushing. I couldn't get a good angle on the wrench to unbolt it from the differential so I needed a impact wrench or a longer handle. Since I had neither I used my socket handle and was able to use my hydraulic jack to lift the end of the handle thus loosening the bolt enough to ratchet them off by hand. I had to roll the car back and forth and do this four times to get all the bolts. Would have been easier if the rear end was up on jack stands.
Drive Shaft Flange Bolt Removal. [Tip from Alan Carlo] To be able to loosen the bolts on the drive shaft flanges I purchased the socket that fits the bolt head, 15mm I think but you should check the size, in a 6 point configuration. I ground it down on the end that goes over the bolt head until the recess was as deep as the bolt head. Then grind the upper shoulders, near the square that fits on the ratchet, to gain clearance. Test it as you go. You can use an open end wrench to hold the nut. Try PBlaster or heat from a torch to get the bolt really hot; this will sometimes break free the threads enough so you can get them out. This should help in the drive shaft removal. Be sure to mark the flanges, bolts, and the u-joints, relative to each other, on the front and rear shafts so they can go back the same way.
Rear Axle and Wheel Bearings:
Solid (Live) Rear Axle or Multilink? How do I tell if my rear axle is solid or multilink? [Response: Rob Bareiss] If you look under the back of the car, and see a big round differential in the middle of a tubular axle, that's the "live" or regular "solid axle" rear. If there is a big framework in the center and long control arms running from center out toward each wheel, then it is multilink (Independent Rear Suspension). The only cars with IRS are: late 760 sedans, 940SE sedans, all 960 sedans, late 960 wagons, and S&V90's.
Axle Model? [John Sargent] The axle identification decal is on the left rear side of the differential and covered with undercoating. Be careful cleaning it off. Don't use solvents, as they can dissolve the writing. Gentle scraping seems to work better to reveal the decal. If the axle serial number has a "S" preceding it, then the pinion seal uses a collapsible spacer.
Symptoms of Failed Pinion Seal. [Inquiry:] 90 740 GL wagon, manual trans. with 197,000 miles. Recently noticed small drip puddle below rear differential, originating near the U joint/drive train. Seems like a pretty heavy weight oil. Is this a pinion seal? What's involved in replacement/repair?
Volvo or Aftermarket? [Editor] This is one seal that HAS to be Volvo OEM and not aftermarket. Experience on Brickboard and with local mechanics shows that only the Volvo OEM seal from a dealer results in a reliable repair. Don't buy an aftermarket product.
Which Seal Spacer Do I Have? [Inquiry] [Response: Brian Sullivan] Find your axle serial number - should be a plastic tag with a bar code and some numbers on the driver's side axle tube, facing the rear of the car. You might have to clean off some gunk to see it. If you have the letter "S" preceding the serial number, you have the collapsible spacer (and therefore lower torque spec) No "S" means no collapsible spacer, and higher torque spec. The actual seal you need to replace is the same for both arrangements. I don't know which number on the tag is the serial number - but as you can see, I didn't have an "S" preceding either number - so no collapsible spacer, in my case.
Tools. You will need a flange counterhold, a modified socket for the pinion nut, a torque wrench with 150 ft-lbs/200 Nm capacity, and a puller for the flange.
Flange Counterhold Tool [Dave Farrington/Tom F/Randy Starkie] Replacing the pinion seal is really pretty easy, but the trick is to remove the large center nut holding the flange to get at the seal. To do this, you need a good home-grown counter-hold tool to hold the flange while you are removing the nut! I took a piece of angle iron around 28 inches long when I cut it down. Then I took the rear drive shaft that I had just taken out of the car and marked two holes of the u-joint flange near the edge of one leg of the angle iron. I then bolt this length of iron to the pinion u-joint flange, but I still have a problem. That is I can't get at the center nut holding the pinion flange in place. Easy to fix: just mark some clearance around the socket you plan on using - it presumably fits that nut. Then grind some of the angle iron off. 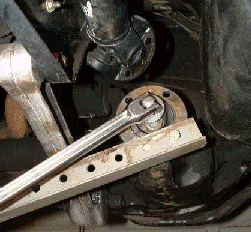 .
.
The tool looks something like this:
____
| |
| |
| |
| o|
| <
| o|
| |
----
Bad representation, but hopefully it gets the point across. I bolt this tool to the flange attached to the rear end and bracketing it against the ground, I have something to work against to loosen that nut.
Center Flange Nut Socket. I removed the pinion nut using a 1 3/16 or 30mm socket; some are reputed to be 27mm. Since the teeth on the socket were recessed in about 1/16" in from the edge, I ground down the edge so that it would get a better bite on the shallow pinion nut. You may also find that the flange recess hole diameter is too narrow for the socket; if so, grind down the outside of the socket using a bench grinder until it fits in the recess. The opposite end of the "counter hold tool" rested on the floor. The breaking torque of this nut, if torqued to 150 ft-lbs, is about 180 ft-lbs. [Note: this is tough to remove even using a long breaker bar; if you are having trouble, try using an electric impact wrench with the parking brake set to remove it.]
Puller. With the nut off, you can pull the pinion flange off using a harmonic balance puller (Harbor Freight has these) and get at the seal to replace it. Re-installing the flange is easy: it should slide on far enough that you can get the nut back on the end of the pinion and pull it in place by tightening the nut.
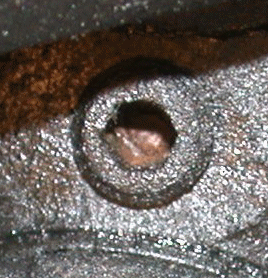
Seal Replacement. [Procedure: Abe Crombie/Dennis] Replacement of this seal will require removal of driveshaft and the pinion flange (first marking the position of everything with paint and then a punch or Dremel so as to preserve the original relationship as it 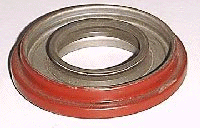 was balanced in-car at assembly.) Remove the pinion flange that the drive shaft bolts to, first marking it in relation to pinion so as to preserve its position since it will unbalance the driveshaft assembly if not put back into position as it was. Drain the rear differential oil. [See below] Remove the center flange nut, then remove the flange with a puller; no hammering allowed! Seal ("1" in the photo below) can be removed by any reasonable means that doesn't scratch the opening in the diff housing where seal fits. You can put a good-sized screwdriver in between the seal and the pinion shaft and pry it out. It will distort and tear but will come out. Some respondents have not found this very effective: if so, try the following advice to bend the seal housing lip over. Whatever you do, DON'T damage the housing or shaft.
You can take a small 1/4 inch chisel or narrow flatbladed screwdriver and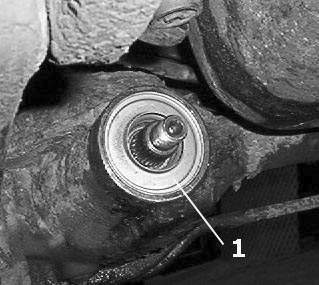 tap it into the little crease that exists between the edge of the metal seal and the edge of the diff housing (be CAREFUL not to damage the differential housing!!). This will cause the tin seal housing to bend over and loosen it's grip on the diff housing. Do this at least 50% of the way around that outer edge and then put a large screwdriver in next to the pinion where the flange was and use it to lever the seal right out. It should pop out with no problems if you did it right. There is a large washer behind the seal, next to the bearing, which you can remove using a dental pick or magnet. Insert a paper towel or other dirt block: don't let debris enter the bearing. Carefully clean the flange where it contacts the seal, removing any rust to ensure the new seal fits. You can use a Dremel with a fine stone to remove rust and clean up any nicks if you are careful. Make sure you install the seal right way around: "outside" is stamped in the metal seal ring. Put a little grease on the seal surface and
 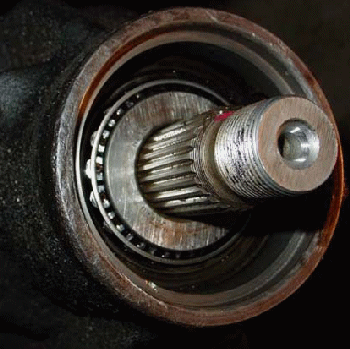 spring so it won't rotate dry and then tap it in place. The new seal will need to be driven in evenly to be just below flush with front of diff housing unless it is one with a lip that stops it when the lip contacts the diff housing. You want it deep enough so the flange does not rub on the outer steel portion of the seal. If you have a socket that is about the size of the seal use that to get it in even, if not just keep at it gently until it is seated evenly all the way around. A brass hammer works well. Re-install flange as marked and tap it onto the greased shaft far enough to engage the splines about ½”. Reinstall the counter hold tool, refit the nut (Volvo recommends a new nut), and tighten the nut to push the flange home. The torque depends on whether your seal uses a compression sleeve or not. NO IMPACT WRENCH ALLOWED, TORQUE IT!!!
- No compression sleeve: range 200-250 Nm (148-184 ft-lb.
- Compression sleeve: 180-200 Nm (range 133 ft-lb to no more than 148 ft-lb. No axial play is allowed.
- If you have a multilink 1035/1045 axle: range 180-200 Nm (133-148 ft.lb maximum.) Use a new, oiled nut. No axle play is allowed. Check drive flange runout and relocate it one-quarter turn until you get less than 0.05mm runout. If you can't get that, replace the flange.)
Failure to torque it properly will result in the pinion bearing being overloaded which will kill the bearing and place the pinion/ring gear relation ship in a new, different, and noisy relationship that will result in replacement of a bunch of parts ($$$$$). And don't forget to fill it up with gear lube when you're done. [Editor] Using synthetic gear lube seems to make pinion seals last forever.
Flange Torque. [Editor] Re-torque the flange coupling bolts and nuts as follows: if you have M8 bolts, torque in a star pattern first to 22 ftlb (30Nm) then angle tighten another sixty degrees. If you have M10 bolts, then torque to 37 ftlb (50Nm) in total.
Pinion Leak: Vent Plugged. [Tip: Ted Tatham] My recently acquired 93 945 with 79k had a pinion seal leak. Seal was replaced under warranty. After 1000 miles the leak was back. I removed the fill plug and tried blowing into the axle vent hose by mouth, but air wouldn't flow. I removed the hose and found it packed with mud right where it goes on the nipple on the axle. My guess is the mud was placed there by a small wasp or other insect. This breather hose is on the right hand side about 4 inches or so from the differential housing. It's about a foot long and fairly thin and it comes off the top of the axle. The upper end is open and should be inserted into a rubber grommet in the chassis.
I have gear oil coming out of the back of the differential where the wires go into it. What needs to be done to fix this? [Mark Stites] You will need a new o-ring for the speed sensor. For tips on removing the sensor or repairing a corroded electrical connector , see the FAQ section in Electrical: Instruments. [A Buxton] If you still have the tamper proof wire on the connector at the rear axle, cut it off. Over time it cuts into the sensor wire.
Wheel Bearing Oil Seal. [Inquiry:] 1990 740: oil leaking from rear right side axle down to the inside of the wheel rim. Could this be the inside oil seal or the wheel bearing/seal assembly? [Response: Various] Remove the caliper, rotor and handbrake shoes and the four bolts securing the halfshaft retaining plate. Save the shoe clips. Re-install the brake disk wrong side out with the nuts tapered side out and use it as a lever to pull the halfshaft out, or use a puller. With the shaft out, you can replace the inner seal. The outer seal, the bearing & retaining collar are pressed on really tight on the half-shaft. You'll need press tools to remove them. While it is possible to use hand tools (like a curved crowbar) to remove the seal, be VERY careful you do not scratch the axle housing surfaces. Chances are the bearing might get damaged when you attempt to pull it off, so budget accordingly. You can drive the new seal in using a cast iron pipe fitting and a hammer. The pipe fitting should be slightly smaller in diameter than the seal so that you can drive it in until seated without damaging it. Clean oil off the brake components very carefully, or replace them, before you reinstall.
Wheel Bearing Replacement. [From the OEM Manual]
Type 1030, 1031, 1041 Live Rear Axles. Parts required: new bearing, new inner and outer seals, new locking ring, new brake caliper bolts
- Remove rear wheel; brake caliper (tie it back onto the rear spring to avoid hose damage); brake disc; brake pads
- Remove the four pressure plate bolts behind the wheel hub, forward of the brake caliper
- Reinstall the brake disk on the hub, positioning the conical ends of the wheel hub nuts outwards, and use the disk to pull the drive shaft out.
- Using a long screwdriver, remove the bearing seal. Clean the inside of the rear axle tube.
- If your car has electronic traction control (ETC), remove the ETC toothed wheel on the shaft by pressing it off using two vee blocks
- Using a bearing press tool or special tool 5212, remove the bearing and the locking ring.
- Grease the new bearing by packing it thoroughly with grease an dmaking sure the grease penetrates inner spaces.
- Grease both inner and outer seals by packing the space between seal lips with grease.
- Place pressure plate and outer seal in correct position on the shaft.
- Place greased bearing and new locking ring on the shaft.
- Press bearing and locking ring back onto the shaft until they are seated in position.
- ETC-Equipped Cars: Using a cylindrical drift or special tool 2412, press the ETC ring back onto the shaft.
- Install inner seal using a cylindrical drift or tool 5243.
- Install drive shaft and pressure plate together with brake pad retaining springs. ETC cars: use care since the toothed wheel passes the inner seal.
- Tighten pressure plate bolts to 40 Nm (30 ft-lbs)
- Reinstall: brake pads; brake disk; brake caliper (using new bolts and tightening to 60Nm (44 ft-lbs); wheels.
- Adjust handbrake cable.
Type 1035, 1045 Independent Rear Axles. Parts required: new bearing.
- Remove: rear wheel; brake caliper retaining bolts; caliper (tie it up to the spring to avoid hose damage); brake disc (marking position relative to pin); brake pds; handbrake cable
- Remove: bolt securing support arm to wheel bearing housing. Tap out the arm. Remove bolt and nut securing lower link to wheel bearing housing.
- Remove bolt securing track rod to wheel bearing housing.
- Withdraw track rod from wheel bearing housing, using a small claw-type puller and a 50mm M12 bolt.
- Remove: nut securing drive shaft to wheel bearing housing; nut securing upper link to wheel bearing housing; wheel bearing housing. Keep the shims and note locations.
- Press off the hub
- Remove circlip retaining the bearing in the wheel bearing housing.
- Press the bearing out of the housing, using a cylindrical drift or special tool 5085.
- Withdraw inner race from hub using a puller or special tool 2722 and counterhold 5310.
- Press on the new bearing. Install the circlip.
- Press on the hub using a counterhold on the inner race to avoid damaging the bearing. Use special tools drift 5088 and counterhold 5085 or equivalent.
- Install wheel bearing housing on drive shaft; drive shaft nut; shims between upper link and housing; nut securing upper link to housing.
- Pull wheel bearing housing outwards at top edge and tighten upper link nut to 115 Nm (85 ft-lbs) to ensure correct wheel alignment.
- Turn wheel bearing housing outwards and insert lower link. Insert bolt securing lower link.
- Pull wheel bearing housing inwards towards final drive to ensure correct wheel alignment. Tighten link to 50Nm (37 ft-lbs) and angle tighten to 90 degrees.
- Install support arm (tighten to 60Nm [44 ft-lbs] and angle tighten to 90 degrees) and track rod (tighten to 85 Nm (63 ft-lbs)
- Install handbrake cable in wheel bearing housing; brake pads; brake disc in correct position; brake caliper (tighten to 60 Nm [44 ft-lbs]; wheel (tighten to 85 Nm [63 ft-lbs].
- Lower car and tighten drive shaft nut to 140 Nm (103 ft-lbs) and angle tighten to 60 degrees.
Tips. [Gene Stevens] If you jack it up so the side of the axle housing that you are pulling is slightly higher than the other (even an inch higher), then you won't have gear oil leak out when you pull the axle. Remove the axle assembly and leave the rest of the job to an automotive machine shop. Just remember to replace the shaft seal while it's apart.
Limited Slip Differential. [John Sargent] The Limited Slip Differential was fitted as a dealer option to certain 1031 rear axles. The LSD add-in for this axle is a Dana PowerLock with Volvo's name on it and a tone ring for cars with electronic speedometer. If your car has it, it likely also has a metal tag on the cover specifying the use of "anti-spin oil" for the differential, meaning rear axle oil with an LSD additive.
Automatic Locking Differential. [Inquiry] In which cars was the Automatic Locking Differential fitted? Do they require special lubricants? [Response 1: Abe Crombie] Volvo came out with the ALD in 91 as std equipment on 940 Turbo engined models and then std on 960 the next year. I believe it was std on all 940's 94-95. It was fitted to S/V90 as part of the "cold weather" pkg. in 97-98. If the Id tag on a Multi-link version 1 says 1045 it's an ALD. If the solid rear axle on a 91 or later is marked 1041 it's an ALD. If the label on a multi-link version 2 (95-98 with leaf spring) is marked 1065 it's an ALD. ALL cross-country or 70 series AWD are ALD in rear. The LSD was a dealer installed accessory and never fitted in factory to my knowledge. Those can be detected by the jack-one-wheel-up-and try-to-turn-it method. Usually they are tagged as LSD if the installer and subsequent servicers don't discard the tag. Response 2: Ceferino Lamb] They are called locking differentials rather than limited slip diff (LSD) because they lock up entirely. In old muscle car lingo I believe this design was called a Detroit Locker. There are no clutch packs as in LSD, so the gear oil required is standard gear oil, not LSD gear oil. I supposed synthetic hypoid gear oil would be best. They have internal dogs that catch when one wheel spins, locking left and right wheels together 100%. It's not the most subtle device, and can cause some pretty amusing powerslides if you're running elevated turbo boost. Above about 25mph centrifugal force keeps the dogs from engaging. But if you start spinning at a lower speed the rear end will stay locked up no matter how fast you spin, until you let off the go pedal. [Response 3: Michael Sestina] Eaton Corp makes the axle. it works great on our 93 945. I don't believe they require special fluids.
[Notes from Eaton on their at http://www.torquecontrol.eaton.com/]
How the Eaton Automatic Locker Works:
During normal driving conditions, the differential operates as a conventional "open" differential. But as soon as wheel slip occurs in either forward or reverse, the locking mechanism engages. A flyweight governor in the differential responds to differences in speeds. During normal driving, the governor does not influence differential action. But whenever one wheel's speed substantially exceeds the other's, which only occurs during wheel slip, the governor spins rapidly causing the flyweight to open. The flyweight then catches a latching bracket and begins lockup. During lockup, a self-energizing clutch system causes a cam plate to ramp against a side gear. This ramping compresses the disc packs that are inserted between the side gears and the case. The ramping increases until both axles turn at the same speed (full lock) which prevents further wheel slip. The entire locking procedure takes a fraction of a second and is unnoticed by the average driver. Unlocking occurs when both wheels regain traction.
How the Limited Slip Differential Works:
Carbon discs behind each side gear are pre-loaded with a central spring assembly. This spring force, added with the pinion/side gear reaction forces, increases the clamping load on the carbon discs as input torque increases. The bias torque of the differential increases in proportion to the input torque. Pyrolytic carbon with a texture of cloth is bonded to steel discs. These discs are then alternated with non-patterned steel discs creating a clutch pack that's virtually indestructible under abusive testing and operation. Due to the texture of the carbon discs, special lubrication requirements are eliminated and there are none of the chatter or noise problems associated with paper and steel friction materials.
Rear Axle Failure. [Tip from Counterman Magazine, Jan 02] The most common cause of rear axle bearing failure is leaky wheel bearing seals or differential seals or gaskets. A loss of lubricant allows the bearings to run dry, overheat and fail. Any bearing that is loose, feels rough when the wheels are rotated or is making noise needs to be replaced. Replacing both bearings (left and right) at the same time is recommended to reduce the risk of the other bearing failing. A rear wheel bearing failure may allow the axle to pull out of the vehicle, causing the wheel and tire to come loose.
[Editor's Note] Do a regular "driveway mechanic" check when you pull out of your parking spot to find leaking rear axle oil. My experience is that pinion seal failure is the most common cause of loss of rear axle lube and subsequent axle failure.
Differential and Rear Axle Exchange. Gear Ratios. [Inquiry] I have a 1986 740 non-turbo with a manual transmission and the differential is shot. I have purchased a differential from 1986 740 turbo automatic to put on my car. I know the bolt pattern is the same but wonder if the gear ratios are the same and whether the engine will rev higher or lower and any other possible side effects. [Response 1: JT Charger] Clean the left side of the axle tube so the sticker can be read; it is probably covered with undercoating now. The part # & axle ratio is printed by Volvo on this sticker. With the car up in the air, the sticker will be on the left side outer tube of the housing, visible from the rear of the car, after being cleaned with solvent. [Response 2: Paul Grimshaw] The gear ratio for the US-spec manual transmission cars is 3.31:1. Autobox equipped 700 series cars will have either 4.10:1 (Aisin Warner 72 equipped B230 engines), 3.73:1 or 3.91:1 -- the latter two ratios used with Aisin Warner 70/71 and ZF 4HP 22 transmissions. Your shift speeds will be different if you have changed the rear axle ratio, but if you have a tach that should not pose a big problem. Fuel economy -- particularly during highway cruising will suffer from the shorter rear axle ratio too. A benefit, however, will be quicker acceleration. [Bryan Warfield] You will want to get an axle from a car that has the same type of transmission as yours (manual or automatic) but also check to be sure the ratio is the same as your old one. Manual transmissions usually have a 3.31, which is too tall for an automatic. Automatics will have either a 3.73 or a 4.10. You can use either--I prefer the 3.73 for its better gas mileage and quieter cruising. An axle from an automatic in a manual transmission car will kill your gas mileage, give you fierce acceleration, and be noisy on the highway. 3.54 and 3.91 axles also exist, but seem to be relatively rare, found mostly in older cars.
Carrier Compatibility. [Inquiry] I have been looking for a limited slip differential for my 83 760 GLE. I have been told that this differential is a Dana 30, which is also used on some Jeep models. I have a chance to purchase a limited slip unit that was an OEM for the 200 series. Can anyone confirm (with a great deal of confidence, since I may base my purchase on the advice) that the 200 and 700 series differentials will interchange? [Response: Abe Crombie] On the back side of axle tube on left (driver's ) side is a label covered by undercoat. Clean this off and see if your model is a 1030 or a 1031. Then determine (label in same place on 240's) if the 240 is the same model. If they are the same model then the carrier will interchange.
Rear Axle Exchange. [Inquiry]I am planning on getting an axle from a yard and swapping it in. Are all of the 200 and 700 solid rear axles the same except for gear ratio? [Rob Bareiss] If you have decided not to just install new bearings and seals (that's really quite easy on these cars), you can replace the entire rear axle unit. Solid rear axles among 740/940 cars are not all the same, unfortunately. They will however, bolt in and work. The important thing to figure out is whether the new axle comes from a car equipped with ABS or not. The 760T and 740T cars will likely have ABS, and the base models will not. However most cars after 1991 DO have ABS, turbo or not. So that's the key. Otherwise, the "tone ring" for the speedometer is different and it'll read way off. [Bryan Warfield] The year of the donor car is important. There is a tone ring (toothed wheel) in the differential that sends a signal to the electronic speedometer and ABS (if equipped) There are at least two types of these. Cars up to 88 have a wheel with 96 teeth. 90 and later have 48. I think 89 is the same as the later cars (48 teeth) but I am not 100% sure of this. You must have the correct number of teeth for your car or the speedometer will be WAY off and the ABS will not work. Changing the wheel is more trouble than it's worth---better to get an axle with the correct type already installed. Number of teeth on the tone ring is not listed on the data plate (which is actually a sticker) You may be able to determine this by removing the speedometer sensor, looking through the hole, and counting the teeth, while you turn it, or you may have to take the cover plate off to be able to see.[Rob Bareiss] Early and late parking brake cables are completely different and incompatible.That was my experience last year, fitting a late model axle to a 1988 745. Ideally there will be a tag on one of the axle housings indicating a model number (DANA 1030, 1031) but I wouldn't bet on it being there. Better to just match up models and find the right axle. The axle does come off the control arms quite easily: 4 nuts. Then the hoop or clamp that actually holds it on is released. I had a LOT of trouble with the bolt for the bottom torque arm on the one I installed. If it doesn't come right out on either car, prepare for a fight. Try to get both torque arms with the new axle; just remove the bolts on the forward ends. That will give you a second option in case the rear bolts are really tough to remove. [Bryan Warfield] An important safety precaution when changing a rear axle: Since the axle weighs a considerable amount, there is a possibility that the car will become front-heavy when it is removed, and could become unbalanced and fall off of the lift or jackstands. To avoid this danger, put a couple hundred pounds (sand bags, car parts, whatever) in the back of the car before you raise it up.
Differential Rebuild. [Inquiry] What is the best way to rebuild my antislip differential? [John Sargent] I found it was cheaper to have a Detroit TrueTrac installed than to rebuild the Volvo unit.
Axle Ratio Change. [Inquiry] How can I alter my rear axle ratio? [Peter Fluitman] The only cost-effective way to alter rear axle ratios is to exchange the entire axle with a used unit. Changing gear ratios requires an all new carrier, internal parts, and tools to set up the clearances.
760 Independent Rear Suspension Vibration. [Symptom:] I have a 760 Turbo with independent rear suspension. When I start off from a stop with a heavy load, there is a fluttering in the drivetrain that feels very similar to worn U-joints or CV joints. The U-joints are new and the CV joints feel fine as far as I can tell.
[Diagnosis:] Probably slightly worn CV joints. Not worn enough to snap/click/knock yet but enough play between the balls and "grooves" to allow the load based "flutter." In my experience, unless there's an obvious knocking or the CV boot has been ripped awhile, it's tough to determine CV condition without removing, disassembling, cleaning and
inspecting. If the inner and outer CV joints are identical, as a temporary fix, swap the axles end-for-end so that load wears a different part of the joint.
760/960 CV Joint Removal. [Inquiry] It has been suggested that I not use an impact wrench on the rear CV joint of my driveshaft, but to lock the wheels and use a hand tool. Why?
[Response: Tom Irwin] The driveshaft on your car is a 2 piece propeller shaft assembly made of a lightweight, rigid, tubular alloy. At the factory, it is dynamically balanced on the vehicle to correct for extremely minor balance issues that would not affect a drive shaft of a more robust design. The corrections are accomplished with tack welded weights and extremely minor deviations are tuned out with the various length bolts. It is my educated opinion that using an impact wrench could transmit low frequency, high amplitude shock waves up the tube and a high level of vibration throughout the driveline and in close proximity to the overly delicate rear end gear set. If you manage to throw it out of balance, your driving experience will not be good. And dynamic driveshaft balancing is a specialists ART. Don't expect to get it fixed at the Goodyear for $39.99. Bottom line.... the impact wrench may work just fine.... but that shit is expen$ive when it breaks. Why take a chance? Oh yeah... and those bolts are a thin walled hex head with a narrow shank. What if one is rusted and you snap it off with the gun? In addition, the bolts are different: make a template from cardboard with holes for each bolt to keep track of them and assist in reinstallation.
Rear Axle Ratio Table. [Courtesy of Simon Dodd]
How to Measure Axle Ratio on the Car. [Rob Bareiss] Here's how I compute axle ratio: Make sure the car's in neutral, and can't roll. Block the wheels and release the parking brake. Raise one rear wheel. Make sure you have an open differential- not limited slip. If you can spin just one rear wheel, it's a regular differential. Make a mark on the driveshaft or pinion shaft of the differential- doesn't matter where, just so you can see it clearly. Use "white-out" or something. Make note of the position of the valve stem or mark the tire too. Turn the tire 20 turns (10 for a limited slip and you need both tires off the ground). Count the revolutions of the driveshaft. When you finish, note the approximate position of the shaft relative to the starting position- only approximate. You should get something like 37 1/3 turns of the shaft, or 41. Divide by 10 to get the actual gear ratio. 41= 4.10, 37.3 = 3.73, etc.
| Year | Model | Engine | Gearbox | Rear Axle Ratio |
|---|---|---|---|---|
| 1983 | 760 GLE TD | D24T | M46 | 3.54 |
| 1983 | 760 GLE TD | D24T | BW55 | 3.15 |
| 1985 | 740 (any) | B230F, B230FT | M46 | 3.31, 3.54 |
| 1985 | 740 GL, GLE | B230F | ZF 4HP-22 | 3.91 |
| 1985 | 740 Turbo | B230FT | AW71 | 3.73 |
| 1985 | 760 GLE TD | D24T | M46 | 3.54 |
| 1985 | 760 GLE TD | D24T | ZF 4HP-22 | 3.91 |
| 1986 | 740 (any) | B230F,B230FT | M46 | 3.31, 3.54 |
| 1986 | 740 GL, GLE | B230F | ZF 4HP-22 | 3.91 |
| 1986 | 740 Turbo | B230FT | AW71 | 3.73 |
| 1988 | 760 GLE | B280F | AW71 | 3.73 |
| 1988 | 760 Turbo | B230FT | AW71 | 3.73 |
| 1989 | 780 | B280F | AW71 | 3.73 |
| 1989 | 780 Turbo | B230FT | AW71 | 3.73 |
| 1990 | 740 GL | B230F | M46/M47 | 3.31, 3.54, 3.73 |
| 1990 | 740 GL | B230F | AW70L/AW71 | 3.73,4.10 |
| 1990 | 740 GLE (16v) | B234F | AW72 | 4.10 |
| 1990 | 740 Turbo | B230FT | M46/M47 | 3.31, 3.54, 3.73 |
| 1990 | 740 Turbo | B230FT | AW70L/AW71 | 3.73,4.10 |
| 1990 | 760 GLE | B280F | AW71 | 3.73 |
| 1990 | 760 Turbo | B230FT | AW71 | 3.73 |
| 1990 | 780 GLE | B280F | AW71 | 3.73 |
| 1990 | 780 Turbo | B230FT+ | AW71 | 3.73 |
| 1991 | 740 | B230F | M46/47 | 3.31, 3.54, 3.73 |
| 1991 | 740 | B230F | AW70L, AW71 | 3.73, 4.10 |
| 1991 | Coupe (780) | B230FT+ | AW71 | 3.73 |
| 1991 | 940 Turbo | B230FT | M46 | 3.31, 3.54, 3.73 |
| 1991 | 940 Turbo | B230FT | AW71 | 3.73 |
| 1991 | 940 SE | B230FT | AW71 | 3.73 |
| 1991 | 940 GLE (16v) | B234F | AW72L | 4.10 |
| 1992 | 740 | B230F | AW70L, AW71L | 3.73 |
| 1992 | 740 Turbo | B230FT | AW70L, AW71L | 3.73 |
| 1992 | 940 GL | B230F | AW71 | 3.73 |
| 1992 | 940 GLE (16v) | B234F | AW72L | 4.10 |
| 1992 | 940 Turbo | B230FT | AW71 | 3.73 |
| 1992 | 960 | B6304F | AW40 | 3.91 |
| 1993 | 940 | B230F | AW71 | 4.10 |
| 1993 | 940 Turbo | B230FT | AW71 | 3.73 |
| 1993 | 960 | B6304S | AW30, AW40 | 3.31 |
| 1994 | 940 | B230FD | AW71 | 4.10 |
| 1994 | 940 Turbo | B230FT | AW71 | 3.73 |
| 1994 | 960 | B6304S | AW30, AW 40 | 3.31 |
| 1995 | 940 | B230FD | AW71 | 4.10 |
| 1995 | 940 Turbo | B230FT | AW71 | 3.73 |
| 1995 | 960 | B6254S, B6304S | AW40, AW43 | 3.73, 4.10 |
| 1996 | 960 | B6304S | AW40 | 3.73 |
| 1997 | 960 | B6304S | AW40 | 3.73 |
| 1997 | S90, V90 | B6304S | AW40 | 3.73 |
| 1998 | S90, V90 | B6304S | AW40 | 3.73 |