Steering Issues on the 700l, 900 series cars
Steering PDF
Fluid and Maintenance:
Power Steering Fluid Cleanliness
Power Steering Fluid Bleeding Procedure
Power Steering Belt Wear/Noise: Pulley Misaligned
Components:
Rebuilding Power Steering Pump
Steering Rack Fluid Line Failure
Loose Steering Wheel and Column
Fluid and Maintenance:
Fluid Specification. [Editor] Your manual calls for "ATF" which means Dexron. Many people have had outstanding results with synthetic ATF such as Mobil 1 or Castrol. While Volvo does not specify an oil change interval, you are highly advised to regularly flush the system or add a filter.
Draining. [Tip] If you want to drain the system, loosen the fittings at the steering rack, from the pump & reservoir, let all the fluid drain out, then refill system with Dexron ATF. Fill the reservoir, then start the engine. When the pump empties the reservoir, then refill it. Do not run the engine when the reservoir is empty. After you drain it, bleed the system.
Flushing Fluid: Methods
[Inquiry] My power steering fluid looks pretty bad. What's the best way to replace it - without disassembling the entire system?
Flushing Using a Turkey Baster. You can use a turkey baster and just replace the fluid several times in the reservoir as it cycles through. Get a quart of new fluid (I use Mobil 1 synthetic ATF.) Start the car and have a friend cycle the steering wheel back and forth. Shut down, suck out the fluid in the reservoir, and do it again. When you've used up the quart, you will have almost completely flushed out the old fluid. Bring the reservoir up to level and you are back in business. If you suspect metal contamination in the old fluid, place a strong magnet on a thin wire into the reservoir and leave it there for a week, removing it to check it and clean it off. Then bleed. This method may still leave some old fluid in the system since it works by successive dilution.
Flushing Via the Return Hose at the Reservoir. [Response: Steve Ringlee/Jerry Andersch] While you can try to remove the top (return) hose and flush all the fluid out that way through a hose into a bucket, the return line is VERY TOUGH to remove because of an aggressive barb at the end of the outlet pipe. Be careful not to be overly aggressive in removing the return line to the plastic P/S reservoir. Lines that have never been removed can be tough to free up. Resorting to yanking, twisting, and swearing can result in a unexpected trip to the wrecking yard to find a replacement reservoir. Easy does it and save yourself some grief.Be prepared to cut about one inch of hose, enough to peel it off the reservoir, so make sure you have a little extra hose you can pull up from the pump. To make life easier next time, file off the sharp edge of the barb to make the hose removable. Frankly, it is better to use one of the flushing methods below (turkey baster or rack fitting).
[Response: Gary DeFrancesco] In my car, the oil was never changed by the PO, and it was black. Be prepared to dump in more than a quart of new ATF while flushing. The flow rate through the pump surprised me, even at idle. I went through 2 quarts of oil as fast as I could dump it in. And I mean DUMP. Have a friend or spouse start the engine and turn the wheel lock to lock. I found it best to do this with the front wheels off the ground. Have your partner start turning the wheel as soon as the engine starts since it will not take too long to go through the ATF. [Tip: Maldin] Because of the high flow rate at idle, merely disconnect the coil wire at the coil and run the starter to move the fluid. Then bleed the system.
Flushing by Removing the Return Hose at the Rack. If the car is on jacks, you can remove the return hose at the rack, place a bucket beneath, and pour new fluid into the reservoir as the pump pushes the old fluid into the bucket. Have a friend turn the steering wheel. Don't lose the small copper washers that seal the hose to the rack. Then bleed. This method is guaranteed to remove all the old fluid. Add a little antiseize to the banjo bolt threads and washer face, insert one copper washer, insert the bolt assembly into the banjo fitting then add the second washer above the fitting. Retorque to 42Nm or 30ft-lbs.
Clean Fluid: Add a Magnet. I keep inside the power steering fluid reservoir a small but VERY STRONG magnet. I lowered it down inside on a wire and because it is strong it attaches to the metal bracket holding the reservoir. After first two weeks I was cleaning it every second or third day and you would be surprised how many metallic particles it was able to take out. For the first week the magnet was all covered and black every time. Now my power steering fluid is so clean, that I can see the bottom of the container with a flash light. Of course I changed the fluid after I take most metallic particles out. Besides there was a bulletin issued by Volvo stating that inside PS container there should be a magnet.
Clean Fluid: Add a Filter. [Editor] Adding a power steering filter can help keep fluid clean and extend the lifetimes of system components. The Magnefine filter in 3/8 inch size works well. Remove the return line (the smaller diameter hose) at the reservoir and free it from the oval clamp below so it is not kinked. Insert and clamp the filter in the hose with the arrow pointing at the reservoir, then add a short section of hose and clamps to connect it with the reservoir. Use a zip tie on the return hose to keep it stable when it is outside the clamp.
Power Steering Fluid Rack Bleeding Procedure.
ZF Rack Bleeding Procedure. [Editor] To bleed the rack of all air after changing the power steering fluid, turn the engine on and then rotate the steering wheel full left and full right several times until air bubbles no longer appear in the reservoir. Make sure the reservoir is properly filled and that you do not run out of fluid while doing this.
Cam Gear Rack Fluid Bleeding Procedure. [TSB courtesy of Alldata] Volvo: Bleeding Cam Gear - Power Steering Racks The Cam gear power steering (p/s) rack has shown an increased sensitivity to the bleeding method used to remove air from the system. Described below is a bleeding procedure that introduces fluid at a sufficiently low rate so that fluid foaming is minimized. Failure to follow this method can result in air retention in the fluid which could result in steering wheel pulsation under certain driving conditions until the air is purged from the system.
Bleeding Procedure:
After installing the steering rack in the vehicle, continue with the following additional steps:
- Connect all fluid and mounting hardware, but do not attach tie rod ends. Top up fluid level in p/s reservoir and maintain throughout the bleeding procedure. Do not start engine at this point.
- With engine off, purge system of air by turning steering wheel full left to full right at relatively low speed until air bubbles do notappear in the reservoir.
- Turn wheel to full lock, for instance full right, and hold in this position until air bubbles stop appearing in the reservoir. Be patient. This can take up to five minutes. Turn wheel to full opposite lock, full left in this case, and let air bubble out as above.
- Remove fuel pump fuse to prevent the engine from starting. Crank engine and turn steering wheel simultaneously full left to full right slowly until bubbles stop appearing in reservoir. Note: Do not crank engine for more than 30 seconds at a time.
- Install fuel pump fuse, start engine and let idle. Turn steering full left to right slowly until air bubbles stop appearing in the reservoir. If the steering continues to pulse or vibrate, continue bleeding by rotating the steering wheel full left to right until vibrations diminish.
- Reconnect tie rod ends and adjust toe-in to specifications. Check for leaks and proper fluid level.
Note: If the system is filled too quickly, the fluid can be prone to retaining air. Once this occurs, it can take one to two days of normal driving before the air is released from the system. In bad cases, you can install a schrader valve, without the valve core, into an old reservoir cap and use a Mityvac to purge air through vacuum.
Power Steering Belt Wear/Noise: Pulley Misaligned.
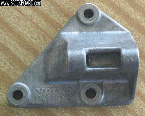
[Editor] If your power steering pump pulley is canted in toward the engine and not aligned with the crank pulley, then the pump bracket (Volvo p/n 1346267-6) is worn and in need of replacement. One usually discovers this when the belt makes noise. This bracket has holes that wear and enlarge over time, allowing the pump to shift position. Buy a new one from the dealer and replace the old one, which will restore correct alignment.
Basic Diagnostics. The only power steering moving parts are the rack and the pump. In general, worn pumps usually provide good assist when cold, but tend to provide less assist as the power steering fluid warms up. In most of these cases, the surface of the cam ring develops a rippled surface that allows fluid pressure to leak past the vanes or rollers. Nonetheless, to properly diagnose a failing pump, you need a power steering pressure tester. In contrast, worn metering valves in steering racks tend to provide sluggish assist when cold and return to normal assist as the assembly warms up and returns to operational tolerances.
[Inquiry:] Problem: power steering pump seems to be failing, 1988 740GLE, 190k miles. Symptoms: Squeeling power steering pump during harder corners at low RPM's (under 1200 RPM) and at start-up for about a minute. Power steering assistance sometimes intermittent during slow cornering when the wheel is more than 30 degrees off-center. Power steering fluid blackened, as if contaminated with heavily used engine oil or carbon soot, but levels have not dropped at all over the past month. Help Needed: Other possible causes, recommended solutions, sources/pricing for the power steering pump (any aftermarket pumps out there? should I go new/rebuilt?), and any special notes on the actual removal/install process. Also considering draining and replacing the fluid to see the effect on the system -- any feedback on this?[Response: Ross Gunn] This may be stating the obvious, but is the belt in good shape (not glazed) and tight? Look at the fluid: black would usually be from seals in the rack (sorry if I spoiled your day). I don't believe there are any o-ring type seals in the pump moving parts. Try stirring a small powerful magnet through the reservoir to see if there are steel particles in the fluid. If none, then the discolouration is probably seal material. If there are steel particles, this is an indication of pump breakdown. Definitely change the fluid before investing time and money on a new pump - empty the reservoir and refill with clean fluid, turn wheels lock to lock with the pump running, shut off engine, repeat about 5 times. This may seem a bit mickey mouse, but is a lot easier than disconnecting the fluid lines at the rack to drain the system [Rob Bareiss] If the rack starts to get stiff when it's cold or is leaking a lot, then you need to replace the rack. The power steering pump can go bad, though its not common. Should be really easy to find a good used one. Make certain fluid is full up to the HOT line and turn the wheel through 10 full lock-to-lock turns to work any air bubbles out. If it still groans[Lazar Weiss] I had similar symptoms: it felt as though the power steering wasn't working well, I felt 'bumps' galore when trying to turn at slow speeds and steering wasn't smooth at all. I was afraid it may be the pump or rack. The best course of action seemed to be to do a thorough power steering bleed/flush and install an in-line filter on the return line from the rack to the reservoir. I purchased a Magnefine very cheap on eBay, installed it, and lo and behold within DAYS my steering was as smooth as I can ever remember. I don't know if your problem is related, but I would certainly first try the inexpensive way and do a good PS oil flush and install the filter. It will get rid of a lot of the gook that collects in the rack over the years, and leave you with clean fluid and a much cleaner rack. If this doesn't solve the problem, I'd give a closer look at your pump and rack.
Failing Harmonic Balancer on Crankshaft. [Tip from Neal Lemerise] My power steering became rather stiff. Checked fluid and it was full. I thought the pump was beginning to fail and we were experiencing a cold snap (subzero).Then a few weeks ago my son couldn't start the car. Check alternator output and it was erratic...sometimes charging well and sometimes not. Replaced the brushes which were worn and it continued to charge erratically. Then one day I had the hood up and noticed that the harmonic balancer seem to be slipping a bit. Long story short - replaced the harmonic balancer and that solved both the power steering problem and the alternator problem. Had I not noticed that slippage I probably would have dumped a bunch of money in parts that were not needed and I would still have the problems.
Stiff Steering. Pump and Rack Issues. As some may remember, I have had a problem with the power steering on my '90 745 GLE (steering heavy, particularly in colder weather). It was of only a little comfort to know that I was not alone. There has been some discussion about what to do with this, (change fluid, add anti-leak additive, etc.) but no clear fix was mentioned other than replacing the rack. In my continuing effort to exhaust all possibilities, before taking a step as drastic as replacing the rack, I disassembled the pump control valve to see if there were any obvious faults. There were none, so I decided to make a little seat of the pants improvement. In order to increase the pressure output of the pump, I stretched the spring of the control valve. Originally 5cm long, it is now 5.5 cm long. The result is more power assist making the steering act more like I believe it should have all along. It will be interesting to see what happens when the weather gets colder. The service manual gives a procedure for checking the pump pressure, but since I did not have the fittings and gauge, I took this trial and error approach:Technical details: my pump is the Saginaw TC type as used on 760/740 diesels 1987-, 4 cyl E and carb 1985-mid 87, 4 cyl F, FT & ET 1985-, 16 valve B204/234 1988- and 780 diesel 1985-. The control valve on this pump is reasonably easy to get at without removing the pump from the car. It is under the pump outlet fitting. If anyone is tempted to try this fix, be careful stretching the spring, because if you over stretch it, you can't compress it back again. Use a graduated procedure whereby you try stretching it a little and check the length, then if not long enough, stretch it a little harder and so on until you get the desired length. It is interesting to note that later versions (don't know what years specifically) of this pump have a higher pressure than earlier and other current variants and produce a greater steering force during parking, etc. (Quoted from Volvo service manual.) The Saginaw TC pump has the remote plastic reservoir mounted on the left inner fender. There are also ZF pumps (carb and E engines without turbo 87-), and Saginaw P pumps with a round (6 cyl B28/280 1982-mid '84 or oval (6 cyl mid '84-, 760/740 diesel '82-86, 4 cyl F, FT, ET, E and carb '82-'84) reservoir. These are the type pumps that are housed inside the reservoir. All have a Control valve, but the reservoir of the P pumps must be removed to gain access to it. The ZF pump control valve may be accessible without removing the pump from the car, but I cannot be sure.If you are having similar problems and feel adventurous, undertake this modification procedure at your own risk. All I can say is that so far the system is working well. Note that I also have a minor balance problem with steering being a little heavier to the right than the left. This is not severe enough to be a problem when driving and as far as I can see, there is no balance adjustment possible on this rack. The service manual simply says to replace or recondition the rack if balance exceeds limits. Without the test gauge, I cannot determine whether mine is within limits or not. I guess the next step should be a wheel alignment to be sure misalignment is not a factor.
Steering Shaft U-Joints. [Fitz. Fitzgerald] The universal joints in the steering column in my 780 were binding, and only when turning to the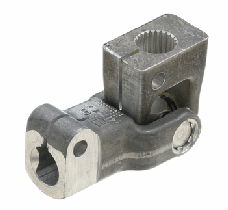 right (which caused my right turns to be significantly harder to make). I soaked the joints in Mobil 1 spray lubricant every day for about 2 weeks and the problem went away. You can buy new universal steering joints for about $65 each through various sources, or raid a parts car in the salvage yard for about $5 each. [Chris Moooney] To help diagnose it, follow the steering shaft from the firewall down to the rack, there'll be 2 u-joints in it, try blasting them one at a time, lower one first, with a decent penetrating lube & see if the binding diminishes. If it does, replace the offending part promptly. Oiling it up isn't an acceptable fix, it'll get just as bad (if not worse). See the FAQ information below. [Bruce Young] Replacement Volvo u-joints are about $130 at discount Volvo dealers and $75 aftermarket.
Strut Mounting Bearings. [Tip: Dave Hearne] I noticed my steering was getting gradually heavier over the past few months so, while I had the car on axle stands I decided to remove the struts to investigate the problem further. Turned out the top bearings were so stiff that I could barely turn them by hand without considerable effort. I removed the top mountings (after comressing the springs) and gained access to the bearings. They came apart very easily, I cleaned them up with some petrol and found the balls and tracks were un-damaged so, after greasing them up, I reassembled everything. I cannot overstress how different the steering feels now! It's like a new car! It leaves me thinking just how hard the rack/power steering pump must have been working before?
Steering Pull. See the FAQ notes under Front Suspension for more details about this.
Components:
Parts Quality. [Editor] Aftermarket pumps can pose problems: my new Scantech had the incorrect high pressure fitting for the Volvo pressure hose, causing it to leak like a sieve. This may be a good opportunity to use only Volvo OEM new or rebuilt parts.
Removing Pump Pulley. [Tip from Bill D.] Use a power steering pulley removal tool. Pounding or trying to use a gear puller will only bend the pulley. I got the $9.99 one from Harbour Freight. Lisle makes one for around $50.00 as well. [Editor] To reinstall, use a bolt and washer to reinstall the pulley, which will be very, very tight. Often cooling the pump shaft and heating the pulley opens the gap enough to get it on. Or take it to a local mechanic and pay to have it installed.
Replacing the Power Steering Pump. [Editor] Raise the front of the car and remove the splash pan. Loosen the pump fixing bolt and unscrew the belt tensioning bolt. Loosen the nut on the three inch fixing bolt at the bottom of the pump, push the pump inwards and pry the belt off the pulley. Place a drain pan beneath the pump. Remove the high pressure hose using a 17mm open end or flare wrench. Remove the low pressure return hose. Remove the bottom fixing bolt, then the pump fixing bolt above and remove the pump. Transfer the mounting brackets from the old pump to the new one using Loctite Red to secure the bolts. Inspect the pump mounting bracket beneath to make sure the holes are not worn, allowing the pump pulley to tilt in the belt line, and replace if needed. On reinstallation, use antiseize on the hose fitting.
Rebuilding Power Steering Pump. There are several pumps used: Saginaw P with integral reservoir; Saginaw TC with remote reservoir; and ZF. Gates makes rebuild kits for each pump for about $30 each online. The kit for the Saginaw TC (also known as GM Type II) is p/n 348390.
Saginaw P. [Tips from Herb Goltz: these relate to Saginaw P with integral teardrop reservoir. I want to share some information about rebuilding Saginaw power steering pumps. My '89 760GLE was leaking fluid all over my driveway at an increasing rate, and would lose significant quantities of fluid on longer trips. This last weekend I finally worked up the courage to tackle it. I called around for replacement parts, and was quoted a staggering $285 + tax (CDN) for a rebuilt pump/reservoir combo-- that didn't include the $75 core charge! Another shop offered just the rebuilt pump for $119. I called Canadian Tire and asked about a pump rebuild kit, and they had one for $16.32! The kit was fairly complete-- 7 o-rings and a new oil seal for the shaft, with reasonably comprehensible instructions. The pump didn't have a bearing, rather just a bushing, which appeared to be in pretty decent shape-- very little axial play of the shaft when reassembled. There is an o-ring that goes on the high pressure fitting that screws into the back of the reservoir, and the high pressure hose connector (a banjo fitting on my 89 760GLE) has two copper crush washers. The rebuild kit I bought came with the o-ring, but not the copper washers. I re-used mine, but no leaks so far, touch wood. After 150K mi, most of the seals were well worn and very brittle. It took me all of an afternoon to dismantle, clean and reassemble the pump. Putting the reservoir back over the pump without displacing o-rings was a bit fiddly, but not too bad. At several points it was very helpful to have a second set of hands. Total cost, including replacing the fluid, the return hose, some hardware bits and all clamps was under $25. It seems to work great so far, and no more spots on the driveway!
Saginaw TC. [Editor] Fairly simple disassembly. Remove the bearing end first, pull out the shaft, and using an 8mm drift tap out the back end. On reassembly, make sure the spacer plate pin engages the rectangular dogs on either side of the middle plate. You will need a press to reinstall the back end.
Steering Rack Fluid Line Failure. [Jim Sousa] Our '90 744 TI sprung a leak where the lines crossed over - I got a new line from Volvo and replaced the line. When I started the car, the other line let go at the same place!!! The lines had rubbed through each other. They were NOT rusty. You may be able to avoid this on your rack by looking to see if it has a crossover/touching point and inserting a small piece of hose at the touch point.
Rack Failure. Diagnosis of Power Steering Failure. [Courtesy Import Car Magazine, Dec 2006, by Gary Goms] Any power steering gear can develop a “lack of assist” complaint. Generally speaking, a worn power steering pump is usually indicated if steering assist deteriorates as the steering oil begins to warm up and lose viscosity. In contrast, some rack and pinion steering gears may develop an intermittent condition called “morning sickness.” This particular lack of steering assist is caused by the metering valve oil seals wearing grooves into the soft aluminum steering gear housing. As the steering gear oil warms up, the valve assembly reseals itself to the housing and restores steering assist.
Causes of Rack Failure. [Tips from Phil Fournier, Motor Service Magazine, Aug 2001] Ray Fitgerald, technical specialist with Cardone Industries (rack rebuilder), noted the following problems found when racks come back under warranty. Ray cites the following common mistakes that cause premature failure: The system wasn't flushed. Crud left over a previous rack failure will do a number on a replacement rack in short order. Flushing any R&P every two years as a maintenance item is not a bad idea, either. Old, rotting hoses weren't replaced. Hoses may look okay on the outside, but debris coming off the inside will circulate in the system even after a flush is done, particularly when hoses are flexed during rack installation. Hoses installed on the wrong rack ports. For reasons unknown, some manufacturers put identically-sized ports on the rack for pressure and return hoses. If the hoses are installed backwards, the rack will slam to one side when the engine is started, often causing immediate rack failure. Twisting the boots when doing a front end alignment and failing to straighten them. This will cause the boot to crack or rip, which will result in rack damage from road slop. Cardone, along with other remanufacturers, recommends the installation of an inline filter whenever a rack is replaced, as long as it has a bypass valve to prevent pump damage should the filter plug up. In my opinion, getting all the crud out and replacing the hoses as needed is a better solution. [Editor] Twisting the rack gear shaft when replacing the inner tie rod ends. Don't allow the rack to rotate.
Repair Options [Erik Esplund]. If your rack is leaking or otherwise failing, you have some options: Continue driving until it fails, which will require a fair amount of oil and also risks your power steering pump if the oil disappears; rebuild rack yourself: not advised; see comments below; install used rack from wreckers, with the attendant work and lack of guaranteed results; or install a rebuilt rack. These usually come with a lifetime guarantee. Given the effort involved and the low cost of a rebuilt rack, the last is preferred.
Should I Rebuild My Own Rack? [Responses] The cost of the parts kit and special tooling required to reface bores, extract bushings and other parts, makes it prohibitive for you to consider rebuilding. Buy a rebuilt unit for $300-350 with a guarantee. [Editor] A good source is Jorgen in Detroit from whom you can buy a rack directly.
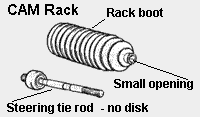
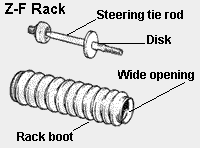
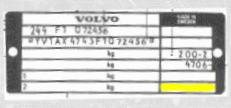
Rack Identification. See the diagrams below to identify your power steering rack as either a CAM, TRW or Z-F. Illustrations copyright RPR, used by permission. More photos exist at VLV World. Later 900 cars can come with CAM, TRW, ZF, or Koyo racks. On the Product Service Plate (see photo below), the last digit in the lower right (shown as yellow highlight) will be 1 (Koyo), 2 (CAM Gear), 3 (ZF), or 4 (TRW). [Steve Sherbundy] 940 cars with VIN ending in chassis numbers 173671 and below have a CAM type rack unit, or Volvo part number 5003682. Those with VIN ending in 173672 and above have a TRW unit, or Volvo part number 5003908. If you have a KOYO rack, the rack will be stamped with the word "KOYO" and you may also see this word on the boot "Koyo". Note that hoses may differ based on the rack you own.
For rebuilt racks, see also Source of Rebuilt Power Steering Racks.
Rack Replacement. Parts Needs. [Editor] New or rebuilt racks are generic and can be sourced almost anywhere: get one with a lifetime warranty. Volvo recommends new rack mounting bolts and nuts (p/n 985347 and 985869, two of each). Buy new steering shaft spring clips since they tend to get lost and may be corroded (p/n 664822, two needed). New copper washers at the two fluid lines are needed, two of each size. Your new rack will come with inner tie rods and boot kits. You may need new fluid lines due to corrosion or rubber deterioration: applications vary and you should check with the dealer for the correct part numbers. As noted below, now is a good time to consider new tie rod ends, ball joints, or control rod bushings. When you remove the old rack, de-rust any metal fluid lines and banjo bolts and treat with POR-15 before reinstalling. Use Loctite on mounting bolts and antiseize on metal fluid fittings. When refilling, make sure you flush the system as noted below and fill with Mobil 1 Synthetic ATF.
Rack Compatibility. [Editor] Make sure your supplier shipped you the correct rack by comparing the new to old. See the section above on rack types. Make sure your tie rods are the correct length too. At least one case of a shorter rack being shipped has been reported. Your outer tie rod ends will need enough threads to engage to do the job securely.
Rack Removal Procedure. [Tips from Jerry Andersch]
To replace your power steering rack:
On a level surface ... set the parking brake ...put the tranny in park (auto) or in gear manual ...jack up the front end high to allow you room for a large breaker bar underneath and support both sides with jack stands ... block the back wheels to assure it wouldn't come off the stands. Remove the front wheels.
Remove the battery ground cable to prevent airbag deployment. Remove the belly pan (black plastic tray under the engine) Remove the cover from the middle of the cross member revealing the bottom of the rack. Pull the spring clips (p/n 664822) from the upper and lower bolts on the steering column U-joint and loosen both upper and lower 13mm bolts (getting access to these bolts is tough and you will have to rotate the steering wheel). Remove the lower bolt. Now turn the steering wheel so that the wheels are pointed straight ahead and don't move it during the rest of the procedure. Slide the U-joint up off the steering rack pinion. [Alternative Method: James Sousa] I did not remove the splined end of the U-joint, I removed the upper end of the lower U-joint which is a slip fit onto a round shaft with flat sides. I took the bolt out all the way, and used an offset screwdriver to spread the slotted universal portion a bit, it came right off. I did the splined end on the bench. I cleaned and sanded the upper end a bit so that it went on pretty easy.
To make the alignment job easier, clean off and spray paint the tie rod/tie rod end assembly BEFORE you remove the tie rods so you can see the correct position for the rod ends on the new rack.
Disconnect the tie rod ends from the steering arms using a puller. Clean all the gunk off the 19mm and 22mm banjo bolts for the two hydraulic lines and remove them, making sure you have a drain pan beneath to catch the fluid leakage. I'd cover the end of the P/S lines with baggies and secure them with twist ties to keep dirt out while replacing the rack. Save the copper washers. There are two large mounting bolts (13mm bolt and 15mm nut) holding the rack into the cross member. Apply PBlaster to the nuts and let it soak in. Remove the nut (it will be stuck and a large 24 inch breaker bar and impact socket on an extension will help) and then push the bolt forward. The rack will drop down and out.
Set your replacement rack next to the old rack, loosen the tie rod fixing nuts slightly but leave them in position to mark the location of the tie rod alignment which you you be able to see with the spray paint. Remove the tie rod ends. Make sure your new rack is positioned exactly the same as the old one (match the ends of the inner tie rods). Lather antiseize on the new inner tie rod ends and install the nuts to the same position as on the old rack. Install the tie rod ends and make sure the tie rods extending from the rack are the same lengths. This will allow the new rack to be set with the wheels pointing straight ahead.
Reinstall the lower U-joint on the rack shaft: it goes only one way, with the fixing bolt determining the orientation. Torque to 16 ft-lbs and install the locking spring clip. Install any new p/s fluid lines if you need to. When you install the new rack make sure your steering wheel remains centered as you reconnect the u-joint from the column. Torque the rack mounting nuts to 35Nm (25ft-lbs) plus 120 degrees. Install the fluid line connections (torque to 42Nm or 30 ft-lbs) ... don't over-torque because the threads in the rack can easily strip out. Just get the connections tight enough not to leak ... new copper crush washers help along with Loctite on the surfaces. Secure the tie rod ends in the control arm (torque the nuts to 60Nm or 44 ft-lbs), and consider new ball joints and radius rod bushings if they need renewal or are getting close to it. Do not tighten the rack boot outer ties until the car is aligned since twisting the boot will cause it to fail: inform the aligner they should do this or plan to do it yourself.
Refill the system using Dexron III or (preferably) synthetic Dexron ATF. Your new rack warranty will be void unless you flush the system. Flush the old, contaminated fluid by disconnecting the return line at the rack, placing a pan beneath, and cranking the engine with the coil wire disconnected while you pour new fluid into the reservoir. This purges the pump and rack of old fluid. Consider installing a filter (Magnefine makes a good product) in the return line near the reservoir. If the steering is not dead straight ahead when you're done then you can either realign the lower steering links or remove the steering wheel and rotate it a spline or two. Steering wheel removal is a bit tricky and requires locking the clockspring to keep it zeroed because if the clockspring is locked while the steering wheel turns, it will break. If the steering wheel is removed without locking the clockspring it will unwind and need to be manually zeroed and locked. Get the front end aligned when you are done.
If you're replacing a rack on an air bag-equipped vehicle, don't rotate the steering wheel while the rack is disconnected. Center the wheel before you disconnect the old rack. The clockspring forms the electrical connection between the air bag module in the steering wheel and the rest of the air bag system. If the steering is not centered when the rack is installed, it's possible to overextend and break the clockspring when the steering is turned all the way to one side or the other. A broken clockspring would prevent the air bag from deploying in an accident, and would also cause the SRS warning light to come on. [Dave Stevens] Tip: Secure the steering wheel in a level reference position using a bungee cord looped around the door frame. That will allow for a little motion while working. The steering goes about two turns in either direction. From the zero position the clockspring can go about 3 turns in either direction without breaking. If the steering rack or steering column U-joints are ever disconnected, the upper steering shaft should never be allowed to turn more than one or two revolutions in either direction to avoid stressing or breaking the clockspring AND on reassembly the clockspring must end up back in the zero position with the front wheels pointed straight ahead. If there's any chance the steering has been previously worked on then the clockspring may not be zeroed and you could unnecessarily strain it even staying within the two turns. If you suspect this then you should take this opportunity to remove the steering wheel and check that the clockspring is properly zeroed. Be careful, clocksprings are expensive.
Reconditioning Copper Washers. [Genaro Lopez] When replacing my rack, I had to use the original washers since the new ones had a sloppy fit. Here is the trick:
Lay a sheet of 320 grit sandpaper flat on your workbench. Rub the washers on it till both sides are nice and shiny. Lay the washers on the flat portion of a bench vice (to use as a heat sink). With a propane torch, heat the washers till they turn rainbow colors. This anneals the copper so it will crush down upon torque and form a good seal. You only need to do the heating on one side of the washer.
After letting the washers cool,finish the job.
Replacing Steel Fluid Lines. [Editor] It is quite frequent to experience rusted fluid lines that leak. These can be replaced independently of the rack itself. [Randy Starkie] I have replaced the small steel lines on one of our 1994 940's. I disconnected the larger lines. I did not remove the rack from the car but I had to detach the rack at its mounting points and let it hang by the tie rods, otherwise there was no room to work. I have bent up a lot of replacement brake lines and transmission cooling lines. The small steel rack lines were not something I was going to attempt. Because of the interlacing of the lines and the space they had to fit I ordered my replacements from Tasca Volvo (around $85). If your car is equipped with an airbag be sure to disconnect the battery and let it sit for a period of time before banging around on the front end so as not to risk setting off the bag. The attachment bolts on my car were corroded and I had to do a lot of PB Blaster soaking, heating and pounding to get it loose. [D.F. Arbuckle] This job is a PIA. It took me several hours. Most of the time was spent trying to get the 2 upper connections off. I ended up using a propane torch to heat up the fittings. I left the rack in place. However, I needed to remove one of the two rack clamps because one of the tubes fits under it.It's not worth the effort to replace only one of the tubes. Do both. These are some complex lines and the OEM parts fit great. [Editor] Just replace the entire rack with a rebuilt unit: the extra $125 or so will be worth the labor and effort saved. I have had particularly good results with Jorgens units direct from the rebuilder.
Swapping Racks with Different Models: Pick-n-Pull Experiences. [Jerry Casey] I changed the rack on my 940T with 255k. The original was a Koyo that worked well but had a loose inner tie rod end. I had an excellent low miles TRW replacement I had gotten at PnP and put in my 740 that was wrecked so I saved it. Research indicated that the only difference, if changing everything out to the outer tie rod ends, was the high pressure hose. I ordered a hose from Rock Auto using the TRW/Cam listing. It was a perfect fit. However, the return hose up to the reservoir was different slightly where it mounts to the rack, the bend was different. Too late to hit PnP for another, my friend came up with a way to bend it just a little so it went in fine. But if doing this yourself I'd say get the hoses also. The high pressure hose is a toughie to get out of the pump. Very hard: my flare nut wrench was opening slightly and starting to round off the corners of the fitting. Taking the pump out made things much easie. A mech's tip was to put a vise grip on the flare wrench so it can't open; tightening it also on the bench worked out well. Getting the angle of the hose right was not too hard. Thread the hose into the hole in the crossmember to the rack, and lift the pump and reinstall. I used one quart of Dexron 6. It took a while to bleed the air off but seems good now. The car now has excellent direction and steering.
Tie Rods. See the FAQ section in Front Suspension for details on replacing inner and outer tie tods.
OEM or Aftermarket? [Editor] Aftermarket power steering hoses are not worth the trouble for their cheaper price: the pressure hoses are invariably too short; lack the curlicue vibration dampers; the return hoses often need bending and manipulation to install; and they are not made to the same quality standards. Buy Volvo OEM for easy installation: slightly more money but vastly less cursing on install. Make sure you buy the hose to fit your rack application above.
Early Models Hose Replacement. [John Flynn] Due to severe corrosion on the banjo fitting connecting my low-pressure return hose to the rack, I needed the entire hose assembly. Volvo no longer supplies this part. Here is a workaround: because it's low pressure line, you can use the low pressure banjo
fitting from a 240 rack and fit a new PS hose to it with a standard
hose clamp. On a 240, this fitting is tucked under the A/C compressor
and somewhat protected from salt spray (unlike on the 940 which is
underneath the rack). I took mine from a buddy's '84 parts car, and it
looked like new. On turbocharged cars, the oil lines to/from the turbo
also use the same size banjo fitting and look like they could be
modified to work as a PS line.
Steering Column U-Joints. See also the notes above. [Symptom:] I have a 89 740t with an annoying steering wheel problem. When I turn the steering wheel more than 1/4 of a turn a single loud click is heard (and felt only very slightly) and then repeated again at random points while completing the turn and then returning it back to center. Lock to lock you can hear it click six to seven times in all. It seems to get louder when the cars not at rest. The rest of the steering feels tight. The sounds are emitting from right behind the steering wheel where the turn signals levers are located.[Another Related Inquiry:] My steering is very stiff at centre and anywhere 90 degrees from centre. If I am at a point at 90 degrees from centre, or at centre, it will loosen up a allow a little play. This makes cornering very jagged. The same thing happened last year, not as bad, but went away as suddenly as it came. It's a soft stiffness, like a tight bearing feel, not a definite notch. I would like to fix this soon before I break something from forcing it [Diagnosis:] You may have a U-joint in the steering column that is seizing due to drying of the lubricant and corrosion. Does the noise occur every 180 degrees when you turn from lock to lock? That is a pretty good indication of a u-joint problem. Try spraying some penetrating oil on the U-joints every day for a week. To isolate which joint is the problem, you could start out by spraying one joint each day for a week and if nothing happens do the other joint the next week. If the situation improves, then apply a heavier lubricant, but something thin enough to soak into the bearing of the u-joint. [Response 2: Brian Oliver] Sounds like one of the U-joints in the steering intermediate (just above the steering rack) shaft is seizing. Give them a good spray of molyslip grease or something (not WD-40!) to see if this frees it up. Then you will know if this was the problem by whether you solved it or not. Unfortunately you will likely have to replace the damaged parts sooner or later, probably more sooner than later, if you are left with a lot of play in the steering. You don't want this worn to the point of breaking.
Replacing the Steering Shaft U-Joints. [Bruce Young/Herb Goltz] Disconnect the battery ground to deactivate the air bag and center the steering wheel. Jack up the front of the car and remove the belly pan. Remove the retaining spring clip (if there is one) from both upper and lower U-joint bolts, remove the nut and tap the
bolt out, then drive a machine screw into the space between the joint halves to spread it out to make it
easier to remove. If you've had to move the steering wheel to gain access to the bolts, return it to the center position. With BOTH u-joints sufficiently loosened — per screw method, plus wire brushing and oiling shaft splines — the shaft is moved (maybe "driven") upward to free the lower joint, then swung aside and moved down to free the upper joint. You may need a hammer or air impact hammer to move the lower joint and shaft upwards.
Then the shaft and both joints are free to do whatever is needed at the bench.
NOTE that each joint fits the shaft in only one position. Pay attention to steering wheel orientation when shaft is separated and removed to aid in reinstalling.
Steering Wheel Delamination. [Editor] If the plastic cover of your steering wheel delaminates from the metal support beneath or develops bubbles, you can re-adhere it using moisture-cure polyurethane liquid adhesive such as Gorilla Glue or similar brands. Buy a veterinary syringe (one used for injecting drugs into farm animals) or get a large human syringe from your local drug lord. If it is a dry day, then first inject a few droplets of water where you plan to put the adhesive to accelerate curing. Put some adhesive into the syringe. Use gloves and a drop cloth since this is sticky and tenacious stuff. Inject this into the delamination, between the foam core and the metal. As it cures, the adhesive expands, so be prepared to wipe some off the wheel cover as it oozes out. Don't inject too much or you will expand the cover. Let this cure overnight and the cover will re-adhere to the metal support. Your syringe will not be reusable.
Steering Wheel Trim. My S90's cherry wood inlaid steering wheel is developing cracks and a small piece of wood has fallen out and disappeared. [Reply] I did a repair on a wood steering wheel a while back and got all
supplies from a hardware store with a good furniture refinishing
section, or a cabinet making shop.
First I would first clean the surfaces with rubbing alcohol.
Second, use a good quality filling epoxy to reaffix the wood where separating. Be sure to smooth the epoxy and remove excess with a finger.
Third use specialty plastic wood to fill the areas that have come off. These usually come in many different colours and tones.
Fourth, when the plastic wood filler has dried, sand it to the shape of the surrounding wood. If the colour is off, consider a wood colour marker, which gently stains the wood to a chosen colour.
Fifth, apply a coat of Duarthane or epoxy based clear coat. Use a very small brush from a model store or hobby shop to avoid too much coating at once. Several coats may be useful and include the entire wood area to provide consistent gloss and finish.
All said and done it will likely cost less than $20 for everything.
Loose Steering Wheel and Column. [Inquiry:] The steering column seems to be very slightly loose on occasions when cranking the wheel. If I shake the wheel vigorously to the left and right, it appears the whole assembly, including the ignition switch, moves independent of the dash board. I expected to find two bolts clamping the column up against the dash structure, but couldn't see anything.
[Response: John Kaiser] Pull lower valance (under steering wheel). Check for loose bolts on support beam(black metal runs right to left. You may want someone to shake wheel while you take a good look. Not usually a 740 problem except on high mileage cars.
Steering Wheel Removal. [Inquiry] How can I remove a steering wheel equiped with an airbag? [Response: Greg/Bob] First remove the negative battery cable and wait several minutes. Now the airbag will be safe to work with. You will need a torx screwdriver, size T30, and a deep 17mm socket. Remove two Torx screws from the back of the steering wheel. If you turn the wheel 90 degrees you will be able to access them. Carefully center the wheel. Now the pad will come off. Carefully pull the pad off, and the disconnect the airbag wire from the pad. Now loosen (but don't remove) the center bolt. Align the front wheels to straight ahead. Now remove the center bolt. You then need to LOCK the airbag contact reel before removing the wheel. You will probably find a yellow warning label attached to the airbag wiring, with the other end attached to a screw on the wheel parked in a hole under and to the left of the bolt. This screw is provided to lock the contact reel.There is a hole in the steering wheel through which the airbag wire comes. Inside this hole is a small round hole in the plastic housing of the contact reel. Keep the wheel centered and insert the screw (still attached to the plastic strip) into this hole. Screw it into the contact reel. This screw prevents the airbag contact reel from unwinding when the wheel is removed. Now pull the steering wheel off without turning it and allow the wiring and plastic strip to pass through the hole in the steering wheel. Reinstall the wheel and torque the center nut to 33 Nm. When reinstalling the airbag, snug both screws and torque the RIGHT side first to 8 Nm (6 ft-lb).