Volvo B234F (16 valve) Timing Belt Replacement
Back to FAQ: Engine Seals,Belts, Crankcase Ventilation
(contributed by Dave Stevens)
Introduction and Cautions
The B234F 4-cyl, 16-valve, DOHC engine was available with certain 740/940/960 models. Although a smooth and powerful engine, you must not trifle with the Volvo gods when it comes to maintenance. Volvo recommends a maximum change interval of 50,000 mi (80,000 km) for both the cam timing belt and the balance belt. For severe operation or an extended time period, this interval should be shortened. The B234F uses an interference design which means the valves will collide with the pistons if the timing belt should ever break when running. This is absolutely one situation where you don't want to wait for something to happen before dealing with it -the resulting engine damage would be very costly to repair. As a further caution, no one acquiring one of these cars without service records should assume the belts were replaced at the proper service intervals -do an initial belt replacement to protect your investment. If you have a B234 16-valve interference engine, you MUST maintain the entire timing end of the engine rigorously. This means new timing and balance belts and a new and properly torqued oil pump bolt every 50k miles, and replacement timing belt covers, new tensioner, and shaft seals on a regular schedule. It also means re-tensioning the new belts after a 500-mile break-in period.
For those experienced with the basic B230 red block engines, replacing the B234F timing belts is about twice as difficult. On the plus side, you don't have to remove the crank pulley to get the timing cover off. The biggest hassle is correctly setting the belt tensions. The Volvo procedure requires an expensive little tensioning gauge (p/n 998 8500). It's available directly from SPF/Kent-Moore to Volvo mechanics with a dealer number. Otherwise, it's only available through your Volvo parts department and, at around U$500, the average DIY'er won't likely be buying one of these for occasional use. In fact, many independent import shops don't have this tool. If you can borrow one of these tools then great, you'll be able to do a better job. If your engine has the newer auto-tensioner (see below) then it isn't overly critical to have the belt tensioning gauge. In any case, if you don't have the tensioning tool then you should be able to make do with one of the methods described below.
If you don't have the magical Volvo tensioning tool and this is one of your first ever attempts at timing belt replacement then you may find it more worthwhile to have a qualified shop do the job. A shop can do the job in a few hours, but you can count on closer to a whole day the first time you do it yourself.
As always, the following assumes a certain level of skill. Specifications provided may only be applicable to certain engines. Errors, inaccuracies and omissions may unwittingly be present. Use solely at your own risk.
Belts
There are two belts to be replaced: the cam timing belt and the balance shaft belt. The cam timing belt is obviously the most critical as you simply can't run without it. In a pinch you can run with the balance shaft belt removed if the revs are kept down to avoid harmonic vibrations (there have even been tales from people permanently running like this, but it really isn't worth the risk). Do note that if the balance shaft belt should break when running, the loose belt will likely get caught up in the cam timing belt causing it to break too. So if either belt breaks, the end result is likely the same: expensive engine repairs to replace damaged valves at the very least.
When it comes to replacement belts, Volvo is probably your most reliable source for quality and fit. Roulunds (Denmark) is a known OEM belt supplier to Volvo. Other aftermarket brands are Beck/Arnley, Clevite, Dayco, Dynagear, Gates and Melling. When it comes to timing belts, price is probably your best guide to quality. An inferior belt that is noisy or fails prematurely isn't worth a $20 or even a $50 saving. If you don't know better, use the suggested list price as a guide to quality, but do shop around for the best buys. Apart from Volvo dealers, sources for these belts are your local parts houses (like specialty import or NAPA and GAPA suppliers) or on-line suppliers like carparts.com and vlvworld.com.
Balance Shaft Belt
The balance shaft belt is a 110-toothed double-sided belt. The Volvo replacement belt is p/n 354745. Aftermarket equivalents are Roulunds 110HP140, Beck/Arnley 026-0281, Dayco 95174, Dynagear TB174, Gates T174 and Melling B0174(verify part numbers when ordering).
Cam Timing Belt
Note that there are two different cam timing belt lengths for the B234F depending on whether the engine has the early manual tensioner or the later automatic tensioner. The timing belt used with the auto-tensioner is longer than the belt used with the manual tensioner. You need to be sure your parts house is aware of this when ordering. Some people incorrectly assume that belts listed for "B234F -manual" and "B234F -auto" refer to the transmission
Belt Tensioners
Timing Belt Tensioner
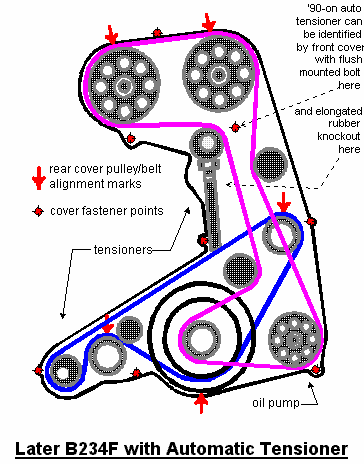
A revised timing belt tensioner was introduced in the early '90 production. The original style was a locked in-place, spring manual tensioner. The revised style is a floating, hydraulic piston automatic tensioner. You can identify which you have by looking at the bolt in the center of the upper timing cover face. If the bolt is in a deep recess then you have the manual tensioner, otherwise you have the automatic tensioner. Additionally there is a rubber knockout in the timing cover above the crank pulley. This knockout is round for the manual tensioner and elongated for the auto-tensioner. The newer auto-tensioner cannot be retrofitted to the older engines.
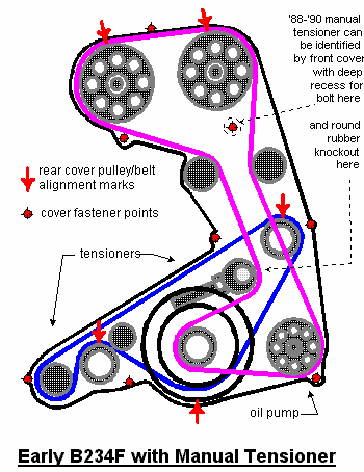
Manual Tensioner (up to early '90 production)
This is a coil spring tensioner, much like that used in the SOHC engines. The spring is used to set the initial tension before locking the tensioner idler pulley in place. One disadvantage is that a new belt needs to be re-tensioned after a break-in period. Another disadvantage is that the spring does a relatively crude job of setting the initial tension. Unfortunately, the earlier B234 block with the manual tensioner isn't upgradable to the automatic tensioner -bolt holes are simply in the wrong place.
The cam timing belt (manual tensioner) is a 164-tooth belt. The Volvo replacement belt is p/n 271720. Aftermarket equivalents are Roulunds 164HP230, Beck/Arnley 026-0285, Dayco 95173, Dynagear TB173, Gates T173 and Melling B0173 (verify part numbers when ordering).
Automatic Tensioner (early '90 production on)
This hydraulic tensioner is a floating idler that puts a constant pressure on the belt. The advantage is you don't have to re-tension a new belt after break-in. The disadvantage is that the hydraulic section can leak allowing the belt to get too slack and eventually break. This is a good reason to accurately check the cam timing belt tension to make sure the tensioner is functioning properly as this is critical for the B234F. The auto tensioners do not last forever and the hydraulic fluid may leak without being noticed. The auto tensioner should always be inspected for leakage as noted in the procedures below.
The cam timing belt (auto-tensioner) is a 167-tooth belt. The Volvo replacement belt is p/n 271714. Aftermarket equivalents are Roulunds 167HP230, Beck/Arnley 026-0293, Dayco 95032 and Gates T198 (verify part numbers when ordering).
There is a Volvo Customer Interest Bulletin (TSB Group 21 #706, June 1990) that fully describes the updated timing belt replacement and adjustment procedures, including diagrams. The AllData CD-ROM contains this TSB or you can try your local friendly Volvo shop.
Balance Shaft Belt Tensioner
The tensioner is simply a toothed idler pulley with a concentric hub for adjustment. A revised balance belt tensioner pulley was introduced some time after 1989. The original style had black plastic teeth on a steel hub and was secured with a large Allen head bolt. The plastic teeth have developed a reputation for disintegrating in climates subject to freezing temperatures (end of pulley, end of belts, end of valves). The newer style i
If you have the old style pulley and drive in sub-freezing temperatures then you should consider upgrading to the newer style. The updated adjuster pulley design is Volvo p/n 3547543 which also requires a longer bolt (p/n 965221). You may notice that the lower front timing cover has a plastic stud that bumps into the new pulley. Simply grind the plastic down so the cover fully seats.
To adjust the early style, loosen the center bolt slightly with an 8 mm Allen key. Place a socket (16 mm or 5/8") over the bolt head to act as a pivot sleeve. Place the short leg of the Allen key through the socket to hold the center bolt. Use another large Allen key with the short leg in the hole next to the socket, which you then rotate to adjust the off-center pulley hub. Tighten the center bolt when you've achieved the desired belt tension.
To adjust the newer style, loosen the center bolt slightly and simply use a 24 mm wrench to turn the square faced portion of the off-center pulley hub while holding the center bolt with a box end or socket wrench. Tighten the center bolt when you've achieved the desired belt tension. See the Balance Shaft Belt Tensioning section below for a diagram of a homemade wrench that can be used to adjust this and is safer to use than a wrench when tension is adjusted with the engine running.
A few notes that apply to both types of balance shaft belt tensioners:
a.Turn the center pulley clockwise to tension the belt. If you go the other way, the belt will be sandwiched against the edge of the rear timing cover.
b.Note the off-center idler pulley to the right of the lower balance shaft pulley. This idler/keeper pulley should be set with the blue dot at the 3 o'clock position then turn it clockwise so that the pulley lightly rides on the belt where it enters the balance shaft pulley and lock it in place. Turning it the other way to support the belt on the long span is incorrect.
c.Note the small, dished, metal plate inserted in the rear cover edge approximately halfway between the two balance shaft pulleys and above the belt. This appears to be a wear plate to protect the cover and to help dampen excessive belt vibration. Make a mental note of where it belongs otherwise you won't have a clue if it drops out.
PROCEDURE
A. To gain access to the timing belts:
1.Loosen the four 10 mm nuts holding the fan to the water pump (try not to round the nuts). Loosen the alternator top locking bolt and back the tensioning adjuster all the way out so you can push in the alt to remove the belt. Now remove the four fan nuts. Unbolt the fan shroud from the radiator (top two screws). Disconnect the flex aluminum pre-heat hose at both ends to permit removal with the shroud (or just snip the tie under the shroud so you don't have to remove the hose). Lift out the shroud and fan (together).
2.Remove the main air intake tube (the flexible black plastic tube between the AMM and the intake manifold). There are two 1" rubber hoses attached to the intake tube. Disconnect the rear one and leave it on the engine. The front one that goes to the idle air control valve (IAC) should be taken off the engine with the intake tube. This will give you clear access to the accessory mounting bolts. You may find it even easier if you also remove the alternator and swing it out of the way for an unobstructed view of what you're doing (disconnect the battery to prevent accidentally shorting the rear alt terminals).
3.Loosen the upper P/S mounting bolt (the long bolt through the cast bracket) and the lower P/S locking nut then back the tensioning adjuster all the way out so you can push in the P/S unit to loosen the drive belts. You will probably need more slack to get the drive belts off; there are two ways. The official way appears to be from under the car, removing the splash pan then removing the lower A/C compressor mounting bolts to allow the compressor to swing inward. The other way is from above, freeing the P/S pump from the main mounting bracket so it can be pushed in closer to the block. If the belts are very tight you might need to do both. To free the P/S pump simply remove the loosened top mounting bolt (long bolt). When you've loosened the belts as much as you can, turn the crank clockwise and "walk" the two drive belts off the pulleys using a large socket wrench on the crankshaft center bolt.
4.Remove the three timing cover sections. See the above diagrams for locations. Good light, a clean engine and possibly a mirror will help you find all the bolts and screws. Try not to drop the screw that's buried on the top right side of the middle cover section -it can easily go down behind the accessory main mounting bracket (gee, why do I know this?). Carefully note the two lowest cover bolts that also secure wire harness clamps. The right (intake side) bolt also secures a metal bracket. If you're working from above it is very easy to miss all this during reassembly. The covers should easily come free once you remove all the bolts and screws. For the middle cover section, you'll need to push the P/S pump back out a bit to get the cover out from behind the crank pulley. Try not to force anything as the mounting tabs and edges of the covers get brittle.
5.While you're here, inspect for any signs of oil leaking from the front engine seals for the camshafts, crankshaft and balance shafts or any accumulation at the bottom of the timing covers. Any sign of oil could mean one or more of the front engine seals need replacing or it could simply mean the PCV system needs cleaning. You don't want oil dripping onto brand new timing belts.
1.Start by locating and highlighting all the rear timing cover alignment marks (raised ridges). See the diagrams for locations. Note that the mark for the crank pulley is below while all other marks are above their pulleys. White correction fluid makes a good temporary marker. Locate and highlight the corresponding notches in the edge of the rearmost belt guide plates for each pulley. Also, note if you can still see the thin line alignment markings across the cam timing belt. If they're no longer visible then, for future reference, you might want to mark your own to correspond with the rear timing cover marks.
2.Rotate the crank clockwise so cyl #1 is at TDC. You can use the marks underneath the crank pulley for this (you may want to use a mirror). You can also temporarily replace the middle section of the front timing cover to use the 0 deg. timing mark and the corresponding timing mark scribed across the crank pulley. Once set, make an easier to see mark on the rear timing cover above the crank pulley aligned with the scribed timing mark.
Now check that all the marks you've highlighted line up. If you happen to find one of the pulley marks won't align with its cover mark when the crank is at TDC then this indicates either that the belt has jumped a tooth at some point (be glad you've caught it now) or the last installer failed to properly align the belt (it's not that hard to do). In either case, you've likely noticed poor performance. If this has happened then be sure to check all the pulleys for bearing wear as a sloppy bearing can allow a belt to jump as can an improperly tensioned belt.
3.Lay the new belts up against the old with the two sets of marks exactly aligned. Follow the new belt around the old belt to make sure all the other markings match otherwise you may have gotten the wrong belt.
4.Remove and inspect the timing belt tensioner
Before removing the tensioners, familiarize yourself with the current belt tensions. Measure belt deflection at the mid-point of the longest span. First, use one finger to see how much force it takes to get a ¼" deflection. Then, use thumb and forefinger to see how much force it takes to make a 90 deg. twist (or as far as you can go). This will help you later. If you have a gauge then use it now to check the current belt tensions. For the hydraulic auto-tensioner, if the timing belt tension is below spec then the auto-tensioner likely needs replacing. Double check the hydraulic tensioner by stretching the belt then turning the crank once or twice and re-checking the tension.
a)For the manual tensioner, start by loosening the tensioner pulley bolt. You need to compress the tensioner spring enough to get a retaining pin (nail) through the holes to hold it closed. Do this either by straining the belt to force the tensioner to retract (difficult) or directly compressing it using something like a c-clamp (simplest). Once the pin is in place, remove the tensioner for cleaning and inspection.
b)For the hydraulic auto-tensioner, remove the upper tensioner mounting bolt then loosen the lower mounting bolt. The tensioner will pivot free of the belt so you can remove the lower bolt. Remove the tensioner for cleaning and inspection. The hydraulic portion of the tensioner needs to be checked for signs of leakage. There is a bench test that can be performed, but apparently it's no longer recommended (when rushed, the test may damage a good tensioner). The approved method is using the magic Volvo tensioning gauge to check tensioner operation by way of the belt. If you don't have the gauge then you should perform the original test; when done slowly and carefully, there should be no problem. Mount the tensioner in a vise (or other large clamp) and depress the plunger by gradually turning the vise handle about 1/16 turn every 5-10 seconds until the locking pin can be inserted in the hole. During this, the plunger should offer some resistance, but should not be seized. Afterward let it sit for a while with the locking pin in place. There should be no evidence of leakage. Release the tensioner carefully.
Once the tensioner has been removed, check the tensioner pulley. Start by cleaning the outside of the pulley bearing using something like WD-40.The pulley should spin freely, without bearing noise and without any slop. These are wear items and need periodic replacement. Now remove the timing belt. Clean, spin and check all remaining idler pulleys for bearing wear. Replace any worn ones.
5.Remove and inspect the cast oil pump gear pulley (lower right -intake side).
To remove the bolt you will need to restrain the pulley. One simple way is to insert the short arm of an "L" shaped tool (like a long legged 3/8" Allen wrench) into one of the lower pulley holes in such a way that the long arm of the wrench rests on top of the crank pulley. Then use a socket wrench to remove the bolt such that the Allen wrench gets jammed between the socket and the crank pulley (be careful not to let it damage the crank pulley).
The oil pump pulley bolts have a reputation for shearing off usually resulting in a broken belt and consequent top end damage. Whether this is due to an over-tensioned belt or to an under-rated or over-torqued bolt is open to debate. In any case, they should be replaced with new bolts at each timing belt change. [Karl-Dieter Haugk] The replacement bolt is Volvo p/n 948472, an extra strong metric 10.9 class M10 x 1.5 mm (standard thread) x 30 mm long bolt including a flat washer (Volvo p/n 960148). This appears to be an upgrade from the original class 8.8 25.4 mm long bolt which should reduce or eliminate the incidence of failure. Use the new, higher grade bolt as this is a critical engine part.
Oil Pump Bolts. [Erwin Yu] When you order the oil pump pulley bolt from your Volvo dealer with the correct (according to FAQ AND dealer part guy)part number 946472, thinking that you will pick up a class 10.9 M10x1.5x30 bolt, you're wrong. What you will get is the same old class 8.8 bolt everyone is warning you not to use. The invoice that come with your bolt will say part number 982817 for only 98 cents.
What options do you have? Luckily, Fastenal ordered me the good quality bolt. While I'm there, I decided to order and replace all the other bolts too (2 cam pulley bolts, two idler bolts, all class 10.9): you can order them from their website. [Dave Stevens] You should be a bit concerned about that bolt. First off, we're talking about the serious M10 bolt that holds the oil pump pulley in a 16-valve engine, not the wimpy little bolts that hold the water pump. The torque spec for the oil pump pulley bolt at 40 ft-lbs (actually 15 ft-lbs plus a further 60 degrees) is basically torque to yield. Over-torqued or re-torqued and a standard grade bolt (class 8.8 metric) would be prone to sheering from metal fatigue. That's why a class 10.9 metric bolt is now called for. Thread locking compound (red Loctite) is also called for as the pulley turns in the direction that would tend to loosen the bolt, but it's hard to imagine that happening if the bolt is anywhere near properly torqued. Although having that oil pump pulley bolt sheer was not a common problem in the first place, it was something to be avoided as expensive top end damage was the result if it ever failed (remember that the B234F is an interference engine). Furthermore, the problem was likely more prevalent in the original 1989 (and possibly early 1990) B234Fs with a manual T-belt tensioner rather than the later B234Fs that used the automatic (hydraulic) tensioner that Erwin has where the belt is not easily over-tensioned.
Remove the oil pump pulley itself and carefully inspect for any signs of damage. You can make a special tool to assist in removing and reinstalling the pulley and bolt. These pulleys have been known to self-destruct, again, probably where the belts have been over-tensioned. In particular, look for signs of stress fractures on the back inside of the casting where the sidewall meets the face. Replace the oil pump pulley at the first sign of a problem.
Re-install the oil pump pulley with the new bolt and washer. Use a little Loc-tite and torque to 15 ft-lbs (20 Nm) then angle tighten a further 60 deg. A one step torque to 40 ft-lbs (55 Nm) should also be adequate, just don't over-torque. You can restrain the pulley using the Allen key method described above.
6.Loosen the balance belt tensioner pulley (lower left -exhaust side). Turn the hub to loosen the belt and remove it. Clean, spin and check all idlers for bearing wear.
C. Belt Installation
If you didn't do it before, layout the new belts against the old belts with the markings aligned to verify that you have the correct belts. If the new belts aren't marked you may want to mark them now to match the old belt. You don't actually need the belt markings, it just makes the job a little easier and a little safer. Note that if the belt marks don't match the original then either the belt needs to be flipped or you may have the wrong belt(or at least one not specifically made for the B234F)
See the diagrams for belt paths and mark locations. Markings and adjustments must be accurate to within a tooth. Site each mark straight on when checking alignment (use a mirror for the lower crank mark if needed).
1.Re-install the timing belt tensioner. For the manual tensioner, keep the tensioner compressed with the locking pin in place and loosely tighten the tensioner pulley bolt. For the auto-tensioner, install it normally extended, tilted to the left with just the lower mounting bolt in place and loosely tightened.
2.Install the balance belt. Have the tensioner pulley turned in as far as possible and the idler/keeper pulley turned counter-clockwise away from the balance shaft pulley (blue dot at about 2 o'clock). Line up the marks on the new belt with the marks on the pulleys, which should still line up with the marks on the rear timing cover. Orient the belt then place it over the right balance shaft pulley with the corresponding mark aligned, then go under the crank pulley, then over the left balance shaft pulley as you slide the end loop over the tensioner pulley. Turn the tensioner pulley hub clockwise to snug up the belt and lightly tighten the center bolt. Check that all associated marks line up. Turn the idler/keeper pulley clockwise so that it is just lightly pressing on the belt and tighten to spec.
3.Install the cam timing belt, lining up all the marks. It may take a few tries to slip this on in the right order. Start with the belt around the oil pump pulley then wrap the belt over the crank so that the double mark on the belt lines up with the TDC mark on the pulley. Partially unwrap the belt off the crank pulley, loop it up and slip it over the cam shaft pulleys keeping the belt between the idler pulleys. Manually tension the belt inward on the left side and check that all associated marks line up.
4.Position the timing belt tensioner.
a)For the manual tensioner, retract the tensioner pulley slightly so that you can remove the locking pin. Gradually release the tensioner pulley onto the belt being careful not to lose belt position. Rock the crankshaft back and forth a bit to ensure the belts are seated. Lightly tighten the idler pulley bolt to spec.
b)For the auto-tensioner, install the lower mounting bolt (loosely), pry the tensioner into position and install the top mounting bolt. Torque the tensioner mounting bolts to spec.
5.Rotate the crank clockwise through two revolutions back to TDC (re-align the crank pulley mark with the rear cover mark you made earlier). Do a final check of the pulley marks against the rear cover marks. NB. The belt marks will no longer align once the belt has been turned, leastwise not for many thousands of revolutions.
6.Make an initial tension adjustment for the timing belt (manual tensioner only) and the balance shaft belt. Be sure to finish by turning the crankshaft through two revolutions and re-checking belt tension. Procedures for belt tensioning and checking are detailed below.
7.Tighten bolts to specifications:
- Balance belt idler/keeper pulley (3rd from left) 9 ft-lbs(12 Nm)
- Balance belt tensioner pulley 30 ft-lbs(40 Nm)
- Timing belt manual tensioner pulley 37 ft-lbs(50 Nm).
- Timing belt auto-tensioner lower mounting bolt 37 ft-lbs(50 Nm)
- Timing belt auto-tensioner upper mounting bolt 18 ft-lbs(25 Nm)
- Timing belt idler pulleys 18 ft-lbs(25 Nm)
- Balance shaft pulleys 37 ft-lbs(50 Nm)
- Crankshaft pulley 44 ft-lbs(60 Nm)plus 60 deg
- Oil pump drive pulley 15 ft-lbs(20 Nm)plus 60 deg
8.Run the engine to normal operating temperature. This will be difficult to do unless you re-install air intake hoses and alternator. You don't need to install the fan, just the alternator pulley on the water pump (use spacers on the threads if needed). During warm-up, if the belts start to wander on the idlers or if there is excessive belt vibration or noise then stop what you're doing. If the problem can't be corrected then re-install the original belts -the new belt may be defective. Note that a certain amount of belt flutter and even a slight whine should be present on a properly tensioned belt.
9.Do a final belt tension check. In particular, this is the time to dynamically tension the balance belt.
10.Replace the timing covers and main drive belts. The main drive belts should be set fairly taught. The alternator belt more loosely, but not to the point of being able to slip when turned by hand. Replace fan, shroud and alternator drive belt, etc. Say a little prayer and you're done.
D) Re-Tensioning
With the later style auto-tensioner, re-tensioning of the cam timing belt should not be required. However, re-tensioning of the balance belt should be performed after a few thousand miles (the service guide indicates 5,000 mi / 8,000 km). This only requires removal of the lower timing cover. The lower bolt is much easier to get at from under the car.
With the early style manual tensioner, both belts should be re-tensioned after a few thousand miles (the service guide indicates 5,000 mi / 8,000 km). This actually only requires removal of the upper and lower timing covers if you remove the round rubber knockout to access the tensioner bolt. However, if the drive belts are blocking the access hole then everything will probably need to come off again.
Belt Tension Checking Methods
Belt tension can be checked using one of the following methods: (crude/better/best):
Method A: For both the timing and balance belts, press down quite firmly using one finger at the mid-point of the longest belt span between pulleys. A properly tensioned belt will have a deflection of about ¼". The deflection for the balance belt should be greater than for the timing belt. This is a fairly crude method and should only be used for initial settings and rough checking.
Method B: For both the timing and balance belt, using your thumb and forefinger, twist the mid-point of the longest belt span as far as you can. You should just be able to twist a properly tensioned timing belt by about 90 degrees. It should not be as difficult to twist the balance belt to 90 degrees (and with effort, no more than about 135 degrees). For the timing belt, this method is about as good as you're going to get without a gauge. For the balance belt, you can do better by performing a dynamic belt tensioning as noted below.
Method C: Use a general-purpose belt tensioning gauge. Tension is normally measured in Newtons (or lbs-force) at the approximate mid-point of a reasonably long belt span. One Newton is one kg-force. Unfortunately, the only published tension specifications are for the Volvo special tool (see below). No units are mentioned and observed comparisons seem to indicate it's not linearly related to Newtons.
Based on observation, it would appear that the timing belt should be somewhere around 14 N (30 lbs-force) with the manual tensioner and closer to 18 N (40 lbs-force) with the auto-tensioner. The balance belt should be somewhere around 23 N (50 lbs-force). Please do not use these numbers for adjustment, they're mentioned here only to promote further investigation.
As for non-Volvo belt tensioning gauges, the "Krikit I" made by HMC International in Colorado is a nifty little tool. You should be able to get it for under U$20, either direct from HMC (www.hmc-international.com) or from your local parts house as Dayco p/n 93865 (an in-stock item at Lordco Canada). It would be quite useful for doing the timing belt if you managed to have the tension specification. It would not be appropriate for doing the balance belt as the range doesn't quite go low enough and the tool isn't designed to sit on the toothed side of a belt.
Method D: Using the sacred Volvo belt tensioning gauge (p/n 998 8500), the timing belt tension should be 5.3-5.7 (Volvo units) for the manual tensioner and 3.0-4.6 for the auto-tensioner. The balance belt tension should be 4.7-5.1 units. When installing a new belt, set the tension to the high end of these ranges to allow for subsequent belt wear-in during the first few thousand miles. When re-tensioning a used belt on a fully warmed engine, aim for a mid-range setting. This is an expensive tool for casual use -approx U$500 from Volvo, slightly less from the SPD Kent-Moore distributor, but only for those with a Volvo dealer number. For the timing belt, the tool is positioned on the short span leading from the bottom of the left cam pulley. For the balance belt, the tool is positioned at the mid-point of the long upper span.
Belt Tension Adjustment Methods
Cam Timing Belt
For timing belts with the hydraulic auto-tensioner there is no adjustment. Check the tension as above. If the proper tension cannot be achieved then the tensioner will need replacement. This is no place to cut corners; if the tensioner isn't replaced when needed then expensive engine repairs may be the result.
For timing belts with the manual tensioner, loosen the tensioner pulley bolt slightly. Adjust the tension by pulling out on the pulley or by prying the idler section of the tensioner using a large screwdriver. Re-tighten the bolt. Turn the crank two revolutions to TDC to seat the belt and check the tension as above. Repeat as necessary.
Balance Shaft Belt
For the balance belt tensioner pulley, turn the concentric pulley hub clockwise to increase tension and snug the center bolt slightly to hold it. See the Balance Shaft Belt Tensioner section above for more details on how to do this for the two types of tensioners.
Make an initial setting for the balance belt tension (as below). Start and fully warm the engine.
A. Static Method (With Engine Off)
Back off the tensioner pulley bolt until the pulley can just be turned with the adjusting wrench. Alter the tension using the adjusting wrench, re-tighten the bolt and check the tension. If the tension  seems correct then turn the crank two revolutions to seat the belt and re-check the tension. This is the approved method when using the special Volvo tensioning tool.
B. Dynamic Method (With Engine Running)
This method is only appropriate for longer belts with chisel-shaped teeth such as the balance belt. This is best done dynamically (adjusted with the engine running), but can be done statically (engine off, adjust, restart and test) with a fair bit of trial and error. Take great care when working around moving engine parts.
To make a dynamic adjustment you only need to re-install enough to run the engine, i.e. the air intake hose and the alternator. For safety's sake, don't install the fan, just the alternator pulley on the water pump (use spacers on the threads if needed). Back off the tensioner pulley bolt until the pulley can just be turned with the adjusting wrench. Adjust the initial tension manually, as best you can, if anything a little on the loose side. Now start the engine and adjust the balance belt tension to the point where the belt makes a definite whirring sound (the belt will be fluttering). That's the sound of the belt teeth starting to climb up the pulley teeth. For a new belt, that should be close to the proper setting -the whirring will go away as the belt wears-in. Stop the engine and manually check belt tension. If it seems wrong (too taught) then you've gone past the magic point. When re-tensioning a used belt, back off the tension until the whirring almost away. For the balance belt, this method is about as accurate as you can get without a gauge.
For a dynamic adjustment, it is important to use a wrench that will not catch in the belt or pulley during adjustment. A wrench with a thick head or one that has to be used at an angle is not appropriate. A good solution is to fashion a wrench out of an L shaped piece of flatbar with a channel cut in one end (the short leg) for the adjuster nut(see diagram). Hold this wrench parallel to the pulley face and underhanded (so as to release from your hand if accidentally caught).
Balance Shaft Belt Makes Noise After Adjustment.
[Inquiry] I replaced the belts about 400 miles ago and there's still a noticable whine from the balance belt. If I loosen the belt, the whine quiets down, but the belt seems loose. [Response: Mike] The balance belt is too tight. Adjust while running at warm idle at the bottom tensioner. Adjust in very small increments until belt starts to flop. Then tighten slightly until flopping decreases. I had the same problem. Remember this belt does not drive a heavy load so lots of tension is not necessary. Too tight a balance belt will damage shaft bearings or produce bearing noise. [Tips from Greg Mustang] The balancer belt should be looser than what you and I are used to on belt drives. Almost floppy. Too tight or too loose and it will be noisy. I just adjusted mine CAREFULLY with a thin spanner with the engine running to get the minimum noise. I was careful to keep my eyes and hands out of the line of fire. Make sure you lightly grip the spanner in such a way that if it should catch on the rotating pulley, it will rotate away from your hand and not pull your hand into the fray. It really should be adjusted with a tensioner. Or you could make minor adjustments with the engine off and check for noise with the engine running. Just be safe!