The thumbnail images below link to larger images to save download time: click the image to open the link.
Tool Sources. See the following links for a variety of special-purpose tools for Volvo cars:
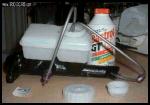
Homemade Cooling System Pressure Tester. Here's what I've rigged up for both pressure testing the cooling system and bleeding the clutch and brakes: I found an old bottle cap that has the same threads as the coolant reservoir. Then I bought $1.00 worth of tank valves and screwed one into it. If you don't have such a cap, then an old coolant reservoir cap should work even better. When I need to use it, I take the gasket out of the coolant reservoir cap and use it in my pressure cap. I connect a $5.00 bicycle pump (with built in pressure gauge) to the cap and presto. Since the brake reservoir has the same type orifice, it can also be used to pressure bleed the clutch and brakes.
Homemade Exhaust Gas Leak Detector. If you suspect a head gasket leak resulting in combustion gases entering your coolant, you  can test for this using special test fluid which turns from blue to yellow in the presence of exhaust gases. Mityvac has a fluid transfer bottle in their vacuum pump kits (pictured) or you can make one using a small jar and a lid with hoses through it. Fill the bottle part way with Lisle testing fluid 75630 for gasoline engines. Place one vacuum tube on your Mityvac or on a source of engine vacuum to pull gases through the bottle. Place a short tube on the other side of the bottle cap to extend down into the fluid to force the gases to draw through the fluid. Seal the coolant reservoir top with an old reservoir cap through which you have glued the sampling hose. Run the engine and draw vacuum: gases will rise from the coolant in the reservoir, exit via your hose through the reservoir cap, enter your test chamber by bubbling through the fluid, and if it turns yellow you have an exhaust leak into the coolant.

Homemade Heater Core Cleaner. [Eric Mollerstuen, courtesy of IPD] If you fail to change antifreeze, your heater core can clog with deposits. For clogged heater cores, you can fabricate a PVC pipe, one end of which contains a "Drain King" pulsating drain declogger and the other end fits into the heater hose. Buy the parts (Drain King, 2 inch PVC pipe about a foot long, a 5/8 inch short pipe, a joining fitting and a tube of adhesive) at a local hardware store. Glue the parts together so that the open 2 inch pipe terminates in the 5/8 inch pipe. Insert the small pipe in the heater inlet hose, place the Drain King in the open end of the pipe, and turn on the water. If your core is badly clogged, it will take a few seconds for the pulsations to blast away the deposits. For Eric, this worked fine and eliminated the need to replace the core. [Editor's Caution] If your core is corroded, this may be enough to cause it to fail and leak. View it as a last resort only.
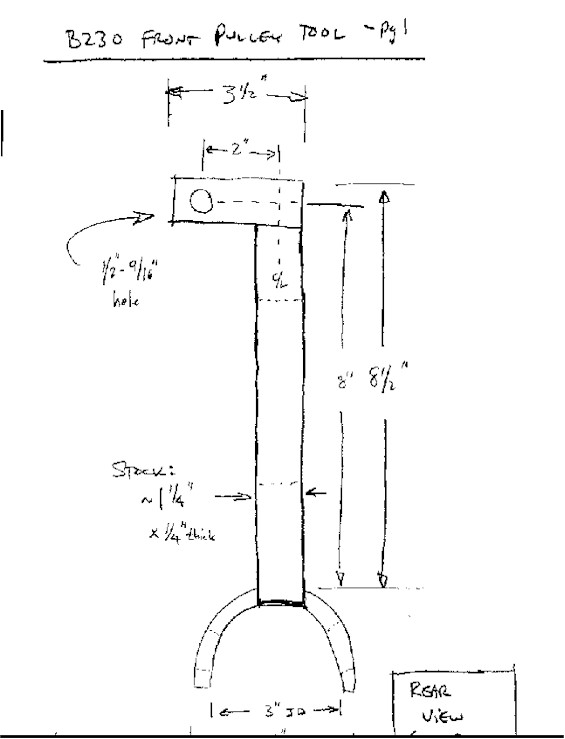
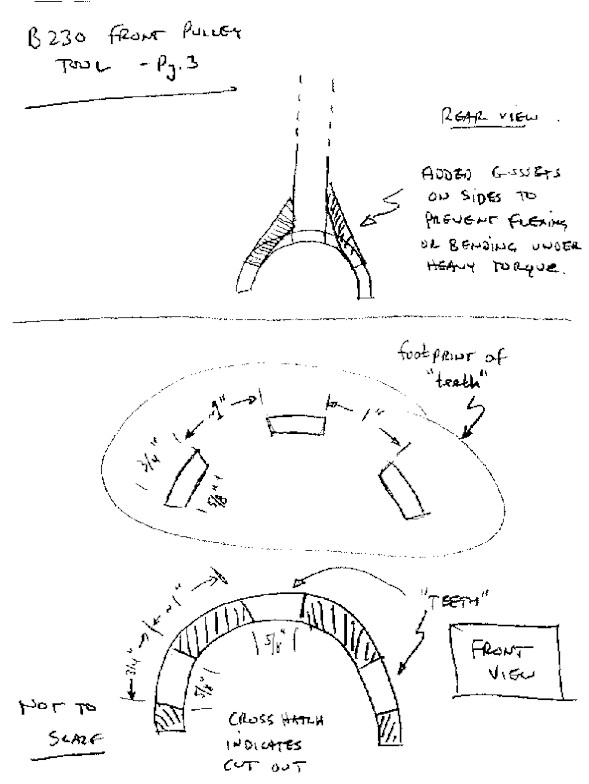
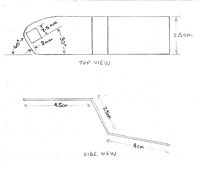
B230F Crank Holder Tool-Method 1.
[Don Foster] Here is the design for the tool used to secure the crank pulley to remove the bolt while changing the timing belt. [Editor's Note: You can purchase this tool number 5284 from Volvo dealers and from IPD for about US$39; see the FAQ section on Timing Belt Tips]
Rear View:
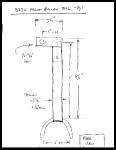
Detail of Rear and Front Views:
Side View:

B230F Crank Holder Tool-Method 2. [Dana Manner] Here is another device used to immobilize the crankshaft by holding the flywheel gear in place.
Manufacture. Make a simple tool from 1/8" thick, 1" wide flat iron bar stock (available at any hardware store or Home Depot in about 4' lengths). Heat the bar stock with a propane torch (or MAPP gas, in the yellow tanks, which burns hotter) until glowing red at a point about one inch from the end of the length of bar stock. Place it in a bench vise and bend it over slightly beyond 90 degrees, so that it forms a shape that is more than an L and less than a J shape (see photo). Now, cut the bent portion you just formed in the end of the original long piece of stock with a hacksaw, so that it has a lower leg approximately that is 1" in length and an upper leg approximately 1.5" in length (see photo). Grind or file the edges and corners smooth with a slight bevel.
Use. To use this tool, remove the two bolts that attach the starter to the engine, and withdraw the starter, exposing the flywheel gear teeth. Insert the tool into the round opening of the starter hole, and engage the lower leg of the tool in between two teeth of the flywheel gear, with the bend in the tool resting on the inside of the starter hole against the engine block, and the upper leg of the tool pressing against the flywheel. Once engaged in the teeth of the gear, rotate the crank slightly to wedge the tool in its position. Now  both hands are free to use to loosen/tighten the crankshaft pulley and harmonic balancer bolt (a huge benefit)! When loosening the crankshaft pulley and harmonic balancer bolt you will install the tool against the top of the starter hole in the engine block, and the tool will jam the flywheel rock-solid from rotating counterclockwise. Install it against the bottom of the starter hole (opposite direction), to prevent the flywheel from rotating in a clockwise direction, for retightening the same bolt. This tool and method works better for me than the various other belt/pulley holding/jamming techniques, and the tool is easily fabricated from inexpensive, widely available materials, by anyone with a propane torch, bench vise, hacksaw and file.
B6304 Cam Cover Compressor. [Tips from Nathan Gundy] A good (and cheap!) solution to the volvo cam squeeze tools on B6304 engines is to use two 2 inch wide by 1 inch thick by 1 foot long(or so) pieces of hardwood to go across the cam cover. Hold these pieces with 4 four-inch C clamps, rooted just under the cam cover on the head. As you tighten the clamps down evenly, the cover will squeeze down the cams so you can safely put in all 48 cam cover bolts. Be sure to use hardwood; a lighter wood would probably crack, as it requires pretty strong pressure. Here's a picture:
B234 Oil Pump Pulley Holder. [Luke Brecheisen] I made my own tool to remove the oil pump pulley on my B234 engine. I used two 7/16-14 bolts that
are 1 1/2" apart. If you skip a hole on the pulley its 1 1/2" apart. I used a piece of aluminum and drilled and tapped the holes for this but just make it wide enough to intall these bolts. In between the bolts you will have to make a half moon or arch to make room or the socket to get onto the bolt. You can drill hole there then file the rest to shape. Aluminum is nice to work with. I used bolts with a 1/4" shank on them under the bolt head. I cut the bolt head off then used the smooth end to put into the holes on the oil pump pulley. You can use the threaded end but put some tape on it so it doesn't scar the pulley. You will then need a handle of about 12" or longer.
B234 engine. I used two 7/16-14 bolts that
are 1 1/2" apart. If you skip a hole on the pulley its 1 1/2" apart. I used a piece of aluminum and drilled and tapped the holes for this but just make it wide enough to intall these bolts. In between the bolts you will have to make a half moon or arch to make room or the socket to get onto the bolt. You can drill hole there then file the rest to shape. Aluminum is nice to work with. I used bolts with a 1/4" shank on them under the bolt head. I cut the bolt head off then used the smooth end to put into the holes on the oil pump pulley. You can use the threaded end but put some tape on it so it doesn't scar the pulley. You will then need a handle of about 12" or longer.
Valve Spring Compressor. [Tip from Warren Erickson] I don't want to pay Volvo prices for tools, so I made a  valve spring compressor out of a large C-clamp and a brass 1/2" to 3/8" reducing coupling. The C-clamp has a six inch opening and is four inches deep. Cut two good size slots 180 degrees apart, on the 1/2" side of the coupling.
  That's where your valve keepers can be removed. Grind off all burrs and wrap black electric tape around the two legs so it doesn't score the aluminum bores if it shifts to one side. Lay the cylinder head on its side with the coupling windows facing up and down. After compressing, the keepers will fall out with a little help from a small screwdriver. Or you can use a magnet. To reassemble, compress the spring then turn the head flat on wooden blocks. Drop the keepers through the windows. They'll fall right into place. I'm sure there are better ways, but this arrangement worked for both my B230FT and my D24T.
Strut Top Nut Removal Tool. [Jay Simkin] The Volvo OEM strut nut removal tool consists of two special sockets. One socket that goes over the strut nut. On the side of this socket is welded a 1/2" square drive opening. The top of the socket has a round hole, through which passes a special smaller socket that grips the strut rod's flats. The socket is needed because the strut nut sits in a "well" formed by the rubber strut mount top. The smaller socket is needed because to remove the nut, you have to keep the strut rod from rotating. One uses a long breaker bar to turn the strut nut tool and the strut nut, while the strut rod is gripped by the smaller socket and held in place.
If you have a bench grinder, a bench vise, and a power drill, you can make a socket that will let you turn the strut nut, while you hold the strut rod steady, using two open-end wrenches.
The strut nut is 24mm across. Take a socket of that size and shorten it, so that the flats at the top of the strut rod stick through the drive hole in the socket. If necessary, drill out the hole in the top of the socket. Then, grind flats on either side of the top of this socket such that an open-end wrench will fit snugly.
To remove the strut nut, put the socket over the strut nut. Use one open-end wrench to grip the socket (on the flats). Use another smaller open-end wrench to grip the strut rod on its flats. Keep the strut rod's wrench stationary, perhaps by wedging it, and turn the open-end wrench that grips the socket to remove the nut.
Vacuum Leak Checker. [Tip from Paul Kane] A good vacuum leak check device is a butane charcoal lighter. Don't light it, just use it for 'sniffing' around the suspected leak. Apply the butane to the potential leak- if RPMs change - you've found the leak.
Fuel Pressure Test Tool.
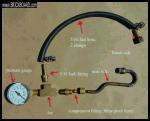
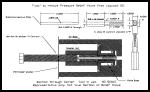
In-Line Pressure Tester Adapters. At last check, Volvo wanted $600 for the pressure rig to test fuel pressures. Here are plans for three designs for much less. Parts needed:
1. Using Banjo Fittings:
- 2 Banjo 'nut' fittings (the ones that actually look like a banjo). Hack apart old fuel lines from an Audi, VW, or BMW from the wreckers to get the ones with the small nipples. Make sure they're the same diameter as your Volvo (see the tip below for Volvo parts needed.)
- 1 Brass Tee , 3/8" NPT =18 tpi
- 1 Brass Valve, 3/8" NP
- 1 150 psi gauge
- 2 2.5" 3/8" NPT brass extender (pipe w/ both ends threaded)
- 2 3/8" NPT brass nipples
- 2" vacuum hose
- 4 small tie wraps (zip ties)
- 1 nylon spacer, 2" long, that will accept the 'bored' banjo bolts
some telfon tape for sealing
Now, hook them up in this order:
Banjo Nut - 1" vacuum hose - nipple - extender -tee -valve -extender-nipple-1" vacuum hose - Banjo Nut
Use the tie wraps to clamp the vacuum hose onto the banjo nuts and the nipples. Vacuum host isn't ideal for this, but the tests are short term and a short piece of the hose holds the pressure just fine. The gauge goes on the top of the tee. Be sure to use teflon tape to seal all connections.
One of the banjo bolts goes where your control pressure feed line connects to the fuel distributor. The other one gets bolted into one end of the nylon spacer. The other end of the spacer has the control pressure feed line bolted to it.
Now, follow your Bentley or Haynes directions to test... when placing the tester into the fuel circuit, be sure to orient the valve on the correct 'side' or else you'll only be able to measure system pressure.
2. Using 3/8 NPT Plumbing Fittings:
The Volvo fuel line threads (14mm by 1.5mm pitch) are very close to the National Pipe Thread 3/8 by 18 tpi. Go to a good plumbing supply store with a rack of brass NPT fittings and buy:
- Male 3/8 NPT with barb fitting on the end
- Female 3/8 NPT with barb fitting on the end
- "T" insert
- Hose to fit and six worm clamps to fit the hose.
- Male 1/8 NPT with barb fitting on the end
Assemble so that the male and female 3/8 fittings go into the fuel line fittings (use teflon tape to fill any thread gaps and don't strip any threads) with the T in between, connected by hose and secured by hose clamps. Add the extender hose to the side of the T, terminating in the male 1/8 into which your fuel pressure tester fits. If you want to be clever, you can use a terminating schraeder valve at the end too.
3. Using the Volvo Tester Fitting:
Special Volvo Fittings to Make Connection. [Tip from Neal] Here are the Volvo part numbers for two hard to get parts needed to build a fuel pressure gauge assembly:
9995265-23 Nipple $40.00
9995116-2 Hose $ 9.30
The nipple is the fitting that connects between the rubber fuel line and the fuel rail. The threads on this nipple are 14mm by 1.5mm pitch, almost identical to 3/8 NPT by 18 tpi. The hose includes the banjo fitting that attaches inline with the nipple. The other end of the hose is an unusual fitting that I imagine could connect only to a Volvo fuel pressure gauge. I cut that fitting off, and installed a 1/8" male pipe thread with barbed fitting pressed onto the hose. The 1/8" male pipe screws into almost any fuel pressure gauge found at any auto store. Make sure you get a gauge that goes to at least 100psi.
Adapter Using an Old Fuel Rail. [Randy Starkie] If you have an old LH fuel rail handy, you can build a pressure tester using connectors and other parts from the rail per the thumbnail picture shown at the right:
4. Buying an Adapter. [Editor] You can buy the adapter: S & G Tool Aid 58012 14mm Volvo Lh-jetronic Adapter. Around $40 on EBay.
Fuel Pump Starting Device. Instead of removing your fuel pressure relay and jumping terminals 30 and 87/2 with a large wire (which if installed incorrectly will fry your ECU), build your own pump activator. Using the base of a non-functioning fuel injection relay from which you have removed the electricals, solder a large wire between the tops of those same terminals, making absolutely certain you've picked the right ones as they are labelled on the bottom. When inserted in place of your relay, this will activate the fuel pumps without turning on the engine. Remove it to stop the pumps.
Large Gauge Wire Crimper.
[Tip from Tom Harper] Ever needed to get a solidly crimped electrical terminal on larger cables (8 - 4 gauge), but found the cost of crimp tools in that size to cause sticker shock? Here's something I've been doing - it works for UNinsulated terminals.
- Measure the OD of the uninsulated terminal barrel you need to crimp
- Find (or buy - a dime or so) a nut with a thread size (thread OD - not ID) equal to or slightly smaller than the size in step 1
- Drill out the nut to match the terminal O
- Cut the nut in half, across opposing corners (NOT across the flats). Your Dremel tool will come in handy for this - a hacksaw will do it also, just takes more time.
- Find a piece of round stock about 1/8" - 3/16" (3-4 mm) diameter, about 3/8" (1 cm) long (you can cut the head off a screw for this - the threads won't affect anything.) You now have a saddle and a punch (halved nut & screw/round stock piece).
- Put the terminal in the saddle, and the punch lying lengthwise on top of the terminal, opposite the saddle - you'll probably want to tape the assembly together, otherwise it takes 3 or 4 hands.
- Put the cable end into the terminal, and crimp the whole works together using a bench vise, Vise-Grips, or equivalent. The saddle supports the bottom of the terminal, while the punch crimps everything nice & tight.
I've gotten really tight & secure crimps on up to 4 gauge cable by hand with this method. After a dozen or so uses, the nut may crack & start to spread; no problem, since you have the other half, and making new saddles is easy & cheap anyway.
Make sure your terminal barrel ID is close to the wire OD - this method doesn't do too well if there's a lot of empty space between the wire and the terminal. You may be a bit clumsy at first, but once you work out a way to keep everything aligned as you start the crimp, it'll go really well. The new Vice-Grip adjustable wrench is ideal for this - the V-shaped jaw is ideal for supporting the saddle
Volvo content - used this trick yesterday when making some overkill (4 gauge) engine-to-body ground and alternator-to-starter terminal cables.
M-46 Overdrive Tools. The following are useful tools for manual transmission overdrive maintenance and rebuild tasks.
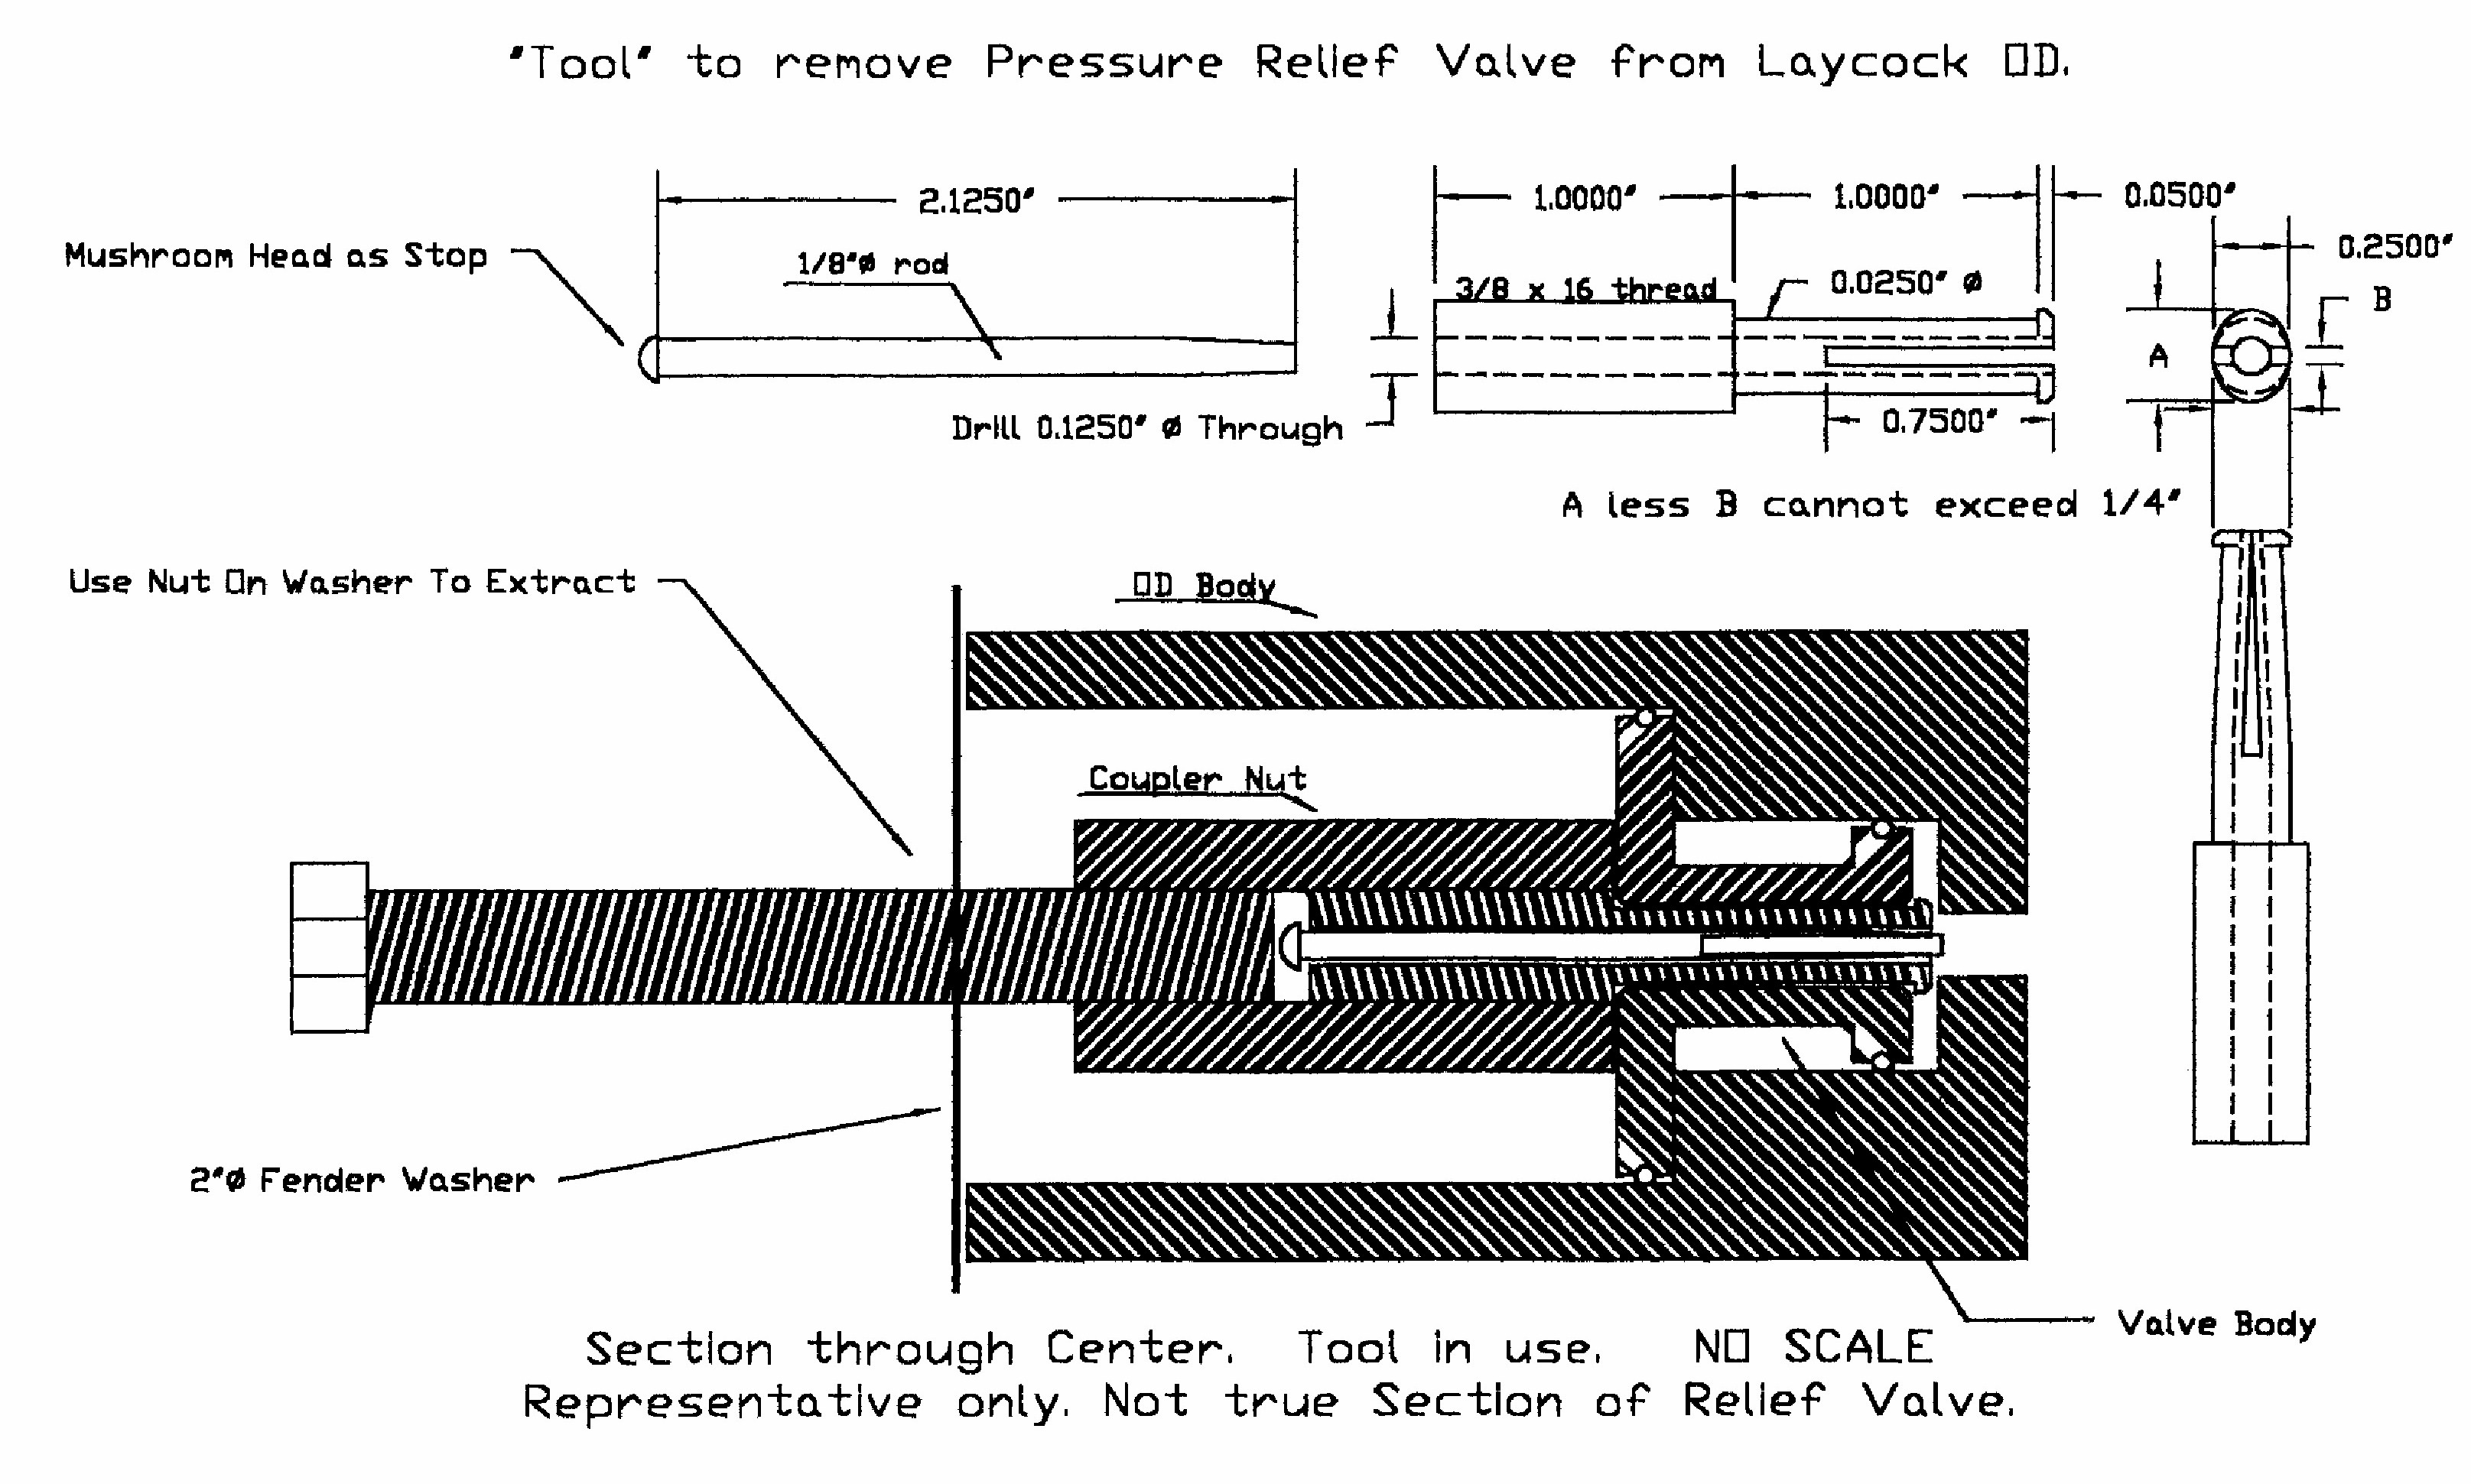
1. Pressure Relief Valve Tool. [Duane Hoberg] Here is a tool I designed for removing the Pressure Relief Valve ( between numbers 22 and 23 on the diagram of the overdrive overhaul procedures.
2. Top Nut Removal Wrench. [Randy Starkie] A cutoff 11mm box-end wrench/spanner is able to fit in the limited space to remove the top two nuts on the Laycock overdrive unit. See the photo to the right.
3. Pan Caps Removal Pin Spanner. [Randy Starkie] To the right is a pin spanner used to remove the caps under the pan on the Laycock unit. The 3/16" bolts are through a square tube positioned on 5/8" centers with the end of the bolts ground to a radius. This tool eliminates the common practice of using a punch/drift and a hammer to turn the caps.
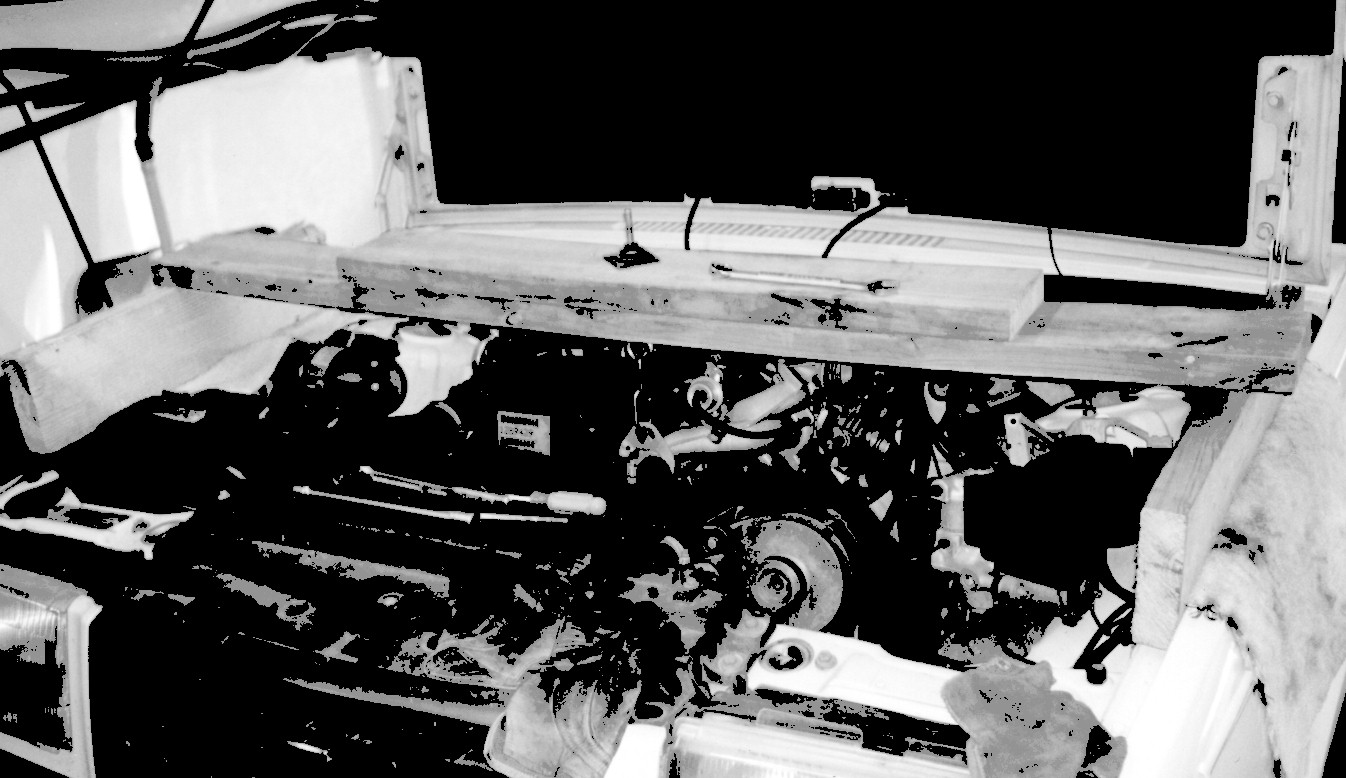
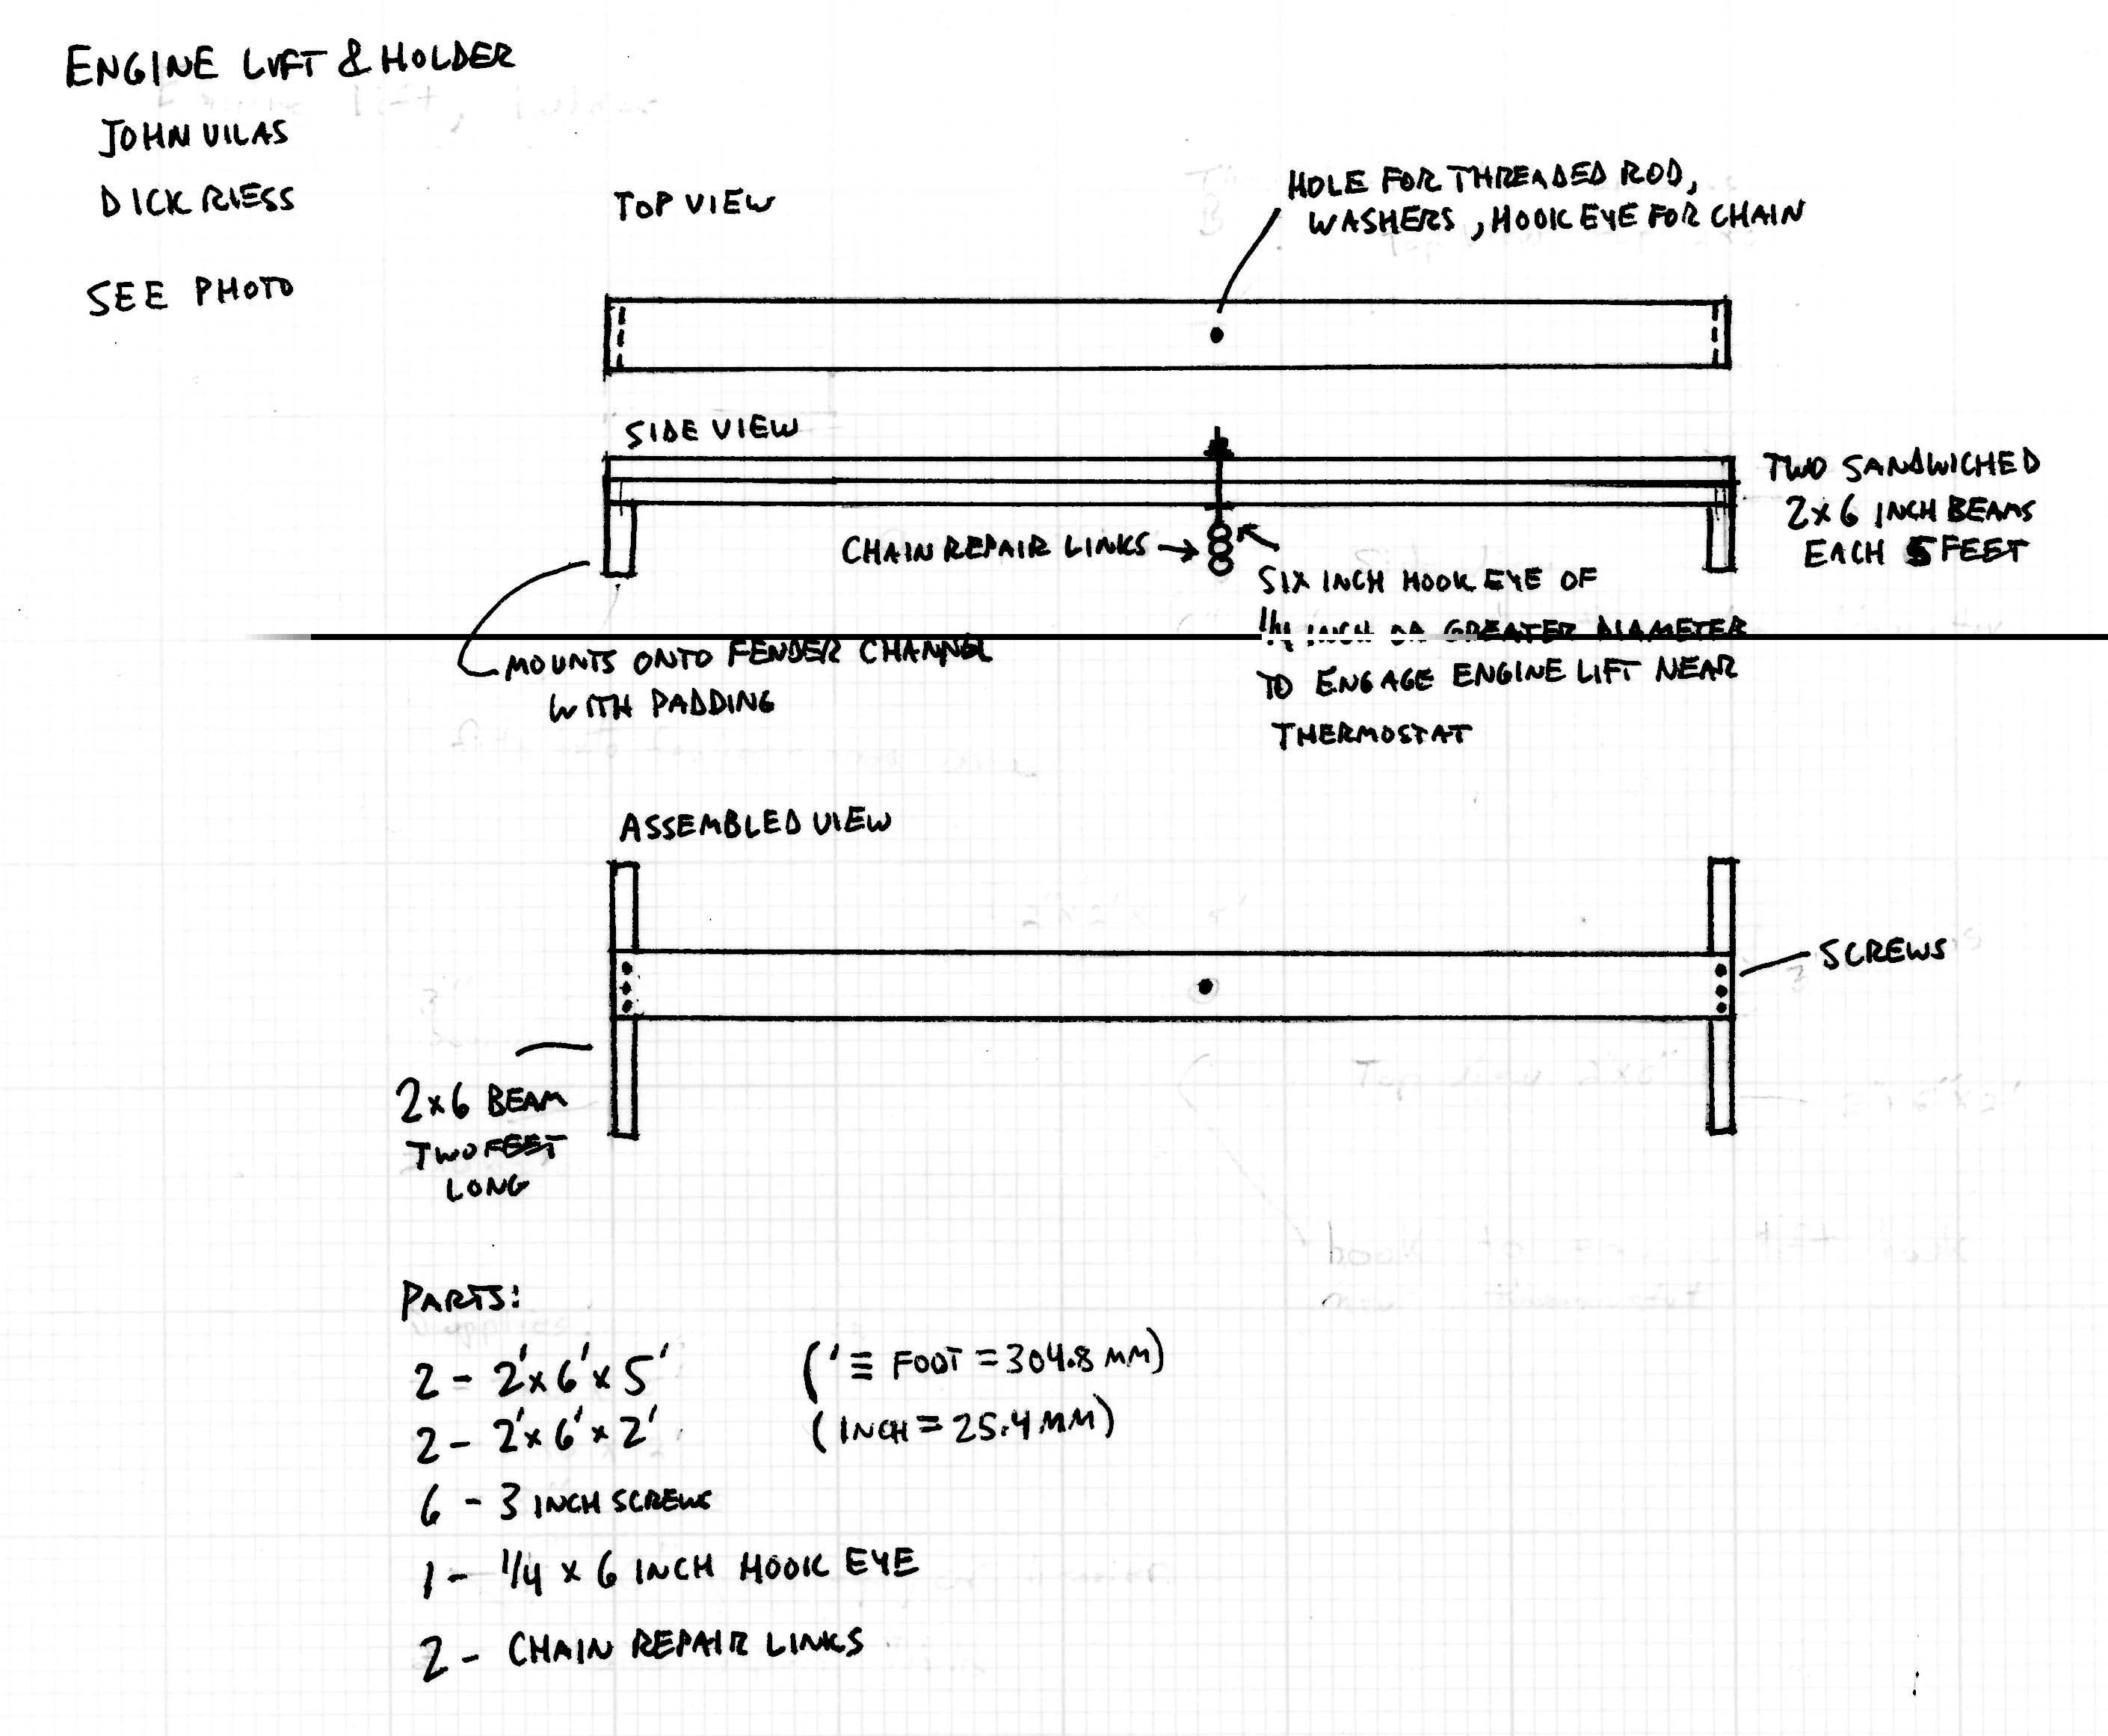
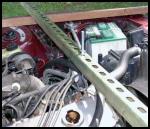
Engine Lift and Support. See the photo and planform for Dick Riess' and John Vilas' design for an engine lift and support, useful for changing motor mounts and oil pans. It is made of 2x6 lumber and mounts on the fender channels.
[Art Benstein] Another version uses two-inch rectangular metal channel stock as the support.
Note the use of the hook and nut. Get a hook with threads long enough to take up the engine sufficiently to remove engine mounts.
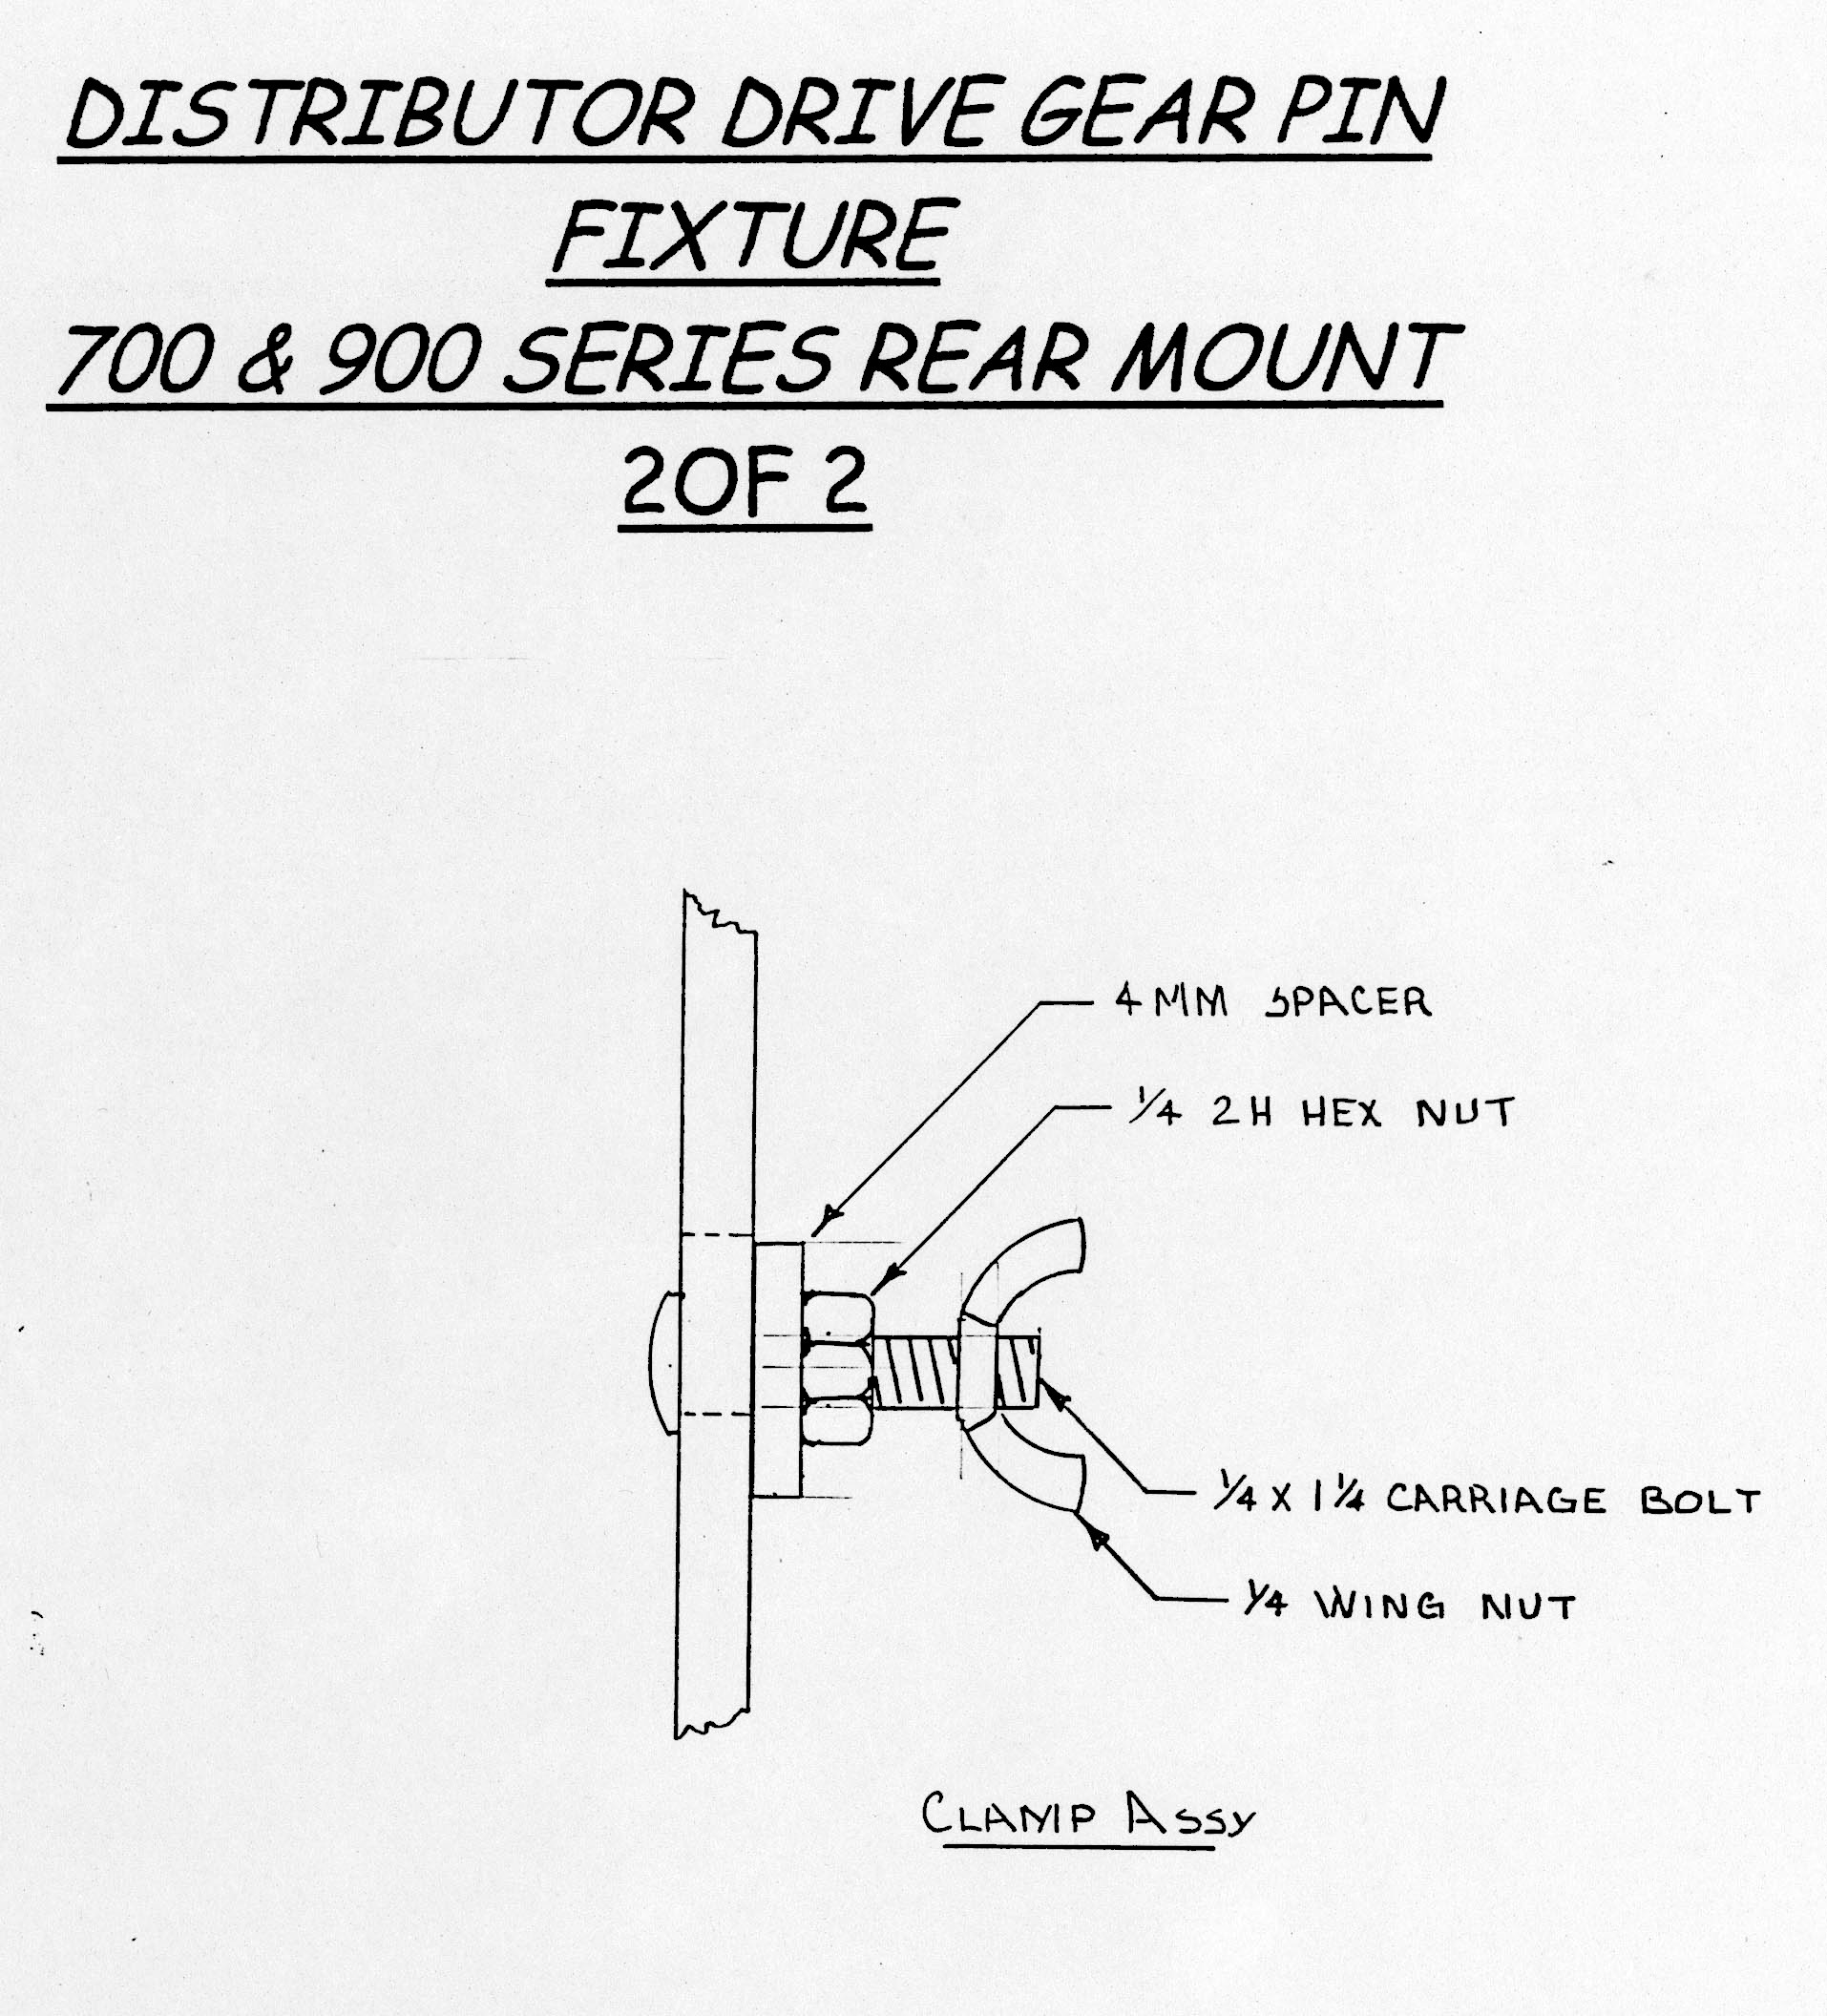
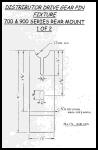
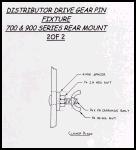
Distributor Drive Pin Remover Tool. [Tool design by John Vilas] This tool may be used with a vise or hammer to remove the shaft pin holding the distributor together. You will need it should you ever decide to change the inner o-ring seal on this shaft. You can purchase this from:
John Vilas
Vilas Motor Works
901 S. Texas Avenue
Bryan, TX 77803-4554 Cost is $25 (at 6/6/00)
To use it, see John Sargent's excellent procedure in the FAQ.
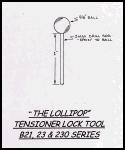
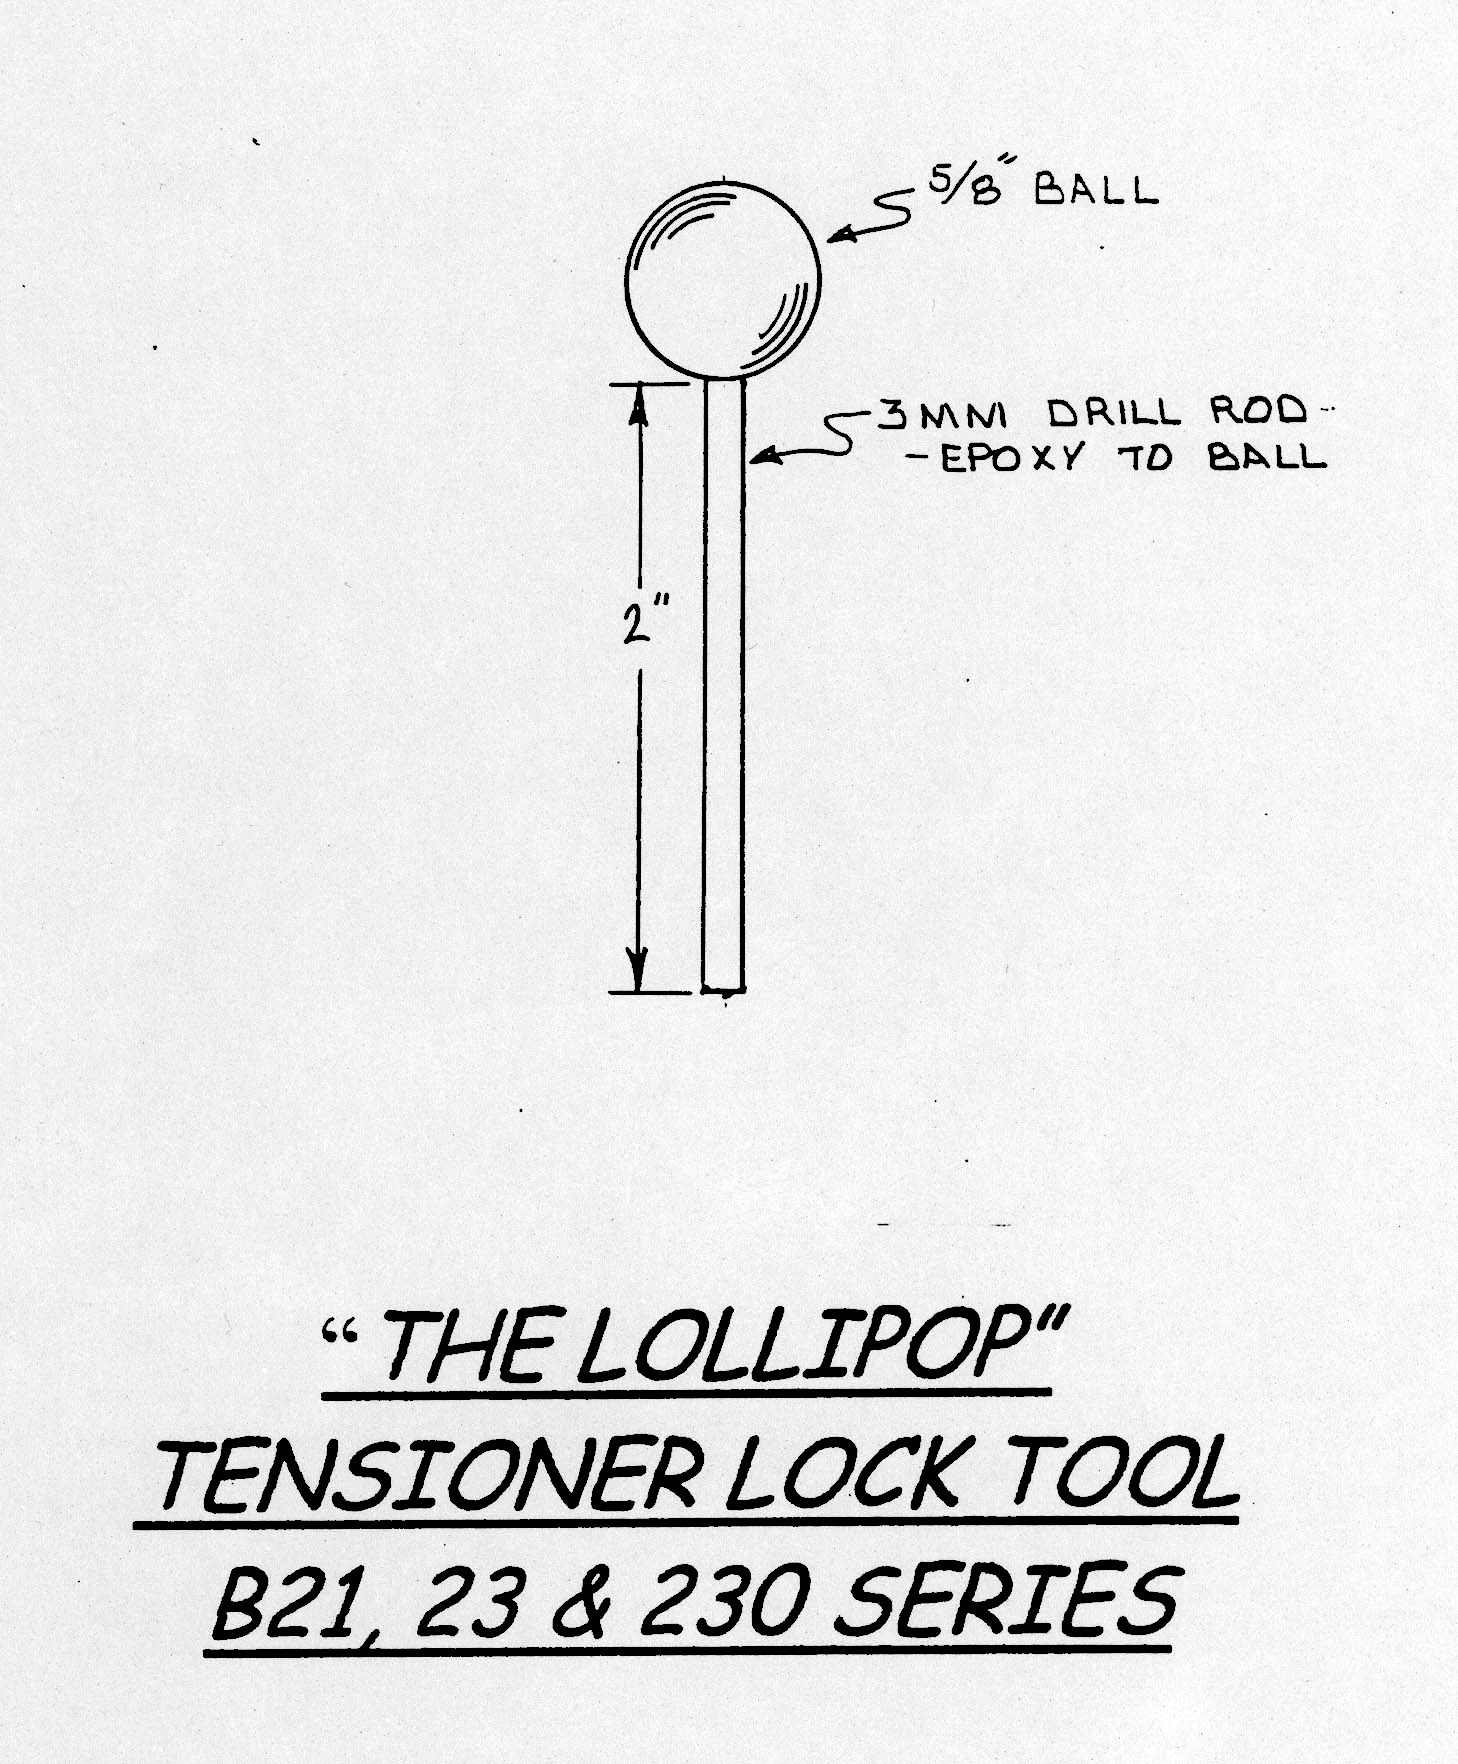
Timing Belt Tensioner Lock Tool. Use this to secure your tensioner pulley out of the way when installing a timing belt in B21/23/230 engines. Purchase it from:
John Vilas
Vilas Motor Works
901 S. Texas Avenue
Bryan, TX 77803-4554 Cost is $12.50 (at 6/6/00)

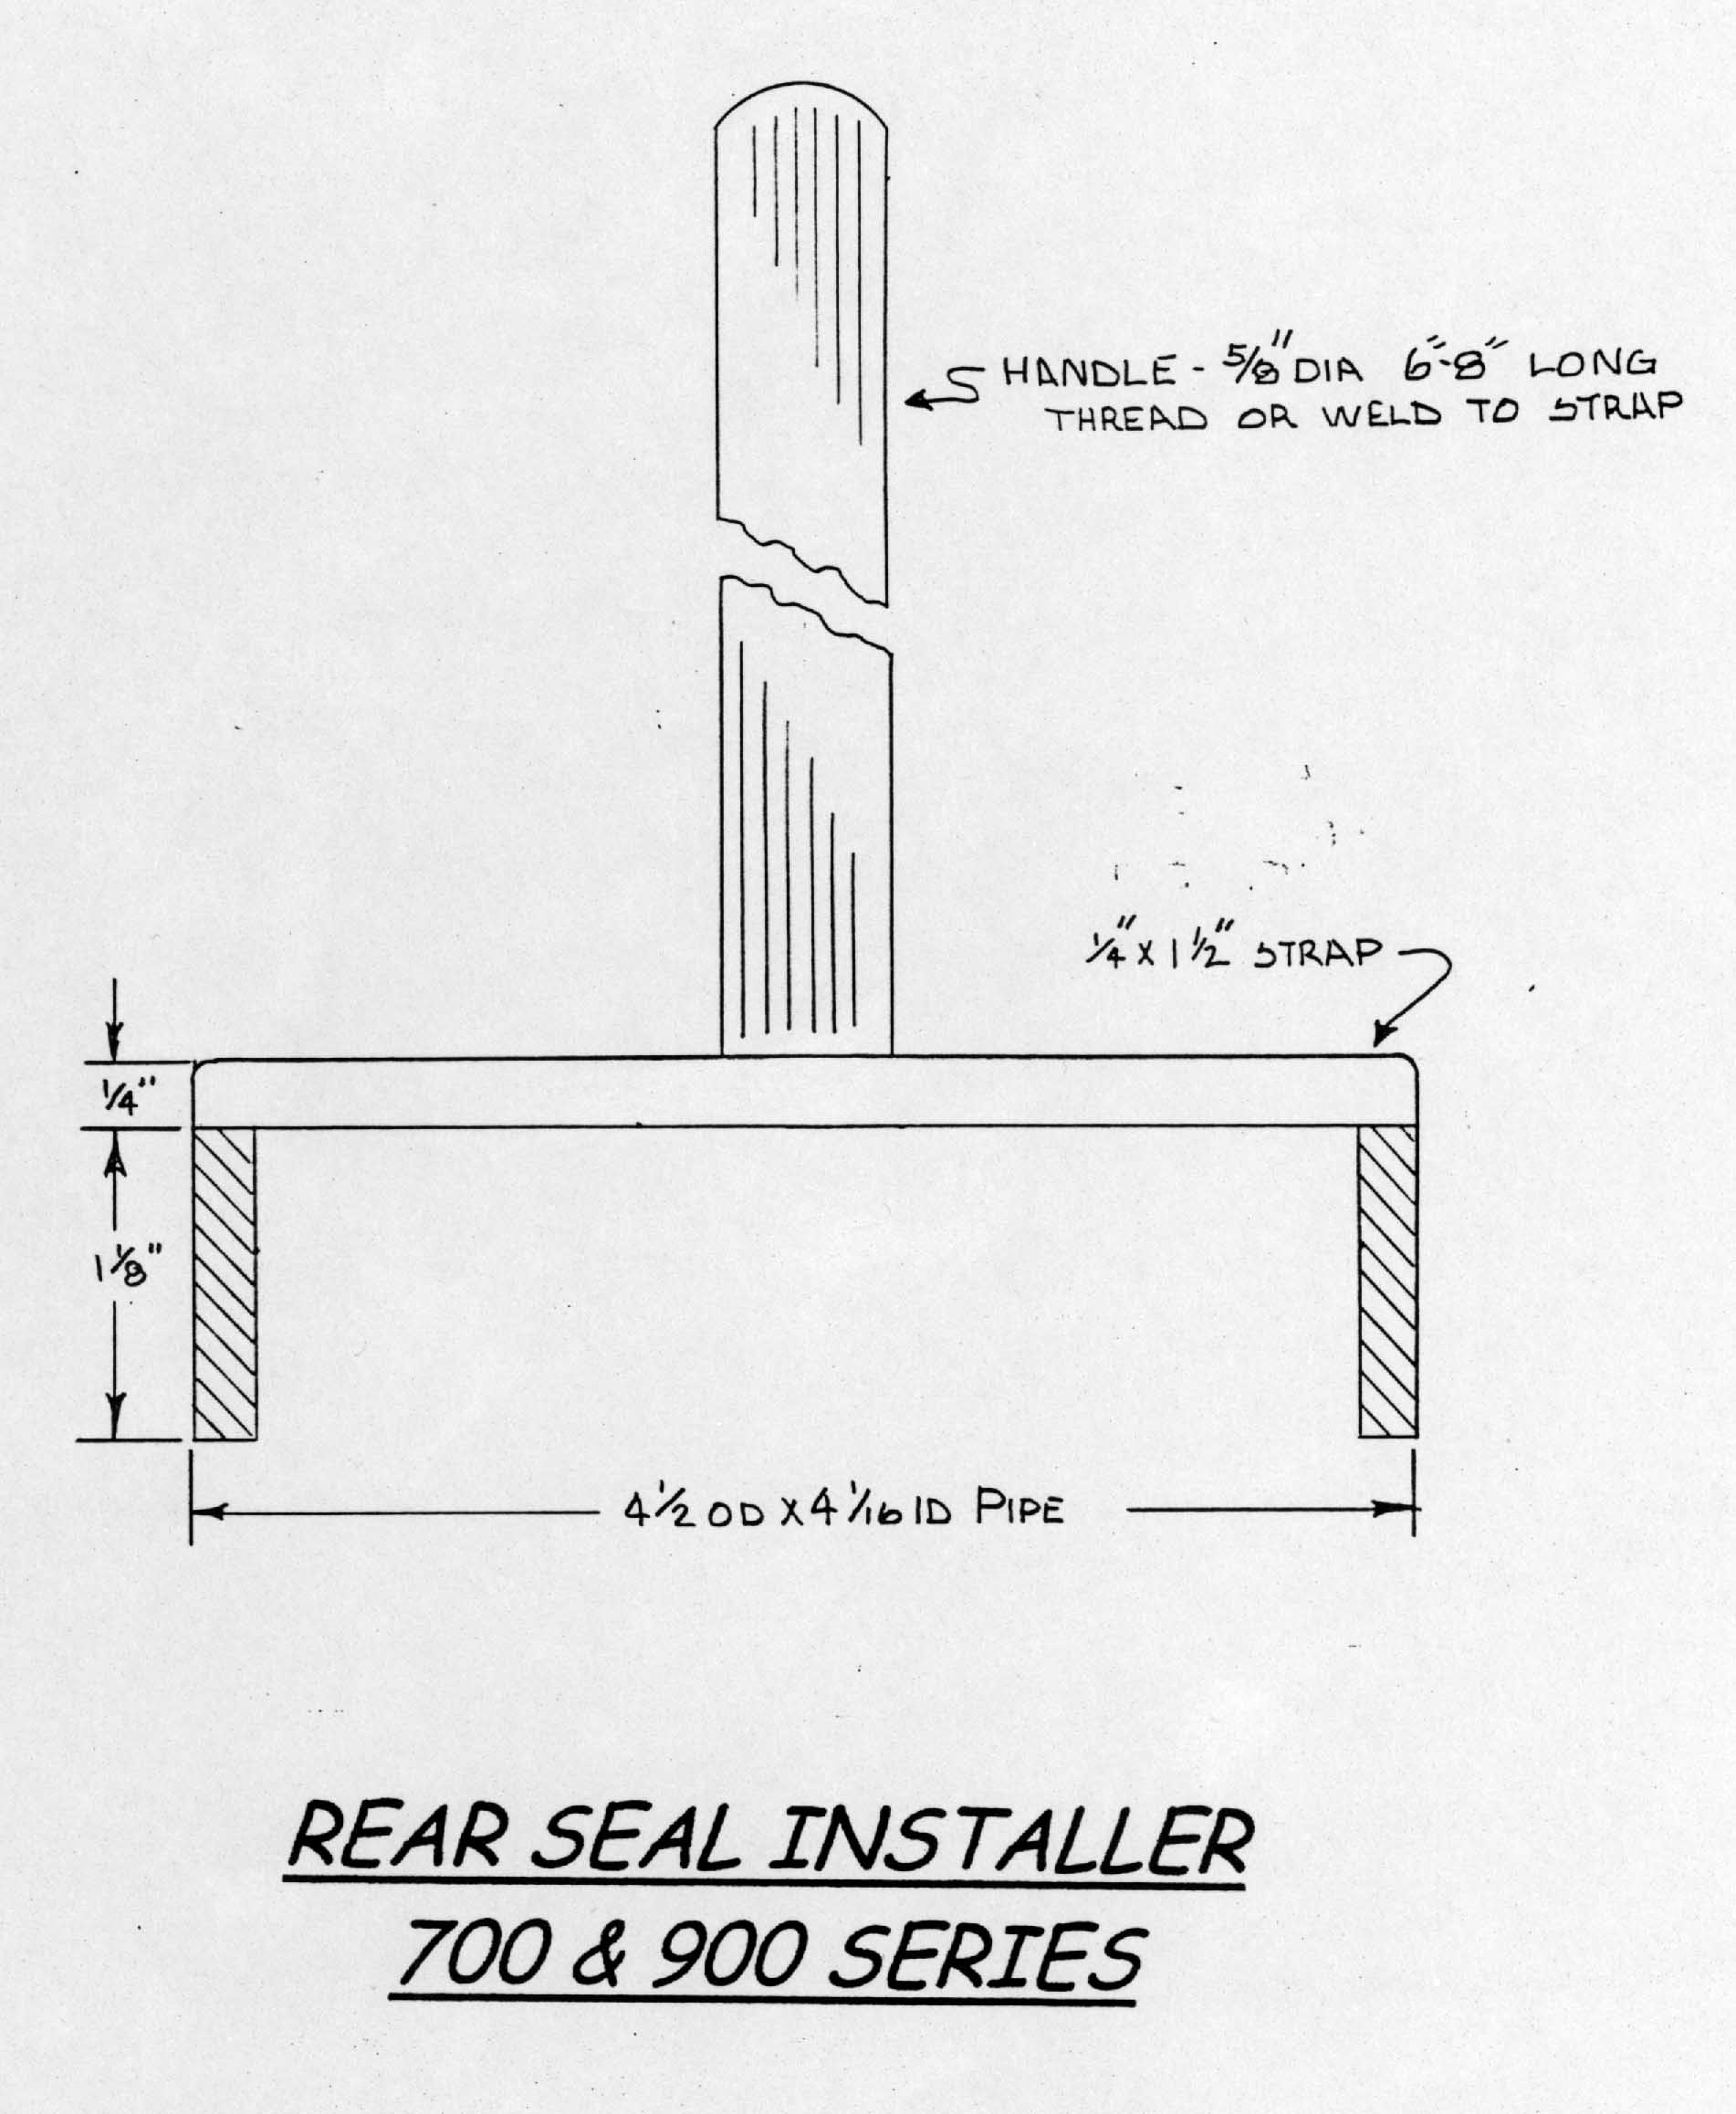
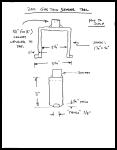
Rear Engine Seal Installer Press. Use this press to correctly install your engine rear main seal on B21/23/230 series engines. Purchase it from:
John Vilas
Vilas Motor Works
901 S. Texas Avenue
Bryan, TX 77803-4554 Cost is $35.00 (at 6/6/00)
[Randy Starkie] Or make one from PVC pipe. The white 4" plastic pipe has just about (but not quite)the right diameter to match the seal size. You can cut a section out and pull it together with zip ties to reduce the diameter. It makes a good installer tool to put on the seal surface and strike with a hammer to get the correct placement. The image to the right shows it sitting on a 230 rear main seal. The other end in contact with the seal has a better cut on it and contacts the seal all the way around.
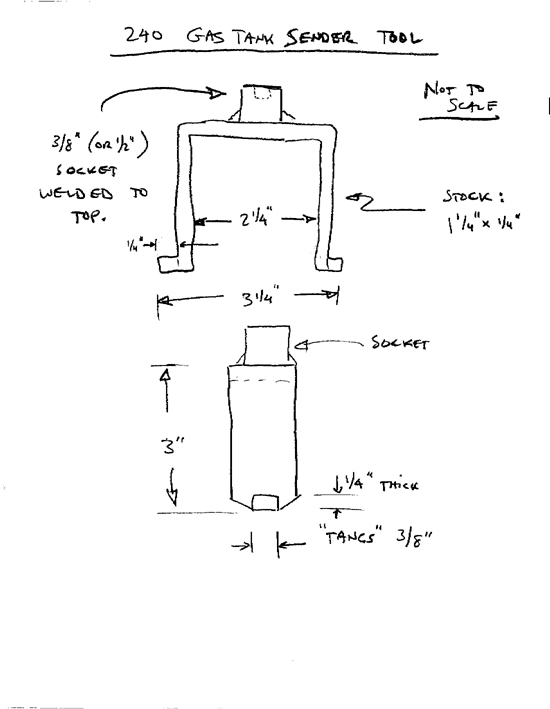
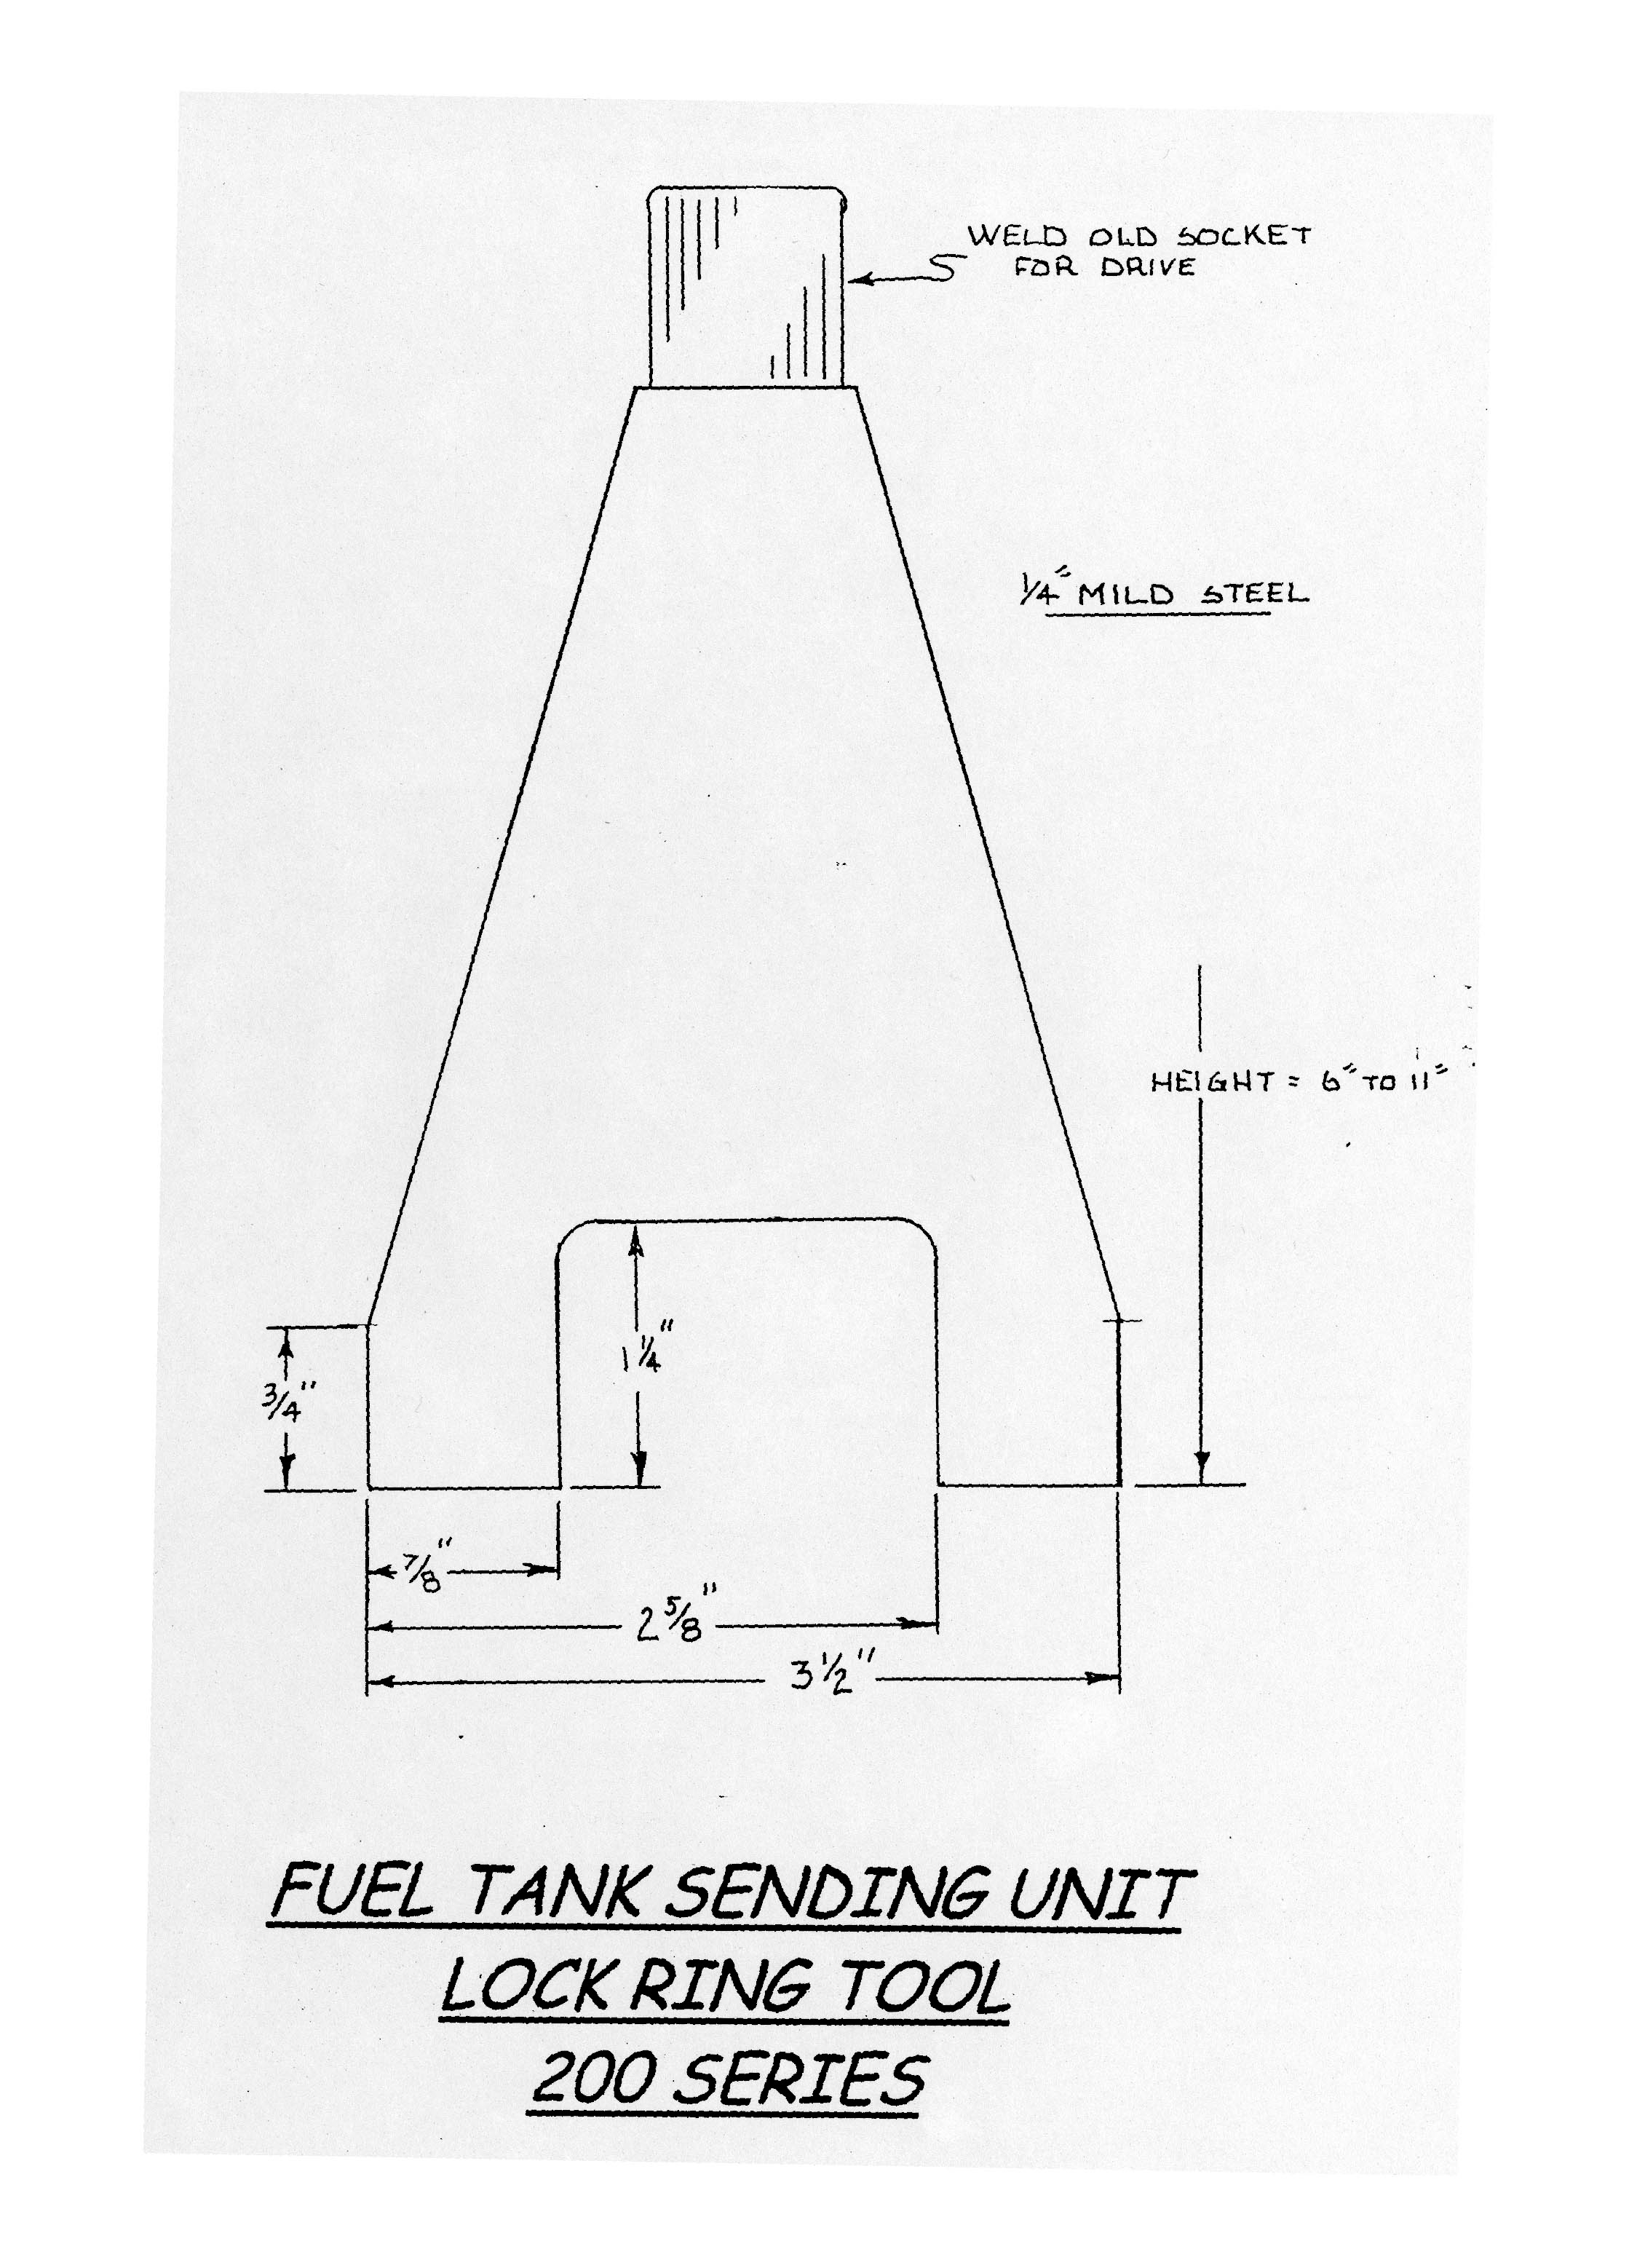
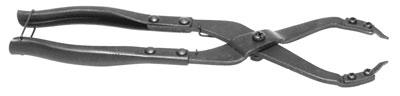
Pre-Pump and Fuel Tank Sending Unit Removal Tools. [Special bonus for 200-series owners!] Use this lock ring remover to take out your sending unit on 200-series cars. Purchase it from:
John Vilas
Vilas Motor Works
901 S. Texas Avenue
Bryan, TX 77803-4554 Cost is $25.00 (at 6/6/00)
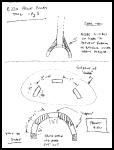
Pre-Pump Removal Tool. [Tip from Ross Gunn] Anyone have a Prepump tool they used when they removed the pump from the tank? Volvo has one of these tools, anyone have one they wouldn't mind loaning out? I'm afraid of taking screwdrivers to it as I might break something. Any ideas?
I made one out of 1/8"steel plate which I shaped like this:
_________^_______ _
| |
| ____________ |
|__| |__|
Using vice grips as a handle at ^ , it was quite easy to remove the level sender/pump unit.
Another version for 240 cars by Don Foster:


Yet another version for 700/900 series cars by John Sargent, using 3/4" x 1/8" angle iron and an old socket to make the tool. The tape measure shows 5-3/8" between the pieces of angle iron.
Transmission Rear Bushing Remover. You can buy this from Ramac Industries.
Tie Rod and Ball Joint Removal Tools. [Editor] Volvo makes a nice OEM screw-type ball joint remover for 700/900 cars, but absent that Brickboard users have recommended the following:
- JC Whitney: American Presto Tie Rod End Removal Tool $22.99
- Harbor Freight: Haba Flate has several ball joint removers and kits in their "Steering" section of "Specialty Tools"
- Your Local Auto Parts Store: Advance Auto, O'Reilly's, Autozone and others often have tools for rent
- A Couple of Hammers: apply penetrating oil to the taper pin, then loosen the nut and hit it on both sides with two large hammers. The shock will release it.
Chassis and Engine Vibration Tracers. [Editor] Several firms make inexpensive testers to locate annoying chassis or engine vibrations. One I have used with success is the ChassisEar by Steelman Tools. It consists of a wired microphone mounted on a clamp and an amplified headphone. Place the sensor on the suspect part, operate the car, and listen for the vibration. No identifiable noise? Move the sensor and try again. This is how I found my cheap aftermarket ball joint had failed at 5,000 miles.
Home-Made Pressure Bleeder. [TV Pierce] You can make your own pressure bleeder. Power Motive's is nothing more than a garden sprayer with a brake reservoir cap attached to the end of the tube instead of a spray nozzle (they also add a pressure guage -- but it's not really necessary). The sprayer is about $10 at Home Depot, and a new reservoir cap should be $2-$3 at FCP Groton. Drill a hole through the cap, epoxy a tube fitting through the hole, then cut off the spray nozzle, and attach the reservoir cap.
[Gary Gilliam] I made mine out of a cheap all plastic 4 liter ( about $13) garden sprayer, and an old master cap. I cut the hose just above the sprayer wand, attached a 5/16" brass fitting that is commonly used for repairing air lines: it is barbed on one end to stick inside the hose and has 1/4" NPT threads on the other. This was secured to the hose with a stainless hose clamp and a 1/2" hole was drilled in the extra master cylinder cap to receive the other end of the fitting. The fitting was secured to the cap with a 1/2" long brass NPT straight connector, adding a rubber washer on both sides coated in RTV for good measure. I was going to add a pressure gauge, but never got around to it. It seems to work fine with just enough pumps to get things moving a bit.
Brake Master Cylinder Bench Bleeder. [Rob Bareiss] Because many master cylinders are mounted at an upward angle that encourages accumulation of air in the upper ends of the cylinder's bore, bench bleeding a new or remanufactured master cylinder is always a recommended procedure. Buy short lengths of European ISO double-flared brake line and bend to fit as per the photo to make a bench bleeder. The tubes are connected from the lower ports back into the fluid reservoir.
Turbo Intake System Leak Tester. [Tips from Josh Wingell/Brent Cook] To assemble a device to locate leaks in your turbo intercooler or intake hoses, try this. Parts Needed:
- A 4 inch long piece of 2.5" O.D. (outside diameter) hose. (I used some radiator hose I got at NAPA)
- 1.5" I.D. (inside diameter) PVC end cap.
- 2 band clamps that will fit around the 2.5" pipe above.
- A schraeder tire valve stem
Note that if you have a larger turbo, the sizes of the end cap and hose may need to be larger in order to  fit the turbo inlet. To use it, just remove the intake pipe from your turbocharger inlet, and attach this in its place. If you have a manual boost controller hooked up, you might want to plug off its intake hose, as they leak a lot of air, making it hard to pinpoint the real leak. Pressurize the tester using a bike pump or an air tank. Pressurize the system, and listen all over for leaks. You might want to have a friend check out your boost gauge while you are pressurizing things to make sure you don't put too much pressure on things. (20 psi should be safe, or whatever you run safely for boost) Make sure you or a friend listens under the bumper too, wherever there is intercooler piping. A leak will be obvious, they make a loud hissing sound.
[Randy Starkie] I used my brake reservoir cap/schraeder valve combination that I have made up to also test a turbo intake hose for leaks and cracks. I normally use it to pressure bleed my brakes with a bicycle pump. As luck would have it the size of the cap is almost a perfect fit when clamped into the end of the turbo hose. I turn my compressor regulator down to about 15lbs pressure and use a tire chuck to pressurize the system. Leaks are instantly found with sound of escaping air. The center hole is drilled to 9/16 inch.
Turbo Torqueing Tool 5411. To replace your pre-1991 turbo unit on to the manifold, you need to tighten the manifold-to-turbo bolts which are difficult to reach between the turbo and manifold. Volvo offers a special tool number 5411 used with an angled torque wrench to tighten these nuts to 30 Nm or 22ft-lbs. It looks like an 13mm open end wrench on one end with a 1/2" drive hole on the other for the torque wrench, which is held at a 90 degree angle to the tool while tightening. Make such a tool by welding a 3/8 or 1/2 inch square drive end (to fit your torque wrench) on a 13mm open-end wrench. The distance between the center of the wrench flats (where the center of the nut will be) and the center of the square drive is 6-3/8 inches. Tighten to the torque spec while the wrench and tool are kept at a 90 degree angle. Use new nuts. [Dave Stevens] Note that when a force is applied at 90 degrees to a torque wrench extension then the torque remains the same at the end of the extension. That's how the Volvo special tool is designed to be used. Any home made wrench that can duplicate that right-angle orientation will work just as well, as long as it is held at a 90 degree angle. The length is immaterial.
Turbo-to-Downpipe Nut Wrench (5411) (used with a torque wrench at 90 degree angle)
Diesel Tools. [Ross Winberg] 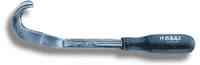
Valve Adjustment.You should adjust your valves every 15,000 miles. To do the adjustment you neet Hazet tool 2574. Be careful as there are several variations on this tool. The one you want is pictured. Some variations are too small to fit the camshaft and are meant for gas VW motors while others are not as ergonomic.
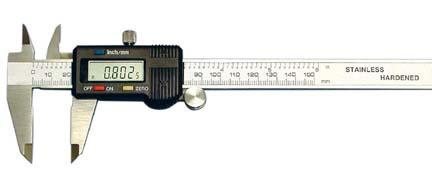 You will also need a supply of VW diesel valve shims. It is also helpful to have a micrometer to verify shim thickness if the numbers have worn off.
To remove the shims use either the VW tool or a shot of compressed air in the notch on the valve depressor.
 Do yourself a favor and draw a diagram before you start showing the 12 valves and which are exhaust and which are intake valves. Your valve clearances will most likely be SMALLER than spec so you will have to put in thinner shims.
 Timing Belt. To do the timing belt, you will need a camshaft locking tool, which fits into a slot on the back of the cam to keep it stationary.
 Compression Testing. You will need a serpentine belt tool (the cheapest is from Sears), a compression gauge reading up to 500 psi (very difficult to find) and an injector hole adapter into which you fit the gauge.
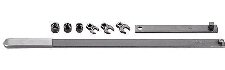
Ultraviolet Leak Detectors. [Editor] To detect fluid leaks in engines, transmissions, power steering units, air conditioning systems and the like, get an Airmax LED penlight for UV leak detection from http://www.keep-it-kool.com/ (costs about $40) and a set of UV-enhancing glasses from JC Whitney for about $5. You can purchase engine and transmission fluid dyes from NAPA stores for about $4 each, and air conditioning dye injectors from NAPA as well. The glasses are necessary to see the dye. This works best in a darker garage, unless you purchase a larger and more expensive lamp.
External Temperature Indicator Lamp Replacement Tool. [Joe Tiffin] Replacing the illumination lamp for the external temperature indicator
in a 900 series instrument cluster is difficult because the lamp is
mounted on top of the protrusion out of the back of the cluster containing the circuitry for the indicator. The tubing for the left dash vent is immediately behind this protrusion giving no room for your hand to get in there. I made this tool out of a piece of aluminum about 1mm thick. I recommend that you buy the replacement lamp (Volvo# 989806 - it's a different lamp than the rest of the instrument cluster lamps) before making the tool as you want a friction fit between the lamp and the tool to aid in installing the new lamp. The hole for the lamp must be quite close to the end of the tool as the lamp itself is quite close to the back of the instrument cluster leaving little room for rotating the tool to release/install the lamp. That is also the reason for the hole being placed at a 30 degree angle to the body of the tool.
Short Circuit Detectors. [Editor] Both macro (wiring harness) and micro (circuit board) short circuits can be very, very time consuming to diagnose. Here are two tools designed to make the process simple and fast.
Wiring Harness Short Locator. [Tip from Don Lewis] Available over EBay, this tool eases the task of locating wiring harness shorts, especially under trim panels. The gadget really works well. You plug one side into the blown fuse negative side and the other into the positive battery terminal; you must remove the positive cable from the battery. When you plug this thing in it fires up with an internal light and buzzer so you know you're on the right circuit. You pull the little magnetic dial indicator from its pod and run it along suspected harness areas. If you're on the right harness, when the console pulses - every ten seconds - the indicator needle jumps in the direction of the short. As you get closer to the short the needle jumps further. If you pass the short the needle stops jumping because all the current is going through the short into ground. The short was a pinched wire under the rear rocker panel trim where the trunk harness runs up along the rear wheel well. I would have never found it without this tool. Great gadget. It really works well and saved me many hours of work.
Printed Wiring Board Short Locator. Electronic Design Magazine (July 1997,ED Online ID #6386) has a schematic and instructions for a short locator to be used on PCBs:
http://www.elecdesign.com/Articles/Index.cfm?AD=1&ArticleID=6386 The battery-powered short-circuit locator uses the small but measurable resistance of circuitboard traces themselves, in combination with a low-voltage excitation current, to directly sniff out bad connections. Useful for engine computer boards, instrument panels, heater control boards, relays etc.
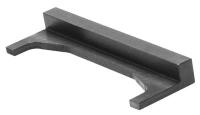
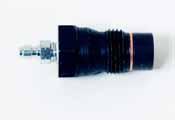
Volvo Special Tool Images. Below are some images of Volvo special tools to help you construct your own versions.
Cam and Front Crank Seal Installer.