Engine Lubrication
Engine: Lubrication PDF
Maintenance:
Oil Change /p>
"Service Engine" Light Reset in Various Models
Oil Viscosity Recommendations for Volvo
Troubleshooting and Tips:
Oil Delivery Tube O-Ring Modification
Oil Pump: Wear and Replacement
960 B6304 Oil Pressure Problem: O-Ring Problems
See Fuel Additive and Lubricant Reference Information for information on lubricants.
Maintenance:
Oil Change. Here's how to change your engine oil:
-
 Tools needed: a one-inch socket or wrench for the oil drain bolt; some oil filter pliers or a strap wrench for the filter; ramps or jacks to lift the car; oil drain pan; plastic or paper funnel; old rags or shop towels.
 - Either lift the front of the car on jackstands or ramps, or find a thin friend to fit beneath the front air dam to loosen the oil drain bolt. If you have a turbo, you won't be able to reach the filter without lifting the car.
- Place an oil drain pan beneath the engine oil drain plug (the one-inch bolt hanging down from the bottom of the red oil pan under your engine.) Remove this bolt using a one-inch socket or wrench. Remember: to loosen, rotate counterclockwise as you face the bolt. Let the oil completely drain until it merely drips.
- Wipe off the bolt and surrounding pan area. Either turn over the copper washer on the bolt or install a new one and reinstall the drain bolt. Tighten by placing your hand only four inches from the end of your wrench/socket and snug it up. Don't over torque it.
- Remove the filter and replace with a new one, first having placed some oil on the filter gasket. Wipe the filter and your hands with alcohol or degreaser so you can get a good grip and hand tighten this snugly. Don't use a wrench else it will be difficult to remove.
- Wipe spilled oil from the motor mount or turbo cooler hoses with a rag and rubbing alcohol so it does not ruin the rubber.
- Pour four quarts (B230) of fresh oil into a funnel placed in the oil fill cap hole on top of the engine at the front of the valve cover. Inspect the fill cap gasket to make sure it is still flexible and not leaking. Replace it if oil has been blown all over the valve cover.
- Start the engine. The oil pressure light should extinguish after five seconds when oil is flowing through the now-filled filter.
- Reset the oil change odometer on the instrument panel.
- You're done!
"Service Engine" Light Reset in Various Models. See the discussion in Electrical-Instruments for information about re-setting the "service engine" lamp, which is an engine oil change timer.
Oil Filter Recommendations. [Editor/Kane Leung] Universal and near-unanimous opinion on Brickboard, Swedishbricks, UK Volvo Club, et al is that one should use either the Volvo OEM or the identical Mann oil filters for all Volvo engines. These are of exceptional quality, have large filter media and full nitrile antidrainback valves, are very inexpensive (Mann W-917 filters for B230 engines come as low as US$3 each), and are readily available. So there is no need to use another brand unless you are in a pinch. For links to oil filter information, see the FAQ file.
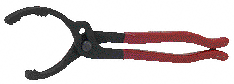
Oil Filter Change. Changing the filter on 7xx series Volvos can be a challenge and I've never seen any way to do it that does not make a mess. As to hints - make sure you use a low profile filter. The generic Fram filter (the PH8A) is way too tall, you can get it in, but getting it out is a pain. The Volvo / Mann filter (or one of comparable size) is the one to use. As to the wrench (I use a band type wrench - where the metal band goes around the filter body) - I tried drawing a picture in my service manual to remind myself how it fits, but I end up re-inventing the wheel each time. I've just resigned myself to fitting the wrench and moving the filter only a 1/2 inch at a time until it gets loose enough to remove by hand. Thankfully, you can move the wrench more as you refit the filter. [Editor:] The wrench to use on turbos is the large curved pliers with gripping teeth that fit around the filter.
Tips for Mess-Free Filter Changes:
[Yeti Man] Put a rag over the motor mount. Place a plastic bread bag (long bag with NO air holes in it) over the filter after 'cracking' it to the point where it's hand tight. Scrunch the bag over the filter, against the block, let the filter drop into the bag. Obviously not good on a Hot engine, but doable on a warm one
[Greg Sievert] Wrap an old sock (best to have a white, cotton sports sock) around the filter. The sock absorbs a good portion of the oil that drips out. Also, remove the filter as fast as possible and tip it upright immediately. Obviously if you tip it bottoms-up, the oil in the filter (nearly a quart) will spill on everything.
[Bob] I use a piece of stiff plastic cut to fit under the motor mount and filter. When you remove the filter, the oil runs down my plastic Bucket Buddie and in to the drain pan. Still get a small amount on the motor mount bracket but this is quickly cleaned off with brake cleaner.
[Editor] I use a large piece of aluminum foil to direct and hold the oil so it does not soak my motor mounts. DON'T allow this to contact any electrical terminals, for obvious reasons.
[Ivan] Using a nail or similar sharp object, punch a hole in the filter while it is still on the car. On vertically mounted ones, straight through the middle, on horizontally mounted ones, just bellow the top (remember there is oil inside). With drain plug and oil filler cap already off there is enough pull to completely drain the filter free of oil. It works like a charm.
[Editor] "Kitty Litter" clay makes a very inexpensive oil absorbant in the event you spill oil while changing the filter.
Oil Viscosity Recommendations for Volvo.
Volvo Oil Recommendations and Warranty Requirements. [Technical Service Bulletin 174901201 and Service Maintenance Bulletin SMB-17-4, Dec 90, updated by SMB 22-3 of Feb 1995 and July 1998] This TSB has a discussion of the dangers of using oils with too heavy a viscosity grade. Volvo's recommended oil viscosity in most climates is 10W-30 (with 5W-30 acceptable in colder climates.) The maximum acceptable viscosity, which is reserved for extreme duty only, is 15W-40. Extreme engine duty is defined as driving conditions that tend to raise oil temperature excessively, such as sustained mountain driving, trailer hauling, etc. An exception to the above restriction could be high mileage engines (above 100k miles) operating in hot climates. These engines may require a heavier viscosity oil to maintain oil pressure and reduce oil consumption. Oils with viscosities heavier than 15W-40 are not approved by Volvo. They then discuss the ills attending use of heavier-than-approved viscosities (which include poor fuel economy, poor cold start lube, poor engine cooling, etc.). "Synthetic Oils are HIGHLY RECOMMENDED for vehicles operating in temperature extremes (very cold or very hot climates), continuous mountain driving, trailer pulling, and for turbocharged engines." The July 1998 SMB lists the the most recent oils by brand and viscosity that are acceptable for Volvo new car failures warranty claims; they include Agip Super and Turbo, Amsoil, Castro GTX and Syntec, Exxon (Superflo synthetic or blend only), Mobil 1, Pennzoil Performax Synthetic, Quaker State (Super Blend, 4x4, High Performance, Synthetic), Texaco Havoline and Synthetic, Valvoline All Climate, Durablend, and Synthetic. Synthetics and most blends are approved for both 5W-30 and 10W-30; nonsynthetics only for 10W-30. Dealers are highly encouraged to use the oils listed. Using oils not approved by Volvo may result in new car lubrication/engine warranty repairs being denied.
Comments. [Tom] My brother and I have made a pasttime of studying engine oil. We respectfully disagree Tim's recommendation of 20W-50. The 30 point gap between the weight and the film strength is too much. The additive package necessary to make up the difference is being asked to do quite a herculean task. We would recommend using a 15W-40 for a heavier weight oil. The 15W-40's have been so extensively developed, that for heavy duty applications such as over the road diesels no mineral based oils come close. Mobil Delvac 1300 is a readily accessible choice and the 'badge' oil of Detroit Diesel; Shell Rotella T is another. A good choice for fall and spring is a high quality 10W-30. 10W-30's are technically acceptable down to 10 Fahrenheit. In the winter you can trust a quality 5W-30. Department store Pennzoil has done well in past tests. We disagree with Consumer Reports conclusions on their NYC taxi tests. Running a taxi is a lot of stop and go with perhaps a lot of rapid acceleration, but the engine is always warm. It's cold starts that are hardest on engines and oil. Granted they tried; they had to design something they could control. Well, that's just two oil fanatics' opinion.
[Editor's Note:] Volvo concurs; see Technical Service Bulletins 22-3, Feb 95: Oil viscosity grades 10W-30 and 5W-30 are recommended brand-by-brand (and include the usual Pennzoil, Quaker State, Castrol, Texaco and Valvoline brands.) The use of 15W-40 should be limited to engines in extreme duty.
Diesel Engine Recommendations. Diesel engine owners should use the CG-4 oil listed in their owners' manual. See Warren Erickson's recommendation about using synthetic oil in D24s due to a poor starting oil pressure and the following note recommending overfill due to poor oil pickup tube location.
[Query] I had an oil change done and switched to Amsoil 10W-30 synthetic yesterday. I asked the service guy at least twice whether to replace the oil filter after 1000 miles. He said that it wasn't necessary. Whats going on ?
[Response: Mr. Lube] The synthetic will clean a great deal of gunk out, which will plug the filter quickly. I have seen it happen at my oil change shop over and over and over. I tell people to bring the car back after a month to change the filter only. It can and will cause some damage. I do not think it is a matter of preference or choice really. Rather, the $4.00 filter will become plugged with the switch, and it is left to the wise to follow past experience and advice from the ample evidence. Get it changed, and you will be surprised how dirty the filter will be.
Don't Strip It!. [Tip] When reinstalling the oil drain bolt, don't mash down on the wrench and don't use too long a wrench or a breaker bar to install it. I hold my ratchet midway down the handle when re-torquing so I don't overtorque the bolt. Install it with the copper sealing washer. It goes without saying that you loosen it counterclockwise; tighten clockwise. Fast lube shops are notorious for over-torquing these bolts.
Size. [Tip from Roger Huggins] The Bentley book for B230 recommends a 1" socket and a torque setting of 60 Nm (44 ft-lb).
Caution. [Dick Riess] The IPD magnetic drain plug has very few threads compared to the OEM plug and consequently the torque is on only about three rounds of threads. Hence, it is easier to strip the pan threads when replacing it. Be careful!
Leaks. [Tip from John Sargent] My car will leak from the oil drain plug even if it is very tight with a new copper gasket. I use an o-ring at the base of threads on the oil drain plug. It does not leak. If you use an o-ring is too large it won't work. You need one which will sit down in the tapered area leading to the threads in the pan. Ideally you would find a washer that would keep the o-ring from pushing out from under the edge of the drain plug hex.
Stripped Plug Threads. While you can find repair kits for stripped plug threads, you are best advised to replace the oil pan. [Dick Riess] To retap the threads, try a 3/4 inch tap with 19 pitch threads. [Jeff Pierce] For a short-term fix, wrap a band of aluminum foil around the bolt (in the opposite direction as the threads, but not extending up beyond the end of the threads) and tighten the bolt to good and snug (that's a technical value that's achieved by tightening until just before you think the threads are gonna give way). Then when you're ready to fix it right, get an oversized bolt -- not a self tapping one --and a tap and retap the threads. Self tapping bolts are essentially screws. They're made to self tap once -- not a good idea for this application. After you've changed your oil a few times, the threads will be gone, and then you'll just have new stripped threads in a bigger hole.
Troubleshooting and Tips:
Oil Leak Diagnostics
Major Culprits:
[Summary of article by Boe Kalinoski, Import Car Magazine, April 2001] The first step in discovering the source of any oil leak is to try to clean the areas where dirt, grime and oil are present (I've found that steam cleaning is best). In our shop, we use a fluorescent/black light along with a special dye. Simply add it to the engine or transmission and run the vehicle while the fluorescent light is warmed up. Most of the time, the leak instantly appears in the form of a bright glow. Or use foot powder: dust it near the leak and the oil will show up later, allowing you to pinpoint the source. Leaks in Volvo B230 engines can occur when the crankcase flame trap ventilation becomes restricted. It consists of a small, black plastic tube located under the rear of the intake manifold that is cleaned at normal service intervals. To help identify the source of the leak, see the chart in Garage Floor Mechanics.
Potential Oil Leaks:
- Any of the three front three seals located behind the timing belt - cam seal, idler shaft seal and front crankshaft seal, can fail and should be changed with the timing belt at the 100,000-mile service interval.
- Distributor shaft seal or O-ring
- Oil cap seal or the valve cover gasket (both easily fixed): this oil can leak onto the manifold, vaporize, and disappear. You can lose large quantities through a bad seal.
- Rear main crank seal, but make sure this isn't caused by leaks from above at the distributor or valve cover gasket.
- Oil filter mounting oil rings, between the oil filter housing and the block and the filter housing and the cooler connections. This is awkward to get to on the turbos, but a reasonably simple repair and the problem is obvious by inspection on a lift. You can also have an oil leak from the oil return line if the cooler has rotated around so as to keep the return line from seating. O-ring part numbers are: 1985-88: 925093; 1988+:3547188 between the cooler can and the adapter; 967343 between the adapter and the block.
- Valve cover nuts: Re-torque the valve cover nuts to 9 ft-lb (12.5Nm) in order to prevent oil seepage per Volvo TSB Jun 88.
- Oil breather box plastic canister that is bolted to the engine block above the starter can crack and deteriorate with heat.
- Oil pressure sensor - another common problem. Right side of block, toward the front, below #1 exhaust port.
- [Tip from Bob] PCV (flame trap) elbow going to the oil/vapor separator. If you haven't personally cleaned it, chances are it's plugged. It's a plastic elbow with a little nipple on the outside...it's generally in the 1/2" hose from the compressor outlet tube to the intercooler that goes across the cam cover and down to the vapor separator. There's a smallish vacuum hose from the intake manifold that goes to this elbow. Also check the vacuum line and nipple at the intake manifold for plugging. If this system is plugged you won't get positive crankcase ventilation...oil life is radically reduced and crankcase pressure is generally relieved through the cam seals if not the engine main seals.
- Transmission leaks caused by a worn-out tailshaft bushing that leads to excessive play on the shaft and a leaking seal that spews ATF all around the tail section. Deterioration of the rubber transmission mount will result.
- The power steering rack and rubber hoses can cause small, disturbing leaks.
- Steering rack seals leaking internally; check the boots for the presence of fluid.
- Steering rack input shaft spool valve seals. At this point, you should replace the rack assembly, as steering assist will be lost if the power steering pump runs out of fluid, resulting in pump failure.
- [Very Rare, per Dick Riess] Engine oil dipstick tube o-ring. This o-ring can petrify over time. The tube is a light friction fit into the block and loss of the ring can cause blow-by.
- Oil Pan Gasket: see FAQ notes. on first tightening the pan bolts and then gasket replacement notes.
- Oil Pan: the oil pan can leak due to rust on the outer surface and perforation through the pan. Some have reported repair success by carefully sanding, then applying JBWeld epoxy and finally silicone on top. You can also replace the pan.
Major Oil Leak: Diagnostic Steps.
[Query] Returning from a 500 mile drive the rear gate on my 745 looked as if it had been sprayed with oil. Didn't think too much of it, thought I may have driven through something. 1 Week later after another 500 mile trip the engine smells hot. I check the oil. The end of the dipstick has baked on oil. It takes 3 quarts to fill. Another 300 mile trip at 85 mph and no oil is lost. The oil light comes on at start up then goes out so I assume it works. The engine temp has stayed in the normal range though. I am frightened.
[Response: L.K. Tucker] You have a major, probably crankcase pressure caused, oil leak. At this point there will be so much oil blown around that the location will be impossible to find. Go to a pressure wash and clean the engine and under carriage. This will not be a hard diagnosis since the most likely point is the rear main seal although front seal total blow out is possible.
[Response: Steve Seekins] You certainly need to figure out where it is leaking out. FIrst thing to check is the PCV system to make sure you do not have any clogged hoses/fittings. Be sure to check the nipple in the intake manifold to see if it is blocked and pull the hoses off and check for clogging or restriction by crusty coating inside - replace any that seem hard and brittle. Check the crankcase vapor separator box - black plastic unit bolted to block underneath intake manifold #3 & #4 runners - if the port appears crudded up, replace the unit. Put the car on a 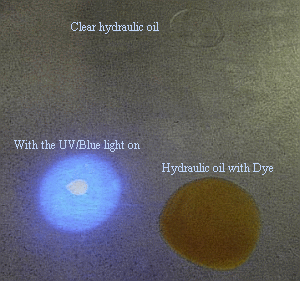 rack and inspect the underside with a bright light to locate sources of leaks - places to check are front end (crank, camshaft, and intermediate shaft seals), oil pressure sender unit (look for leakage from the unit itself), oil filter assembly (turbo?), rear of head around distributor, bottom of bell housing (rear main seal). If you can't tell where it is coming from due to overall oil and dirt all over the engine, get it cleaned, then start checking regularly for signs of fresh oil.
Use of UV Dye to Diagnose Oil Leaks:
Using a bottle of compatible ultraviolet dye and an ultraviolet lamp is a highly effective way of tracing oil or fluid leaks. Dye can be purchased from NAPA in small one ounce bottles for about US$3. Dyes are made for motor oil, a/t fluid, coolant, and R12 or R134. Place the dye in the system, run the engine, and use the UV lamp to locate the leak, which will fluoresce in bright blue when you are wearing a pair of "UV-enhancing" yellow glasses from JCWhitney ($4). Various firms sell UV lamps specifically for leak detection. Clean the dye off with Simple Green and a hose.
Flickering Oil Pressure Light. [Symptom:] Oil lamp flickers.
Potential Diagnoses:
- Are you sure you are using the correct oil viscosity? (5W-30 minimum unless synthetic.)
- Failing oil pressure sensor. Test the oil pressure with a gauge.
- The insulation on the wire from the sensor has degenerated from heat over the years. I had the wire replaced for about $85.00 and it has been fine ever since. This is a major problem on pre-1988 cars with rotting wiring harnesses.
- One of the o-rings on the oil pickup tube on the pump has slipped, causing the oil pressure problem.
- Oil pressure bypass spring has fatigued, requiring a new oil pump.
- Signs of pump wear. Oil pumps don't fail at once they just slowly wear out. As the gears wear the oil pressure drops so slowly that we don't notice it. Meanwhile the bearings are getting less and less oil and their wear accelerates.
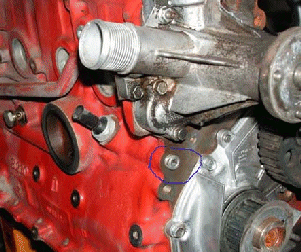
[John Sargent] To install a gauge to test oil pressure, use the front oil galley port (circled in blue in the photo) which is just ahead of the oil pressure switch on the block, and faces the front of the engine. It is 6mm internal hex, and the block threads are 1/4 inch NPT.
[R Haire] The oil pressure sending unit threads for the B230 are 14 mm/1.50 thread.
Oil Delivery Tube O-Ring Modification.
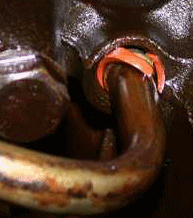 B230 [John Sargent] The oil delivery tube connects the oil pump outlet to the inlet for the oil galleys in the block. Occasionally the o-rings sealing the oil delivery tube at the pump will slide out of place, reducing oil pressure. [See the photo: the seal is bulging out on the left.] Oil delivery tube seal failure is a known problem, but I can't give you any figures. If you don't get the tube seated all the way in the block and oil pump cavities you will probably experience the failure. It is possible that some tubes are manufactured with a smaller ridge on them than others. Those tubes would be likely to have the seal slip up and over the ridge. When you reinstall the tube, carefully drive it into place with a mallet, using a wood block as a cushion against the delivery tube. Make sure it fits: some are looser than others. Watch carefully and make sure it is fully seated.
Replacing the Seals. [John Sargent] The B230 oil delivery tube is a pipe that goes from the oil pump to the engine. To replace the seals, access the oil pump as noted below. Then pull the pipe after you remove the two bolts securing the oil pump
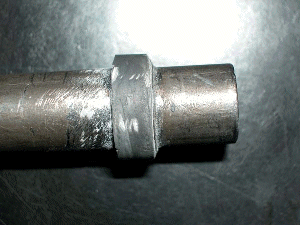
Solving the Problem. To solve this I modified an extra oil delivery tube by building up a ridge of JB Weld, a high (read slow setting) strength epoxy that bonds well to metal,.on both ends of the pipe. I did this by using an old oil pump for a casting mold. I use a Q Tip to put a light coat of wheel bearing grease in the cavity which the oil delivery tube fits into. I mixed up the JB Weld and coated the ridge and about 1/4 inch of the delivery tube above the ridge with the epoxy. Then I inserted it into the oil pump housing and let it set up overnight. The next morning I twisted the oil delivery tube out of the housing and went through the same process with the other end of the tube. I used a fine mill file to smooth the epoxy at the ridge where the square cross section o-ring fits. The ridge now has a square shoulder and the o-ring cannot be pushed over it with high oil pressure. The tips of the oil delivery tube are unchanged, but the tube at the ridge and past is now a precision fit in the respective bores in the block and oil pump. The modified tube is shown to the right. The seals cannot get pushed past the improved lip on the tube. Hot oil pressure is now 42 psi at idle. Hot running oil pressure is 65 psi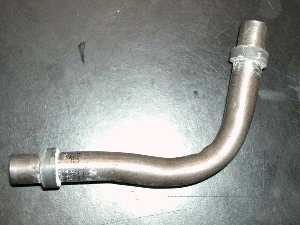
 .
.
B6304. See Below for more information on the o-rings and tube for B6304 engines.
Oil Pump: Wear and Replacement.
Rebuild or Replace? [Tip from Engine Builder Magazine, Jan 04] No engine builder in their right mind is going to risk a failure by reusing a worn pump in a rebuilt engine, so most simply replace the pump. According to Melling Engine Parts, a major supplier of oil pumps and repair kits, most engine builders today replace pumps rather than rebuild them because installing a new pump is quicker, easier and less risky....Another item that should always be replaced (but often isn't) is the pickup tube and screen. Pickups are difficult to clean and can hide debris that may damage a new pump or the the engine.... The pump should also be filled with oil when it is mounted on the block to prime it and reduce the risk of a dry start. Do not use grease or assembly lube here... Feeding pressurized oil into the main oil gallery through the oil pressure sending unit fitting will route oil to all the critical areas inside the engine and eliminate the risk of scuffing the bearings when it is first started.
[Tip from Dick Riess] Paul Despres posted a note on in-the-car oil pump replacement in a 200 series. This stimulated me to try a 700 and 900 series.
- Problems: Cold idle 1.5 bar
- Hot Idle: less than .5 bar
- Cold at 2000 rpm, 2 bar +
- Hot at 2000 rpm l.5 bar
- Not good and below spec.
- Engine approx 130K. This is a turbo running Mobil l.
OEM Pump Replacement Procedure. [There is in addition to the following instructions a separate FAQ file describing disassembly of the bottom of the engine.] Note that replacement oil pan gaskets come in 2 flavors, a complete 1-piece gasket, and a 3-piece gasket that's used when you can't fully remove the oil pan from the vehicle.
Followed the Volvo manual and changed out pump in approx 6 hours after fabricating a jig to hold the engine up slightly. Built out of 2x6 yellow pine, a couple of chain repair links and a 1/4 inch hook eye.
Pump and Pan Replacement By Dropping Crossmember :
Take off license plate and bracket so you don't make new holes in your body. Place car on jacks. Locate them on box frame just before the box slopes and becomes small, not on the frame crossmember. Take off belly pan. Unbolt sway bar at frame only. Undo steering shaft at U joints and slip upward. Remove negative cable from battery. Remove intake hose (turbo) from intercooler to intake manifold. Loosen power steering reservoir. Remove distributor cap and rotor. Clip tie holding hose to motor mount. Under engine, remove nuts and bolt from bottom of passenger (LHD) side motor mount. Remove entire motor mount series of bolts and nuts, 6 total. Snug up and lift slightly on engine jig. I used a nut to tighten and lift the hook eye connected to the lift hook on the thermostat housing. Unbolt the frame, 4 bolts. It will drop slightly. Undo bolts and remove the reinforcement plate between engine and bellhousing. Remove motor mount from the driver side. No need to remove actual rubber from metal portions. Unbolt oil pan, drop and rotate nose toward the driver side (this is why you remove the motor mount). Remove oil pump, replace with new one and new rubber O rings on feeder pipe. Lube rings with oil or Vaseline to help with reassembly. Carefully reassemble pump to block aligning pump driving shaft with driving shaft from engine. Clean pan and gasket leftovers. You can also replace your rod bearings if you want. I did on one of the cars---less than an extra $30 using a standard size. Reassemble.
Results:
- Cold idle: 4 bars
- Cold 2000 rpm: 4.5-5 bars
- Hot idle: 3.5-4 bars
As Paul experienced, both engines (B230FT) are much quieter re: piston slap. I used a Febi Bilstein HD pump in both. Cost approx $120 without rod bearings and approx $150 with bearings. This is not a bad job to do and may prevent some major blowups on engines which are good, but have a failing oil pump. So far I have a series of 5 oil pumps which I have replaced either rebuilding an engine or as this and all show the same wear pattern. Mileage usually in the 125-150K. All turbos. Believe they are wear items.
Oil Pump Replacement Without Dropping Crossmember: [Isaac/Kenny] Undo bottom bolts on both engine mounts, raise the engine slightly, then completely remove the driver side mount. Remove distributor cap and rotor. Then hoist the engine as high as it'll go (watch that you do not smash the distributor against the firewall). Undo all the bolts on the pan (after draining) and drop the pan. At this point the pan will still be impossible to pull out, but you don't have to. You can get at the two oil pump bolts with a 13mm (approx) wrench. Once the bolts are out (watch out for washers) pull the pump out, and be sure to fish out the O ring seal in the block if it didn't come out with the oil pump output tube. There should also be a seal between the output tube and the pump itself, in case it fell in the pan and you didn't see it, you'll know to retrieve it. To install the new pump, feel around where the drive shaft of the pump meets the drive on the block, and feel what direction it's pointing. Line up the notch in the drive of the pump with that so it's close when you raise the pump up into there. Lube the new seals on the new pump, dump oil in the pump to prime it (it will not prime itself), and put it inside the engine with the output tube attached, lining the tube up in the block at the same time as you raise the pump into place. With one hand holding the pump, put the bolt (the one without the tube guide thing) into place. Then do the other one and you're done. Raise pan, bolt into place, and reverse the rest. If you have trouble getting the pump back in, it'll take 3 hours. If not, 2 hours. And make sure you have oil pressure before driving off.
Some tips [Bruce Young]:
Is it possible to install a one-piece oil pan gasket by sliding it under the oil pump inside the pan? I already have one, and now I realize thy make 3 piece ones to make installation easier.
I wouldn't want to try it, even with a 3-piece gasket, without at least hoisting the engine.
Is it possible to unbolt the oil pump, let it drop into the pan, and the remove the pan? Yes, with engine hoisted. But to put pan back on after putting pump back in place, the pan baffle tray has to have a section bent or cut away to clear the pickup tube. The photo shows what worked. But now I'd say the larger bent piece should be cut
out completely, as think it contacted the pickup and kept the pan from
moving rearward, so the front could swing inward when almost in place
(interference at AC compressor bracket, which I had to detach and move
forward).
in place, the pan baffle tray has to have a section bent or cut away to clear the pickup tube. The photo shows what worked. But now I'd say the larger bent piece should be cut
out completely, as think it contacted the pickup and kept the pan from
moving rearward, so the front could swing inward when almost in place
(interference at AC compressor bracket, which I had to detach and move
forward).
Oil Relief Spring Failure. [Editor's Note] Dick swapped the pumps because after dropping the pan, a $100 pump replacement did not seem to be a big expense and would certainly eliminate any uncertainty. If you remove your pump, note that clearance between oil pump gear teeth should be between 0.15-0.35mm, and axial clearance between the end of the gear and a straightedge across the face between 0.02 -0.12mm. The relief valve spring, which is highly suspect in low oil pressure conditions, should compress from 39.2mm to 26.25mm under a load of 46-54 N (10-12lbs) and to 21.0mm under a load of 62-78 N (13.6-17.2 lbs.) Unfortunately, the spring is no longer available separate from the pump. Also, make sure the drive shaft cog teeth are intact and not fractured. IPD sells a reinforcing ring for this drive and if you have the pump out of the engine it is worth installing. Use new delivery tube seals on reinstallation.
Oil Drain Valves. Oil drain valves are available for Volvos from Fumoto Engineering of America, 12328 Northup Way, Bellevue Washington 98005. Phone is 206-869-7771, fax is 206-869--2558. The part number for four-cylinder engines is T-204; V-6 engines (1976-1982) use part number F-108. I've heard there might be a clearance problem with 850s because the drain nut isn't on the bottom, but can't say for sure. It's operated from below, but requires only pushing a lever out of the spring-loaded locking position, then rotating 90 degrees. It doesn't create a clearance problem, and can not open by mistake. I used a copper washer on mine rather than the washer supplied, and it has never leaked. I've used these for more than 25 car-years and they are really great. No stripped drain bolts, no bashed knuckles, no mess, no wrenching, less time.
960 B6304 Oil Pressure Problem: O-Ring Problems. [Query:] i have a 95 960 with 114k miles with an unusual oil pressure problem that my repair shop nor I can solve. I'm hoping someone out their may know of this problem, know of someone that knows of this problem or can direct me to someone who can help me. I've owned this car for 6 months with absolutely no problems except a noisy ps pump. Suddenly the oil light went on and i then heard the valves complaining of no oil pressure. After flushing the engine, replacing the filter, oil pump and associated tubes, pickups and valves, it still has the problem. From a cold start the engine will idle for hours, including running the rpms up, and the oil light stays off and there is oil pressure. Then a short trip down the road produces the light and valve noise. After a short cool down everything is ok. Sometimes the light goes on right from cold start up.[More Symptoms] My 98 V90 runs as smoothly as one could wish except for an occasional valve tap. It seems to occur after a long drive. I can hear it while the car is idling. I can shut the ignition off and restart it immediately and the tap is gone.[Response: Abe Crombie] The o-ring on the oil pump suction tube in the oil pan has been pulled inward allowing air to enter. While the pan is off the two o-rings at the pan-to-block joint need to be replaced also.
See the FAQ file: B6304 Oil Pickup Tube Repair for more information.