
Volvo Instrument Cluster Interchangeability
Instrument Cluster Interchangeability: Overview. [Editor] Volvo used a variety of instrument panels and clusters over the years with two basic shapes: the rectangular units used through 1990 in 740/760 cars, and the trapezoidal units used for 1992 and thereafter. Within the clusters, manufacturers included VDO and Yazaki making different units. Each model year has some small to large electrical or mechanical differences among clusters, so they are interchangeable only with the limitations described below. This becomes important if your model year cluster is either unavailable or unreliable, as are the 1991 and 1992 clusters which suffer from capacitor failure in the speedometers.
Clusters That Are Interchangeable. [Randy Starkie] With reference to the 140mph speedometers in 700/900 series cars, the 1991 and 1992 instrument clusters and their speedometers are the same. 1993 and 1994 are the same but different from the 91/92. 1995 has different speedometer and tachometer connectors on the rear and is not interchangeable with any earlier models. The speedometers from a 91/92 cluster will not swap with a speedometer from a 93/94/95; the 95 panel will not swap with any other year. It would appear that the 960 cars share the same cluster with their respective 740/940 cousins. I was able to swap a speedometer from a 92 960 with a speedometer in a 92 940. Turbo cars require the tachometer/boost gauge to be swapped into a replacement cluster from a NA car.
Caveat: the fuel gauges are an exception to this rule. The fuel gauges are definitely different and will not swap without modification. The gauges on the 93-95 cluster will read empty when the cluster is installed in the 91-92 cars.The difference between those two is in the resistance produced by floating device in the sending unit and number of connectors in the fuel gauge. [John Sargent] Changing to the 1993-94 sending unit will make the 1993-94 fuel gauge work in the 1991-92 cars.
While speedometers will not swap between the already noted clusters, I believe entire clusters will swap across the 91-95 models with the exception of the fuel gauges. The clocks are a wild card in that some are controlled from the dash and others through the bezel. I did not investigate the cruise control. 91/92 have a male spade on the speedometer and the later cars have the spade on the back of the cluster- I would guess both are providing the same needed signal but I did not have the opportunity to check this out.
[Jay Simkin] The temperature gauge and the clock are "bolt-in" units. They will interchange between 1995 and earlier clusters (to 1993, for certain) These items get their signals from the flexible circuit card, via contacts under the the mounting screws, that secure these units to the cluster housing. [Editor] See Randy Starkie's notes on clocks below.
The speedometer and tachometer get their signals via a dedicated connector, the format of which changed after 1994. The 1994 connector was female (and on the board, the connector is male). The 1995 harness connector is male, which when pushed into a recess contacts a "flap" of the flexible circuit card, on which there are exposed copper contacts.
The 1994 and 1995 speedometer circuit boards are different shapes. The 1994 unit has a six pin male connector at the top on the right. The 1995 does not have this connector. A 1994 unit will not fit in a cluster housing intended to take a 1995 unit. Here are the part numbers from Volvo VADIS for non-turbo cars, set-up to meet US specifications (speedometers for Canadian cars are calibrated in kilometers):
Temperature Gauge : 1398478 (common to 1994 and 1995)
Fuel Gauge (w/LED): 9130049 (common to 1994 and 1995)
Clock : 9130121 (common to 1994 and 1995)
Speedometer (1994): 9130043
Speedometer (1995): 9434109
Tachometer (1994) : 3623643
Tachometer (1995) : 9434149
Speedometer (1992 turbo): 3523652
Sources for Used Clusters. [David Hunter] Lakeview Auto Parts in Charlotte NC (704 393 8655) has collected many used 740/940/960 clusters and instruments. The online search tool http://www.car-part.com/ has many clusters and speedometers/gauges listed around the country.
Fuel Gauge and Clock Interchangeability Among Clusters and Model Years.
If you have a failing 1992 speedometer, you have several repair choices. You can install a 93-94 cluster in the car using the earlier fuel gauge and clock as noted below by Karl and Randy. If for some reason you need to install a later fuel sending unit and gauge in the earlier cluster, follow Robert's instructions below. The latter fix will not solve any speedometer issues.
Fuel Gauge/Fuel Sending Unit Compatibility. [John Sargent] The 93/94 fuel gauges may be used in 91/92 cars if you also change the sending unit at the fuel tank to the corresponding later versions.
Fuel Gauge Interchange. [Randy Starkie] I now have a 1992 745 that has a cluster from a 1994 940 and everything works. I reported not long ago that the work around to the traces and jumpers that Karl Nitz described below did not result in a working fuel gauge. I had performed the work around which involves severing several traces, adding two jumpers to the circuit board, and adding a capacitor from the 90/91 circuit board to the 93/94 circuit board, but the fuel gauge always read full.
The short story is that the work around Karl shared does work, but it also has to include the addition of the 91/92 fuel gauge to the work on the circuit board. It is not as easy as a simple addition of the 91/92 gauge to the 93/94 cluster.
Here is Karl's circuit work on fitting a 91-92 fuel gauge to the later 93-94 cluster:
There is a capacitor in the area of the fuel gauge on the circuit board of the 91-92 cluster. It must be removed and then installed on the 93-94 circuit board. The capacitor from  the 91-92 board is soldered into place on the 93-94 board.
The 93/94 circuit board has the fourth connector pad position (see photos below), but the white plastic of the cluster does not have the hole for the screw in the earlier 91-92 gauge to pass through. You need to drill out the hole if you install the earlier gauge. I used a #21 drill bit but a 5/32" bit will work fine. You need to remove several components to peel up the board and then drill the plastic. You can then install the 91-92 fuel gauge into the 93-94 cluster. See the plans and illustrations below.
Notice that the traces are severed in two places: between A and C; and B and C.
 After carefully scraping the coating off of the traces two jumpers must be soldered in on the 93-94 circuit board. Care must be taken to use enough heat to achieve a good connection between the jumper and the board, but not so much as to damage it.
Here is Robert Deptula's work fitting the 93-94 fuel gauge to the earlier 91-92 cluster:
To accomplish this and be able to reuse the 91-92 cluster in your 91-92 car, you will need to replace the earlier fuel sending unit and fuel gauge with the later units while making the modifications below. Note that 91-92 clusters uniformly suffer from failing speedometers so you consider replacing the speedo as well with a known good unit from another 91-92 cluster.

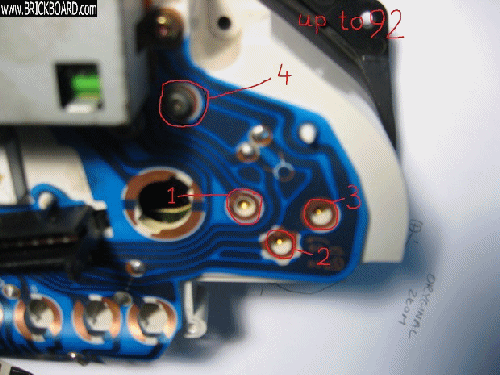
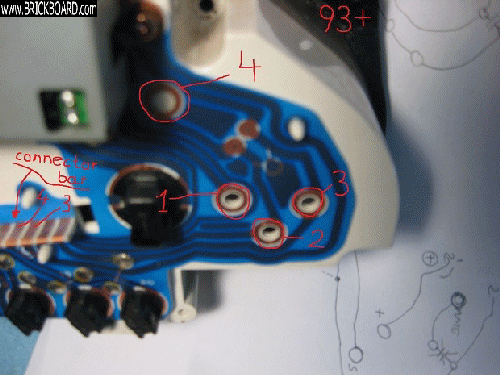
The 91/92 fuel gauge has four connections; the 93/94 has three as depicted below. In the 92 gauge connector, 4 is for the sensor, 1 and 3 power up the gauge and number 2 is an option between two different tank capacities. In the 93/94 gauge 1 and 3 power up the gauge and number 2 is the sensor.
Number 4 on the later circuit board print is left unconnected.
Fuel Gauge Connections for 91-92 Clusters:

Fuel Gauge Connections for 93-94 Clusters:

Robert's Circuit Modifications to the 91-92 Cluster PCB and 93-94 Fuel Gauge to make them Compatible:
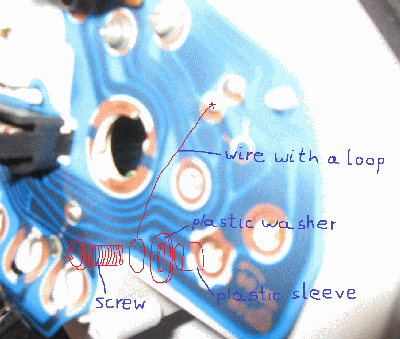
Separate the screw that goes to connector 2 (the number is circled in the illustration but does not appear on any circuit diagram) of the gauge from the print on the instrument cluster circuit. As you can see on the photo above there is connection between point 2 and 3 (circled) on the 92 instrument cluster circuit. You need to separate those two since newer gauge (93+) has sensor connector at point 2 and the old one is at 4. So I fabricated a small sleeve about 3mm long and a plastic or nylon washer and then on top of it I have placed a wire loop circuit that I have connected to the point marked by X on the picture below. This isolates point 2 on the PCB board from the guage and connects point 2 on the gauge directly to point X. From the point X the instrument cluster circuit goes directly to connector #3 on the connector bar (which is the actual number on the connector plug that on the back of the cluster). Connector #4 on the connector goes to number 3 circled in both gauges. As you can see on the picture of 92 instrument cluster circuit there are two soldering points between circled 3 and 4. This is the duplicate capacitor that I have pulled out since, electrically speaking, the same capacitor is between those two points on the 93 gauge circuit.
Gus Rouhas' Installation of a 1991 740 Fuel Gauge into a Later 940 Cluster Whilst Retaining the Earlier Fuel Sending Unit in the Tank:
I successfully made the 740 fuel gauge to 940 cluster swap yesterday. Here are the steps I followed (without including the soldering details already in the FAQS).
- Remove the fuel gauge from the 940 cluster
- Remove the fuel gauge from the 740 cluster
- Drill a 5/32” hole in the 940 board through the corresponding round copper trace for the attachment of the fourth screw on the 740 gauge (the 940 gauge is attached with only three screws).
- Remove the clock from the 940 cluster
- Carefully bend the flat round capacitor at the square corner of the 740 fuel gauge (above photo of the 91/92 gauge PCB, at the lower left) to a horizontal position to allow the clock to clear it when the clock is reinstalled.
- Transfer the small (300μF) capacitor from the 740 board to the 940 board as per the FAQs
- Sever the two traces on the 940 board as per the notes above.
- Solder the two jumpers as per the notes above.
- Install the 740 fuel gauge in the 940 board
- Reinstall the 940 clock in the 940 board making sure it clears the capacitor that you bent over
- Put the 940 cluster back together, reinstall in the car and you now have a working speedometer, fuel gauge, and clock. However, the clock has to be set with the mechanical knob that protrudes through the cluster face, not the original electronic switch mounted below the cluster on the 740 dash. The FAQs do contain a method for adapting the 740 clock to the 940 board but I skipped that procedure.
Robert's Fuel Sender Swap:
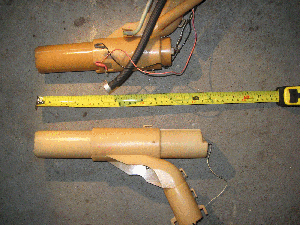
The fuel sending units are different between 91-92 and 93-94 cars. Not only are they different sizes but the electrical resistance was changed, hence the need to use the later gauge with the later sending unit. Up to 92 the sending unit between black/white and brown wires (#3 and #4 on the connector bar at instrument cluster widest connector) reads 0 ohms when empty and about 280 when full. The 93+ reads at the same points about 131 ohms when empty and about 2 ohms when full. The gauges are accordingly different. The 92 sedan also has the short fuel sender and the newer one is about 2 inches longer. After the modifications above, the later fuel gauge reads slightly differently in the 91-92 car because of tank differences. Before the swap I had to drive about 70-90 km from full tank to see any drop of the needle, right now I have a sudden 1/8 drop of the needle within 20-25 km and then the needle goes steadily down as it supposed to. This is the only difference I have noticed. This is due to the capacity of the tanks and the height of the rods that the floating device travels on.
Fuel Gauge and Clock Interference if You Install the Earlier Gauge in a Later Cluster. The fuel gauge swap can also pose problems for the clock. The early fuel gauge does not provide clearance for the later clock that is in the 93/94 cluster. So you need to transfer the clock from the 91/92 cluster to the 93/94 cluster.
Transferring the clock presents two problems. The first is that the clock has a harness attachment on the back that is not present on the 93/94 clock. You will need to cut off the plastic protrusions on the back of the 91/92 clock. I used a die cutter to remove the plastic flush with the back of the clock- leaving the three electrical spades the only thing protruding from the back.
The three connectors need to be accommodated on the cluster. This involves using a step drill on the white plastic behind the circuit board. The circuit boards are a different configuration in this area so you need to make a hole that will allow the connector clearance but not damage the the circuit board. The step drill works well- the hole ends up being about 3/4".
Of course the connector that attaches to the clock to enable you to adjust the setting is to large to be used so I used the die grinder or dremel to cut it down so that you have the two electrical females isolated. Once you cut it the orientation is lost so mark it for reference before you cut the excess.
I found the clock did not fit in the 93/94 cluster the way it did in the 91/92. There are only two screws that provide the power to the clock but the second hole ended up being about 3/32" off. Once again peel back the circuit board so that you can drill the second hole (the upper one) over size. The circuit board is still off about 3/32" so you need to scrape off the coating on the board and then cut a small section out so the board matches up with the oversized hole in the white plastic.
At this point you should be able to install the clock and fuel gauge from the 91/92 cluster in the 93/94 cluster.
You need to use the clear plastic and the gauge surround from the 93/94 cluster. It would be nice to not have the hole in the clear plastic that the manual clock adjustment stem went through but the 91/92 plastic does not have a filler in the area below the temperature gauge.
You should have an extra black rubber plug from the second cluster simply install it in the hole for the adjusting stem that is not there. Before putting the two cluster pieces together use something (I used black electrical tape) to cover the back side of the second hole through the black plastic so the white light from the gauge illumination does not leak through.
After connecting the cluster harnesses and before securing the cluster by the screws on each side be sure to check to see that all of the gauges are properly illuminated. Sometimes the bulb holders need to be moved to complete the circuit.
Randy's Simplified Fix: Swapping instrument clusters from 93/94 to 91/92 7/9 series car
[Randy Starkie] This procedure describes the steps necessary to alter the instrument cluster from a 93/94 Volvo 940 for use in a 91/92 Volvo 7/9 series car. This supersedes the previous instructions I put together that were included in the FAQ's. This "fix" is easier and has far fewer steps involved.
If an unaltered cluster from a 93/94 car is swapped into the earlier cars the fuel gauge will not register. Many thanks to Karl Nitz for sharing with me the information on the changes necessary to the circuit board on the 93/94 clusters in order to make the 91/92 fuel gauge work when transferred to the 93/94 cluster.
I have come across several 93/94 clusters that have bad speedometers. You should remove the original cluster from your car and loosely install the 93/94 cluster. Check that all the gauges (other than the fuel gauge) and lights work before proceeding. Once you have determined that you have a good replacement cluster move both clusters to your workbench.

Remove the nine screws from the 93/94 cluster and the seven screws from the 91/92 that hold the two halves together. Separate the two halves of each cluster. Be extremely careful of the exposed instrument faces. The pegs that the gauge needles rest against are very fragile.
Remove the four screws that hold the 91/92 fuel gauge in place and remove it from the cluster. Remove the three screws that hold the 93/94 fuel gauge in place in its cluster and remove it as well. Remove the two screws on the 93/94 cluster's clock and set it aside.

The fourth hole for the 91/92 fuel gauge is on the later circuit board but the hole needs to be drilled through the plastic of the 93/94 cluster. If you are careful you can simple "eyeball" the center of that hole and drill a 1/16" pilot hole and then follow up with a 5/32" drill. The 5/32" bit will clear the opening in the circuit board.
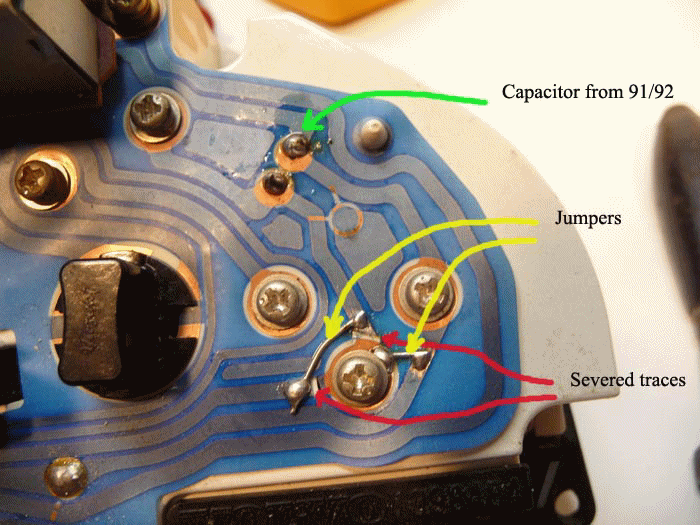
The 91/92 cluster has a capacitor that needs to be removed and then soldered into the 93/94 board. It has been suggested that this capacitor is not necessary but I have never been compelled to test that theory. It is easy enough to remove it from the one board and install it on the later one.
The alteration of the circuit board on the 93/94 cluster is the next step. Sever each of two traces by removing a portions with a razor blade knife. Make four small cuts on each trace and that section of the board will fall away.
Carefully scrape the area that shows the solder puddles in the photo and solder a light weight jumper into place. Very light wire requires less heat from the soldering iron and reduces the risk of damaging the board.
The fuel gauge and clock need to be reinstalled in the cluster. They will not fit into place without some alteration. Even with the alterations it remains a tight fit. Note that 91/92 clusters have the clock adjustment on the dash panel below the instrument cluster. 93/94 have the clock adjustment through the cluster face.

The fuel gauge components shown in the photo interfere with the time adjustment portion of the clock. You may find the components stuck together. If so separate them with a sharp knife. Then carefully bend them away from the clock position to gain the much needed room for both the clock and the fuel gauge to fit.

Use a dremel fitted with a cutting disk to alter the clock. You need to remove a portion of the clear plastic that covers the gear on the time adjustment mechanism. Care should be taken not to allow the dremel to come into contact with the gear. You can change the position of the gear with the adjusting knob so as to have more room to work; first cutting one side and then the other.
Install the fuel gauge and clock (the promised tight fit). When I assembled the two halves of the cluster they did not want to go together completely. I believe it was the edges of the gauges not fitting into the recesses around the openings. Wiggle, wiggle finally worked, but 20/20 hindsight makes me think that if you left the two clock mount screws loose until the halves were together it might make it easier.
Install the nine screws that hold the two halves of the cluster together and install the cluster in the car.
