Sunroof Issues and Fixes
Maintenance and Adjustment:
Sunroof Preventive Maintenance
Sunroof Alignment: Won't Retract Properly
Electric Mechanism:
Electric Sunroof Motor Overhaul
Sunroof Won't Stop at Close: Motor Defective
Electric Sunroof Motor Needs to Be Zeroed
Sunroof: Replace Motor with Crank
Sunroof: Replace Crank with Motor
Headliner:
Removing the Sunroof Pan to Replace the Headliner
Maintenance and Adjustment:
Sunroof Preventive Maintenance.
Lubrication. [Editor] Using Mobil 1 Spray Lube, Superlube, or Valvoline Synpower clear spray oils, spray the following:
- Front air deflector hinges and side pivot arm pins.
- Cables within cable channels on the side. Locate these from within the car using a flashlight: they are within the side guides.
- Pivots, levers, and hinges visible from inside the car.
Operate the sunroof to spread the oil and be able to see any spots you missed. Do this once per year.
Sunroof Motor/Crank Preventive Maintenance
For everyone with a sunroof in a 200, 700 and 900: Remove the crank handle and tighten the gear assembly screws. For electric sunroofs remove the cover and tighten the motor mounting screws. They all work loose over time and will cause the drive teeth and/or the drive cables to bind, wear out or get the lid misaligned and then the roof will not close. You might consider using a little Loctite on them to make certain they don't loosen. This little procedure will save you $100's of dollars
Sunroof Alignment: Won't Retract Properly.
Emergency Retraction. If your electric sunroof will not retract, you can manually close it using a screwdriver. Remove the cover. You will see a large slotted screw, possibly with a ball bearing in the middle of it. Use a screwdriver to depress the bearing and turn the screw to manually operate the roof.
Sunroof Stuck Open: Check Electricals. [Inquiry] The moonroof on my 95' 940 opened tonight and immediately stuck in the ventilation position. The switch makes a clicking sound but the sunroof does not move. The fuse looked fine but I changed it anyway. Any suggestions? [Response: Rob Bareiss] You wouldn't be the first person to have a bad sunroof switch in a 740/940 with a power sunroof. It's likely to be the switch- replacement is pretty straightforward. Get a new one from Volvo, and it comes with a short piece of cable and the connector. How do you tell if it's a common failure item? It'll be IN STOCK at your local dealer (unless they just sold the last one...)
Sunroof Sticks When Closing. [Symptom: I have a 90 740 GLE and noticed that the sunroof is getting stuck when trying to close. I took out the motor, lubed everything and the motor appears to work fine. Also when the sunroof is closed if you look on the outside it doesn't appear to be sitting flush like it should.] [Diagnosis:] If your guides are not broken then you may just be out of adjustment. Adjustment is accomplished by loosening a number of screws, moving the roof and re-tightening. A Haynes or Bentley manual will help you through. If you do need to remove the sunroof there is an easy method. Open the roof to the vent position. Use a screw driver or needle nose pliers to release the springs that hold the sunroof liner to the roof. Push the liner back into the space where the roof would normally retract. This will expose all parts, and adjustment screws. [Response: Rob Abel] Our sunroof in our '93 940 acts goofy at times. Clicks and doesn't move - gets stuck - usually open - have had to close it manually by taking off cover and using screwdriver. On ours it's the switch. I take it out about once every two months, take it apart, clean up the contacts, and it works fine for the next two months. The only manual that will adequately address this is the Volvo factory body manual (Body Fittings: Exterior/ TP 8202201).
None of the others do. [Norm Cook] My electric sunroof was binding on the wind flap and keeping it from closing properly. I noticed the sunroof trim had come unglued at front on one side; this was dropping down low enough to bind on the wind flap. Reglueing it fixed the problem.Electric Sunroof Alignment. [Inquiry] The power sunroof on my '91 940T has stopped functioning, and is stuck all the way "open" (tilted up, rather) and won't go back down. This follows a few weeks of CLICCLICKLCLIK when opened/closed, and some erratic operation. [Response: Kerry] (Applies to 1986 765) With your sunroof in the vent position you can remove the sunroof liner and check all the bolts on the mechanism and rail to realign the sunroof. To remove the liner:
- Get a coat hanger and cut out the straight part. Bend the end to form a small hook
- Pull the edge of the sunroof liner down at the end sticking up (remember your sunroof should be in the vent position)
- You will see two spring loaded hooks which are attached to the sunroof liner and hooked to the sunroof. These hold the liner in place. They are at the back of the sunroof, one left and one on right.
- You can unhook them with your coat hanger wire.
- The sunroof liner can then be slid back out of the way (don't push it to far back)under the roof and above the headliner.
With the liner out of the way you can check all the bolts and screws. You can see the adjustment Allen (some may be Torx or Phillips) screws in the four corners. Adjust these so that leading edge of sunroof is 1 MM lower than car roof.Adjust trailing edge 1 MM higher than car roof. This gives minimum wind noise. When I checked mine, I found two screws VERY loose and one about to fall out. Use some locktite blue on any you have to tighten up.
Then close the roof and hook the springs back on with the help of the coat hanger hook
The other thing is to remove the cover from the sunroof motor. There is a large screw with a button in the middle on the motor assembly. Turning the screw with a screwdriver will depress the button and allow you to move the sunroof BUT, it also adjusts the stop location for open and closed.
Sunroof Won't Open to Vent Position. [Tips from Ken Dibnah] If you have a 740 with an electric sunroof, when the roof is in the fully closed position you should be able to push the closed switch again and have the rear of the roof pop up to the 'vent' position. If you have a manual roof, after it reaches the closed position you feel a bit of resistance; you then continue moving the crank in the closed direction and the rear of the roof should pop up to the 'vent' position.
If your roof does not move at all, you must NOT pry up the rear edge manually as there are cast tracks at the rear of the panel that hold it in place and you will break, bend, or damage the tracks, roof or the panel.
Most likely it is out of alignment and too tight for the minimal leverage applied by the motor to move it, as well as being thoroughly gunked up. The secret to lack of motion is most likely binding in the up and down motion of the panel. If manual, try moving the crank back and forth, bearing in mind that the first motion the roof makes is that up and down motion at the rear of the panel. If there is resistance to the crank motion immediately, there is 'likely' to not be any damage in the screw mechanism, just binding of the panel in the roof.
If nothing moves as you move the crank towards 'vent', push up gently through that small rectangular opening inside the headliner on the rear of the panel to help it along, by just pushing it free of the roof. The tracks at the rear of the panel move the panel up and down, either to pull it down before retracting or to pop the rear of the panel up for the 'vent' position, and if they are damaged or too gunked up, they will resist opening. The device that is connected to the motor/crank via screw cables slides back and forth in these tracks, raising and lowering the panel, which will not be possible unless you can move the crank/motor. Try to get it high enough to be able to peer inside the roof from the outside to unhook the headliner clips - once you get those, all is revealed and you will be able to see why your roof is not functioning properly.
Re-Aligning the Crank Gears While Aligning the Sunroof. [Inquiry] I removed my crank to try to adjust the position of the sunroof. But the crank no longer clicks to a stop from the crank mechanism pin popping into the hole in the handle. How do I properly time the crank with these cycles?.[Tip from Bob] Start with the roof in the closed position. Remove the crank from the drive gear shaft. Remove the drive gear from the roof. Reinstall the crank, and turn clockwise (vent position) till it stops. Remove the crank and reposition it pointing straight ahead. Now, turn counter clockwise till it locks. Should be 2 revolutions. Reinstall the gear to the roof.
Cable Attachments Loose. [JMars ] If you can get the sunroof to open, you can sometimes work from the top down. Remove the metal stock wind deflector and it should reveal the motor driven gear where it engages the cables. There are two rivets on either side that attach the cables that often come loose. Replace them with pop rivets or self tapping screws and use a faucet washer over the gear to keep it inplace. My sun roof was jamming in the rear raised position and I fixed it in this way.
Sunroof Motor and Cable Alignment/Reindexing. [Qeury] My sunroof motor loosened up on the right side and now my panel is off kilter. (passenger side is one inch lower than driver side. I have removed clips and springs per FAQ but the liner will not slide back to reveal mechanicals... does anyone have a secret weapon for adjusting the worm drive when the motor is still in your way. [Tip from John Sargent] The motor (or hand crank) is supposed to move both cables an equal amount. When the motor was loose, it moved one cable without moving the other, and the cables are no longer indexed to each other. After you get one side of the sunroof where it is supposed to be, remove the motor, and look up at the cables. You'll see them on the front and rear of the opening. Then move one cable using a flat blade screwdriver. Watch to see you are moving the side which needs to be re-indexed. When you have adjusted one side to match the other, re-install the motor and try it electrically. With not too much trouble you can get the cables indexed to each other. [Dave Stewart] I loosened the motor again and using it in "out of spec" locations rocked the panel back to true.. [Don Stauffer] In my case, one side of the sunroof was in perfect alignment while the other was down too low. The result that when the motor was engaged the roof was "racking" against itself and was binding so it couldn't move. To fix it, take the motor out and "zero" it. Lubricate the tracks and the sliding mechanism. While the motor is out, carefully pry the cable which is attached to the errant side of the sunroof so it moves and slides the roof into perfect alignment. Now replace the motor and tighten all screws. When the motor is engaged, the roof should move easily.
960 Sunroof Adjustment. [Tip from Tom Irwin] Most of the posts I've seen here describe access as through the rear with the roof up in tilt/vent position. Something about unhooking some springs or clips to remove the "push back guard(?)" then push back the headliner panel into the roof....then something about some chingas with a torx screw
WRONG! Not on this run of 960's anyway. It took me a while to figure this out, so I hope someone will benefit. Basically the rear of the roof , when parked, was always about 5mm's below the roof line, while the leading edge was flush. I can hear this at highway speeds.
Don't do anything to the "push back guard", (not necessary) or look for springs or clips, (there aren't any.) Just leave the roof in parked position. Push back the panel was far as it will go without undoing anything. Up on both side of the roof, parallel to the tracks, you will find one per side of black/grey injection molded, plastic strips. Lift the lower edges and they snap right out.
Now there are 4 bolts with an 8mm head. one each at the front and rear of each track, left and right. Loosen each of these 1/2 of a turn. Push up one corner at a time until the rear edge of the sunroof glass is .5mm higher than the roof and the front edge .5mm lower, then cinch the corresponding bolt tight. Snap the strips back in place and you are done.
S/V 90 Sunroof Sag: I loosened the 4 bolts and am at the top of the adjustment with none left and a noticable sag.
There is a space between the gasket at the rear and the roof.
The rear just does not lift high enough. My immediate solution was to snip the bottom of the adjustment holes off so they became slots.
Re-install, adjust, and problem solved.
Why did it go bad? I think the gasket around the glass was compressed over the previous 11 years. This resulted in the glass moving forward slowly every time it was closed. That caused a gap at the rear. The proper solution, IMHO, is to replace the gasket.
Adjusting the Sunroof Position:
[Inquiry] Recently I've noticed my sunroof seems to be sagging, and I'm wondering if there is some way to get it sitting straight again? [Tip from Rick Tilghman] There are two adjustable screw brackets that allow you to alter the sitting position of the sunroof (silver coppery color, one on either side in the back to control the angle of the "vent"). It is possible for these screws to become loose with time and allow the sunroof to drop down a bit to the lowest possible sisting position. Fix: vent the sunroof; from the outside undo the two springs that hold the headliner sunroof panel to the sunroof; use a long screwdriver to tighten the adjustment screws down while holding the sunroof at the desired angle.
Repairing Sunroof Support Rods:
[Inquiry] I tried adjusting my sunroof's sitting position, but it is currently maxed out and is STILL sagging below the roofline. Is there some other solution? [Tip from Rick Tilghman] This happened to the sunroof on my 1985 745t. The answer is a bit long, but bear with me and you'll be well informed. The adjustment screws on my sunroof were maxed, and the sunroof was still low. Looking closely I noticed that there was discoloration on the end of the metal bars that the adjustment screws hold the sunroof onto. These two levers, one on either side of the sunroof running parellel to the car's direction, control the venting action and sitting height of the sunroof. When I looked really close I noticed that the discoloration was, in fact, a spot that was supposed to connect the rear and front ends of these rods. Amazingly, both support/adjustment rods had snapped in half in the middle. The flaw: In 700 sunroofs there is a metal bracket on each side with two grooves in it. The front groove is long and closed at both ends. This groove allows a metal pin to slide back and forth, limiting and manipulating the sunroofs vent action. The second groove is closed at the top and open at the bottom, providing secondary (but pivotal) support for the venting mechanism. When the sunroof is up ALL FORCE is applied to the small piece of metal (about 1/4" square) that closes the top of this second groove. This piece of metal is inadequate for the job, and over time the piece breaks from the combination of upward force applied via the levering and downward pull via springs and resistance. Once this piece snaps in two, the back of the sunroof sags down in the resting position due to the lack of support, making it IMPOSSIBLE to get it sitting right ever again. The interesting thing was what I noticed when I examined NEWER Volvos. NONE of the newer volvos sunroof brackets were snapped, and all were in perfect working order. ALL newer volvos utilize a slightly modified design that redistributes the force applied to the metal bracket more evenly between the front and back of the metal bracket. It does this via one major change: In the earlier models there is a metal arm approximately 2" long that reaches to a pin that sits in the aformentioned open ended groove on the rear of the venting arm. In the newer models this arm is replaced with a 5"- 6" piece that reaches past the mechanism to the every back end of the bracket. Additionally, there is a metal bar extending from one side of the sunroof to the other that helps to push the brackets out slightly and keep the pieces oriented properly. This extender has springloaded ends that slip over silver arm extentions from the front groove. Instead of having the springs slip through holes in the little arms of the front grooves (like the older models), the springs in the newer design have plastic o-rings that slip around the metal rods. Because of this and the extender bar, the pull from the springs and general downward is dissipated over the entire arm, eliminating the possibility of breakage. If you notice your sunroof is sagging constantly, and that you can't seem to get it to stay at the height you want, even WITH massive adjustment of the sitting screws, this may be your problem. Open the roof in the vent position and use a flashlight to take a closer look. This problem is apparently limited to earlier production models, but it is possible that later years could experience the same problem if excessive downward force is applied to the sunroof (a luggage carrier comes to mind). Repair: The fix for this is nasty and tedious, but it is doable and inexpensive if you have access to a junkyard. Replace your sunroof supports and mechanics with the newer design from a junker. The sunroof roof itself is only held into place by 6-8 screws, and lifts out once you gain access to these and remove them. You only need to replace the support struts and accompanying components, not the roof itself (but removing it makes it easier to gain access to the elements). Make sure to take ALL the little pieces you take off the junker... many pieces may look similar to ones you have but they are slightly different (so substitution isn't really possible).
Procedure to Remove Sunroof Panel (see also Warren Bain's notes above)
740/940 with Venting Sunroof:
- Tools: a magnetic T-25 screwdriver (so you don't lose the screws); a magnetic parts tray (ditto); and either a flashlight or, better, a head-mounted Petzl-style lamp so you can see.
- Vent the sunroof
- Working from outside the car, pull down one corner of the inner sunroof headliner and release the flat spring bails that hold the inner headliner/sunroof panel to the outer sunroof panel. You can see these at the corner of the sunroof. If needed, use a bicycle spoke head or a hooked wire to pull them back.
- Make sure the vent part of the inner sunroof headliner panel is pushed down completely so it is flat.
- Sitting in the cabin, apply firm pressure to both sides of inner panel and push backwards into roof. The panel should "snap" out of its holders in the front and slide back into the roof completely. Just be careful the vent panel doesn't slip upwards and get caught. Slide it back on its tracks SLOWLY but surely, keeping an eye on it to make sure it the vent is down and that it is properly aligned. The vent can "pop-up on you and get wedged over the metal cross-piece. Move it back so that about one inch is showing at the rear.
- Look up at the now-exposed inside of the sunroof outer panel. You should see a rod across the middle, the track runners, etc. You should also see a number of Torx screws. There are four in the front and (depending on model) two on either side in the middle, and two on either side in the back. The front four control the height of the sunroof in the front and the last two control the sitting position of the sunroof in the rear.
- Disconnect the rear of the coil springs on either side where they are connected to the flat spring bails.
- Remove the side screws and then the front screws. DON'T lose the square plastic retainer/washers mounted on the rearmost screws.
- Lift the sunroof panel out of the roof (with care) .
- You now have direct access to the runners and internal sunroof components.
- To reinstall, mount it back in the roof opening in the vented position. Install the front screws, then the side screws . Reinstall the coil springs on the flat bails.
- Adjust the sunroof position so that the front edge, when the panel is closed, is 0-1.5mm below the roof and the rear edge is 0-1mm above the roof edge.
- Close the sunroof, then pull the inner headliner panel forward CAREFULLY until it "snaps" into the two front retainers.
940/960/90 95+ with Glass Sunroof:
- Close the sunroof and open the sunshield. Remove the plastic side pieces just under the sunroof if installed by prying outwards by hand. This exposes the mounting screws.
- Loosen the four screws with M5 8 mm socket and lift the glass. Very helpful to have a helper for lifting and moving the glass unit.
Sunroof Panel Gasket Falls Out. My 1995 940 sedan's moon roof had a thin black gasket drop out and can't figure out which edge it goes on. It's just under three feet long, about a half inch wide, grooved eighth inch high. [Dave Stevens] Tip the sunroof panel up at the back or retract it. Slide the headliner panel all the way back. Right where the headliner panel slides over the tray there is a metal strip along the front edge of the tray with a lip on top. The cross profile of the rubber strip is "h" shaped. The groove of the "h" sits over this metal lip with the tall part of the "h" toward the front of the car. You may want to tack the ends down with a little glue (like RTV or silicone sealant) if it won't stay seated. [Editor] Some models have this lip and gasket on the sunroof panel front edge.
Adjustment of Height:
[Inquiry:] The wind flap (I assume that's what it is) that pulls down just as the lid docks doesn't pull down far enough and the lid jams into it preventing complete closure.
[Response: Dennis Jeong ] Tilt the roof up and pull both of the cover flap spring rod loose (it pulls toward the rear of the car). There is one towards each upper corner of the cloth cover . Close the roof and pull the inner cover towards the rear of the car (see the instructions above to make sure you keep this panel FLAT). Check the top of the roof, if it's flush then look at the adjustable catch on the front edge of the roof panel. It should not tightly hold down, there should be a little play. There are four copper colored screw, two per side side. These determine the overall height of the panel and it's fit. Loosen the front catches then adjust the copper screws. Adjust the sunroof position so that the front edge, when the panel is closed, is 0-1.5mm below the roof and the rear edge is 0-1mm above the roof edge. Play around with it, you'll figure out how it works. DO NOT FORCE ANYTHING. If you break anything, you'll need to get a used part. The sunroof mechanicals are sold as a unit only. Very expensive.
Vibration and Arm Adjustment:
[Tips from Rick Tilghman] Recently my sunroof flap began to vibrate while driving. Having read other posts from brickers about this annoyance, I thought I'd post my results. While I've disassembled the unit, I've never really thought about the wind flap... it was always just kind of there. Anyway, my first assumption drawn from incidental "looks" at the piece was that the responsibility for anti-rattle lay with the two horizontally mounted springs under the flap (parallel to flap). They just looked weak and responsible. However, when I pulled all the parts I noticed that a cout hanger looking piece of metal was sticking out from under one of the retaining arms connected to the sunroof. I had thought these arms were only responsible for pulling the flap down, but this proved incorrect. After disassembly of the arms it turns out that there is a premolded piece of steel (white metal coat hanger in dimensions) that is curved to bendup into the arm and provide resistance. It also turns out that these pieces and their accompanying brackets aren't stainless, because the whole damned thing was rusting like mad. One of the pre-molded pieces actually snapped as I was playing with it. Anyway, the solution was just to uncouple the retaining arms from the flap (you have to push the flap to a straight up position to do this with it in place), push the arms up out the way, remove the pre-molded resistance piece, bend it appropriately so that it is forcefully "loaded", and reinstall. Once this is completed you may notice your flap riding high and failing toclose properly... generally a side effect of pushing the flap up to get it unhooked and playing with it over time. Just put two blocks under the outside edges of the flap (screw driver handles work well) and gently flex the entire flap down so that its overall shapes doesn't ride quite so high in the middle. Close and open the sunroof after each small flex to make sureyou don't overdo it... you only want it to just clear the sunroof edge. (you could also solve this by altering the bend in the retaining arms themselves, bending them up so the sunroof contacts and drives them down farther earlier, but that metal is a three way piece and much more resistant to general "flexing".) If you need to replace the pre-molded steel first bet is a junkyard brick, second bet is the hardware store (you just need a piece of thin and lightly maleable steel in the appropriate dimensions), final is Volvo (maybe they should be first, but something tells me they don't supply this piece separately). I should also note that the job is slightly easier if you remove the retaining arms entire connection bracket. To do this just loosen the screws that hold teh runner down and gently flex it up about 1/3". The connector can be finnagled out without full removal. End result is an absolutely quiet windflap.
Addition of Plastic Wind Deflector to Roof
[Inquiry] Does anyone have experience with the plex wind deflectors? Does it help the buffeting? Worth the bother? [Responses] It does seem to cut the wind noise. Wind deflector definately worth it!! My 89 740 has one and it makes driving with sunroof open quiet even at 75 mph...well, not silent but quiet.
Sunroof Leaks. [Inquiry:] We just got an 89 740GL, the owner said that the sunroof only leaked when washed with a high pressure spray. This is not the case, it just rained and the headliner is wet. I looked at the seal? if that's the black strip that goes around the whole sunroof, it seemed ok. I'd imagine that the water goes past that seal and into that black gutter type thing on the aft side and drains overboard. I don't have a manual yet so I'm not sure how this is supposed to work. Emergency Leakstopper: [John Sargent] Get some clear duct tape from Home Depot and seal the gap until you can repair it. Leaks can ruin the headliner and backer board in short order.
Drain Holes and Tubes:
[Response: Tony Stanley] If it's a factory fitted sunroof the 'seal' is not to meant to be a perfect seal and the gutter should carry away the water to the four sunroof drains at the front and rear corners of the sunroof pan. If these do not drain, chances are the drain is blocked or the hose is kinked. Debris that creeps onto the sunroof pan can also clog the drain outlets in the pan corners. Debris that is washed down from the rear window drains can clog up the 90 degree plastic fitting which can flood your trunk and cause the sunroof drains to back up.The front tubes go down the A pillars and exit behind the front wheel; the rear go down the C pillars and then through the rear quarter panel, draining behind the wheel. [Don Hodgdon] The drain holes for the front sunroof drains are just below the leading edge of the front door. If you feel under the rocker panel, there is a "D" shaped hole that the water from the sunroof and the fresh air vent (at the base of the windshield) drain to. They can be clogged with undercoating. Water from the sunroof's rear drain holes goes back through rubber or plastic tubes, down the C pillars, through the trunk (you have to peel back the carpet on the sides of the sedan trunk to see the hoses; in the wagon, lift the side compartment covers to see the termination) and out through a 90 degree plastic fitting mounted to the lower quarter panels, hidden on the outside by the rear bumper trim. You can disconnect the rear rubber hoses and use a shop-vac with a hose taped to the nozzle to clear out any stubborn debris. Vacuum the accessible portions of the sunroof pan too. [Editor] To clear blockages in the tubes, use a long cable with a non-snagging end or a narrower vinyl tube so you can rotate it within the drain tube as it is pushed down from the sunroof. Compressed air works but might either compress the blockage or burst the tubes apart deep with the pillars, so go easy. Test by opening the sunroof and pouring water into the side of the sunroof pan, then looking for the water to flow freely out the drains.
Worn Sunroof Seal Guard:
[Rick Tilghman] Over time the sealing ring around the sunroof's edge becomes worn and frayed, allowing water to leak in regardless of how the roof is seated. The seal can also slip off the edge of the sunroof panel, allowing a path for water to flood in. The fix is to pull the sunroof panel and replace the sealing ring with a new one. Note: you HAVE to remove the sunroof to do this since the ring slips off from the bottom. The seal sits on the bottom lip and can be removed by pressing down on it. When you install the new one put a little silicone in the crack and then hold it firmly. This will help make sure the new ring doesn't slide down and dislodge when you vent or move the sunroof. When installing, place the seal joint 100mm from the passenger rear corner on the rear of the sunroof panel. You can cut extra length off using tin snips (the seal has a metal core). 1990+ models have a separate rubber sealing flap at the rear edge of the gutter: when the roof is in the vent position, make sure this is secure along the entire length of the edge since it can slip off. [Editor] These seals for 740/760/940 and 780 models are reported as "discontinued" by many Volvo dealers. It appears that the sunroof seal is interchangeable across 700/900 model years, but the moonroof seal is different. A used seal may be appropriate if a new one is unavailable.
Dried-Out Caulking: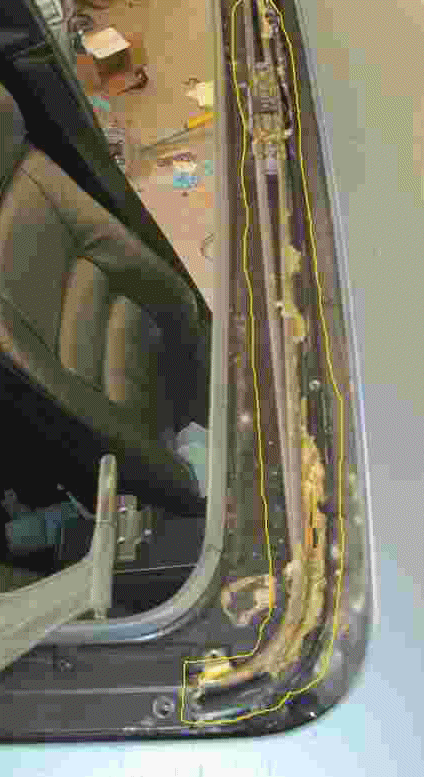
[John Sargent] The sunroof on my 745 was leaking a little water into the interior, but the drains were clean. A little investigation showed the water was wicking under the front cover for the sunroof mechanism. The area around the tubes which the cables run in is supposed to be filled with plumbers putty. The before pictures below show the area which needs to be caulked. I carefully filled the area with plumbers putty, just enough to contact the cover for the cable tubes. After several days of rain the car is dry inside.
Sunroof Design Flaw in Earlier Models:
This causes the sunroof to perpetually sag and fail to achieve the solid seal that prevents water from entering the cabin, affecting both the sunroof headliner and the headliner surrounding the sunroof opener. See the Sunroof Sag section for details.
Failing Glass Seal in Glass Sunroof/Moonroof:
[Adam Stevens] In trying to trace a significant water leak from my sunroof, I saw that the water appeared to be getting into the greased 'tracks' that guide the sunroof backwards and forwards (they look like a channel on either side of the sunroof about 2-3 inches from the edge of the sunroof opening and are supposed to catch and get rid of any water that gets past the weather seal around the outside of the glass) and then into the 'guttering' that runs around the outside of the mechanism, thence to the bottom of the plastic corner pieces of the gutter. It seemed a little odd as it was leaking from both sides. It was then that I noticed water between the weather seal and glass on my glass panel. When I removed the glass panel and stood it on its end water dripped out. I pulled the seal off to find that water had been getting under the seal and managing to track around the glass panel thanks to Volvo's crap attempt at sealing the glass to the frame. The sealant was not in the joint for much of the time, but a few mm off which allowed it to act as a nice irrigation channel. The water then reappeared above the guide rails and hence the leak. Had I spotted it before I removed the entire sunroof, I could have undone the 4 bolts holding the glass panel and changed the seal with all other trim and fixtures in place. Alternatively, some silicone sealant would have done the job in minutes. Blast. A few hours job which took me days to trace and fix. [John Seaton]
I removed the seal around the glass and had a good look. It seems the glass is bonded onto a metal frame. This bond had gone in places and was letting water through. So with a little time to clean up and reseal then placing the main seal back , no more leaks.
[Charles Salley] I used a black silicone trim sealant from my local auto parts store that came with a fine nozzle attachment to force the product into tight areas. I first gently pried back the rubber gasket on the glass side and scraped all the crap off to ensure a good seal, then forced the sealant around the perimeter of the glass. Problem solved.
[Jeff] My leak was where the glass was laminated to the frame. I repaired it myself using a $10 roll of butyl rubber window sealant from the auto parts store, a hard plastic card, a spray bottle of lightly soapy water & a razor blade. I hand rolled the butyl until it was about the diameter of spaghetti & used the plastic card to stuff it between the external seal & the glass. Spraying the area with soapy water kept the butyl from sticking before it was fully tucked under the seal. When I was done, I used a razor blade to trim off the excess butyl. It hasn't leaked since. If you try this yourself, I suggest parking the car out in the sun for a couple days after, as the sun's heat will help the butyl seep into any holes under the seal.
[Greg]In the UK there is a capillary crack sealant called ‘Capt. Tolly’s Creeping Crack Cure’. It can be purchased from the manufactures website www.captaintolley.com or from one of the retailers listed on the site. After checking all the retailers to find which was selling the cheapest, I bought a 60ml bottle of CTCCC from http://www.midlandchandlers.co.uk/searchresults.aspx?searchterm=capt. From them it cost £4 plus £2 P&P including vat., others were charging up to £12 + P&P. In the US, buy it as "Creeping Crack Cure" from any West Marine or Boat US stores or from the Home Improvements catalog.
CTCCC can be used to repair water leaks between the sunroof glass and gasket. The sunroof on my 960 was leaking between the glass and its plastic/rubber surround. The surround has a slight bulge in the middle of the front edge, also it is possible to pull the front of the surround and other parts of it away from the glass; an obvious route for water to seep through. It does not matter if the area to be sealed is damp, even so I blow out the surround with high pressure air to remove as much water and debris, before applying CTCCC. The CTCCC bottle is squeezable and has a fine nozzle with a tiny cap on top, so tiny it is very easy to loose. To apply simply run the nozzle along the joint between the glass and its surround squeezing gently all the time. By capillary action the liquid is drawn in to the joint. In my case I could feed the liquid non-stop where the surround bulged, eventually liquid dripped out from the other side of the surround on to the visor that pops up when the roof is open. CTCCC instruction say apply at 30 minute intervals until the crack is filled. In use it is necessary to wait until the first application has dried; when using in cold damp conditions it takes longer than 30 mins. My leak took three applications with another four specifically around the bulge. The repair was carried out the day after Guy Fawkes Night; three days later it has hardly stopped raining and the inside of the sunroof is as dry as a bone.
Moonroofs. [John Sargent] I can tell you the moonroof tray is not nearly as good as the sunroof tray at catching water and getting it into the drain hoses. The sunroof tray will catch major amounts of leaking water and get it into the drain tubes. The moonroof tray won't do this; it will deal with only small water leaks and the rest runs out of the catch tray and onto the headliner. Install a new moonroof seal, if you can get one. I don't care for silicone adhesive, and I would use weatherstrip cement to attach it. Sunroof seals are no longer available from Volvo, but the moonroof seal may be available. Once you have the moonroof seal installed, make sure the moonroof closes properly. If the back edge is down at all, you have a problem.
[Tip from Warren Bain. See also Ken Didnah's sunroof overhaul tips below.] These are the procedures I used to fix my sunroof. Mine would not flip up in the back, in fact one side would not flip up, the other would. The sunroof would retract but would not close without my help. I determined one control mechanism was broken so I bought both, since one was bad, the other might not be far behind, and I didn't want to do this repair twice.
The first and most important step is to determine the extent of your sunroof problem. Will it move at all, will it retract ok and not close, will it flip up in the back? I will not discuss the more involved procedures, cable replacement, sealing strip replacement, cable sleeve replacement or complete removal of the frame. I will also not discuss 140's and 240's since I have only experience with 700's. Some 900's have a moonroof, a glass panel instead of stamped steel, like my 965, and I will not address them. I will discuss adjustment and control mechanism replacement.
When you have determined the extent of the problem and want to continue, open the sunroof to the ventilation position. From the outside, release the spring clips from the sunroof lining, a pair of needle nose pliers works for this.
- Close the sunroof.
- Pull down on the headliner just forward of the interior lights.
- Pull the sunroof lining back so it is inside the roof.
- Look at the control mechanisms to determine the extent of the repair. Are they ok, are screws missing or are they loose? If the screws are loose, tighten them, if missing, find and replace.
- If the sunroof needs more extensive repair, remove all screws and lift out the sunroof.
- Remove the electric motor or manual crank. Doing this will allow for proper control mechanism centering, a procedure I needed to repeat.
- Replace the mechanisms by removing the two SMALL circlips with a small screwdriver. Do one side at a time so the other can be used for reference.
- Transfer the spring to the new control mechanism and place the new one where the old one was, make sure the small plastic covered tab is in it's slot and on top of the flat metal 'spring'.
- Replace the circlips, again needle nose pliers work here.
- Do the same to the other side.
- Align the control mechanisms with the slots for the small plastic covered tabs, slight back and forth motion works here.
- The control mechanisms should now lay flat and be loose, not tight under tension. The sunroof is supposed to be closed after all.
- You will notice the cranking mechanism is nothing more than a modified worm gear arrangement.
- Make sure the sunroof retracting mounts, up front and to the side, are properly positioned and as far forward as possible.
- Replace the sunroof.
- Replace the screws leaving them loose so the sunroof can be adjusted for height, which will be done now. Do not try to operate the sunroof at this time since it is loose and the liner would be pushed back into the bowels of the car never to see the light of day!
- Adjust the sunroof height by operating the sunroof SLIGHTLY in the rearward position and also in the ventilation position, flipped up in the back.
- Close the sunroof and make adjustments. It should sit down slightly from the roof but there should be no gaps. Make sure the spring clips are installed in the rear edge of the sunroof and the large springs are attached to the large pin on the control mechanism.
- Apply oil or grease to the control mechanism slots which should be an annual event. I found one of mine had dried out grease and was nearly ready to break.
- When you are happy with the positioning of the sunroof, move the liner forward and flip up the sunroof to reattach the clips to the lining.
- Operate the sunroof and enjoy.
See it wasn't that bad! Take your time, have a friend assist, maybe even videotape the entire procedure, just in case.
Alignment Notes. If the roof position is "out of phase" by one revolution of the crank i.e., the detent pin clicks in one turn too soon when lowering the roof from the vent position, then you should be able to drop the transmission down, crank it the one turn it needs and reinstall it. Sometimes the transmission will slip on the cables at a spot putting it out of synch.
Sunroof Overhaul. [Tips from Ken Dibnah on stuck sunroofs] Is the roof manual or electric? If it is electric, there may be electrical problems with motor, switches, wires and fuses, which I will not deal with. Will it open? My experience with them is the 'tracks' at the rear of the roof that raise and lower the panel, pot metal I think, break and jam everything up. Also the roof is rarely cleaned or lubricated: if this is done carefully, the only thing to do is to replace worn/broken bits and then adjust the 4 adjusting screws, one at each corner.
You may also have to replace the sealer that lives around the perimeter of the sliding panel, as it may not provide the exact clearance required to allow movement yet still seal.
I will assume it is electric and the motor works (although it may be seized, have faulty microswitches, or need an overhaul - usual motor clean-up with commutator-cleaning and possibly lubrication, although it may have sealed bearings (most likely)). If it does not work, remove the panel that covers it and use the tool that is supplied in the tool kit, inserted in the shaft, to manually move it. Also, when you look at the motor, there is a guarded-by-paint screw that I believe is used to adjust the microswitches, but I have not observed any change when I fiddled with my own. There may be an issue with these switches as to positioning when the motor stops, but bear in mind it is possible to toss the motor and use a crank/manual version from another model.
Do you know how to get at the roof? Open up the rear roof part in the vent position and peer inside. There are 2 clips that are best removed/gripped with needle-nose pliers, unclip them and these will release the head-liner cover from the moving panel. Go back inside the car and push the headliner back in its slot, but not too far in lest it get jammed, as it likes to do; everything is now revealed.
The panel just sits on the tracks in the front, and is actually a loose fit. Most likely you will see that the screw/worm that drives the roof back on either side will be gummed up with old grease/lube, in typical Volvo fashion; I found that liberal doses of WD40 loosened the goo so it was possible to remove a lot of it. Re-lube was done with spray lithium grease, but beware the close proximity to headliner et al, the grease fairly flies about and careful masking is required.
Sunroof Removal. [Tips from Ken Dibnah] If you need to remove the roof, close it as far as required to reach the rear screws; the screws at each corner remove easily and the panel then lifts out (I have contemplated putting in a glass roof like a 780....hmmmm). Put a blanket on the roof so you have somewhere to set the panel. Taking it off may not be necessary, but it would make it easier to clean all the tracks. I used a dry stick lube on the tracks, but I think something less viscous might help the operation (perhaps the aforementioned lithium grease?), but I would worry about getting it on clothing etc. I have a vague memory of some cables and small springs? I do not have them on my roof, but maybe on an older one? Other car I worked on was a crank-driven roof on an 85 740 GLE, but I think there was no involvement with these cables, except to unclip 'em when the panel came out? If yours doesn't have 'em, forgive my 'old' moment.
If you replace broken tracks/racks, I would replace them in pairs, as whatever shock that has caused the roof to fail may have affected both sides. As I recall, they are involved with split-rings, diabolically small and determined to shoot far under your workbench.
The front of the roof pops up into position only by riding up on the collapsed wind deflector. There are (2?) rubber snubbers that sit under the deflector, only glued in, and frequently these have vanished, therefore not encouraging the roof to finish in the flush position. The rear pops into place by the action of the racks, those that are most likely damaged, and its position is adjusted by the screws that you remove to take off the panel, as well as by the position of the worms when the motor shuts off - you can observe this as the worm should sit in the bottom of the rack, holding it flush, when the motor stops turning. You can remove all the tracking/guides/bearing surfaces from the car, just by undoing everything and replacing it in order, but why would you want to? If a worm has broken, perhaps, but cleaning in situ should suffice. With the roof out, your experience should allow you to fix whatever I have neglected to mention. Look for warping, physical damage etc. [Tips from Dan Williams] Removing the sunroof is not as daunting as you might think. There are 8 to 12 screws that hold it in place. First, raise it to the vent position and from the outside, press down on the inner panel to locate the spring clips. They are fairly obvious and easy to access with needle-nose pliers. Back inside, go from vent to 'slide open' mode but only open the sunroof a few inches. Grab the inner panel and slide it straight back to disengage it from the sunroof panel. A quick jerk is required, or the whole panel will move. I used a lightweight mallet - no damage to be done because the fabric was being replaced. Back outside with the panel almost fully extracted remove the screws mentioned above. They can be easily found by looking at the pan for where they protruce. Some of the serews are machine screwsa and some are sheet metal screws. To access the screws on the front will require you to 'spring' the wind deflector open wider than normal. You may have to adjust any slight bend out when you put it all back in. Now just pull the whole assembly out through the top. Place a blanket on the roof in front of the opening to avoid any scratches. I didn't remove the crank mechanism from the rail network, and was able to get it all out and back in, but I believe others recommend removing it before lifting all out. Be carefull with the inner panel. There are some plastic glides that slip over the end of the panel where it moves in the side guides. They can be broke or lost. Alternate solution: Drop the whole pan that holds the sunroof in place. This requires you to remove the four hoses and clips around the perimiter. I have not tried this, but it may actually be easier if you have a second pair of hands. Might be a good idea in your case since you are concerned about the hoses being clogged.
Electric Mechanism:
Removing Sunroof Switch. [Editor] The sunroof switch fails frequently, usually showing intermittent symptoms, because of the high current loads through the switch. See the FAQ section for instructions to remove it.
Electric Sunroof Motor Overhaul.
[Tips on Motor and Cam Follower Overhaul] There have been some comments recently about 740 electric sunroof problems. My experience with my '90 740 GLE follows. Perhaps it may be of use to others.
Problem: occasionally, if the sunroof were opened to either the full back or full tilt position, it would not be possible to move it out of these positions. When pushing the switch, the click if the motor solenoid could be heard, but the motor did not operate. Sometimes, persistence paid off and the roof would close after a few tries, but on other occasions, the only way to get it to close was to remove the plastic panel covering the motor and with a large common screwdriver turn the drive shaft 1/4 turn in the closed direction (as evidenced by movement of the roof) after which the motor would respond to the switch input.
Diagnosis:
- Seized sunroof motor. [Colin Shepherd] Wire 12v direct to the motor connections as a first step to isolating the problem before stripping out the micro-switches etc. Mine had a seized drive motor armature bearing and all worked fine when this was freed off.
- Problem in the switch(es) internal to the motor unit.
Repair action for microswitches:
Remove the motor as follows:
- Remove the two screws holding the plastic cover (2 #10 torx screws)
- Cut the headliner as required to get access to the motor - only cut areas that will be covered by the plastic cover. Obviously when the car was built, the motor was installed first and then covered by the headliner
- Remove two small Phillips screws near the rear of the motor housing, 1 10mm nut at the front, and one large Phillips screw that connects the motor ground to the body just in front of the motor (front and rear refer to the ends of the car that have headlights and brakelights respectively).
- Withdraw the motor and undo the connector (may be a little easier said than done depending on the amount of slack in the cable)
[Photo courtesy of Mike Ponte] With the motor out of the car, remove the white plastic cover over the switch cam (I'm making up names as I go here). It is held in place by three snap clips and is easy to remove. This will reveal a large (2+ in dia) white plastic cam disk that is driven by the motor/gearbox output gear. On this disk are three cams.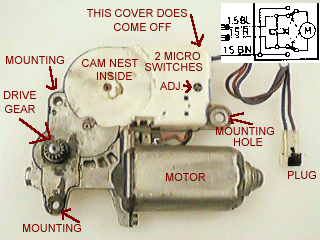 There are black plastic cam followers that activate one microswitch each on the top and bottom cams. On the middle of the three cams there is a white plastic follower that moves a plastic leaf that in turn activates both microswitches. The black cam followers had fairly sharp points that rested on the surface of the cam, while the white one had a rather blunt point. My conclusion was that the white one had worn to the point that it no longer activated the microswitches reliably. To overcome this I glued a piece of cardboard (as in cereal box, although others may come up with a preferred method) to the ivory coloured plastic leaf the follower contacts. The cardboard was positioned so that the follower would contact it, thus compensating for the presumed wear to the tip of the follower. I then applied some grease to the surface of the cam with the hope of minimizing further wear and put everything back together.
Result: So far the sunroof has operated 100% reliably. I hope my conclusion about wear to the cam follower was correct and that the roof will continue to work properly.
[Tips on Motor Electrical Overhaul from Pete Gotseff]
Testing:
- If your motor "clicks" but doesn't move, remove motor cover (2 phillips) and get access to the motor connector (comes in from left side). The blue and red wires at the two prong connector should be +12V or -12V depending on sunroof momentary switch position. If you're getting proper voltage to the motor verify brown ground wire is well grounded (very important!). If I recall correctly an improperly grounded motor will "click" but not move
- You will be removing the motor so it would be best to put sunroof in vent or closed position with a screwdriver on the manual ove
- If voltage and ground check out - reconnect connector and unscrew (2 phillips) and unbolt nut (10mm) and let motor hang (not a good idea but what the heck). Now test the motor while electrically connected including the ground. Again, make sure the ground is well grounded. BTW, if the motor moves you will have to retime the motor :-) more on this later. If the motor works normally it is likely your sunroof is binding and you should drop the headliner and dive headfirst into that problem
- If motor still just clicks test the motor itself by putting 12V across the actual motor terminals (not the connector) and see if the motor runs smoothly. Reverse polarity to verify both directions
A properly working motor will rotate (as seen from the bottom and in vent position) CCW about 1 turn to closed, pause, push SR button again and CCW about 8 turns to full open. Not exactly sure about # of turns.
Repair:
If the motor still just clicks then it will likely one of the two microswitches located in the timing gear cover.
- Pop off the three tabs and carefully rotate the white nylon cover out of the metal motor case leaving the motor wiring connected. This plastic cover contains two microswitches, a selenoid (remember "click") and three small pointed plungers. FYI: These plungers are actuated by the sunroof motor driven timing gear which remains in the case. The timing gear has three alignment points on three levels which correspond to vent, closed and full open. The center point on the middle level is "closed." This will help when you retime the motor.
- Remove the micoswitch holder pin at the corner (some have a slot to adjust switch position and small retainer clip) and remove the microswitches as a pair (they are soldered together). They can be removed without removing anything else by using a small jewelers screwdriver to move the microswitch plungers out of the way of the selenoid actuator. Now, use photographic memory or paper to record colors of wires on each switch (you'll be sorry if you don't). Unsolder just one side of the common copper ribbon holding the microswitches together (just one side is good, leave the other side attached to the other switch). Then unsolder the remaining wiring (two black leads) which hold the switches to the selenoid.
- With switches free test each one for high resistance through the normally closed circuit - the front (blue or red) connections to side terminals. My switch had 63 Ohms across these terminals when they should've been around 1-2 Ohms.
At this point you should find a bad microswitch. You can repair (as below) or replace from a good electronics store (i.e. not Radio Shack) be sure to get a switch with lug terminals not spade type. Spade type will not fit when placing switches back into the cover. - Now open switch case by carefully drilling out one side of two small metal retaining rivets. Punch rivets through with small screwdriver. Open case carefully to avoid spring, switch assembly from flying behind/over/under workbench. Sand contacts lightly with sandpaper. Reassemble case and epoxy switch case cover (you'll never do this again). Resolder switches and reassemble them into the cover.
- Turn the motor manually with a screwdriver to ensure the three level plunger in the cover will fall somewhere between the three timing points on the timing gear. But don't align the gear points directly with the three level plunger - they will interfere when putting the cover back on. Replace the cover which contains the microswitches and selenoid onto the motor case.
- I suppose now would be a good time to bench test the motor. If no 12V supply is available (I use an old Sun computer power supply) test in the car (see below).
Retiming motor (electrically installed in car):
- Make sure motor is electrically connected to sunroof connector and ground. Now, run motor CW (as seen from below) until it stops, push on momentary switch again. If no movement then motor is in vent position.
- If sunroof is in vent position motor can be reinstalled. If sunroof is in closed position push sunroof button to rotate the motor CCW to the closed position. Now the motor can be reinstalled. This may take some trial and error but if the motor is working correctly you'll figure it out eventually - HeHe.
Sunroof Won't Stop at Close: Motor Defective. [Inquiry:] My sunroof will not stop in the closed position and therfore the user must get out and look at the roof to make sure it is closed properly. The local dealer says the "stop" mechanism in the motor has failed and the only solution is to replace the motor or live with the nuisance. [Editor: see overhaul notes above. An overhaul is labor intensive and a new motor might be a better choice] [Response: Rob Bareiss] Replace the motor or live with it. You might get lucky and find a good one in a junkyard. If that fails locally, try calling the used parts suppliers who advertise at the Brickboard. They have more nationwide connections. I will bet that they won't guarantee one of those motors once it's out of their sight. Alternately you can bite the bullet and buy the $300 motor new from your friendly local dealer. Seems to be happening to a lot of '88's lately. Can't guess why except they're about the right age to fail, and they're among the earliest cars to have this unit.
Electric Sunroof Motor Needs to Be Zeroed. [Tip from Jim Urban] Don't know if you are aware of this, but: to zero out the power motor:
1. Disconnect the motor from the gears.
2. Hold the motor in your hand and run the motor rearwards to the stop position (4-5 secs).
3. Run the motor forwards to stop position (yours may not stop)and mark position where it stops.
4. Run motor forwards again (should go to vent position).
5. Run motor forward (1-2 secs). It should close from vent postion. Mark where it stops.
If motor doesn't stop in same position, adjust it using a screwdriver. Adjust it between the two stop marks.
6. Put the control arms in the neutral position (the little wing on the arm is in the notch in the rail.
7. Install the motor. If the motor won't line up, move the control arm forward on one side
(1-2mm). Still a problem? Move that arm back to neutral position and try it on the other side.
Your gears are working, so I think this will work. If not, I can't help.
Sunroof: Replace Motor with Crank. [Inquiry:] My sunroof motor has died and I do not want to spend $400-500 to replace with a new Volvo motor. Can a manual sunroof crank device replace an existing sunroof motor? How extensive is it to perform, or is it a square peg into a round hole... Do you know of a good aftermarket manual crank or motor unit available? [Response: W. Bain] I have a manual crank in my '86 744Ti and it is blissful. My 965 has an electric motor. Go to the junkyard and find a donor with a manual cover and crank and remove the handle, the gear mechanism, the plastic trim and ALL screws. Make sure the sunroof itself sits in the roof properly, i.e. flat and level, while fully and properly closed . Remove the power motor and tape up the wires. Swap the manual for the power parts. The crank mechanism needs to be centered properly, otherwise it will need to be re-centered.
Sunroof: Replace Crank with Motor. [Tips from George Holmer] To convert your manual sunroof to a electric one and enjoy the luxury of a smooth, button operated opening and closing of the sunroof, simply do as follows: At a breakers yard, find a sunroof motor, a motor cover colour matched to your headlining and a switch matching your dash style. Get as much wire as possible. Once home, remove the sunroof rank handle and then the cover to expose the mechanism. Remove the mechanism too and replace with motor, this is a direct fit. Now, you have to wire it in. Remove the trim bit that goes along the top of the windshield and also the mirror, the sun visors and the sun visor clips. Finally, remove the grab handles and trim behind the grab handles on one side to expose the screw fixing the A pillar trim which you then also remove and the panel underneath the steering column above the driver's feet. First, ground the sunroof motor by attaching the black wire to one of the sunroof bolts. The pull the red and blue wire to the switch which you have fitted in a spare switch socket and attach red to red and blue to blue. Finally, wire the black switch wire to an grounding point and the blue/yellow wire to a power supply, preferably the fuse which according to your fuse board is the one for the power sunroof. Now re-connect the ground lead on the battery and test sunroof.
Headliner:
Sunroof Headliner Replacement. [Tip from Chris Mullet] When I replaced my sunroof headliner, I left the sunroof in place, but dropped the back end of the pan (over the back seat) and slid the sunroof headliner panel out the back. I had to remove or loosen all the screws out of the pan except for the ones across the front which kept everything in its proper location. That way, I didn't have to do a bunch of re-adjusting of the sunroof itself when reassembling. Worked slick.
[Editor] There is a Volvo TSB (83910, August 1994) describing a procedure to replace the headliner on the sunroof and the inner panel.
[Rick Tilghman] Let me just say that you want to use 1/8" headliner EVERYWHERE, not just on the sunroof. Don't listen to what anyone else tells you... trust me and ask for 1/8" material. If the store you go to (a fabric store) doesn't have it have them order a new roll. The reason for this is that the headliner must go under various edges around the car (including under that plastic edge at the sunroof opening) and the 1/4" is too thick to fit. Also, the 1/4" material is much heavier and will pull off the headliner backing board over time faster than the 1/8".)
[Tip from Lawrence] With the sunroof in the vent position, release the springs so the sunroof will lay flat (you will need to use needle nose pliers to reach underneath to release the spring, the spring holds the sunroof headliner to the sunroof). Then from inside or outside the car(wherever you can get a good bite) give the sunroof headliner a shove(a mighty shove) to the rear. It's held by two clips in the front. The headliner will release from these two clips when you push it back. A shove will release. But you can't baby it. Pull, shove, whatever. Once you push the sunroof headliner out of the way, you can reach everything else.
Removing the Sunroof Pan to Replace the Headliner. [Dave Rogers] If your car has a sunroof, replacing the headliner is more difficult. It is frankly best to remove the sunroof assembly. When I did my headliner, I removed the pan in which the sunroof is mounted:
- Loosen the hose clamps from the drain hoses and remove the hoses.
- Remove the screws from the front of the pan. Remove the sunroof motor (at the front of the sunroof pan). Remove the screws from the sides of the pan.
- The pan can be removed at this point. (I do have a wagon, so it is easy)
- The next steps I took once the pan is removed, but could probably be done with the pan in place, which might be easier for a sedan.
- Move the sunroof to the 'all the way open' position. (not just popped up)
- Remove the 4 screws from the front cable casing (this covers the cable that moves the sunroof back and forth. The cover has something like plumbers putty to waterproof it, so you might want to have some putty on hand.
- Remove the 5 or 6 screws from the side brackets on each side.
- The sunroof assembly should come out now. Pull the whole assembly toward the front of the car and out the sunroof hole.
- To remove the sunroof from the assembly: pull the sunroof toward the back of the assembly so that the tabs on the back of the sunroof slide out of the tracks. Twist the sunroof so that the front tabs slide out of the tracks. You should now have a track assembly and the sunroof. Put the tracks aside.
- Pull up on the back of the sunroof which exposes the clips that hold the sunroof in place. Pull on these to remove the headliner from the exterior part of the sunroof. At the front of the sunroof are two clips that the headliner into. Slip the headliner off of the exterior. You should now have the interior and exterior parts of the sunroof. Replacing the fabric should be easy from here on out.
Replacing the sunroof is the opposite of install, just make sure that the rear of the sunroof assembly mounts into the holes at the rear of the sunroof pan. In all this took me about 2 hours to do.