Door problems on the Volvo 700, 900 and 90 cars
Door Operation and Troubleshooting:
Door Hinge/Lock Preventive Maintenance
Electric Window and Door Lock Problems
Door Replacement and Interchangability
Fuel Door:
Mirrors:
Trunk/Boot:
Tailgate:
Tailgate Will Not Stay Up: Struts
Rear Tailgate Latch Won't Open
Cargo Area Lamp and Tailgate Electrical Harness Access
Trim:
Repairing Vinyl Door Panel Covering
Repairing Panel and Lamp Posts
Hood/Bonnet:
Stuck Hood Release and Cable Adjustment
Remote Operation:
Door Remote Lock/Unlock and Alarm Operation
Installation of Remote Power Door Lock Actuator in a 740
Installation of Remote Power Door Lock Actuator in a 940
Remote Door Lock Range Extender
Door Operation and Troubleshooting:
Door Hinge/Lock Preventive Maintenance.
Hinge Lubrication.
[Inquiry] The driver's door on my wife's 940 has resisted all efforts at lubrication. It continues to make those horrible 'CRACK-CRACK' noises as it moves through the two opening detents. I've squirted lithium grease all over everything, including inside the little grease fitting, but to no avail.
[Response] My 'CRACK-CRACK' noise turned out to be produced by the location where the torsion spring passes through the hinge plate that is attached to the body. The minute amount of rotation by the spring in the hinge plate is what was causing the creaking and not the wheels. Squirt some motor oil on top of the torsion spring in such a way that the oil runs toward the hole in the plate that houses the torsion spring. Don't forget the hinges. [Dan R] There are two of those torsion springs on the lower hinge. It is the one you can not see that is causing the noise. It is on the far side of the hinge, and is lubricated from the the bottom. I use lithium grease from a spray can that has a straw over the plastic tube that comes with the can.[Paul Kane] Try Lubriplate.[Dick Riess] If the spring is lifted slightly, it seems to cure the problem. Just use a large screwdriver and raise it a quarter inch or so and problem seems to go away. Good time to lube the hinges and spring also. [Jeff Pierce] I attached my flexible tube extension on my grease gun, popped an injection needle on the end, and was able to easily reach the elusive front door hinge. The extension tube on the grease gun allows you to apply grease with the door in various positions to ensure the grease is getting everywhere it needs to. Use your choice of grease: simple chassis grease, synthetic, lithium, etc.
Door Lock Lubrication. [Editor] Lock cylinders and lock mechanisms collect dirt in their original grease which hardens over time. To keep them operating, lubricate twice yearly. Do NOT use WD-40 or the like to lube your locks. I use Mobil 1 spray lube (tough to find). CRC makes some superior clear synthetic lubes as does Valvoline. I am not a fan of graphite lubes: I have had frozen locks on GM cars when I've used them and they are messy. Lube the lock cylinders and the inside mechanism using the spray tube on the aerosol can. Spray a little lube inside the lock and then work the key. Use silicone spray on the rubber stripping between the frame and doors. Water can enter the dirt on this strip and freeze, holding the door quite securely shut. Spray it on then wipe off with a rag to remove both excess carrier and any dirt on the weatherstripping. This seems to prolong its life as well.
If, in spite of regular lubrication, your door lock freezes in the winter, use spray isopropyl alcohol in the little "door lock unfreezer" aerosols available at auto stores.
Electric Window and Door Lock Problems. See the FAQ files on Body Glass and Electrical Circuits for more information. Note that the door harnesses can flex near the hinges and result in broken wires which cause intermittent failures of door components. You can replace these front harnesses easily by removing the door panel, the bottom of the A-pillar trim, and under-panel knee bolsters. The harnesses feed through the door and hinge holes from the door into the cabin and terminate up near the side of the instrument panel, about ten inches from the hinge hole. Buy a new harness from Volvo ($200 or so at Borton Volvo) or obtain one, with all connectors, at a breakers yard. Repairing the old one is tough: they have special heavy duty shrink wrap tubing.
Driver's Door Won't Unlock. See the FAQ file on electrical faults in the door locking mechanisms.
Electric Switch Mechanical Malfunction. [Inquiry:] I can't unlock the driver's door from the keylock. I have to go to the passenger side, unlock the passenger side door, reach over and pull up the lock knob on the driver's door, which activates the power door lock system, a
Diagnosis. The outside driver's keylock should mechanically unlock the drivers door even if the central lock system has failed. If it simply will not unlock the rest of the doors, then the problem is likely either in the switch mounted in the door, the central locking relay, fuse, or wiring between the driver's door and the relay panel.
If the driver's door will not mechanically unlock from the outside, then there is a mechanical problem between the lock cylinder and the lock mechanism or a problem within the lock cylinder itself.
The driver's door switch is actually pretty easy to replace if that is the culprit - just remove the door interior panel and you will find a small rectangular plastic box screwed to the inside of the metal panel near the lock mechanism. There is a rod connected to it from the lock mechanism. If it is bad and you are going to replace it, consider getting the later combined switch and lock motor from a later (~95 or so) 900. The earlier cars have only a switch in this location, but the box looks identical to a lock motor with the exception of a couple of extra wires. This will enable you to later add an alarm system with remote locking if you wish (you will have to run a couple of additional wires for the lock motor to connect it to the alarm system - your car may even be pre-wired for the motor). [Ted] The two Torx screws holding the latch also hold the actuator. They can be quite tight so use a quality Torx bit.
Mechanical Link Rod Malfunction. [Inquiry] My driver's door handle is not working. When you press it nothing happens, I have to open it from the inside. [Response: Paul] The door handle may have come off the link rod. You'll need to remove the trim panel, then the screws that secure the handle. There is a plastic piece on the door handle that hooks to the rod. You can remove the plastic piece from the handle by removing the pin that secures it to the handle. Note the position of the plastic piece which can be improperly reversed. Hook the plastic piece to the rod then reattach the piece to the handle.
Door Locks Fail to Lock. [Inquiry:] All of a sudden the function which allows me to lock all doors/ rear wagon hatch has stopped. If you push down on the drivers door lock only the drivers door will lock....BUT after locking all the doors, you can unlock them by the driver's door. Where do I start in diagnosing and curing this ? [Response: John Sargent] Look at two potential faults:
Switch Defect. There is a switch on the push/pull rod that is actuated by the knob on the driver's door. Remove the driver's door panel. Locate this switch and manipulate it by hand. There are one or two screws that secure the switch to the inside of the drivers door (see above). You probably need to adjust the switch.
Relay Fault. There is one Central Locking Relay for both the lock and unlock functions. If the door fails to lock, then the timer circuit for the locking function may be bad. The relay is momentary in action and when you operate the switch manually, the locking coils are only held for less than a second. You need to replace the relay. I have had good luck with used ones. You didn't state what model year of 700 series, but 1986 and later use the same relay and it is located in the Central Electrical Unit in the lower left of the relay block and has a K on it. . For 1983-85 model years, the locking relay is in the driver's door and integral with the switch which controls it.
Door Locks Frozen. [Inquiry] My door locks regularly freeze. How can I prevent this? [Responses: Jay Simkin/Editor/Gord Hull] Spray some high-quality oil into the locks to ensure that water is displaced and they will operate: Valvoline Synpower Spray, CRC, etc. Stay away from graphite powder lock lubricants - the graphite can "pile up" after a while. With your car in the warm garage - or even outside if it is above freezing - insert the straw-like nozzle from the spray lube into the keyway - (open the little door that covers the keyway)- spray a short squirt into the key way - insert your key -and work it back and forth a few times. repeat 2 or 3 times each lock. WD-40 is a mild solvent-based lubricant - it will dissolve any oily build up in the tumblers. Any small amount that drips on the paint can be wiped off. While you are at it - get a light spray lubricant and lube the working/moving parts of the latch where it catches onto the door-frame. If you do this once or twice a year you should have many trouble free years.
Your locks may be "gummed up" with oil-based lubricants, which get very "sticky", in extreme cold. If a synthetic-based lubricant does not free-up the locks, try to find a Teflon lubricant. An auto supply store should have this item: I do not know of a specific brand, as I have some cans bought years ago. You will need to warm the lock, to liquefy the petroleum-based lubricant, so that it can be displaced by a synthetic lubricant or a teflon-based lubricant. You can warm the lock mechanism with a hair dryer and also be heating the key, and putting it into the lock. When using the hair dryer, be careful with regard to the paint. Keep the hair dryer on "medium". To avoid frozen water from window strip leaks which can drip down and freeze on the lock rods, spray the lubricant into the lock and latch mechanism and rods when you have the door panel off.
Door Handle Fails to Operate.
Cam Broken: On my 960, I couldn't open the door. The internal cam actuator was broken and would not operate the wire pull hooked to it to open the door. [Repair]: Instead of buying a new handle or a used one from another 960, I took the plastic cam off a 740 model handle and transplanted it on my unit with the broken cam. I removed the cam by using vice grips to remove the axis pin. I then transplanted the pin and cam into my existing handle, ,reinstalled it back into the car and now it works fine. As it happens, the cam is universal and will fit either right hand or left hand door handles (740, 940 or 960) just by reversing it. If searching in a yard for the cam part, obtain one from a rear door with much less wear.
[John Davies] One problem that affects 700 and 900 series cars as they get older is the doorlock failing to latch, or, worse,opening to the first 'safety' position whilst driving along. If this happens,you can often repair this by simply replacing the'outer' part of the door lock with one from a scrap car. The 'outer' contains return springs, latches etc, and is a sealed unit - it is held on by two 'torx' screws, and can be removed in seconds. The 'inner' part of the lock is located by a screw hidden behind the 'outer'and will therefore stay put during the operation. The'inner' part of the lock inside the door is less likely to wear through opening and closing the door as the principle strain falls on the 'outer' - if thehandlesand the keyoperate the lock properly then the 'inner' part is probably fine. The front and rear 'outers' (aIthough not the inners) are the same, so it is a good idea to take a replacement from the rear of a car as it will have done less work.
960 Door Return Spring Broken:My 960's inside drivers door handle has broken.
Something went "sprong" and now the handle does not return to the flush position.
It still works, and can be returned to the flush position by manually pushing the locking plastic handle.
[David Aidnik] The return spring is broken.
I just got finished replacing this on the driver's door of my '95 960 which has the same setup as the S90/V90.
There are Left & Right hand versions on the return springs, but not Front & Rear, so there are only 2 variations.
The springs are cheap; ~$3.50 each. I was able to replace the driver's door return spring without removing
the door panel by just removing the bottom 3 clips as well as the 2
screws under the plastic closing "cup" for the hand in the vicinity of the window switches.
With these clips & screws removed, I could finagle the panel upward & outward just enough to get the pivot pin for the lock & door handle to go up & behind the door panel. You just need to get it up far enough to get the door handle on the bottom out & it was just barely possible, but possible.
In goes the new spring. I had to take off a trim piece around the handle on another door to see with a penlight where the long arm of the spring anchors. Once I got that, the install was pretty easy.
I used a bicycle spoke bent into a right angle at the last half inch to get the pivot pin started upwards, then used a pair of surgical forceps to lever/pull the pin upwards at the top until I could get the handle out.
I pushed the pin back in with the forceps & lastly with a blade screwdriver to get it flush.
The only thing to be careful of is the alignment of the pin/handle/lock handle assembly as you push the pin down. With the return spring in, it pushes itself outward, so you need to push it a bit inwards so that the pin goes into the hole in the plastic door handle frame. That aged plastic is easy to break.
[Another Tip from Erwin Yu] Do Not make the same mistake as I did (to fix a loose 96 960 door handle)! This is what I found in Brickboard archives: “The handle assembly is "pop-riveted to the door sheet metal. You will need to remove the inner door panel and then drill out the pop rivet to get the handle where you can see what is what” posted by Jbowers in 2004. I’m sure he meant well. However, DO NOT drill out the pop-rivet! Do not even attempt to remove the door handle assembly. All you need is a small Philips screw driver or some sort of metal stick or a small punch to push the pin downward while holding the handle and lock plastic piece with another hand. This way, all the small parts will not fly everywhere once the pin is out. If you got a replacement assembly, do the same to it to get the spring. Then, assemble the old parts with the new spring onto the base unit riveted to the door. If you are too cheap to get a replacement assembly like me, remove the spring from the rear door handle and use it on the front. The whole process takes less than 10 minutes!
Door Contact Switches. See FAQ description of operation and rebuild.
Rear Door Lock Won't Release. [Symptom:'85 760; right rear door]
[Tip No 1; Requires Door Trim Removal:] I fixed this same problem just yesterday! Remove the trim which holds the speaker and unscrew the locking button, then there is one or 2 screws to be removed (the thing had been messed around with by previous owner so I don't know.) Pull the remaining trim up until it unlatches then pull it outward to remove it. Pull up the locking control as far as it goes then look through the hole so you can see the locking mechanism and watch the little part which moves sideways when you try to lock and unlock it. Then push it towards the inside of the car (you may have to "wriggle" it a bit) while pulling on the lock switch. The door should then unlock and you can open it. Remove the lock with an allen key and detach the control arms and thoroughly lubricate it with some oil/ grease/ or equivalent. You may have to remove the seat by pushing it back hard then pulling it up at each side then sliding it out, in order to remove the door trim
[Tip from Ursula: Requires That You Merely Move the Trim Panel to Access Lock] This is how I got the stuck rear passenger side door open without destroying the panel. First, lower the window. Slide a putty knife between the rubber moulding and the inside door frame and pried it away from the frame -- just enough to open it, but not crack the door panel (which is not as fragile as one might think I came to learn). Pulled the door panel toward the inside enough to see down in there, and I was able to wiggle a metal-hanger-sized bar, located about four inches down from the top of the door frame itself ON THE INSIDE of the door frame that ran vertically from the lock mechanism back to the lock at the end of the door. What was causing the door not to open was that bar had come off of the little rubber inset guide tracks that hold it in a completely vertical position so that it puts enough tension on the release end to unlock the door. VOLVO must have designed it to work within centimeters of proper alignment. Anyway, once I held it completely straight and pushed the door release button on the outside of the door -- VOILA! -- the sound of an opening door! So I just bent the bar inward so that it would sit nicely in the little black rubber guides (there are two of them, spaced about 10 inches or so apart), and the door open and closed and all is right in the world again.
Spring Broken. [Inquiry] The inverted 'U' spring that holds the door open is broken in my 740. Has anyone replaced it? [Response: Bob/J. Daigle] The inverted U spring is part of the hinge. You need to replace the hinge. Remove the trim from the driver's side footwell to access the bolts holding the hinge to the frame. Support the door. Unbolt hinge from door and body. Be prepared to spend a little bit getting the alignment of the door right after replacing the hinge. Not too difficult. You may be able to get a used hinge, if lucky, the same color as your car. Try some of the better salvage yards.
Spring Lubrication. [Tip from Todd] The front door hinges on my 1990 wagon kept making noises everytime I would open or shut the doors. I tried everything from oil to some kind of grease and found they would work for a week or two at most. I used Mobil 1 synthetic differential fluid on my door hinges and they have been noise free for about 6 or 7 months. [Editor] The springs are the u-shaped rods that extend up and over, down into a pocket on the pillar. Lubricate the pillar side as well as the small wheels.
Door Replacement and Interchangability. [Tip from Jim Bowers] If you go to your Volvo parts guy, the replacement doors for almost any 4 door 700 will be the same part number. I replaced a driver's door and a right rear door on my '85 when they got rusty. The driver's door came from a '89 and the RR from a '90 as I remember. The driver's door was rusty because some previous owner had damaged the original '85 and put a '82 door on it. You may have to drill a small hole to hold a plastic snap or something. Internal parts such as locks, wires, etc. will likely need to be transferred. Been there, done that!
Door Handle Removal. [Tip from Bob Hoen] I have had the occasion to replace several door handles on 700/900 series vehicles. First tape-up the metal casting on the handle beforehand and the square hole in the doorskin to prevent scratches. The tricky part is getting the nut off inside the door while the bolt is spinning in the plastic housing. After trying several different methods, I hit on one that works very well. After removing the outer handle cover,I heat (with a torch) a cheap 1/4 in. drive 10mm socket to the point it will melt into the plastic, and onto the bolt head, the rest of the job is just remove and replace. [Inquiry] I replaced a front door handle and couldn't get the "trigger" to depress and open the latch. [Kerry O'Connor] It matters which way the rod is hooked into the plastic ring on the door handle. All you have to do is attach it from the other side (180 degs from where it is now) and the handle should work as normal.
960/90 Series. See the FAQ reprint in pdf form for diagrams explaining 960/90 door panel removal and handle repairs.
Interchangeability. [Inquiry] Has anyone fit the 960 paintable doorhandles to a 740 with similar doors? [Response:JLG] You can use 960 door handles on a 740 with no modifications. My friend who is a mechanic at my local dealer is doing this right now. He purchased his from a VOLVO wrecking yard.
Reprogramming Door Lock Receiver Unit. Some time ago, I lost use of my keyless entry. Both remotes did nothing, changed batteries, checked fuses all good. Everything worked except the remote.To regain operation, you have to reprogram the receiver module. It must also be done for new transmitters (maximum 4) to function with your alarm system. You will have to (re) program all the transmitters at the same time. To do this:
- Make sure all doors, hood, trunk/tailgate are closed.
- Turning the key to position I or II five (5) times in ten (10) seconds.
- On the fifth try, leave the ignition on in position I.
- Press either LOCK or UNLOCK on the REMOTE within fifteen (15) seconds. The first transmitter must be programmed within 15 seconds, the others within 10 second intervals. When the alarm system accepts the codes from each transmitter in succession, the LED on the dash will glow steady for several seconds.
- Switch the ignition off and test the transmitter(s)
- Turn ignition off
Fuel Door:
Fuel Door Removal/Hinge Repair: [Tip from Bill Peyton] The gas door hinge (Volvo p/n 1380664 or Dorman 924-141) will break if pushed forward. This usually happens when you 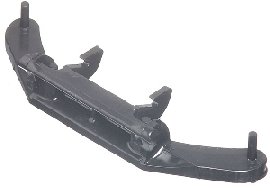 move around the car with the door open, bump it with a gas pump handle, or by curious children. The repair job can be done completely from the exterior. The black plastic hinge is held in place by four plastic prongs mounted with little rubber washers. The prongs are expanded in place by four conical pins, thereby holding the whole thing in place in the four holes in the body. You will need two flat-bottom punches about 2mm and 6mm in diameter and a light hammer.
Remove as follows:
Illuminate the area well. Open the fuel door and note the position of the spring and the hinge and how they are assembled. Using the small punch and hammer, push the four existing plastic rods through to the interior of the car. The hinge can be pried off. It is easier to mount the new hinge when the door has been removed from it. Remove the spring from the old hinge and then the door. Clean off the body area beneath.
Reinstall the Hinge:
Now for the hard part. You will see on the new hinge four plastic conical 3mm rods. On the other side of the hinge are four plastic "flowers" split into four segments. You will need to push the plastic rods through the "flower" prongs. Put a little penetrating oil on each rod where it goes into the hinge. If they are not already there, mount the little rubber washers on the prongs with the lip inserted into the hinge recess. While the hinge is off the car and on a soft layer of cloth or paper, use a larger diameter punch and tap each rod to loosen it slightly and drive it a little into the hinge. Work in a lighted area so you can find the peg if you knock it out. Turn it over and push it back out with a narrower punch. Seat the peg at its proper starting position (just above the point where
it spreads out the 4 fingers that hold the bracket into its mounting
holes.) Be careful not to break off any of the fingers. All this ensures the pin can be driven into the hole without breakage or knocking it sideways. Now mount the hinge firmly in the four body holes and use the larger punch to VERY DELIBERATELY AND CAREFULLY tap the pins into the hinge while holding it firmly in place against the car body. The goal is to drive the pin in bit by bit and not knock it clean through into the body cavity. Millimeter by millimeter will do it. If one falls out onto the garage floor, you can reinsert it again from the front, and drive it in again with the punch. If it goes into the car body, you will have to do some fishing around in the trunk.
[Response: Rob Abel] It does look confusing at first. If you did not remove your broken hinge, hold the new one up near the broken one so you can get the orientation right. The connectors are akin to the mollies that you use in your house to hang a picture on wallboard, expanded by small plastic pins. I had the luxury of having another Volvo sitting next to the one on which I was replacing the hinge. Looking at an intact one made the difference for me. Maybe you can find another car and inspect the installation.
Install the Door:
Mount the door on the hinge mounting studs. Insert the spring by first inserting the side prongs in the holes in the door from top and bottom. Then squeeze the spring into place by pushing; the wire bail clips into the two V-shaped hooks on the hinge body (see photo above). Test to ensure it is all mounted securely.
Water Problems. [Inquiry] Water collects inside the filler door, in the gasket recesses. [Response: DanR/Colin Shepherd] I would bet that some debris or mud has blocked the end of the drain tube on the underside of the car.There should be a small drain hole at the bottom of the rubber seal around the filler neck with a 1/4 inch plastic tube pushed into the rubber boot hole draining down to the outside just rearward of the L/H/R wheel. The best way to clear it is to blow it through with an airline from the bottom. If you blow from the top it may push the pipe out of the rubber. If this happens just remove the trim and push the pipe back in.
Missing Rubber Bump Stops. [Mike] If you cannot find these at a hardware store, use two one inch lengths of 7/32 vacuum hose. Place them on the little round protrusions on the fuel door and trim them a bit at a time until they sit flush.
Trunk/Boot:
Valet Key. My trunk is locked shut: I only have the valet key and can't open it. [Response: Rob Bareiss] Either go to the dealer Parts department with your VIN # in hand, and have them punch out a new key, or, take your valet key to any shop that cuts keys and have them copy that onto the normal key blank. The replacement blanks sold by your typical hardware stores are a full-cut key, not the odd valet key. That will let you into the trunk without getting creative.
Broken or Stuck Lock. [Tips fromJohn Rundle]
740/760 Cars. The secret to entry into a 700 series trunk after the locking mechanism fails (in the locked position .. of course) is two fold. It turns out that the lower locking mechanism is secured to the lower trunk lip with two bolts that are accessible through the fold-down ski-hole in the rear seat with three or four 12" extensions and a 10mm socket. After removing the two bolts the trunk can then be opened with the upper and lower portions still mated and the upper portion of the locking mechanism can then be removed from the trunk by removing three 10mm bolts (only one of them is accessible via the ski-hole as access to the other two is blocked by the closed trunk). When you raise the trunk lid the lower portion of the locking mechanism may bind on the plastic/vinyl trim that covers the lower lip, but a little effort will free it and any damage to the trim is less severe than cutting/drilling the trunk. The upper portion of the locking mechanism is covered by a plastic/vinyl cover/boot . Which leads to the second method of entry. If this plastic/vinyl cover has been removed you can insert the same three or four 12" extensions (3/8" drive) into the opening on the left side (as you look through the ski-hole) of the upper locking mechanism and release the spring trigger by pressing it towards the right (driver's) side. If the cover/boot has not been removed in advance (as mine was) you will not be able to use this approach.
940/960 Cars. [Tip from Tony Diamond] The usual problem is that the lock control arm, extending from the lock cylinder to the lock itself, has come loose. This is unfortunately covered by the plastic boot trim and is not accessible through the ski hatch opening. You can try two approaches. Easy, risk free: remove the rear seat, climb into the trunk, remove the trim, and repair the lock. Brute Force: A friend with the same car allowed me to dismantle the trim in the trunk to see what was inside. I measured the position of the arm in relation to the rear panel, I then drilled a hole behind the rear number plate and was able to recover the loose end of the control arm with a wire coat hanger and then tugged it open with a pair of long nosed grips. The hole was 25mm and was treated and sealed with a rubber grommet and is unseen under the number plate.
Lock Replacement. [Matt Brascia] In removing the lock cylinder for replacement, the lock could be released once I figured out that the "rivet" at the bottom of the lock is actually a screw. I had to cut my own slot to fit a flat head screwdriver but once that was done, it all came out really easily.
Trunk/Boot Adjustment. [Inquiry] My trunk leaks at the rear window. The trunk lid appears to sit a few mm too high at the front allowing water to pass by the seal. I have read that there is an adjustment on the hinge but I cannot figure out how to access it. [Response: Editor] To adjust the trunk/boot on sedans/saloons:
- Front Edge adjustment: -Remove the seat belt retractor covers and use a wrench to adjust the trunk/boot. The eccentric bolt is 12mm and the head is 13mm. In some cars, there may be an Allen head.
- Rear Height adjustment: -Loosen screws to striker plate in rear frame and move it up or down or sideways as required.
- Front Height Adjustment: -Loosen the bolt holding the trunk lid on end of the hinge and move it accordingly
To locate leaks and gaps in your trunk gasket, use a dollar bill/pound note, place it on the gasket, close the trunk lid, and pull it out. If you find a gap, the bill will be easier to pull. The gasket has a metal stiffener which can be squeezed using pliers to raise the gasket slightly.
Trunk/Boot Struts. [Inquiry]My trunk lid will not stay up in winter. [Response: Ed] You need new lid struts. I replaced the struts on my 87 740 in all of five minutes. The rear strut end on the lid has a spring clip on it: use a needle-nose pliers or screwdriver to take it off, then pop it off the ball stud holding it. The front end fits into a notch on the back of the rear seat panel. [Editor] If you replacing trunk struts, buy the Stabilus units (similar to OEM) with the flat springs and not the Meisterstruck versions with tiny round springs: the former are vastly easier to install.
Tailgate:
Tailgate Will Not Stay Up: Struts. [Inquiry] My rear hatch will not stay up...almost as if the gas in the 2 arms that hold it up will not provide enough resistance to hold it open. How to repair? [Response: Bob/Rob Bareiss] The two lift struts are the only support and need to be replaced. They are available aftermarket at most auto stores and on line. It is very common for the mounting studs at the body to wear, so be prepared for possible replacement of those as well. They screw out. To replace the struts, prop up the tailgate. Spray a little penetrating oil on the sockets. The strut is held on by a spring clip on the outside of the socket at the end of the strut; once you pry that off it pulls off the ball. A small screwdriver is a good tool for the spring clip. Don't let it fly away and get lost. Just snap the new one on over the ball. [Editor] Some aftermarket struts have cheap little spring clips that take some patience to install. Be careful you do not lose them. See the note above.
Strut Ball Joint Stud Breaks. [Arthur Pearse] If you snap off the ball stud, you can buy a new one at the dealer. If you can't unscrew it, just drill out the old one, retap the threads, and screw in the replacement.
Tailgate Panel Removal. [Inquiry:] My 93 945T has an annoying rattle in the tailgate caused by a missing screw in the brake light bracket. The screw is driven from beneath the bracket. This requires a removal of the entire panel. The lower trim screws are self explanatory, but how does one completely release the upper part? [Response:] This entire assembly has fragile plastic parts. See the section Removing/Repairing Tailgate Panel for complete instructions and for a discussion of a repair kit for loose fasteners.
Rear Tailgate Latch Won't Open
Lubrication Problems. The problem with the latch is that it takes a lot of moisture from the backdraft. The problem is likely one of two things. In either case you need to remove the back inner panel. carefully remove the rods that connect the electric lock piston (small plastic clip slides sideways) to the outer handle mechanism, and the rod that goes to the lower latch. Now remove the four 12mm nuts that hold the handle from the inside and pull the handle out (you'll need to disconnect the wires for your license plate lights. Now pull the rubber protective seal off the back. Generously lubricate the handle and make sure it's free to return to it's outward resting position, if it stays depressed after you close the gate, the lock will not respond to the electric lock mechanism. while you have it apart, lube the pivoting metal part on the handle to which the electric lock is connected. Reinstall it all and you're all set. I would also consider taking apart the rod that goes through the rear window for your rear wiper. They need greasing every two years or they seize and fry the wiper motor.
Broken Pieces or Stuck Mechanism.
Stuck Due to Cold. [Tom Kaylor] The internal mechanism sometimes sticks from winter cold. Push the outside latch handle all the way forward, then operate the central door locks several times. If the outside latch handle is not returning the mechanism won't engage. Free it up with good penetrating oil.
Broken, Stuck or Disconnected Parts.[John Randle] The symptom was that the latch would operate .. but not far enough to release the locking mechanism so that the tail gate could open. It turned out that a piece of the black plastic guard that goes around the latch had broken off ( old age) and lodged under the latch ... I had to remove the trim panel and then disconnect the exterior latch actuator rod as well as the exterior key lock actuator rod inside the tail gate from the latch mechanism. Next I used a 12mm socket with a universal joint to remove two of the 4 bolts holding the latch mechanism to the tail gate and then I used a 12mm offset box wrench to remove the other two bolts. Once that was accomplished I was able to push the tail gate out enough to force the latch open with a common screw driver (compressing the piece of plastic that was lodged in the mechanism) and completely open the tail gate and then remove the latch ... where I then found the stray piece of plastic. Reassembly was straight forward. [Becky Gilbert] Problem: rear tailgate won't latch. You hear the sound of metal meeting metal. The latch has turned too far and is no longer in an open position to accept the bar at the bottom of the rear of the car. Solution: WD-40 and a screwdriver. It takes me a little while to remember which side opens: the hinge is shaped like a C and opens to the right. A little coaxing from inside the right end of the hinge loosens the stuck part and it opens up nicely!! Easy fix and no taking apart of the tailgate! [John Betmanis] After removing the latch mechanism and the inner handle mechanism, I
found an "empty" plastic push-rod anchor on the latch mechanism. Turns out this was the culprit, because the lock solenoid had become disconnected from the latch.
While I was in there, I also unscrewed the push-rod between the outer handle and the latch mechanism a bit to lengthen it, because the latch had been operating very near the limit of the handle's travel, Now it works about mid-travel.
Stuck Due to Broken Glass. [Editor] Numerous stories of broken rear or side window glass finding their way into the lock mechanism and utterly jamming it are out there. If you've had broken rear glass and your tailgate lock is stuck, look for bits of glass caught in the mechanism.
Opening a Stuck Tailgate. [James Banks] To open a tailgate on a 960/V90 and probably 700 wagons etc., sit in the cargo area and drill a 3/16 inch hole in the small black plastic plate under the bottom of the tailgate cover. The plate is just under the plastic tailgate cover and has a left side, a right side and a center area. As you sit in the rear cargo area looking down at the black plate, the 3/16 inch hole should be in the left section and be centered about 3/8 of an inch toward the back of the car, away from you as you sit in the back, and centered on the left section of the plastic plate. After you have the hole drilled, take a small screwdriver and put it in the hole at about a 30 degree angle to the left. Now push down and then move the screwdriver to the right and at the same time push gently on the tailgate to open it. What you are doing is moving part of the lock as in if you had a quarter (coin) below a hole as in the plastic plate and with the screwdriver you are pushing down on the quarter and moving it to the right.
Loose Rear Latch Handle; Lock Adjustment. [Eric Carlson] Neither the power lock nor the key would unlock my tailgate hatch. Occasionally, I was able to jiggle the lock enough with the key to unlock it, but as soon as I shut the hatch again, it wouldn't unlock. I discovered that the latch handle has to be in the fully returned position (i.e. completely pushed forward towards the hatch) and over the years, the handle didn't quite reset itself. As a result, the lock won't unlock and the key won't turn. If you push the handle towards the hatch and jiggle the key, you can feel the two working against each other. To repair it, remove the inner tailgate panel. Follow the lock assembly inside the tailgate hatch from the lock to the latch - you will see two bars; one is for the unlocking mechanism, the other is for the outside latch handle. If you squeeze the latch from the outside, you will see the latch handle bar move upwards. On the latch handle bar, just behind one of the hatch frame members, you will see a two-piece unit connected by a turnbuckle. With a pair of pliers, rotate the turnbuckle to tighten the rod (effectively shortening the rod and causing the handle mechanism to tighten). One or two complete turns should be sufficient as too much will cause the handle to bind and not open. Be sure to lube everything while you are in there.[Symptom] The outer tailgate latch won't open the gate from outside. I have to crawl over the rear seats and open it from inside. [Jim Weiss] The vertical connecting rod between the lock/handle and the bottom latch has a small fitting in the middle with opposite threads that connects the two parts of the rod. It was easier for me to detach the top end, being careful not to break the plastic retainer clip, and adjust the length by turning the upper rod in the "mini-turnbuckle-like" fitting. It's also a good opportunity to clean and grease the moving parts.
Rear Lock Solenoid Won't Activate. [Ian Stewart] Symptom: The driver's key in the front door only activates the rear lock solenoid after several tries or not at all. [Diagnosis] The spring in the lock cylinder provides the return to start position for the power motor, since the motor is one way only (retracts) when powered. This spring ages and breaks. The only solution is a new lock cylinder.
Replacing the Hatch Lock Cylinder. [Ian Stewart] To replace the rear hatch lock cylinder:
- Remove the back trim covering to get access to the lock.
- Disconnect the 3 link arms for the door opener, power motor & lock mechanism: this latches to the lock brace on the floor of the hatch opening.
- PB Blaster etc on the bolts/nuts. Remove the 2 nuts (stud/nut combo) & 2 bolts holding the handle assembly. I had to drill out one stud.
- Let the assembly hang there unless you want to remove the connections for the licence plate lights. Good time to replace these if they don’t work.
- Pop the retaining clip on the lock cylinder & tap it out.
- Lube up the new one both inside & the spring then slide it in. Replace the retaining clip.
- Anti-seize your bolts/studs & re-assemble.
- Reset the lock mechanism in one of two ways: 1. remove it & manually work the mechanism to release & return to unlocked postion so that the link arm from the lock cylinder can move it; or (2) grab both link arms with needle nosed locking pliers and pull & push both until you hear a click. This is the mechanism resetting itself. Sounds crude but it works. If you haven’t had your lock mechanism out for a while I’d take it out & lube the life out of it while working it thru its travel.
- Adjust the threaded link arm going to the exterior hatch handle so that there is 3mm of play in the handle movement. This is right from the Volvo green book. Don’t be greedy & try to take all the slack out of it. You will just have to undo it.
- Reattach all link arms, being careful not to break a retaining clip.
- Make sure everything works before installing all the trim.
- Install the trim & fix everything that broke removing the rear panel.
Tailgate Replacement. [Inquiry] Having damaged my wagon's tailgate, how do I remove the old one and install and align the new one correctly?
[Response: Paul Golden] I have done this replacement and all it takes is a little patience. Open the hatch, remove the 6 screws for the filler panel, the black piece that runs left and right. Remove the rear interior light: you will see a 1cm space to pry the light on the left side, pull down in an arc to unhook the right side. Remove the wires from light. In the middle of the light pocket you will see a black push pin, turn 1/4 of turn and remove. Using a coin or large flat tip screwdriver, remove the interior panel rivets which screw off, saving the middle ones for last. The connector for the hatch is to the drivers side: disconnect and then remove the torx screw that holds the wire under the black panel you have removed. Gently push the rubber grommet toward the back and pull wiring through the hole. Disconnect the washer hose at hinge. Place some corrugated cardboard under the lip of raised hatch, remove bolt caps. Remove the bottom bolts covered by the rubber flush caps. Pull the lock circlips on the hatch struts, push on the right side, swivel and pull out of the small hole. Now you need another person to hold the hatch while you remove the bolt on helper's side. Remove the bolt on your side and slide the hatch out and up off the hinge. Do the opposite to replace.
Cargo Area Lamp and Tailgate Electrical Harness Access. I'm trying to remove the plastic access panel to get to the wagon/estate tailgate
wire harness in the roof. I've removed the 7 screw tabs but the panel
seems to be held on by the roof light. I don't want to force that out
and I don't know how. [John Martin] The light is spring-loaded. gently push lengthwise on the end with the
switch to compress the hidden metal spring that's at the far end. Once
you've depressed it about 3/8" to 1/2", then you may start to feel the switch end coming down out of the hole. CAREFUL! The switch end has two small and fragile plastic ears that just LOVE to snap off if you try pulling the light down before they're cleared the lip in the roof.
Then you will need to gently remove the three wires that plug onto the fixture. I would disconnect the battery, as there are TWO hot wires there (one always hot, the other controlled by the "door open" switch). You do not want to short them out against the metal body while you're fiddling around with the tailgate wires. [GregR] Having just snapped off the plastic ears of my cargo area light trying to remove i, here are some tips.The metal spring clip is only at one end; it's on the passenger side of
the light fixture. If you have a long, thin screwdriver you can access
the spring clip (and you can tell Volvo wants you to, because there's an
indent molded into the lamp). What's NOT apparent is that you have to
push a good way toward the driver's side, as DinoMartino implied, to get
that sucker to "give" and allow the light to be gently pulled down. I tried to get at it from the "switch side" of the lamp, and as soon as I started trying to wiggle the lamp downward was rewarded with two SNAP sounds. [Jay Simkin] Be advised there is a plastic "screw" that secures the top panel to the bodywork. It is on the rear-facing side of the cargo bay light opening. If memory serves, this screw is black and has a slotted head. Once this has been removed, the panel will come loose, so be sure to support it.
Trim:
740/760/940 Cars. [Tip from Dean et al] Taking off the door panels is a snap after you have done it once. There are only six quick steps to getting the door panel off.
Removal:
- Unscrew the door lock vertical stem at the top of the door panel.
- Examine the end of the door near latch. In later models, the red warning light lens at the rear of door doubles as a clip, in which case you can gently pry it off toward the rear of the door; in earlier models, remove both the lens and the clip inside. Remove the bulb. You will see a little black knob on the left wall of the little white box. The little knob is a catch that holds the door panel on.
- Turn the plastic screw at the bottom of the door handle "cup" 1/4 turn and remove it.
- If you want to remove the door handle cup (not necessary to remove the trim panel): at the top of the spade-style door handle you will see a tiny hole on top of a rubber plug. Insert a piece of sturdy wire, or better yet, a nail and the plug pops out (it is a little tedious to get out.) Then remove the screw you find under the plug and remove the handle. You may have two screws behind a fake leather panel on the door handle.
- Lift out the cover to the cup, levering it carefully past the carpet or leather insert. The switch panel is spring mounted into the plastic cup beneath the cover with springs both fore and aft; use a screwdriver to pry it free if you need to do so.
- In '88 models, pull the speaker cover straight out and remove the screw beneath; in '89+ models, slide it forward toward the front of the car, off the mounting posts. [Herb Goltz] The covers often break at the bottom mounting clip, causing them to loosen or fall off. The red plastic mounting studs sometimes break too. If the cover is stuck, push in on the door panel while pushing the cover forward. Repair tips here.
- Use a flat screwdriver to remove the three clips (two in pre-'87 cars) along the bottom horizontal edge of the door (look upwards under the door: if you have the white clips, skip the next sentence.) Slide a thin flat butter knife under the edge of the door panel and slide it up or down until it is stopped by one of the snaps, then gently twist the knife and gently pull on the door panel until it snaps loose. If you have the white door clips, use a screwdriver to lever them downwards.
- For pre-'87 cars: there are three snap plugs that also hold the inside door panel to the door. Two are in front of the speaker grill (top and bottom), and one about 5 inches below the door edge lamp. Pull out firmly on the bottom of the door and the plugs should unsnap from the door.
- Now you can grasp the door panel by the sides: lift up and out. Pull out on the bottom of the door panel and push upwards. You must rise high enough to clear the door handle, but keep an eye on the electrical connections to speakers and lamps that will present themselves. As soon as you can, unplug the wiring and lift the door panel completely away from the door/body.
Reinstallation:
- Reattach the electrical connections removed above.
- As you fit the panel back in during reinstallation start at the top. You must first insert the spring clips on the top into the top channel of the door frame. Pushing on the top of the panel toward the door may help engage these. Pop the unit downwards to bring it home. If it bulges away from the window glass then you misses a spring clip or two. You may also find that it doesn't seem fully attached along the outer rearmost edge. This is where the little black knob mentioned earlier comes in. Look inside the white box containing the door lamp and make sure that the knob protrudes into it. Check that the knobs holding the speaker covers are also correctly protruding from their holes in the front of the panel.
- Then reassemble the rest in reverse order as above.
960 Cars.
- Pry off the trim around the interior door opener and the cover in the handle recess.
- Remove screws beneath cover.
- Pull up window switch control panel.
- Pry off door warning lamp cover.
- Use a flat screwdriver to remove the three clips (two in pre-'87 cars) along the bottom horizontal edge of the door (look upwards under the door: lever them downwards).
- Pull the bottom of the door away from the door frame, then move upwards to loosen the three clips at the top of the door seal. Do not remove these clips.
- Install in reverse order.
Repairing Vinyl Door Panel Covering.
Tears and Cuts. [Inquiry] How can I repair small tears in the vinyl door panel trim? [Response:Bill] The door panel vinyl on Volvos is very thin and does not lend itself to vinyl repair easily. However, it can be done with an iron on a low heat setting. We've used a product called vinylhyde that you can use to repair the tears. It is sold by detail and interior trim retailers which you can find through Google.
Door Panel Puckering in 93+ 900 Cars. [Inquiry] [Response: Dick Riess] Here in TX we have problems with the top part of the door panel pulling and puckering away from the rubber window sweep. John Howes at http://www.southwestauto.com has a means of repairing. He advertises this service on his web site. [Response: Rob Bareiss] We've seen 960 door panels bunch up on both '95 and '96 cars. Haven't seen it on a 97, but we have only one customer with a 97. We've seen it with both beige and dark grey ones. Volvo will only sell the panels as a set, EXCHANGE! You've got to both spend your $800 AND give them the panels back. If the car's out of warranty, it's best to live with it. Replacement is easy to do, if not easy on the wallet. But even replacement is not a snap: the handle cup, door latch, wood trim, inserts, speakers, EVERYTHING has to be taken apart and fitted to the new panel. Even heat fused plastic parts have to be CUT OFF then screws put in to hold the parts together on the new panels. Speakers must be riveted. See below for tips on repair.
Vinyl Repair Tips:
[Tip from Tom Irwin] I've had tremendous success with a 3M product called "Spray Adhesive #90". Big black can. Remove only the trim you need to to stretch and reposition the material that wrinkled. Peel it back as a far as possible, using care not to rip the foam underneath. When the repair area is exposed and everything else is masked off and protected, apply the adhesive... CAUTION...... If you hold the can too close you will soak and saturated the backing material. A neat trick with 3M #90 is to set the variable nozzle to 'slow' and spray from a distance of at LEAST 10"-12", the farther the better. At this distance, 90% of the carrier solvent evaporates before it hits the material. When sprayed from a good distance, the adhesive lays down in a heavy spider web pattern. Put it on the backing material AND the loose fabric. Let it dry for 1 to 5 minutes. GENTLY tug the creases out of the material and press it firmly with your hand, expelling air bubbles along the way. Put it back together and be sure to tack down any additional loose trim.
[Tip from Dave Stevens] I've had reasonable luck with a DIY fix for this common problem, but it's fairly tedious work. Remove the door panel and take it indoors to work on. Work on a protected surface like a piece of carpet. Carefully unclip the window seal strip from under the top edge. Now, with something like a mildly sharp 3/4" wood chisel, gently open up and pry off the remaining metal retaining strip. Work your way back and forth along the strip on the under side where your handy work won't show. You may need to encourage the top edge a bit, just be careful not to cut into the vinyl or damage the visible part of the top edge (note that very little of this strip is actually exposed from under the window seal, so a little bit of metal wrinkling on the inside edge won't show). Remove any plastic-ware in the area you're working (the door button or the defroster vent). Now for the tricky bit. You need to carefully peel back the vinyl around the wrinkled spots. As the glue isn't all that strong (hence the original problem) it comes away from the wood panel fairly easily. Use a 1200 watt hair dryer (or with care a heat gun on low) to heat the vinyl just enough to let go of the glue. Peel it back slowly. Try not to stretch it. Gently cutting in with a thin knife edge may help. If you start to lift wood chips then you may not be applying enough heat (later scrape off any chips that do get lifted). You'll be peeling back a wide "U" shaped area. Go right back to and slightly around the corners. Go about 3-6" inward of the wrinkles along the top ledge. Stop peeling downward when you hit a defined edge (ie. the ledge corner). Let the vinyl cool. As it does, try to smooth out the ridges of the wrinkles (and any glue ridges on the back side). Note that unecessary heating of the vinyl will only stretch it. Lightly sand or fill any damaged areas of the wood panel that might show through. The lifted area of the vinyl now needs to be properly re-laid, pulling out and smoothing the wrinkles as you go. The excess "puckering" (the original wrinkles) needs to be spread out evenly over the area you've lifted. If it won't spread out enough to avoid further wrinkling then you may want to lift a wider area. There may be limits to how much you can pull and smooth the vinyl without the edges showing, such as at the door lock button and the defroster vent. Practice how much pulling and in which direction to go so as to minimize the wrinkles. Now coat the back side of the vinyl and the panel wood with contact cement. As it's porous, the wood surface will need two thin coats. Be careful not to create a ridge of cement at the back of the lifted area. Let it partially set (this will give you some working ability), carefully lay the vinyl into place, stretching and smoothing as you go. Afterward, press out or use a (pizza) roller to minimize any remaining ridges. Cut off any excess vinyl, replace the trim and you're done. If you've done a good job, any remaining ridge marks will reduce over time especially if you help smooth them out occasionally. In my own experience on front doors, I've been able to do a near-perfect job eliminating wrinkles at the door lock button, but only a half successful job around the defroster vent (but that area really doesn't show that badly anyway).
[Randy Starkie] I made the repair with Weldwood Contact Cement (pint can; brush on). Did it in two steps because of the length of the repair (length of door panel). I removed the two trim/wiper pieces. Pulled the vinyl up into place and clamped it there at a point dividing the job in half. Applied cement to both vinyl and composite door panel, two light coats on the vinyl and three on the panel. After allowing it to dry to the touch I stretched the vinyl out and rolled it into place. I over stretched it some as it was easy to let the vinyl pull itself back into exact alignment even after intial contact. The vinyl wanted to shrink back away from the edge so I used a paint stir stick to clamp it into place using small C-clamps. I did the second half the same way and readjusted the clamps and sticks. I let it set overnight, removed the clamps and reinstalled the panel. Time (and some high interior temperatures) will tell if the fix is permanent. [James Souther] I have used plastic bookbinding tape as an black edge trim on my gray panels by the window, looks factory even though it is not.
Radio Speaker Panels. The speaker panel front clips often break. To remove and repair these, see the FAQ link.
Door Armrest Repair. [Tip from Dave Stevens] The elbow area of these door panels has been known to crush under excess and repeated weight. You probably only need to worry about the driver's door. If you have the door panel off, add a stiffener on the back side of the elbow area. I used contact cement to fasten a piece of 3/8" high density fibre board that was cut to fit the area (contact cement goes on the shiny side). Let the glue fully set before firmly pressing into place.
Door Pockets. Removal. [Inquiry] How do I remove and install the door pockets at the bottom of the door on the 740? The plastic seems brittle, and I don't want to damage it. [Response: Matt L.] You have to take the entire inner door panel off; the map pocket is screwed on from the back.
Crack Repair. I have a 740 and have developed a crack in the map pocket on the drivers side. I'd like to glue this crack. ] I believe it's ABS thermoplastic. [Solution] Remove the pocket by pulling the door panel and unscrewing. Buy some reinforcing material: fibreglass cloth, or my favorite which is hobby shop carbon fibre strip used for model airplanes: the 1/2 inch by .09 inch size is perfect. Buy some plastic-grade epoxy. Roughen the inner surface of the door pocket over the crack, clean with alcohol, apply the epoxy and reinforcing strips. This fixes the crack and materially reinforces the plastic.
760 Pocket Caution. [Norm Cook]
I finally got the carpeted map pocket from a 760 installed into my 740 tonight. And guess what--760 map pockets are longer (and not just because it's carpeted) even though the screw holes line up. So when you go to the Volvo shop and look lustfully at those durable carpeted reinforced map pockets for your door panel, ensure you measure it first. I had to elongate about 6 holes and move the panel toward A pillar so it wouldn't bind on B pillar door moulding. It's not really too much of a hassle but it should be reflected in the price.Handhold Trim Piece Loose. [Inquiry:] Right above the drivers side door, there are two plastic covers, which cover a screw. This piece is loose and driving me crazy. [Response: Rick Klasic] Carefully pry off the 'lid' with a flat screwdriver. Under the lid there is a white plastic clip. Tighten the screw (philips or torx) and replace the lid.
Exterior Door Trim. [Editor] The rubber door moldings in the middle of the doors are adhered using clips in holes: pry off the outer cover using your hands or a spatula (protecting the paint with tape), then remove the inner retainer and clips from the holes. You may need new clips to reinstall, and make sure the paint underneath and at the holes is intact to keep it from rusting. The top rubber wipe moldings are also held in place using clips in holes: protect the paint with tape and pry up using a spatula.
Repairing Panel and Lamp Posts. [doug Peterson] Just removed/replaced the interior door panel on my 940, and found that the black retainer pin that is gripped by the red "open door indicator" lamp lens was broken. I made a replacement pin using a Ford pin like the #A21098 retainer found @ http://www.clipsandfasteners.com. I used a slightly longer screw, and inside the door sheet metal I slid a 1/4" length of rubber tube over the "legs" of the new retainer, to give it more grip. Much easier to do than to describe. A similar procedure could probably be used to replace the red Volvo pins used to retain the bottom of the door panel and the speaker grilles.
Hood/Bonnet:
Hood Hinge Lubrication. Make sure you regularly spray a light oil (Mobil 1 spray or Superlube) on each hinge pin.
Hood Seal Repair. [Lawrence Sommer] The rear hood seal ($41 at the Volvo dealer plus 11 fasteners at $2.79 each) came loose from plastic retainers at firewall. I drilled through the seal, enlarged the holes slighly and used plastic, push-in type, carpet retainers found at Ace Hardware for $0.49ea). I Put a bead of silicone sealant on the firewall before installing. This was a less expensive solution. I was not certain if the original retainers would hold since they tore loose from the seal. Once that seal is in place it creates a little drainage canal for the rain water to drain to both sides of the engine compartment. Without the seal, water goes straight for your distributor, which could cause problems. This 20 minute repair turned out well. Just be sure you don't tear the rubber seal while drilling. Be Careful!
Stuck Hood Release and Cable Adjustment.
Cable Adjustment is Too Loose. How do I adjust the hood release cable?
[Response]If your hood will not open, it may be just wear and stretch in the release cable. Fine adjustment of the cable is done inside the car at the adjustment screw just behind the red hood release lever. Coarse adjustment is done at the cable stop at the end of the cable at the hood release mechanism under the hood.
Lubrication to Keep Pins from Sticking. [Editor] When you do your regular chassis lube, clean off the always-dirty hood release pins/springs and re-grease these with a light grease. Spray some brake cleaner in the catch holes while pulling on the hood release cable to move the mechanism, then spray some lubricant to keep the mechanisms on both sides free.
Cable is Broken or Has Come Unattached. [Inquiry:] Anybody knows how to open the hood from outside on a 740, when the cable doesn't work? The latter can no longer be adjusted, and now the hood is stuck closed. Unhooking the handle and pulling the cable itself doesn't work either.
[Response: JohnB]. You have to go in from under the bumper, drop the belly pan, long arm up to the cable and pull/flex should release the two locks. Sometimes it helps to have two people, i.e., the springs on the two locks aren't pushing up the hood so while you're pulling on the cable another person lifts up on hood so the hood comes up to the safety latch. Usually pulling the inner wire and holding onto the cable body at the inside the car point works unless the inner wire is broken, in which case you have to access the combined lever to both latches or both latches individually. There are two latches, both cable operated, just outboard of each spring-loaded hood locating pin. If you look at a friend's 7xx you should be able to see where the cable split or lever(s) are). Difficult to describe verbally but once you see one when you have to fix it you never forget it. Take a look at how this works when it is operating normally so you can repair it when it fails. [Tip] If your car has the four-headlamp fitment, you can remove the two inner headlights and work the latches by hand to get the hood open.
To loosen the hood latch, you can use "long-assed NEEDLE NOSE pliers" to grasp the "stub" of the cable (Harbor Freight):
Lie on your back on the deck and look UP on either side of the radiator..can you see
the SLOT in the PIN that runs thru the "catch"....if so, use a LONG STRAIGHT BLADE SCREWDRIVER to spin the pin out (it *WILL* be tough at first until you "break the lock tension on the shaft of the screw...) Harbor Freight also sells a long 24" pry bar that can be ground off at the end to make a flat blade. SnapOn sells a narrow 28" screwdriver that also works.
Remote Operation:
Door Remote Lock/Unlock and Alarm Operation. [Bob Cavenaugh] If your car came with a remote lock/unlock device, here is how to program it:
Remote. New transmitters (max.4) must be programmed to function with your alarm system. To do this:
- Make sure all doors, hood, trunk/tailgate are closed.
- Turn the ignition on and off 5 times within 10 seconds. On the fifth try, leave the ignition on.
- Press either button on the transmitter.
NOTE: the first transmitter must be programmed within 15 seconds, the others within 10 second intervals. When the alarm system accepts the codes from each transmitter, the LED on the dash will glow steady for several seconds. - Switch the ignition off and test the transmitter(s).
Alarm. Since using the remote also sets up tha alarm system, you should know a little about that, too. We managed to set the system off ourselves several times. Embarrassing. If your 960 has the alarm system, there is a red LED in the right side dash speaker grille. The LED will blink when tha alarm is set. Volvo recommends that you not use the transmitter to lock the doors from inside the car. On cars equipped with an alarm, the alarm would be activated and would sound when one of the doors is opened. You should also not give the remote fob to a valet parking attandant since it unlocks all the doors and trunk.
Installation of Remote Power Door Lock Actuator in a 740. [How do I install a remote actuator in a 740?] Actually (on US cars) they do have power locks, but the drivers door does not have a power lock solenoid. (i.e. the driver's door is manual, the others are power locks). See the related file for 940 cars with pictures and detailed data. So you need to find a passenger door power door lock solenoid and linkage (a junk yard is a good source). Reverse the solenoid in the bracket and install in the drivers door. Use the passenger door for a guide, if you need it. Then you need to provide power to run the new solenoid. You can run news wires into the door from any of the other door lock circuit. I do not have power mirrors on my car, but it has the wiring, of which the wires from where the power mirror switch in the door should be straight over to the passenger door. Tap into the solenoid there and hook up similarly on the drivers door. For the $29 JC Whitney controller, I installed just above the drivers left foot and tapped into the wires from the switch in the drivers door (that lock and unlock the door) to the solenoid behind the fuses. No need to access the relay, just tap into wires. I can now lock the doors with the key, the knob on the drivers door, or the little two button remote. Works well. Good range.
[Inquiry:] Is there an *easy* way to add a remote alarm/keyless entry system to an '87 740? The rear doors, passenger door, and liftgate all have solenoids that actuate the locks - but the driver's door is only mechanical. [Response: Anders Persson] When I installed a similar system in my previous 744 GLT 16 Valve -89, I had to add a lock motor to the drivers door. There is such a kit available from Volvo. Article number is 3529 065 for 740, 760 and 780 from 1986 and onwards.
Installation of Remote Power Door Lock Actuator in a 940. See the separate illustrated file from Dick Riess for more detailed information.
Remote Entry Malfunction. [Inquiry:] I'm having to reprogram my remote quite frequently. The batteries are OK. I do not use the remote every day - could this be the cause?
[Response: Tony Giverin] The remote fob is not one of Volvos stronger assets!...Even in the best of days the range is from 10-15ft (noted in the manual). Others have found it susceptable to RFI/EMI interference. I myself have found that some days you have to be right on top of the car, other times it works 15ft or more away. Having said that, the frequency of use should make no difference. You say the batteries are OK, I'm suggesting anything under 2.9-2.8v and you can expect trouble. My wife's key fob stopped working altogether recently, I took it apart and cleaned the contact switches with electronic contact cleaner, have not had a problem since. [Peter KL Milne] Every six months or so, I take out the internal batteries in the fob and clean their contacts and contact faces thoroughly, using a PCB eraser. This is enough to keep the about 150 feet range nicely. [Inquiry] Despite best efforts, since disconnecting the car battery I still can't get the fobs to work. I've renewed all batteries. I've done the turn-on-ignition four times and on the fifth turn on press key fob. I've tried pressing the fob eight times. Central locking works fine on key. Status lights are doing a double flash, pause, double flash, pause and so on. What is wrong with this system? [Responses: Peter KL Milne] In another case, one of the sensor loops went open circuit, caused by the bonnet open/shut switch (at the front left-hand of the bonnet opening, very close to the bonnet spring retainer) having gone faulty. This will cause the fob to fail. You might also try reseating the relay.
Remote Door Lock Range Extender. [Tip from Tom Irwin] Are you as fed up as I am when locking/unlocking your brick with the remote clicker and you have to stand 2 inches on top of it and hold your finger to your nose before it unlocks?? Wouldn't it be nice to zap it from 50 feet away and hear the reassuring 'clunk'?? Well, fellas I found the fix! I was into another project today and happened across the central locking transceiver unit which is mounted atop the center of the steering column. It slides right out and one wire harness disconnects easily. Take the unit to a clean bench and remove the 4 screws that hold the case together. Separate the 2 halves. There are 2 PC boards atop one another. The bottom one has all the guts. The top one has 4 wires going to it that terminate at a single grounding trace. THAT IS YOUR ANTENNA ! I swear before the Sages of the BrickBoard...that is what Volvo us
Now the fix... Take a piece of ultra fine sandpaper and remove a spot of the green PCB varnish at the end of that trace. Do this until you see a shiny silver trace peeking through. Find an old DC toy motor and crack it open, remove the armature. The copper windings inside are about a 38 ga. wire. This makes an EXCELLENT antenna. Unwind about 36" and straighten it out. Take one end and hold the last 1/2" to a flame. This will cook off the insulation, it's way too fine to use a stripper.
Using a 20-30 watt soldering iron and rosin solder, attach the bare end of the wire to that cleaned trace. Lay the wire down in the connector cavity and button it back up. Reinstall the unit in the car. Thread this long wire up over the steering column and over to the free loom that passes thru the firewall just next to the Motronic brain. It helps to tape the end to a straightened coat hanger and fish it up in to the engine compartment. Pull it through completely til no slack. See the weather strippping seal that spans the engine bay, just south of the wiper arms? Lift it up from the drivers side and pull it up to the middle of the span... Now lay your wire down inside of it and push the seal back down on the metal stay. This does two things: 1. It makes the job nice and neat 2. It gets your antenna up and out of the cars interior so it does a much better job. The good news? I can pop my locks from 120 feet away!!! HEY! It doesn't take much to get me excited.......... but I know a few of you have mentioned this problem, especially you 850 folks.